
In this tutorial, you will have the opportunity to learn how to use the Gradient Mesh Tool to draw a party flyer template design. Then you’ll see how to turn this template into a real flyer with Placeit!
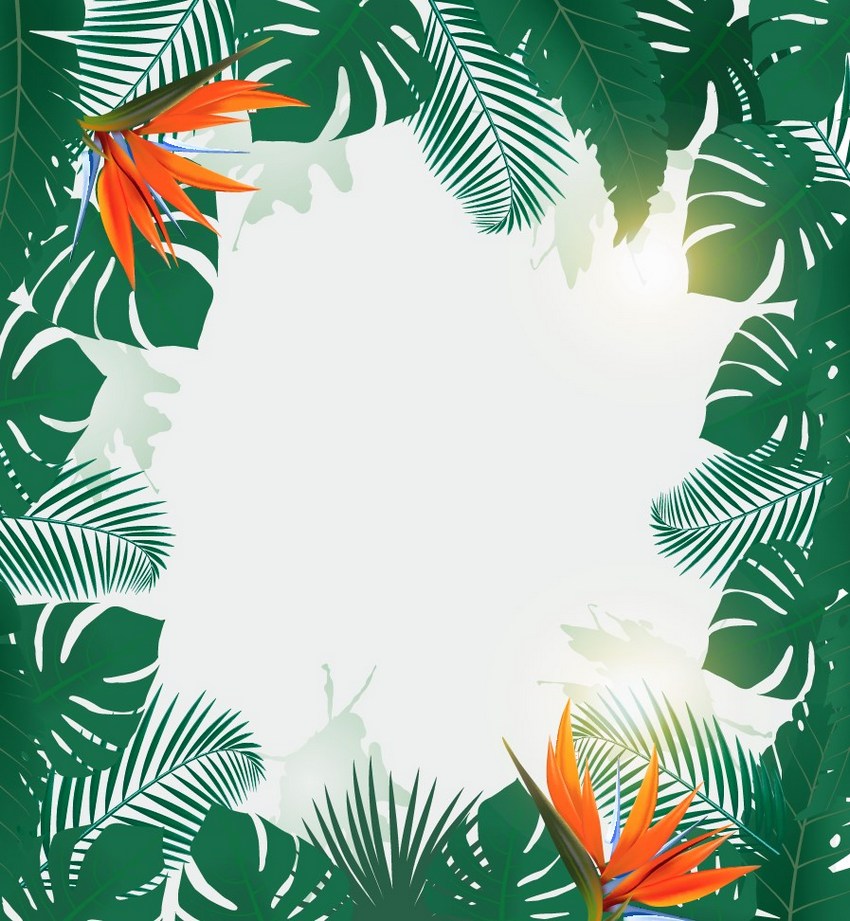
If you’d like to skip this tutorial and just use this flyer background in your work, you can go ahead and simply purchase Summer Holiday Background With Tropical Plants from GraphicRiver!

1. How to Draw a Tropical Flower
Step 1
Let’s start off by drawing a flower petal with Gradient Mesh.
Create an orange rectangle—the color is #F55703.
Next, grab the Mesh Tool (U). Click to create nodes, which in turn create a Mesh Grid.
When you have a thick enough mesh grid, grab the edges of the
rectangle and move them to make the shape rounder. It should resemble
the shape of a petal.
Once you’re done with the shaping, select
the left cluster of nodes (they are already colored differently in the
screenshot) and color them with #F8B67F.
Next, select the nodes that are darker (they’re selected below) and proceed to change their color to #C54E0A.
Add some darker orange tones in the fourth step with #872E0D.
Always make sure to select the nodes that are selected in each screenshot below and apply the corresponding color to them!

Step 2
Create another petal with Gradient Mesh.
#FD8604#D74E02#B82E02-
#FFD38C

Step 3
Draw a third petal.
#F05A03#F9A15D#CA4725-
#7E2309

Step 4
Finish the third petal.
#B35C11#FA9234

Step 5
#DF4502#EA8A1C#550500-
#962607

Step 6
Draw one more orange petal.
#F75506#F2A05F#FB730D-
#C44001

Step 7
#F35909#FD9E04#DC3500-
#99361F

Step 8
Finish the petal.
#D66B01#D56A02#FD7604

Step 9
Draw a blue element.
#E2F1FF#224FA3#72A6BE-
#AFCAF3

Step 10
Draw the final mesh element.
#6284C2#67180A#0A2D2B#A5B29F

Step 11
Place the two elements together.

Step 12
Create a copy of the group, and then recolor that copy with Edit > Edit Colors > Adjust Colors.
- Red: 11%
- Green: 13%
- Blue: 25%

Step 13
Draw leaves with Mesh.
#313D21#778D26#4E561C-
#60605B

Step 14
Finish the leaf.
#5B593E#BD7D0E#BCB150

Step 15
Draw the final element.
#2A3B17#A5973C#79815D-
#475530

Step 16
Assemble the flower.

2. How to Complete the Flyer Template
Step 1
To learn how to draw the tropical leaf, consult this tutorial.
Next, recolor the leaf with Edit > Edit Colors > Adjust Colors.

Step 2
Bend the leaf with Effect > Warp > Arc Lower.
- Bend: 21%
- Horizontal Distortion: 14%
- Vertical Distortion: -34%
Expand Appearance of the object.

Step 3
Draw a Mesh backdrop.
#386D4B-
#326143

Step 4
Draw #36763C lines for the leaf.

Step 5
Use a Clipping Mask to create the leaf.

Step 6
Draw one more Mesh backdrop.
#386D4B#1D492C-
#3F7A52

Step 7
Use #547554 for the lines.

Step 8
Use a Clipping Mask.

Step 9
Draw another #547554 element.

Step 10
Assemble a plant frame for the party flyer background.

Step 11
Draw a Gradient element and set it to Multiply.

Step 12
Place some of the elements on a #EDF0EE background to create a backdrop for the party flyer design.

Step 13
Place the party flyer backdrop behind the plant frame.

Step 14
Add a Radial Gradient highlight, set to Screen.

Step 15
Place the highlights on top of the party flyer background.

Step 16
Make a Clipping Mask for the final version of the flyer design!
3. How to Use Placeit to Make a Flyer
Step 1
Our tropical flyer template is done—now it’s time to add text and other decorative elements to truly turn it into a flyer!
You can easily do this on the Placeit site! Just head over to the Designs > Flyer Maker section for various flyer designs.
I’ve decided to search for a “summer party flyer” to complete our template.

Step 2
After you type in your keywords, you will be presented with various designs to choose from.
Choose the one you like the design of most—we will be changing the actual background image!

Step 3
I have chosen the first design, Online Flyer Maker for a Summer Party! Now, head over to the bottom left section, Background, and choose to add a Custom Image.
Select a .jpg version of the flyer template we made!

Step 4
After cropping the image accordingly, it’s already in place!
Now you can change the text or the colored filter on the image.

Step 5
You can also change the color of the text…

Step 6
… and move all the elements around as you’d like!

Step 7
Don’t hesitate to play with the options while creating your ideal tropical flyer on Placeit!

Awesome Work, You’re Now Done!
What now? You can try any of my other tutorials from my profile, or check out my portfolio on GraphicRiver, as well as the original vector we recreated in this tutorial.
I hope you enjoyed the tutorial, and I would be super happy to see any results in the comments below!
Check out more tutorials!
 Gradient Mesh ToolHow to Draw a Wreath of Tropical Flowers in Adobe IllustratorVladimir Galantsev
 NatureHow to Create a Vacation Beach Background in Adobe IllustratorVladimir Galantsev
 Gradient Mesh ToolHow to Create a Showroom Background With a Red Carpet in Adobe IllustratorVladimir Galantsev
{excerpt}
Read More