This is the final lesson in our four-part series on How to Design Flat Icons in Affinity Designer.
If
you haven’t already, make sure to check out Part Three in this series,
where you’ll learn how to create a shopping basket icon and a dress icon.
Find more incredible Design & Illustration Courses on Envato Tuts+. And get amazing vector resources for your projects on Envato Market.
How to Create a Cargo Truck Icon
In this final lesson, Yulia Sokolova will show you how to make a colorful cargo truck icon. Learn how to draw the most detailed design using a combination of the tips we’ve already learned.
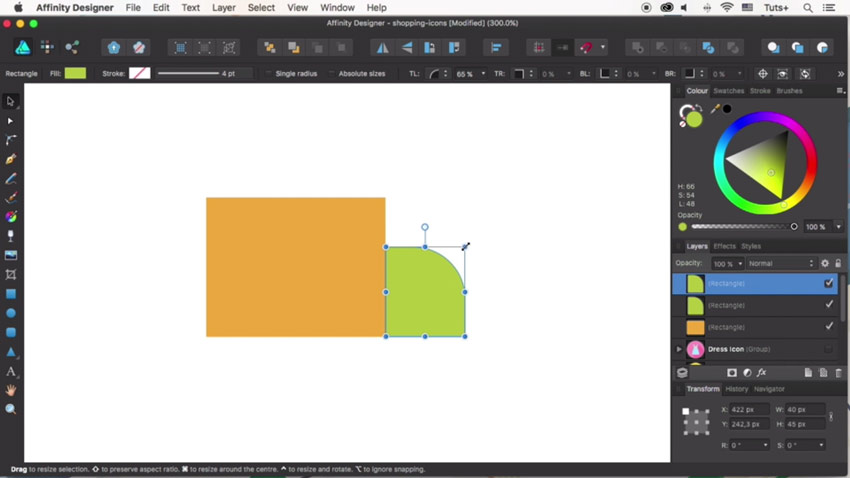
Use the Rectangle Tool (M) to create two orange base shapes for the truck. Adjust the size with the Transform panel.
Then change the color of the second rectangle to green. Modify the shape of the truck cabin for a more rounded curve.
Duplicate the shape for the truck’s cabin and make it smaller. Use this shape to create a light blue window before adjusting the size with the Vector Crop Tool.
Now use the Rectangle Tool to make the bottom of the truck. Use the same tool to create additional details, like the bumper of the truck and the door handle.

Add more details to the truck. Use the Rectangle Tool to create a row of stripes along the back. Then use the Ellipse Tool to create a set of wheels along the bottom.
Customize this design even further with a simple arrow design. Create a quick rectangular shape first, and then add a bold red arrow on top with the Arrow Tool.

Finish this icon using the style we created before. Apply it to a light blue circular base before adding a nice long shadow for a trendy effect.
Here is the result below.

Awesome Work, You’re All Done!
In this course, you’ve learned how easy it is to create beautiful flat icons using simple shapes and tools in Affinity Designer. Continue learning more about its special operations and functions to make your workflow better.
I hope you’ve enjoyed this tutorial. Here’s a final recap from instructor Yulia Sokolova which covers everything we’ve learned from this series.
Want More?
Learn more about Affinity Designer by taking a crash course from our lessons. Share your results with us, and let us know how you liked this course in the comments below.
Find creative assets for your designs on Envato Elements.
And for more helpful lessons, check out these tutorials to learn more from our experts!
 VectorHow to Create a Detailed Lighthouse Flat Icon in Affinity DesignerYulia Sokolova
 Affinity DesignerHow to Create a Set of Flat Hiking Icons in Affinity DesignerYulia Sokolova
{excerpt}
Read More