As a graphic designer, you may be very familiar with working in Adobe Photoshop. But Photoshop, though very powerful, isn’t good for everything—just try to animate something more advanced than a bouncing ball! Luckily, there are other programs you can use to animate a character created directly in Photoshop, so that you can design in the software meant for designing, and animate in the software meant for animating.
In this tutorial I will show you how to use such a program, CrazyTalk Animator 3, to animate a character created in Photoshop. I’ll teach you how to prepare the character for editing, how to add the bones, how to import it to CrazyTalk Animator, and then how to animate its body and facial features—with both simple and advanced techniques.
1. How to Create a Character for Animation
This part is optional. You don’t need to follow me directly; you can
create any other character or use one you’ve created before. Just make sure it’s layered like mine.
A character is the easiest to animate if it’s made of simple shapes. In Photoshop they can be created as Shapes with the Pen Tool. It’s not hard to use this tool, but if you want to learn about it, try our super short course How to Use the Pen Tool and Paths in Adobe Photoshop. We also have an older tutorial with a great exercise that will help you grasp the tool in no time:

If you have Photoshop CC, you can also use the more intuitive Curvature Pen Tool.
Make sure you use the Pen Tool in Shape mode. This will color the paths automatically, and you’ll be able to change the colors anytime by double clicking the thumbnail.

Step 1
Start with a torso. It shouldn’t be completely oval; try to make the front slightly smaller. Use #acb6b8 to color it. You don’t need to copy my shape perfectly—just make sure it’s smooth and round.

Step 2
Create the front leg and the paw separately (on different layers). Use the same color to blend the leg nicely with the torso. This will help us hide any potential inconsistencies in the movement.

Step 3
Copy the leg with the paw, and place them behind the other layers. Change their color to #919a9c.

Step 4
Create two other legs the same way.


Step 5
Create the tail with a simple oval. Color it with #919a9c.

Step 6
Add the head. Color it with #c1cdcf.

Step 7
Add two ellipses for the patches around the eyes. Use the color of the torso for them.

Step 8
Add the eyes: a black circle, a white oval for the shine, and a dark gray shape in the bottom for the reflection. Keep the eyes on separate layers.


Step 9
Create the mouth out of three circles: two of them colored like the torso, and one colored like the legs in the background.

Step 10
Add a simple ellipse for the nose. Color it with #ff7dd1.

Step 11
Add the ears. Color them like the torso.

Step 12
We’ve created all the body parts, but the face is just as important as the legs or tail. You can add some variations of the eyes and mouth to achieve various facial expressions you can use later in the animation. Keep them all in the same place, so you can change the expression just by showing/hiding the layers.

Step 13
These are all my layers. The basic ones are:
- Front right leg
- Front right paw
- Back right leg
- Back right paw
- Tail
- Torso
- Front left leg
- Front left paw
- Back left leg
- Back left paw
- Head
If you want to animate the body only, merge the eyes and mouth with the head (you can merge the ears as well). If you’d like to animate the face as well, you’ll need more layers:
- Left eye normal
- Right eye normal
- Left eye closed
- Right eye closed
- Left eye smile
- Right eye smile
- Left eye scared
- Right eye scared
- Mouth normal
- Mouth open
- Mouth surprised
- Mouth smile
- Mouth teeth
- Right ear
- Left ear

2. How to Add Bones to a Character in Photoshop
To animate our character, we need to assign a “bone” to each body part. All the bones will create a “skeleton” together, allowing you to create a fluid, realistic animation. You can easily add the bones directly in Photoshop by using a special template for quadruped motion.
Step 1
Download the templates pack and go to 01_Templates > Quadruped Template to open the template in Photoshop.

Step 2
We need to bring the template into the file with our character. To do this, make both windows visible, select all layers in the template, and drag them over the character window.

Step 3
With the layers still selected, use the Free Transform Tool (Control-T) to resize the skeleton to fit the character roughly.

Step 4
The template file contains four types of elements:
- Images: the parts of animation that we can see.
- Bones: the parts of animation that direct the movement of the images, though they are not visible during the animation.
- Labels: they help us assign the bones to the correct images.
- Pivot: it defines the ground level.
First, we need to replace the template images with our own, part by part. Open the RL_Image group, and then open a folder inside it, and delete its content.

Replace it with a body part of your character.

Do this with all the folders expect the Neck (which we don’t have), and, if you want to create facial animations later, also the Head. The ears can be animated as a part of the body, but in the case of a forward-facing cat we don’t want them to move too much, so exclude them as well.

Step 5
The images for facial expressions should be prepared the same way, except they have their own folders inside the RL_TalkingHead > HeadImage group. Place the “normal” eyes in the Iris group, and the others in the EyeWhite group.


Step 6
The images are ready, so we can add the bones now. Bones will be created automatically in CrazyTalk Animator; you just need to tell the program where the joints are. You can use the template as a reference to see where the dog has its joints and how they apply to your character.

Open the RL_Bone_Quadruped group. Each body part has its own folder containing the joints’ marks. To place the marks correctly, you can hide the other images while working on one. Start with the tail: place the marks along it, staying away from the borders of the shape. These marks will be the points of bending.

Step 7
Show one of the hind paws now and find its corresponding folder with joints. Place the Foot_Nub mark almost at the tip of the foot, and the Foot mark in the middle.

Step 8
Show the rest of the leg, and add the other joints: Shank for the heel, Thigh for the knee, and UpThigh for the hip.

Step 9
Add joints to the other leg of the pair as well.

Step 10
Come to the legs in the front now. Here, Shank is the wrist, Thigh is the elbow, and UpThigh is the shoulder (the names come from the template for a human character; that’s why they’re a little confusing when you’re creating a cat!).

Step 11
Finish the other leg the same way.

Step 12
Open the Torso folder to assign the joints for the hip and the spine.

Step 13
My character doesn’t really have a visible neck, but we still need to show where it is.

Step 14
If you want the ears to move as a part of the body, add bones to them as well.

Step 15
If you want to animate the facial features, go to RL_TalkingHead and open the HeadBone folder. Place the marks on the corresponding facial features.

Step 16
Finally, place the ObjectPivot directly under the paws of your character (you’ll find it in the RL_Bone_Quadruped group) and take a final look at the whole skeleton. You can see it as a complete structure now, so it should be easier to see if something’s not placed right. If you spot any mistake, just go to the group and shift the mark to the correct place.

3. How to Import a Character Into CrazyTalk Animator
Step 1
Once the character is done and saved, open CrazyTalk Animator and click Create G3 Free Bone Actor.

Your character will be transferred into the program and shown automatically in Composer Mode. You can see how the bones have been created between the joints you’ve assigned in Photoshop. The ears don’t have real bones because I’ve made them a part of the head to stop them from moving (if you want them to move, just place them in their folder in the RL_Image group).

Step 2
In Composer Mode, you can play a bit with the character to see if it’s ready for animation. For example, you can click Preview to test the joints.


Step 3
If you click Edit Pose, you’ll be able to adjust the character.

For example, you can move the whole body part along with its bones, if you’ve discovered a mistake…

… or you can open the Bones Editor to move the bones separately.


Step 4
If these options are not enough for you, and you want to change something more comfortably in Photoshop, just click Launch to External PSD Editor. Or you can simply open your file again, modify it, and import one more time.

Step 5
You can notice that some of the layers have been messed up in the process of assigning the bones. We can fix it now. Just go to the Layer Manager…

… and drag the layers where you want them to be. I’ve placed the ears over the face, and the front right leg and paw above the head.

Step 6
When you’re ready to start animating, just exit Composer Mode by clicking Back stage.

4. How to Add a Simple Animation to Your Character
Step 1
Once you have the character done, it’s very easy to animate it! First, open the Window > Timeline editor.

Step 2
Click Motion to see a typical timeline under your character.

Step 3
CrazyTalk Animator has a set of sample animations that you can use right off the bat. Just go to Content Manager…

… open the Animation tab…

… go to Motion…
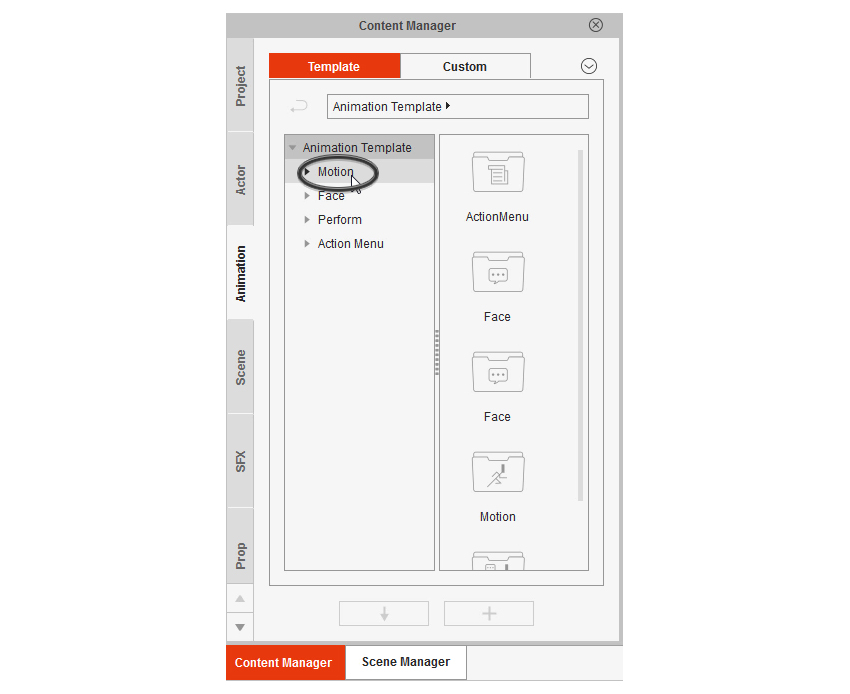
… and go through the folders: G3 Animals…

… Cats…

… Move…

… until you get to the list of the available motions. There are many types of motions. Here, for example, you have a starting motion (1S), a loop motion (2L), and an ending motion (3E). You can use all of them to create a fluid movement.
To add the animation, simply select your character and double click the motion. For a simple walking animation, add one Walk(1S), two Walk(2L), and one Walk(3E).

Step 4
To play the animation, you can use the simple controls right over the timeline. To establish the start and the end of the animation, drag the red markers.

It’s walking!
If you want more ready-made motions like this, you can find them in the G3-Animals: Cats pack.

5. How to Create a Custom Animation
The ready-made motions are universal, designed for the bones but not for the images, so sometimes they may not fit your character completely. For example, the Sit and Lick motion wasn’t designed for a forward-facing character like mine. But it’s not a problem—we can create such an animation (and many, many more) by ourselves!

Step 1
Open the 2D Motion Key Editor.

Step 2
Move the marker over the frame where you want your motion to happen.

Step 3
Apply your changes. Move and rotate the bones to position your character.


If you play the animation now, you’ll see the character change its position gradually from the first frame.
Step 4
So our kitten sits down. Now we want it to move its paw up and lick it. As you’ve just noticed, the animation happens between the keyframes—the ones where something was changed (as indicated by a dot on the timeline). If you want your character to stay in the pose for a while before getting animated towards another change, just add a keyframe manually by pressing V.

Step 5
Move the marker to the frame where you want another motion to stop.

Step 6
Position the bones again as you like.


Step 7
Play the animation to see the results! Remember: if something happens too fast or too slow, you can always drag the keyframes to change the intervals between them.
6. How to Animate Facial Expressions
Now you know how to animate the body, but what about the face? It’s not so difficult either!
Step 1
Add a keyframe where you want your motion to start.

Step 2
Open the Face Puppet editor.

Step 3
Select the cat as the Face Animation Profile.
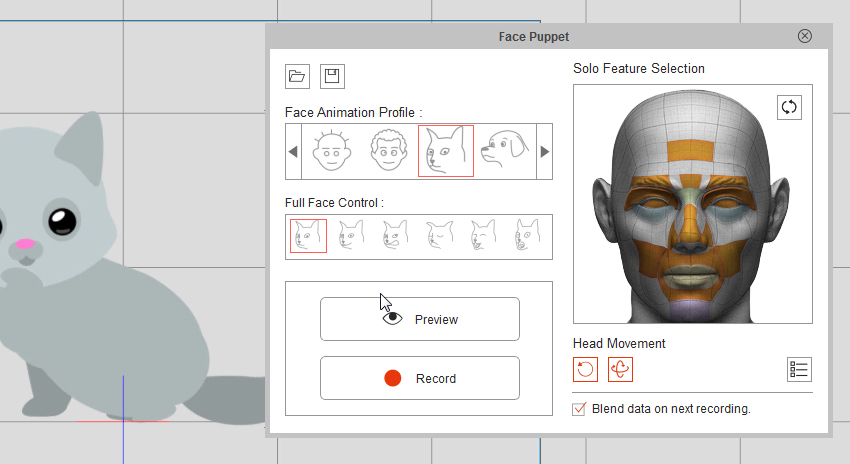
Step 4
Click Preview and move your cursor to the center of your character’s face. Press Space and move the cursor around to see the kitten look at it!

Step 5
There are various default facial expressions available, and their effect will depend on the assets you’ve used. I’ve discovered that the “angry” expression is actually pretty good for licking, if I move the cursor to the left, and quickly up and down!

You can make the character blink by clicking the left mouse button during the preview. This is going to be useful!

Step 6
Practice for a while with the preview until you are sure you know how to move the head to achieve the effect you want. Then click Record and press Space or Enter to record the motion. Press Space again to finish.

Looking good!
Step 7
After the animation of licking stops, I’d like the kitten to move its paw to the ground again. To do this, place a keyframe after the animation.

Step 8
Place the marker some distance from this keyframe…

… and position the character again.

Step 9
After the animation is complete, I’d like the kitten to tilt its head and smile. The first part can be done with the 2D Motion Key Editor…

… and the other with the Sprite Editor.

Step 10
With the marker in the proper frame, select the element of the face you want to change and then select the image you want to replace it with.


It’s smiling!
Step 11
To finish the animation, you can add another keyframe later, with the facial features back to normal.

7. How to Finish the Animation
But what if you want to add some animation at the start, where there are too few frames to add anything? No problem! Let’s just add more frames.
Step 1
Make sure you have the Project on your list.

Step 2
Click Collect Clip.

Step 3
Click Insert Frame.

Step 4
Type the number of frames you want to add. Don’t be afraid to add too many; it’s easy to remove the empty ones.

Step 5
The frames have been added! I’ve decided to fill them with a walking animation.

Step 6
Make sure your two animations both have enough space on the timeline, and that they meet at the correct moment.

Step 7
The kitten is walking in place for now, but it can be fixed. Just go to the first frame and move the character outside of the scene.

The motion speed will be adjusted to the distance automatically.
Step 8
I’ve added more frames between the walking and licking animations to make it all slower. My kitten will now blink cutely and move its tail as well.

Step 9
When your animation is finished and ready to be shown to the world, go to Render > Render Video.

Step 10
Adjust the options to your liking. Make sure the Range of frames is correct!

Good Job!
My kitten is walking, smiling, and licking its paw! And how about your character? I’d love to see your result, so don’t be afraid to share it in the comments!
{excerpt}
Read More