Like all DAWs, Ableton Live allow users to automate the tempo and signature of a given set. Unlike other DAWs, Ableton Live incorporate the session view where tempo changes can be automated there as well by renaming the Scene names accordingly. We are going to examine various ways of achieving this and also another way of automating tempo between two values by using external software.
Automating Tempo by Renaming Scenes
Till now, we know that by properly renaming Scenes in Ableton Live we can cause the tempo to jump to our desired value. Scenes can be renamed by clicking on a particular Scene in Session View, then hit CTRL(CMD for Mac)+R then type in the new name. Scene names can be both descriptive and functional; if Live detects a viable tempo and/or time signature as part of a scene name, the project will automatically adjust to these parameters when the scene is launched. To assign a tempo to a scene, select the scene and rename it with a viable tempo (e.g., “96 BPM”). Any tempo can be used, as long as it is within the range allowed by Live’s Tempo control (20-999 BPM).
To assign a time signature to a scene, rename the scene with a meter in the form of “x/y” (e.g., “4/4″). Any time signature can be used, provided it has a numerator between 1 and 99 and a denominator with a beat value of 1, 2, 4, 8 or 16. Tempo and time signature changes can coexist within a single scene name, and can appear in any position as long as they are separated from each other by at least one character. For example, “2/4+102 BPM”, “112 BPM;7/8″ and “110 BPM Verse 3/4″ are all scene names that will cause simultaneous meter and tempo changes.

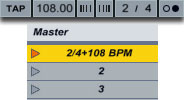
The renamed Scene above, when launched, will cause the master TEMPO to jump to 108BPM with a signature change of 2/4.
Using Dummy Clips to Gradually Automate Tempo Control
The “problem” with this method is that the master tempo jumps to the required BPM. What if our live set incorporated a slow gradual tempo change? We know that we can easily achieve that in Arrangement View but there seems no way to do that in Session View.
We need to make use of dummy clips and external software. Dummy clips are essentially empty midi clips that contain modulation information for other parameters in our Live set. The extra software we are going to be using is a free software called MIDI YOKE. MIDI YOKE is a MIDI Patch Cable driver. It’s a Windows multimedia driver that allows you to connect the MIDI output from one program to the MIDI input of a different program. Mac users already have this functionality in the form of the IAC driver.
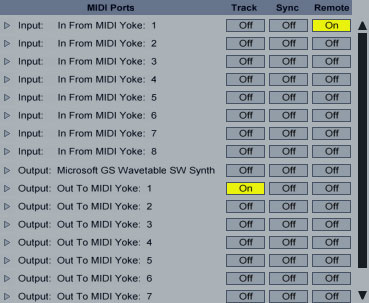
Once downloaded and installed head over to Live’s preferences in the Midi Sync tab. Under Midi Ports activate Remote for the Input In From MIDI Yoke: 1 port. Activate Track for the Output: Out to Midi Yoke: 1 port.

Exit Preferences. Create a midi track and set it’s output type to Out To MIDI Yoke: 1. Leave Output Channel to 1. Midi Yoke allows you to utilize all 16 midi channels if so desired.

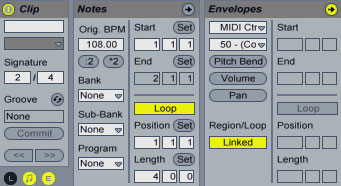
Double click on an empty clip slot to create a dummy clip. On the Clip View hit the E icon to show the Envelopes Box. Leave the Loop switch activated. From the Envelope Editor’s first drop down box(Device Chooser), select Midi Ctr and from the second(Control Chooser) select a parameter controller. In my case, I chose 50. Set the Loop Length to the bars, beats and sixteenths that you want your automation to last. In my case, I set it to 4 bars.

Now, please, pay attention as it may seem a little bit tricky. On the red line representing the envelope’s control automation, create two breakpoints one at the beginning and one at the end setting the first one to 0 and the second one to 127.

Launch the dummy clip by hitting the Clip Launch Button, then press SPACE bar to stop. Activate Midi Map Mode, click the tempo at the right of the TAP button(make sure to click the left side of the number where the Coarse value of the tempo is located) and click space bar again to launch the dummy clip. Hit the space bar once more to stop the clip. On the Midi Mapping at the left, you can see that the CC 50 controller number has been assigned to the master Song Tempo. Change the min and Max values to 60 and 187 values respectively or any other values whose difference is 127(for instance 100 and 187). Obviously the range you choose should cover the values you are planning to use to complete your automation. Exit Midi Map Mode.
The reason we set our range as such is that it will allow us to have whole number increments on the Master Tempo instead of decimal ones. As you know, the breakpoint envelope values range from 0 to 127 so setting a min and max Song Tempo values whose difference is 127 while on Midi Map Mode, allows us to work in single unit increments of the song tempo.

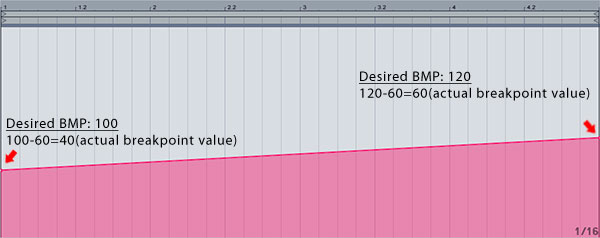
Now, let’s say we wanted to execute a gradual tempo from 100 to 120 BPM. All we needed to do is subtract the value of min value of 60 from both values and adjust our breakpoints accordingly.

Remember that you always subtract the min value you have set while on midi Map Mode, so if your range had a minimum value other than 60, this value should be used for subtraction.
Now you can deactivate the Loop switch for the dummy clip, launch it and see the song temp gradually increasing from 100 to 120 BPM in the duration of 4 bars! This way, whenever you want an automation change like that in your live set, you can create similar dummy clips and launch them either on their own or as part of a Scene launch.
Let me know if you have any questions and thanks for your time!