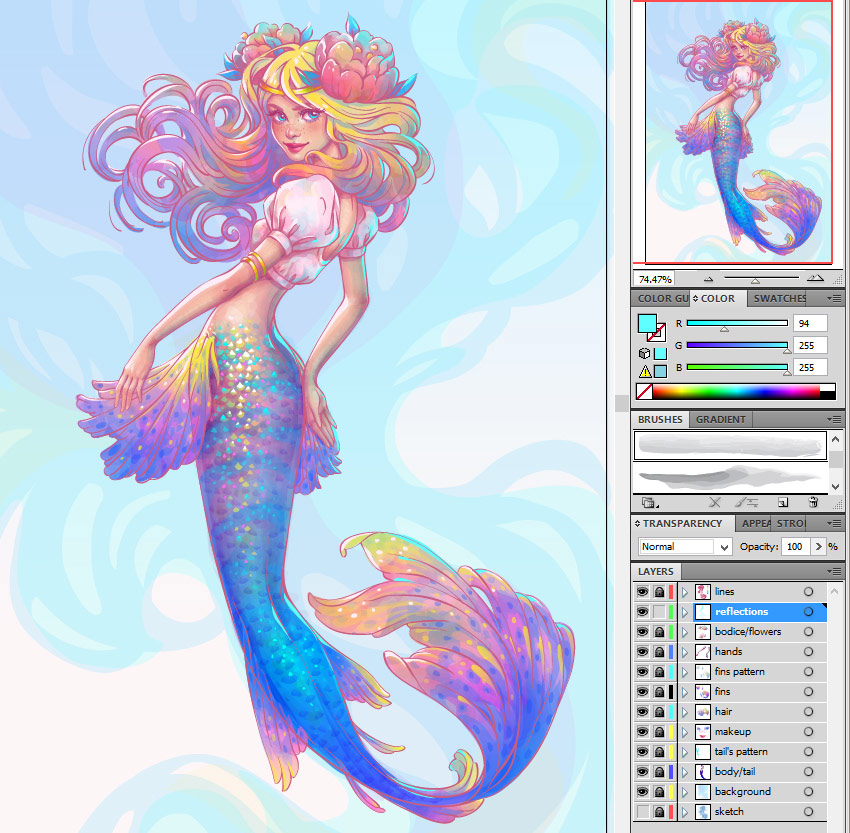
In this tutorial we’ll be creating a colorful character of a mermaid, imitating a watercolor painting technique in Adobe Illustrator. One of the most beautiful and touching characters from the fairytale The Little Mermaid will serve as an inspiration to us.
Find more great Mermaid Design inspiration on GraphicRiver.
Let’s start!
1. How to Make a Sketch
Open a New document in Illustrator at 850 x 1200
px, RGB. Change the first layer’s name to
“sketch”.
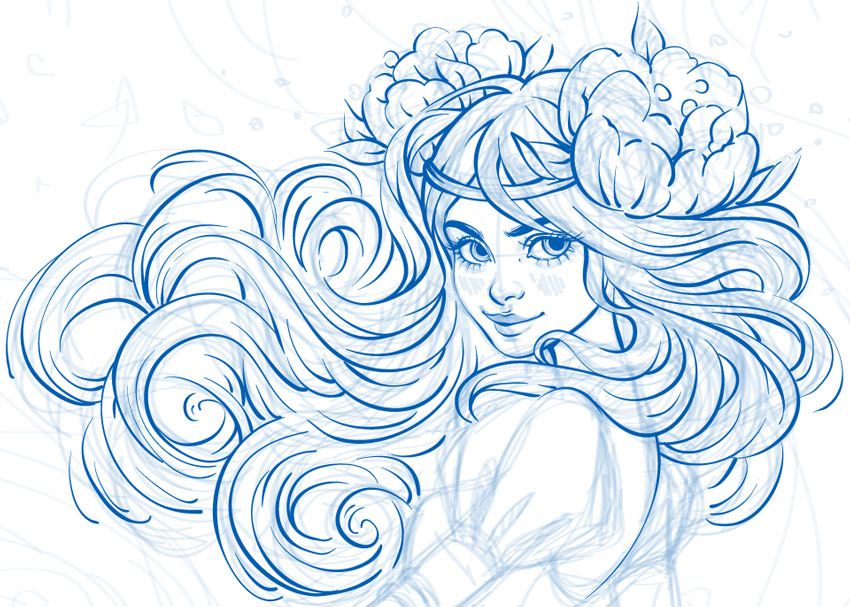
Let’s begin by drawing a sketch. To
draw our character, we need to use her recognizable features. In the fairytale,
the Little Mermaid is a daughter of the Sea King: “The youngest was the
prettiest of them all; her skin was as clear and delicate as a rose-leaf, and
her eyes as blue as the deepest sea; but, like all the others, she had no feet,
and her body ended in a fish’s tail”, “She was a strange child,
quiet and thoughtful”, “she cared for nothing but her pretty red
flowers, like the sun.”
Let’s draw a rough sketch
using the silhouette and some attributes inherent to mermaids. For more
inspiration, you can use references from looking at mermaids on Envato Market.
I create my sketch
directly in Adobe Illustrator using my graphics tablet. Select the Paintbrush Tool (B) and use the Oval Calligraphic Brush with 2 pt diameter, 20% Opacity to begin
sketching your mermaid. You can choose any brush from the default Brushes panel you like.

2. How to Create a Brush for the Contour
Step 1
Create a New Layer for the lines. We’ll draw all the lines on this layer, because the color of all the lines will be the same.
Open the Paintbrush Tool Options by
double-clicking on the Paintbrush Tool (B)
icon. Use the settings below and press OK.

Step 2
Now we need to create
a New Calligraphic Brush. This brush
is one of my favorites, and I use it in practically all my artwork.
Press the New Brush icon on the Brushes panel, and choose the Calligraphic
Brush type. Then press OK, and
the window with brush options will appear. Use the settings shown below.

Step 3
Choose our new brush from the Brushes panel,
and make a few trial lines. The thickness of the line depends on the pressing
force of the stylus. Try to sense the lines.
We’ll use the advantages of this brush
to achieve some volume for our drawing even at the line art stage.

3. How to Draw the Contours of the Character
Step 1
It’s time to apply our skills in practice. Let’s begin
to create the line art of the character.
First, Group
(Control-G) your sketch. Lower the Opacity of the sketch to 50%,
making it semi-transparent.

Step 2
Now let’s take the Paintbrush Tool (B) and select the newly created brush
from the Brushes panel.
Start drawing the face. Draw lines as smoothly as you
like. If you feel the lines are thicker or thinner than you would like them, you
can change their Weight in the Stroke panel.

Also, you can fix crooked lines using the Direct Selection Tool (A).

Draw smooth and “live” lines, making transitions
from thin to thick, and vice versa.

Step 3
Next, draw the hairstyle and head wreath. Make just the
main lines, following the sketch. We’ll add more details and volume created with color shapes later.

Cut unnecessary pieces using the Scissors Tool (C), select the segment and press Delete.

Here’s how the hairstyle looks now.

Step 4
Next, let’s draw the hands and her naked back. Make the
lines smoother and discontinuous.

Step 5
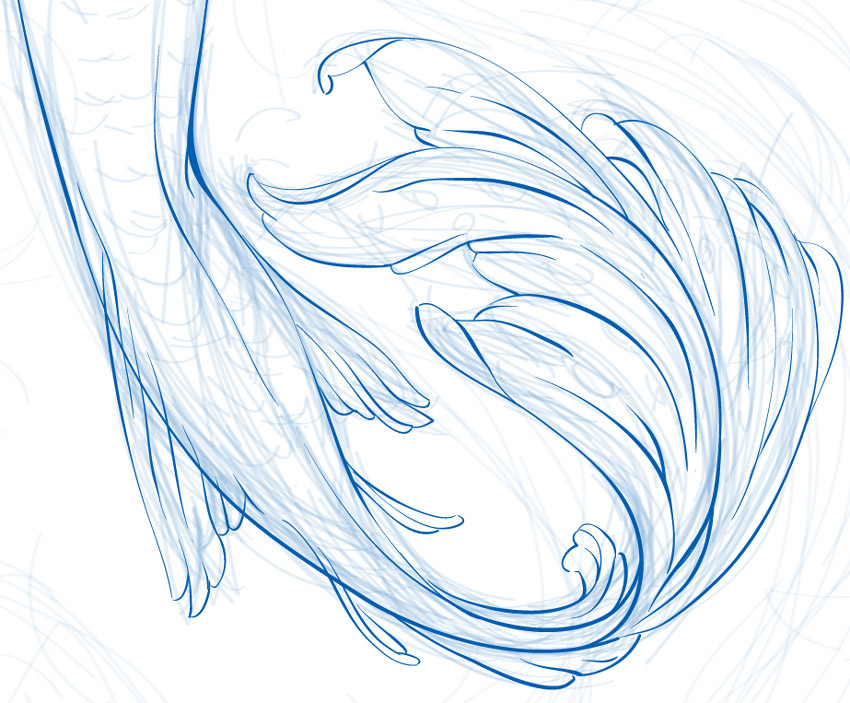
Now draw the bodice, tail and
fins of our mermaid. Draw this way, making the lines thicker on the shadowy
area.

The membranes on the fins
will be semi-transparent, so make the inner lines thinner and almost
imperceptible.

Step 6
Make the “sketch” layer invisible and admire the
result of the line art.

4. How to Create the Main Shapes
Step 1
First, let’s select all lines and go to Object > Expand Appearance. Open the Pathfinder panel and click Unite, holding the Alt button. Then press OK
to create one solid object.


Step 2
Create a New Layer for the background and drag
it under the “sketch” layer. Don’t forget to Lock the
“sketch” layer and make the “lines” layer invisible.

Step 3
Start by creating an 860 x 1210 px rectangle
using the Rectangle Tool (M), and Fill it with a Linear Gradient from light-pink to light-blue.
Open the Align panel and choose Align to Artboard, and then Align Objects: Horizontal and Vertical.

Step 4
Choose the light-turquoise color with Opacity 25%, and draw the main shape of
the background pattern following the sketch. You can use the Pencil Tool (N) or the Pen Tool (P) for your convenience.

This way, draw more detailed shapes of the pattern inside
the main form. It’s difficult to draw the entire shape using the Pencil Tool (N), so we’ll create a few
smaller shapes and then unite them. Open the Pathfinder panel and click Unite.
Fill this shape with a light blue color, 25%
Opacity.

Add some purple and
yellow shapes with 10% Opacity.

Make the
“sketch” layer invisible. We don’t need this anymore.
Step 5
Well, it’s time to draw the main shapes of the
character.
First, let’s change the contour color of our mermaid.
Select the lines shape and Fill it with maroon color.

Step 6
Now we need to create the swatch of the basic colors.
I chose the soft and pure tones of pink, yellow, and blue.

Step 7
It’s time to begin painting. Choose colors from your
swatch. Use the Pencil Tool (N) and
the Pen Tool (P), or the Blob Brush Tool (Shift-B), whichever you
prefer for the main shapes.
Draw the body, makeup and hands on the separate
layers, and organize them as shown below.

Step 8
Add a New Layer for the hairstyle above the “makeup” layer. Draw
the hair shape and Fill it with a Linear Gradient using yellow, pink and blue
colors.

Step 9
Use the light pink for the bodice, yellow for the jewelry, and pink for flowers.

Step 10
Use a Linear Gradient from skin tone to blue for the
mermaid’s tail. Draw it on the “body” layer.

Step 11
Apply the same
gradient as on the hairstyle with 80%
Opacity for the tail’s fins.


Step 12
For a convenient work
process, we’ll create separate layers for each part of the character. Organize
them as shown in the screenshot below.

5. How to Add Shadows and Highlights
Step 1
First, change the
color of the eyes’ lines to make them more expressive. Select the shape of the
lines, and Duplicate by pressing Control-C
and Control-F. Draw some shapes on
the area of the eyeliner and pupil, nostril and middle line of the lips. Unite
them using the Pathfinder panel.

Now, select the lines
shape and our new shape and click Intersect while holding the Alt button, and then press Expand.

After you’re done
cleaning this new shape of unnecessary details, fill it with a darker color.
Add some white glare to the pupils.

Step 2
Let’s add some volume to the face. We’ll work on the “body” layer. Draw
the blush first. Take the Ellipse Tool
(L) and form some shapes: two bigger shapes on cheeks, and a smaller one on
the nose. Fill them with a pink Radial Gradient, reducing the Opacity to 0% on the
outer slider. Then select all blush shapes and change the Opacity to 30%.

This way, add some
blushes to the neck and back. Also add some blushes to the elbows and wrists
on the “hands” layer.

Step 3
Let’s add some shadows to the skin. To achieve a
watercolor effect and make the brush strokes more attractive, we’ll use the Artistic Watercolor Brush from the Brushes
panel, as shown in the screenshot below.

Choose the Light
Wash-Thick Brush and a violet-red color for the Stroke. Change the Blending Mode to Multiply and Opacity to 50% on the Transparency
panel. Change the Weight of the Stroke to 0.4 pt.

Draw basic shapes on the shadowy area. Lay them one on
top of the other until you get the desired result.

The same way, add some volume to the back, hands and
tail. Change the Opacity and stroke Weight in the process. We may need this
on narrow sections like the fingers, for
example.

Step 4
Let’s add the falling shadows. Use the same brush
here. Choose the blue violet color, varying the Opacity from 100% to 70%.
Draw the shadows under eyes, lips, hair, on the right
side of her face, on the neck and hands. Also draw some fish scales on the
tail.


Step 5
This way, let’s add some highlights to the lightened
area. Pick the white color, change the Blending
Mode to Soft Light, and reduce
the Opacity to 50%. Draw separate strokes to make them expressive.

Step 6
Change the Opacity to 100% and Blending
Mode to Normal.
Using the Pencil Tool (N), add some
bright highlights and twinkles.

Step 7
Choose the cyan color
with 50% Opacity, Multiply Blending Mode, and draw
reflections from the background. Use the same Light Wash-Thick watercolor brush.

Step 8
Now we’ll get to work on the eyes and lips on the “makeup”
layer. Take the Pencil Tool (N) and
add some volume on the white of the eye, drawing some shapes under the eyelashes.
Use the color from the lines and reduce the Opacity to 30%.
Next, draw a pink strip on the eyelid margin, and add
some highlights to it.
Now select the iris of the eye, and Fill it with Linear Gradient from dark blue to light blue. Add some cyan twinkles.
Draw eyeshadow using a purple color with 20% Opacity, and then add some bright blue shapes for highlights.
Now draw a deep pink shape on the left side of the upper lip. Add the dark violet red color with 25% Opacity between the lips. In the end, draw bright twinkles on the
right side of the lips.
To make the skin more natural, add some freckles. They
shouldn’t be perfectly round, so draw them randomly on the nose and cheeks.

Step 9
Let’s draw a pattern on the mermaid’s tail.
Create a New Layer for it over the
“body/tail” layer. Draw some blue stripes, and reduce the Opacity to 25%.

Now choose the Watercolor-Wet Brush from the Brush Library, and
draw smooth lines
on top of the stripes. Change the Blending
Mode to Multiply, and reduce the Opacity to 50%.

This way, add some yellow lines between the stripes.

Using the Pencil
Tool (N), draw some scales on the lightest area. Unite these
shapes using the Pathfinder panel to
make one solid object. Fill it with a Linear Gradient from cyan and yellow to
pink. Reduce the Opacity to 55%.

The same way, draw some new scales, Unite them, and Fill
them with a cyan Gradient, as shown below.

Now let’s add some final twinkles to the scales. Use the
pink, cyan and white colors with 100%
Opacity.

Step 10
It’s time to add some volume to the bodice. We’ll use
the watercolor brush here too. It’s very easy to get painting effects and an imitation of watercolor.
Choose the Watercolor-Wet
brush with 1 pt Weight, and draw some
pink textured shapes of the shadows. Reduce the Opacity to 50% and
change the Blending Mode to Multiply. These strokes may extend
beyond the basic shape, so we’ll fix it with Clipping Masks later.

This way, draw some blue shades using the cyan brush
strokes.

Now add some yellow spots, reducing the Opacity to 30%.

Take the Pencil
Tool (N) and draw some falling shadows using the color from the lines with 37% Opacity. Then add some shapes of
highlights to the left side of the bodice. Use the Eyedropper Tool (I) to choose the white color from the body for it.

Now Duplicate the lower basic shape of the bodice,
pressing Control-C and Control-F. Move the copy up, sending
it to Front (Control-Shift-]).
Select all objects of the bodice, Right-click, and the following
window will appear. Then press Make
Clipping Mask.

Step 11
Let’s add highlights and shadows to the accessories.
We’re still drawing on the “bodice/flowers” layer.
Start with the golden diadem and bracelets. Choose the
Watercolor-Wet brush with 0.5 pt Weight, and draw some red spots
for the shadows and some cyan reflections. Reduce the Opacity to 70%, and keep
the Blending Mode as Multiply. Then make a Clipping Mask, as we did it before on
the bodice.
In the end, add some yellow and white shapes of gloss
using the Pencil Tool (N).

Step 12
We’ll draw flowers using the same principles.
First, Fill the flowers and leaves shapes with a Linear Gradient from pink to light pink and from blue to light blue, respectively.

Play around with the Watercolor Brush to make the drawing more
decorative and picturesque. Use the pink, yellow and cyan colors.

In the end, add some shadows and gloss with the Pencil Tool (N). Choose the maroon color from the lines for the shadows
and white color for the gloss.

Step 13
Let’s start forming the hairstyle.
First Duplicate the shape of the hair, Fill it with
white color, and move it down. Select the upper gradient shape and reduce the Opacity to 70%.

Choose a new Watercolor-Thick Brush from the Brush Library, and
draw some pink strokes randomly, creating beautiful artistic spots. You can see all the brush settings in the screenshot below. Then apply the Clipping Mask, as we did earlier.

This way, draw some blue brush strokes. Feel free to
place them in whatever manner you find best.

Add some yellow and cyan spots too.

Now draw the shapes of the shadows. Select them and press Unite on the Pathfinder panel. Fill this shape with a blue Radial Gradient, reduce
the Opacity to 40%.

Next draw shapes of the highlights, unite them too. Fill
this solid shape with a yellow Radial Gradient, reducing the Opacity to 75%.

In the end, add some bright highlights to the left
side of the hairstyle.

Step 14
We have a few steps left. And it’s time to draw the
mermaid’s fins.
Add some strokes using the same principles as we used on the hairstyle. Choose the Watercolor-Wet
brush with blue, pink, yellow and cyan colors for it.


Take the Pencil
Tool (N) and form a beautiful pattern
on the fins. Fill it with a blue Linear Gradient with 40% Opacity, as shown below.

The same way, draw another shape of pattern and Fill
it with a yellow Radial Gradient, 75%
Opacity.

In the end, add some blue dots and white gloss.

Step 15
It’s time for the final touches. Let’s add some
necessary details.
Create a New
Layer under “lines” for the reflections from the background. Draw
some cyan shapes on the right side of the character.

Now add some dark blue shapes to the darkest area, and
set their Blending Mode to Overlay, 10% Opacity.

Also add some of the brightest shapes to the lighter area of
the tail, setting their Blending Mode
to Overlay, 10% Opacity too.

In the end, let’s change the color of the lines slightly,
adding some blue. Select the lines shape and Fill it with a Linear Gradient, as shown
below.

Finally our character is ready!

6. How to Create an Abstract Background
Step 1
We already have the basic substrate with main colors
for the background. It will serve us as a reference point in adding brush strokes and details.
Let’s make the first brush strokes, using a new Watercolor Stroke 3 Brush, varying the Weight from 2 pt to 4 pt. Use a
light-blue color, Multiply Blending Mode
and 15% Opacity for them.

Step 2
Now choose the light-cyan color, switch to Normal Blending Mode and draw some light spots. Play with the Opacity and thickness of the strokes
until you get the desired result.

This way, use the Watercolor-Wet Brush to add some yellow and cyan spots, applying the Multiply Blending Mode again.

Step 3
Let’s add some splashes to the background. First, go to
Open Brush Library > Artistic > Artistic_Ink and choose two new
brushes: Fire Ash and Galaxy. Use them to add some random
light-blue and white splashes. Change their Size and Opacity, moving them as you wish.

In the end, decorate the upper part of your
illustration with bright yellow spots. Draw them with the Pencil Tool (N), Duplicate them, and place them around your character.

Wow! We’re Finished!
I like this bright colorful mermaid and this softly
colored pastel background. It was a time-consuming and complicated
process, but at the same time, it’s creative and interesting.
Thank you for creating this really beautiful mermaid
character with me. Enjoy and share your result!

{excerpt}
Read More