In this tutorial I’ll be demonstrating how to design a geometric style logo that conceptualizes the letter M, using Inkscape.
If you’re looking for premade logo templates, you can find many logo letter designs over on GraphicRiver.
1. How to Set Up a New Document
Step 1
Go to View and make sure you have Custom selected.

Step 2
Go to View > Zoom and select Zoom 1:1 to make sure you’re zoomed in at 100%.

Step 3
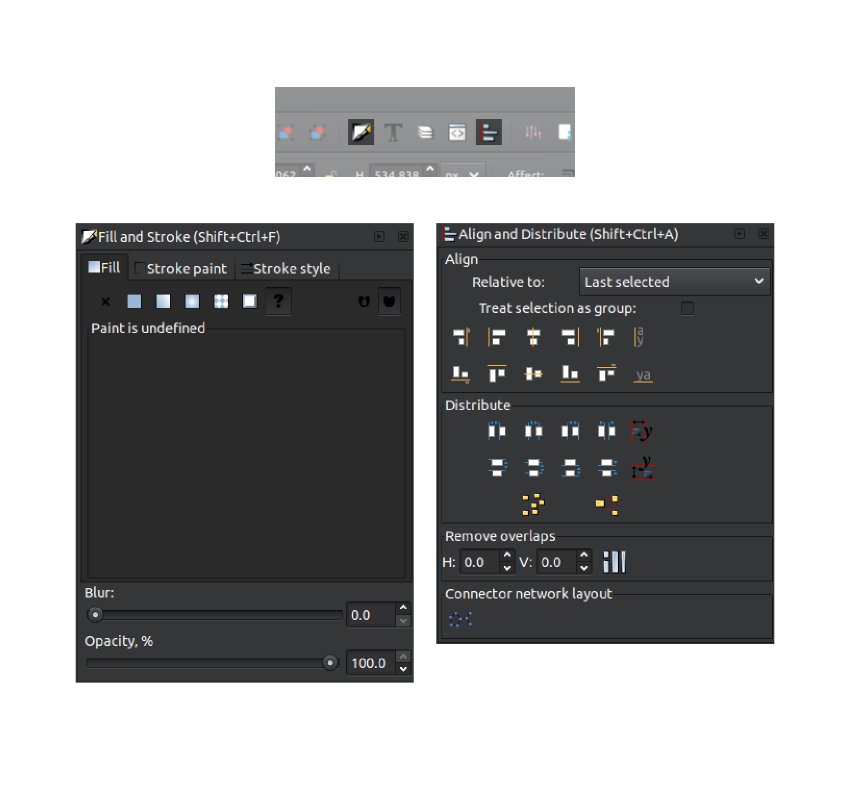
Click on the Align and distribute objects icon in the top toolbar to open up the alignment panel. Then click on the Fill & Stroke icon in the top toolbar to open up the Colors, gradients and strokes menu.

Step 4
Go to File > Document Properties (Control-Shift-D) and deselect the boxes that read Show page border and Show border shadow, and then close out of that window.

2. How to Create the Base Shape
Step 1
Grab the Create Stars and Polygons (*) tool and set the parameters in the toolbar up top to the following specs:
- Regular Polygon
- Corners: 6
- Rounded: 0.000
- Randomized: 0.000

Step 2
Hold down the Control and Shift keys on your keyboard and click and drag on the canvas to create a polygon where the corners are pointing vertically as depicted below.

Step 3
Change the color of the polygon to red and bring down the Opacity to 50% using the Opacity Percentage tool in the Fill and Stroke panel.

Step 4
Grab the Select tool (F1) and turn on the lock icon between the W and H fields in the top toolbar. Then, change the value of the W box to 300 and press Enter to establish the width of the polygon as 300 pixels. After that, turn on the Snap to cusp nodes box in the Enable snapping toolbar at the very top of the window.

Step 5
Right-click on the polygon and select Duplicate (Control-D) to create another copy. Make that copy blue, and then click and drag the new polygon and snap the corners of it to the lower left corners of the red polygon.

Step 6
Right-click the blue copy and select Duplicate (Control-D) to create another copy. Make that copy green, and then snap the corners of it to the lower right corners of the red polygon.

Step 7
Right-click the green polygon and select Duplicate (Control-D) to create one more copy, change the color to black, and snap the corners of it to the center of the three colored polygons as depicted below.

3. How to Trim Down the Base Shape
Step 1
Right-click on the black polygon and select Duplicate (Control-D) to create another copy, and with that copy selected, hold Shift on the keyboard and click on the blue polygon. With them both selected, go to Path > Intersection. You should end up with the following:

Step 2
Now we have to do the same with the red and green polygons. So right-click on the black polygon again and select Duplicate (Control-D), hold Shift and click on the red polygon, and then again go to Path > Intersection.

Step 3
Click on the black polygon, hold Shift and click on the green polygon, and then go to Path > Intersection. You should end up with a three-part polygon in three different colors.

4. How to Create the Defining Shape
Step 1
Right-click on the blue object and select Duplicate (Control-D). Turn it black, and then change the width of it to 150 using the W input field in the toolbar up top, and press Enter. After that, click and drag that copy to snap it onto the lower right corner of the blue object.

Step 2
Right-click on the black object and select Duplicate (Control-D). Then flip the object horizontally by clicking the Flip selected objects horizontally (H) button in the top left of the top toolbar. After that, click and drag the object to snap it onto the bottom left corner of the green object as depicted below.

Step 3
Right-click on that black object and select Duplicate (Control-D). Click on it a second time to bring up the rotation handles. Then, while holding Control on the keyboard, grab the rotation handle in the top right corner of the object and rotate it clockwise four steps so that the corners of the object are pointing vertically, forming a diamond-like shape.

Step 4
Click and drag the object to snap it onto the top corner of the red object.

Step 5
Right-click that black object and select Duplicate (Control-D), turn it red, and then change the W field in the top toolbar to 100 and press Enter. Then, snap it onto the top corner of the black object beneath it.

Step 6
Right-click that red object and select Duplicate (Control-D), and click and drag it to snap it onto the corners between the two black objects at the bottom.

Step 7
Right-click the red object again and select Duplicate (Control-D), and then snap the bottom of it to the top corner of the red object beneath it.

Step 8
Grab the Bezier pen (B) tool and snap the cursor onto the far bottom corner of the bottom red object, and left-click to create a new point. After that, snap the cursor and click on the following corners and left-click them to create the following shape:

Step 9
Make that object blue, and bring the Opacity down to 50% using the Opacity slider in the Fill and stroke panel to the right. After that, click on the Stroke tab in that panel and click on the X to the far left to remove the black outline around the object.

Step 10
Go back to the Select (F1) tool, right-click that blue object, and select Duplicate (Control-D). Flip selected objects horizontally (H) using the icon in the top left toolbar, make the object green, and snap the left-side corners of it to the right-side corners of the blue object.

Step 11
Hold Shift and click on the blue object to the left, and with the blue and green objects both selected, right-click on them and select Duplicate (Control-D). Take the duplicated copies and snap them onto the bottom corner of the black object at the top of the graphic.

5. How to Trim the Unwanted Areas
Step 1
Click on the black object that sits within the large red shape, hold Shift, and click on the large red shape. With them both selected, go to Path > Difference.

Step 2
Click on the black object that sits within the large blue shape on the left, and then hold Shift and click on that blue shape and select Path > Difference.

Step 3
Click on the black object that sits within the green object, hold Shift, and then click on the large green object to the right and go to Path > Difference.

Step 4
Click on the green L-shaped object on the right, right-click it, and select Duplicate (Control-D). Then click and drag it over to the left to snap it onto the bottom right corner of the blue L-shaped object to the left.

Step 5
Click on the blue L-shaped object, right-click it and select Duplicate (Control-D), and then hold Shift and click on the green L-shaped object beneath it. Then go to Path > Difference.

Step 6
With that object still selected, go to Path > Break Apart. This will break the object into three separate objects. Now hold Shift and click on the green object to the bottom right to deselect only that object, and with the other two still selected, press Delete on the keyboard to remove them.

Step 7
Right-click on that new green object we’ve just created and select Duplicate (Control-D). Flip it horizontally using the Flip selected objects horizontally (H) button at the top left of the toolbar, turn it blue, and snap it onto the bottom left corner of the green L-shaped object on the right.

We now have the structure of the design completed. All we have to do is color it in!
6. How to Color Everything In
Step 1
Click and drag over the entire graphic to select everything, and then bring the Opacity up to 100% using the Opacity slider in the Fill and stroke panel.


Step 2
Hold Shift and click on all of the red objects to select them, and then go over to the Fill and stroke panel, and under the Fill tab, change the RGBA value to ffe065ff.


Step 3
Hold Shift and click on all of the blue objects to select them, and then go over to the Fill and stroke panel, and under the Fill tab, change the RGBA value to ff0030ff.

Step 4
Hold Shift and click on all of the green objects to select them, and then go over to the Fill and stroke panel, and under the Fill tab, change the RGBA value to ff8e00ff.

Awesome Work, You’re Now Done!
And with that, our logo is complete! We’ve successfully created a geometric style logo using Inkscape.

{excerpt}
Read More