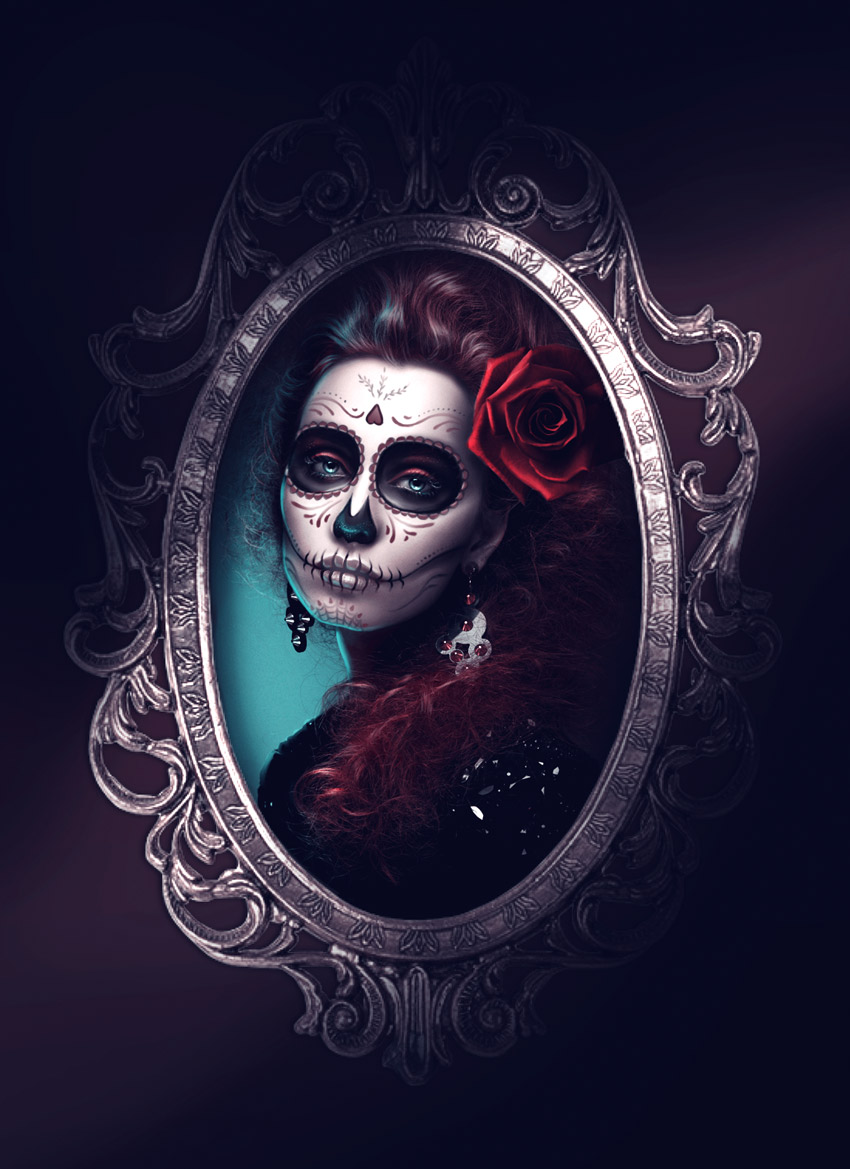
To honor the dead is to honor an important Mexican tradition and ensure the protection and wellbeing of your entire family. So to celebrate the beautifully unique holiday of Dia de Los Muertos, I’ll teach you how to create portrait of a woman with traditional Calavera makeup.
Learn how to create a glamorous Dia De Los Muertos photo manipulation using Adobe Photoshop and resources from Envato Market.
Tutorial Assets
The following assets were used in the production of this tutorial.
What Is Dia De Los Muertos?
Dia de los Muertos, also known as Day of the Dead in English, is a Mexican holiday that celebrates the lives of loved ones who have passed over.
This ancient tradition originates from the belief that if a family brings food, gifts, and flowers to the burial place of a loved one, they will be blessed with good luck, and the souls of the dead will hear their prayers.
The Calavera Portrait
One of the traditions included in this day is dressing up as Calavera. According to Wikipedia, a Calavera simply “represents the human skull,” and for many years people have been dressing up on this day by painting their faces to depict a beautifully decorated skull.
Also known as a “sugar skull” makeup look, after the traditional folk art of creating skull offerings made out of sugar, the entire look showcases beautiful bold colors, Gothic-like design elements, and hair adorned with flowers.
Let’s continue this unique tradition by creating our own Calavera portrait using both non-destructive and digital painting techniques.
1. How to Set Up the Calavera Background
Step 1
Open the image for the Ornate Frame Set you downloaded from Pixabay. Since the document is already perfectly set up with a transparent background, I’ll be using it to create the Calavera portrait. First use the Rectangular Marquee Tool (M) to select and Delete the left frame from the layer.

Step 2
Then use the Crop Tool (C) to Crop the document around the frame. When you’re finished, your initial setup should look like this.

Step 3
Now let’s move on to the background. Create a New Layer underneath the frame and Fill it with a dark green color (#0f0f01) using the Paint Bucket Tool (G).

Right-click the layer and go to Blending Options, applying a purple Gradient Overlay with the following settings below. It’s a subtle effect but worth the extra detail.

2. How to Frame the Calavera Portrait
Step 1
We’ll be employing a few non-destructive techniques to manipulate our images without actually affecting the original photos. Let’s start by putting our model within the frame using this Woman Stock from PhotoDune. Copy and Paste the image onto a New Layer underneath the frame layer. It helps if you also place the image within its own Group for better organization.
Use the Free Transform Tool (Control-T) to adjust the size of the image and make it much smaller so that her face and body fit within the frame.

Step 2
Select the Elliptical Marquee Tool (M) and create a selection that mirrors the circular detail of the inner frame. Then hit the Layer Vector Mask button on your Layers panel to create a circular mask that hides the rest of the photo perfectly.

Step 3
Let’s add some subtle shadow to the inside of the frame so that it looks as if it’s sitting on top of the portrait. First, hold the Control key while selecting the circular Layer Mask you just created. Then right-click and select Inverse Selection.
Create a New Layer underneath the frame and use the Brush Tool (B) to paint soft black shadow along the edges of the portrait. Try to create a soft, believable shadow before adjusting the Opacity to 72% or whatever works for your effect.

3. How to Adjust the Model’s Face & Lighting
Step 1
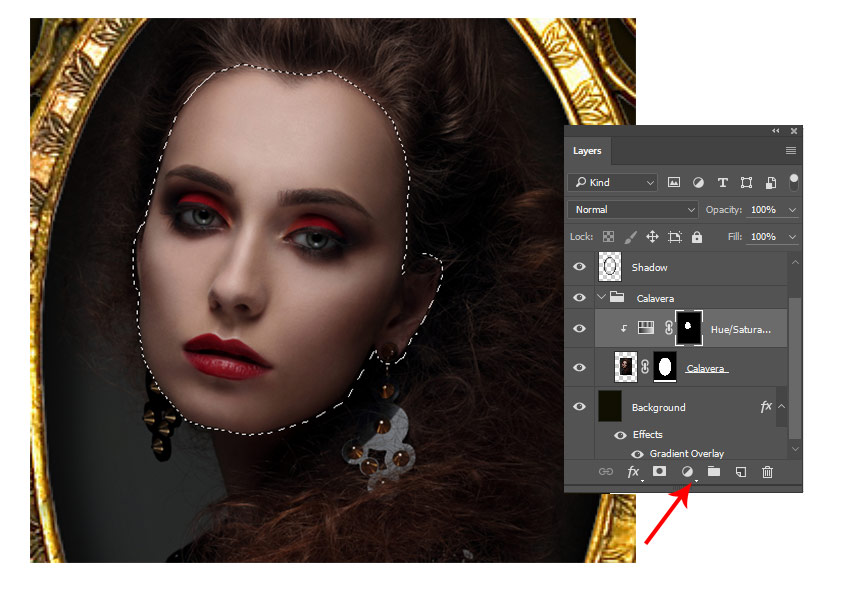
The base for every calavera makeup routine is pale skin to simulate a white skull. To create our own white base, use the Polygonal Lasso Tool (L) to create a selection around the model’s face and ear. With the face selected, add a New Adjustment Layer of Hue and Saturation, which you can find on the Layers panel.

Step 2
Desaturate the color in her face by adjusting the Saturation to -67 and the Lightness to -12.

Step 3
Now that her face is pale, we’ll need to bump up the lighting of the overall portrait. Create a New Adjustment Layer of Levels, Right-click to set it as a Clipping Mask to the stock and adjust the RGB Channel with the following settings:

Then follow up with another Adjustment Layer set as a Clipping Mask, this time Brightness and Contrast with the following settings:

Step 4
The last steps we’ll take for now include adjusting her hair color and lips. Create a New Layer set to Multiply and use the Brush Tool (B) with a Hard Round Brush to paint red #55130b all over the woman’s hair. Finish by adjusting the Opacity to 40%.

Step 5
We also need to change the model’s lip color to appear more pale. To do this, create a New Layer set to Color. Use the Brush Tool (B) to paint a light tan color (#d9d0cd) over her lips. Then Control-J to Duplicate the layer and set the copy to Linear Light. Adjust the Opacity to 23% and softly erase any harsh edges with the Eraser Tool (E).

4. How to Paint Dia de Los Muertos Makeup
Step 1
Now that we’ve got a great base for our model’s face, we can move on to creating the makeup. Create a New Layer and use the Brush Tool (B) with a Hard Round Brush to start drawing the outline of your makeup.

Step 2
Fill the eyes and nose with black before moving on to the rest of the shading. Then switch to a Soft Round Brush with 0% Hardness to begin painting black shadow along the angular parts of her face for more contour and shadows.

Step 3
Again, use a Hard Round Brush to continue adding more detail to the calavera makeup. Draw flower details, lines for her skull teeth, dots, and a spider web along her chin.

Incorporate some red #3f1821 into the makeup for added contrast and color. Use the Eraser Tool (E) at any time to help lift some color and lighten up your details.

Step 4
No calavera portrait would be complete without some beautiful flowers. Copy and Paste the Red Rose Stock onto the canvas and adjust the size with the Free Transform Tool (Control-T). Place the rose onto the right side of her hair, and then go to Blending Options to add a quick Drop Shadow with the following settings:

Adjust the lighting and color of the rose with two New Adjustment Layers set as Clipping Masks to the rose. First use Hue and Saturation, then Curves with the following settings:

Here is what the portrait looks like so far after these adjustments.

5. How to Finish the Overall Lighting and Colors
Step 1
Now it’s time to make this portrait shine! Let’s start by adding more color to this manipulation. Create a New Layer set to Color Dodge. Use the Brush Tool (B) to paint bright blue in the background of the stock and bring some of the color onto the model’s face and hair to show the reflected light.

Then set a New Layer to Vivid Light and continue painting more highlights along her hair, face, and eyes. You can paint fun glittery details by painting dots with a Hard Round Brush and softly erasing some away with the Eraser Tool (E).

Step 2
We haven’t looked at the frame for a while now, so let’s get rid of that bright gold color. First, go to Blending Options and create a quick Drop Shadow with the following settings:

Now set a New Adjustment Layer of Hue and Saturation as a Clipping Mask to the frame. Bring down the Saturation to -72 to remove that harsh gold.

Step 3
We can also paint shadow onto the scene to help the lighting. First add a New Layer set as a Clipping Mask to the frame. Use the Gradient Tool (G) to apply a black to transparent gradient to the top and bottom portions of the frame. When you’re finished, set the Layer Blend Mode to Linear Burn and adjust the Opacity to 40%.

Now create two New Layers above the frame to adjust the shadows of the entire scene. Set the Layer Blend Modes to Multiply and use a Soft Round Brush to paint black shadow at an angle. Adjust the Opacity to 67% and 90%, or whatever works best for your look. Leave the middle free of any shadow to showcase the portrait.

Step 4
The portrait is looking a little dark, so let’s brighten it up a bit! Add a New Layer set to Overlay. Paint white along the middle part of the scene where there isn’t any shadow using a Soft Round Brush. Sprinkle some light onto other areas of the frame to make the lighting more interesting.

Step 5
Finish this photo manipulation with a few Adjustment Layers. The first two are Color Lookup and Gradient Map. Create these Adjustment Layers with the following settings, remembering to set the Gradient Map to Luminosity with an Opacity of 26%.

Last but not least, add two more Adjustment Layers. Add a bright blue #323eb8 Color Fill set to Lighten with an Opacity of 11%, and a Levels adjustment with the following settings:

That’s it! Enjoy the final result of this photo manipulation below!
Conclusion
I hope you’ve enjoyed creating this glamorous calavera portrait to celebrate Dia de los Muertos. Not only were we able to create a unique portrait, but we created it all by using non-destructive techniques. Use these techniques for future photo manipulations to make your work so much better.
Let me know if you have any questions in the comments. Looking for more fun photo manipulation tutorials? Check out the following links below:
- How to Create a Dark Gothic Portrait Photo Manipulation With Adobe Photoshop
- Photoshop in 60 Seconds: Paint Halloween-Inspired Skull Makeup
- How to Create an Energetic Paint Splashing Effect in Adobe Photoshop

{excerpt}
Read More