
Drawing Kawaii animals is always fun. But this is much more fun—you can
let free your imagination and creativity. ?In this tutorial, you will
see how fun and easy it is to make different Kawaii animals from one
figure. By following all the steps, you will learn how to use the warp
effect, move anchor points and use the Pathfinder panel. You will also learn
how to use the Line Segment Tool and the Reflect Tool.
If you want to see more kawaii animals, you can find hundreds of great illustrations over at Envato Market.
1. Draw the Rabbit
Step 1
Open your Adobe Illustrator and
create a new document with 850 x 850 px Width and Height. First, we will
start to draw the head of the rabbit. Using the Ellipse Tool (L), draw
an oval. In the image below, you can see which fill and stroke colors
you need. Select two side anchor points with the Direct Selection Tool
(A), and move them down using the Down Arrow key on your keyboard.
If you see that the top of the head is very pointy, expand the top handles of the ellipse anchor point.

Step 2
To make the signature kawaii googly eyes, create an ellipse
using the Ellipse Tool (L). Add a tiny white circle to brighten up the
eye. Select this eye and while holding the Shift and Alt keys, move it
to the right. You will get another copy of it to complete the eyes.

Step 3
For the nose, create a dark brown ellipse (the same fill color
as eyes) and make a sharp base using the Convert Anchor Point Tool
(Shift-C).

Step 4
Let’s add a cute mouth with the Arc Tool.
Delete the
fill color and make sure you have the same stroke color as for the head.
Check Round Cap on the Stroke panel. Let’s first draw one side of the
mouth. Choose the Direct Selection Tool (A), and then select the right or
left anchor point and move its handles to make a more pronounced curve
of the arc. Attach this shape to the sharp point of the nose.
To create
the other side of the mouth, select this arc, right-click your mouse
> Transform > Reflect, choose Vertical, Angle 90 degrees, and press
Copy. Move the created copy of the mouth to the left using the Left
Arrow button on your keyboard.

Step 5
Now let’s draw the body of our kawaii rabbit. Using the
Ellipse Tool (L), draw an oval. Then go to Effect > Warp > Fish to
form the shape of a body. Use the Warp options shown below. Then expand
the warped shape: Object > Expand Appearance. (Don’t you agree that
the unwarped body shape makes the rabbit look like a seal? Take a copy
of the rabbit, add fins, and voila! You will have a kawaii seal!)

Step 6
Let’s return to the rabbit. To draw the forelegs, start
with an oval again. Select the bottom anchor point with the Direct
Selection Tool (A), and move it to the right using the Right Arrow key
on the keyboard to create the shape, similar to the image below. ?
Now
we will cut a piece of the shape. Select the Scissors Tool (C) and
click on the points shown with red circles in the image below.
After that, switch back to the Selection Tool (V) and move this piece
out from the shape and delete it.?
Make another ellipse, expanded
horizontally. Move its right and left anchor points down, using the
Direct Selection Tool (A) to select and Down Arrow key for movement.
Make a copy of this shape in front (Control-C, Control-F) and make it
narrower (using the Selection Tool (V)).

Step 7
To create another foreleg, select the one created from the
previous step, right-click your mouse > Transform > Reflect,
choose Vertical, Angle 90 degrees, and press Copy. Move the created copy of
the foreleg to the right using the Right Arrow button on your keyboard.

Step 8
Let’s draw the hind legs. Draw another ellipse. Using the
Direct Selection Tool (A), select the left and right anchor points and move
them down. Take the copy of the paw from the previous step, where you
created the forelegs. In the end, slightly rotate the big vertical
ellipse to the left.

Step 9
Attach the created hind leg to the rabbit’s body. Place it in
front of the body but behind the forelegs. Let’s create the right hind
leg. Select the left hind leg, take the Reflect Tool (O), hold down the
Alt key, and click in the middle of the body. In the new dialogue
window, select Vertical, Angle 90 degrees, and press Copy. Move the
created hind leg to the right side.

Step 10
For the ears, we will first start by building two ellipses
(white and coral). Move the top anchor point of the white ellipse down
by using the Direct Selection Tool (A) and Down Arrow key. Make a third
large white ellipse and deform it by using the Direct Selection Tool (A)
and by adjusting the handles of the anchor points to get the image,
similar to the one shown below. Rotate the first two ellipses to the right.
At
the end, cut a small part of this shape where it’s marked: Select the
Scissors Tool (C), click on the points that are marked red, and delete
the unnecessary parts of the stroke. This is the ear for our rabbit.

Step 11
Attach the ear to the head. Make sure that the ear stays
behind the head. To place it behind, select it and press Control-X,
Control-B. Make a reflected copy of the ear: select the ear, right-click
the mouse > Transform > Reflect. A dialogue window will pop up,
where you should enter Axis Vertical, Angle 90 degrees, and press Copy.
Move this copy to the other side.? Now our cute rabbit is ready!?

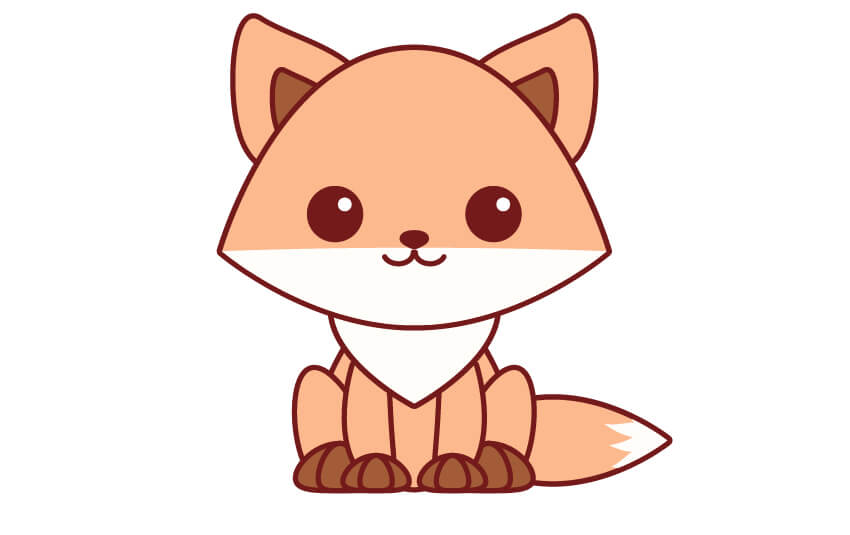
2. Draw the Fox
Step 1
In this step, we will simply take a copy
of our rabbit’s body and change its color to the one shown below. Let’s
also change the color of the paws.

Step 2
For the head of the fox, we will start with an ellipse. Using
the Convert Anchor Point Tool (Shift-C), make sharp corners on the
ellipse; while keeping the ellipse selected, click on the left and right
anchor points—these two points should be sharp now. Keep the sharp
anchor points selected and press the Down Arrow button on your keyboard a
few times.

Step 3
Make a new copy of the head in front (Control-C, Control-F).
Add another white ellipse which overlaps the head, with no stroke, just a light fill color. Keeping both shapes selected (ellipse with no stroke
and the copy of the head), press the Intersect button in Pathfinder.
On the Stroke panel, press Align Stroke to Outside.

Step 4
Place the head on the body. For the face, we’re going to take
it from the rabbit. So copy the eyes, the nose and the mouth, which we
created for the rabbit, and place them on the head of the fox.

Step 5
To make a furry chest, draw an ellipse and place it behind the
head. For this ellipse, use the same fill color as we did for the
bunny. To do this, use the Eyedropper Tool (I). Keep the fox’s chest
shape selected and press the Eyedropper Tool (I). Then hit the cursor on
the bunny. ?
Next, make the bottom anchor point on this ellipse pointy by clicking on it using the Convert Anchor Point Tool (Shift-C).

Step 6
For the ear, we will start by making an ellipse. Take the
Direct Selection Tool (A), shift the side anchor points down and move
the handles of the anchor points of the ellipse to create the shape
shown in the image below. Copy-paste this shape in the front and make it
smaller and darker.

Step 7
So that was the left ear. For the right one, hit the Reflect
Tool (O) and make a reflection of the whole ear as you did for the
bunny. Place the right ear on the right side of the head. ?
We can now
also align everything if you didn’t do this before. So, select the two
ears and group them together (right-click > Group), and then group
the two eyes, the nose and the mouth, the two forelegs, and the two hind legs.
Select all, and on the Align panel, press Horizontal Align Center.

Step 8
And of course, the tail. We will also start with an ellipse.
Make the right and left anchor points on this ellipse pointy. Copy this
shape (Control-C, Control-F) to have two copies on top of each other.
Next, using the Pencil Tool (N), draw the shape, as in the image below.
Remember to hold the Alt button before finishing this shape; it will
help you to close the path. Also, remove any stroke colors from this
hand-drawn shape. Keep it selected, and while holding the Shift button,
select the top copy of the tail. Hit the Intersect button on the
Pathfinder panel (Window > Pathfinder). On the Stroke panel, press
Align to Outside. Our tail is ready. ?

Finally, place the tail behind the fox: press Control-X, Control-B. Our transformation of the bunny into the fox is finished!
3. Draw the Frog?
Step 1
For this character, we will use the
bunny’s body and the head again. Since it’s a frog, let’s select a green
color and give it a flatter head.

Step 2
Draw two circles for the eyes. To create an even circle, hold
down the Shift key. Select the three shapes (the flattened ellipse and two
circles) and using the Unite button on the Pathfinder panel (Window >
Pathfinder), unite them. Finally, add the eyes and the mouth, by taking
them from one of the previous animals. Here we go—our frog is already
finished.

4. Place All the Animals Together
Place all three characters together and see what you’ve created! Aren’t they cute?

5. Create the Accessories
Step 1
Let’s give the bunny a carrot.
Take a part of the bunny’s body, for example, one finger from the paw.
Change the color of this shape, turn it upside down, and move the bottom
anchor point down. Behind the orange shape, add a thin green ellipse.
Make two more copies of this ellipse and slightly rotate them in
different directions to create leaves for our carrot. ?Finally, add a
few small brown lines using the Line Segment Tool (\) with no fill
color.

Step 2
For the fox, let’s add some mushrooms. Take the carrot shape,
change its color, and turn it upside down. Make a copy and place it on
the top for the mushroom’s “hat”. Change the mushroom’s hat color to
brown (like the fox’s paws). Make a smaller copy of the whole mushroom and slightly rotate the
new mushroom.

Step 3
Let’s create a water lily for the frog. Make a copy of the
fox’s tail and delete its white part. Change the color from orange to
pink, make two more copies of this shape, and rotate them to the left
side. Add two more symmetrical copies on the right by selecting the two
rotated shapes, right-click > Transform > Reflect, Axis Vertical,
Angle 90 degrees, and pressing Copy. Move the two new petals to the
right side to have a symmetrical lily.

Step 4
Place all the created images together: carrots near the rabbit, mushrooms close to the fox, and the water lily near the frog.

6. Make a Complete Image
Step 1
Draw a square behind all images with 850 px width and height, and set the fill color presented in the image below.

Step 2
Using the Line Segment Tool (\), draw three lines below the
created characters with no fill. To make the lines straight, hold down
the Shift button as you are drawing the line.?

To hide the unnecessary parts, add rectangles under all three lines with
the same fill color as the background and no stroke color. (The green
stroke in the image is only to show you where the rectangles go.)

Step 3
To finalize our image, add three darker circles behind each
character. Pay attention while placing these circles—place them behind
our characters, lines, and rectangles, but above the large square
background.

Conclusion
Congratulations, your kawaii illustration is done! You
see—it’s not difficult to make a transformation from one object to
another. You just need a little imagination and creativity. I hope you
found some useful tricks and have enjoyed this tutorial!

{excerpt}
Read More