Roll up, roll up! In the following tutorial you will learn how to create a simple circus tent icon. You may discover some interesting things about the magic of Warp effects. Warp effects are often overlooked in digital illustration, but as you can see, they make some really nice results.
Step 1
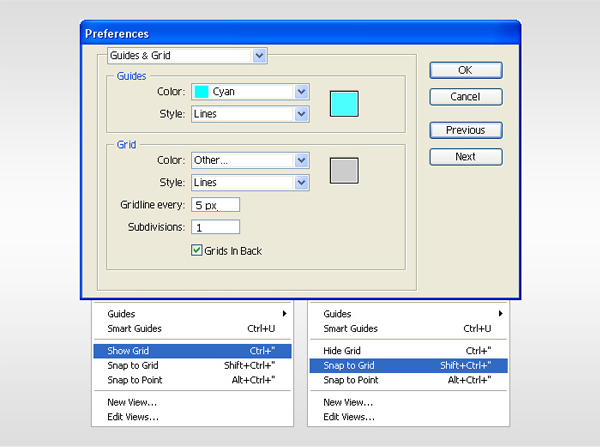
Create a 256 by 256px document. In this tutorial you will create a series of shape with exact dimensions. To make your work easier you will need turn on the Grid (View > Show Grid) and turn on the Snap to Grid (View > Snap to Grid). Next, you’ll need to set the grid to every 5 pixels. Go to Edit > Preferences > Guides & Grids and enter "5" in the "Grid line Every" box and "1" in the "Subdivisions" box. You can also open the Info palette for a live preview with the size of your shape.
Step 2
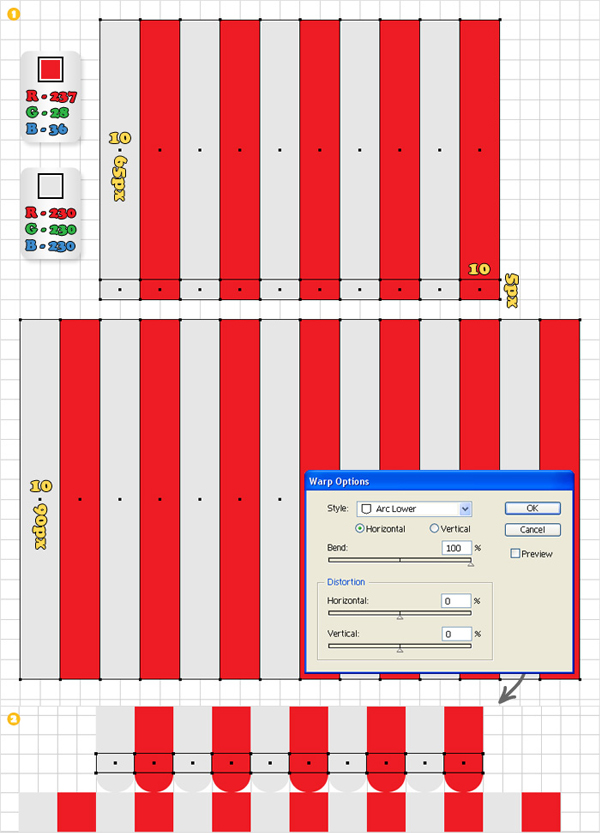
Now, let’s create the shapes. Create a 10 by 65px rectangle with the Rectangle Tool (R), fill the new shape with R=230 G=230 B=230. Create a copy of this shape (Control + C then Control + F), move it 10px to the right and change its fill to R=237 G=28 B=36. Create four new copies of these two shapes and move them as shown in the image below. Select the ten shapes and group them together. Name the group "Top.Shapes".
Create a 10 by 5px rectangle and fill it with R=230 G=230 B=230. Duplicate this small shape, fill it with R=237 G=28 B=36 and move it 10 px to the right. Once again, create four new copies of these two shapes and move them as shown in the following image. Select all the small shapes and group them. Name it "Middle.Shapes" and place it right below “Top.Shapes” (the snap to grid will ease your work).
Create a 10 by 90px rectangle and fill it with R=230 G=230 B=230. Duplicate this shape, move it 10 px to the right and fill it with R=237 G=28 B=36. Create six new copies of these two shapes and move them as shown in the image below. Select these fourteen shapes, group them and name this group "Bottom.Shapes". Place this group as shown in the following image. Take a closer look at the grids to understand the precise position. Add the Arc Lower effect (Effect > Warp > Arc Lower) for each shape from the "Middle.Shapes" group.
Step 3
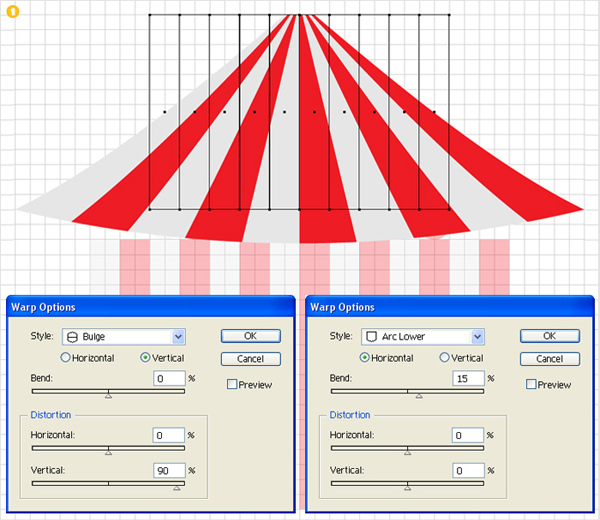
Select the "Top.Shapes" group. First add the Bulge effect (Effect > Warp > Bulge) then the Arc Lower effect (Effect > Warp > Arc Lower).
Step 4
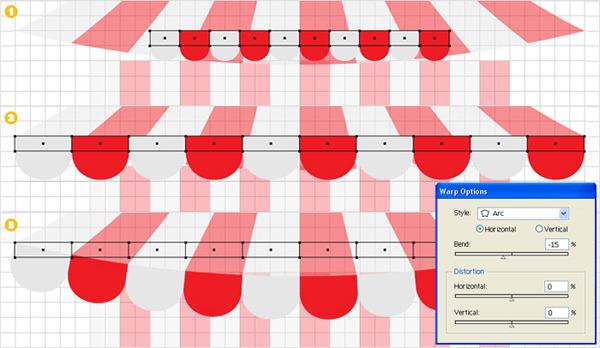
Select the "Middle.Shapes" group. Resize these shapes (as shown in image #2) then add the Arc effect (Effect > Warp > Arc) shown in image #3.
Step 5
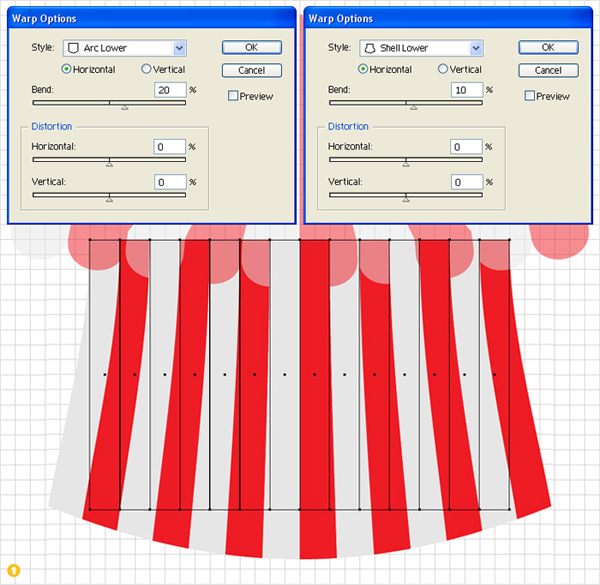
Select the "Bottom.Shapes" group. First add the Arc Lower effect (Effect > Warp > Arc Lower) then the Shell Lower effect (Effect > Warp > Shell Lower).
Step 6
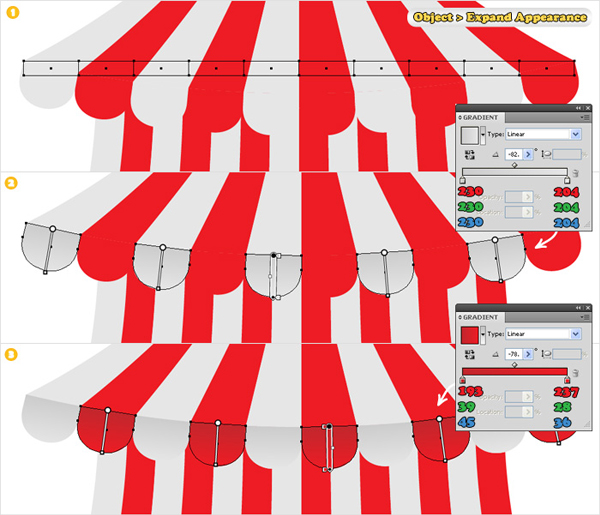
You wont need the grid any more. Turn the Grid and Snap to Grid off. Continue by selecting the "Middle.Shapes" group and go to Object > Expand Appearance. Fill the grey shapes with the linear gradient shown in image #2 and the red shapes with the gradient shown in image #3.
Step 7
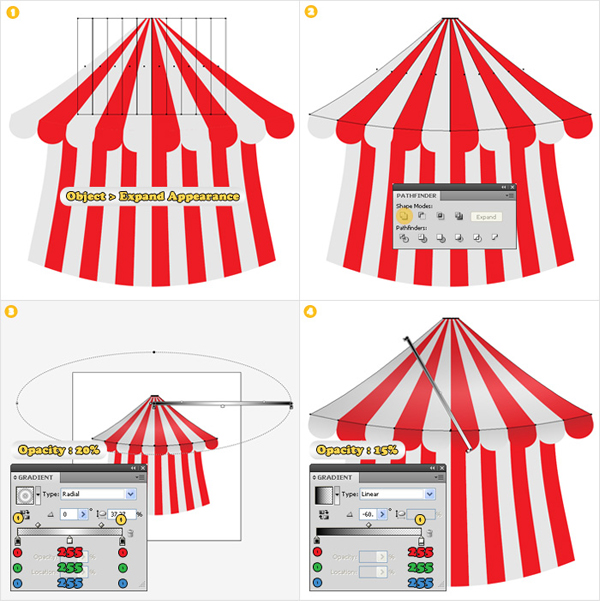
Select the “Top.Shapes” group and go to Object > Expand Appearance. Duplicate the resulting shapes. Select these copies and click on the Unite button from the Pathfinder panel. Fill the resulting shape with the radial gradient shown in image #3 and lower its opacity to 20%. Add a new fill for this shape (from the flyout menu of the Appearance panel) and use the linear gradient shown in image #4. Select this fill (from the Appearance panel) and lower its opacity to 15%.
Step 8
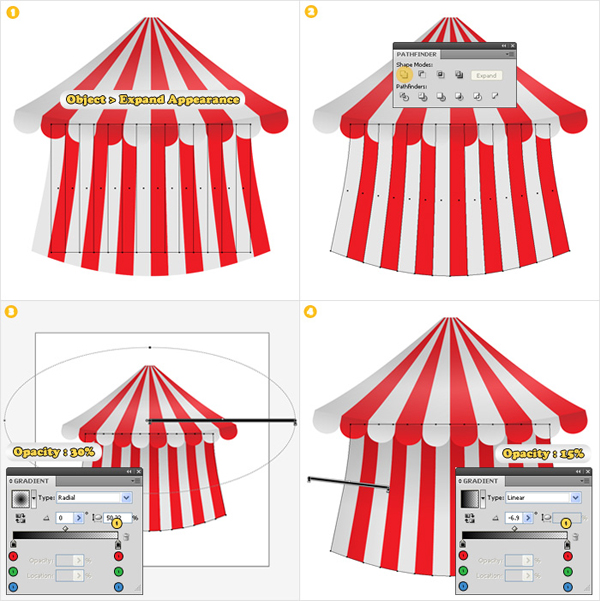
Select the "Bottom.Shapes" group and go to Object > Expand Appearance. Duplicate the resulting shapes. Select these copies and click on the Unite button from the Pathfinder panel. Name the resulting shape "Bottom" and fill it with the radial gradient shown in image #3. Select this fill (from the Appearance panel) and lower its opacity to 30%. Add a new fill for this shape (from the flyout menu of the Appearance panel) and use the linear gradient shown in image #4. Select this fill (from the Appearance panel) and lower its opacity to 15%.
Step 9
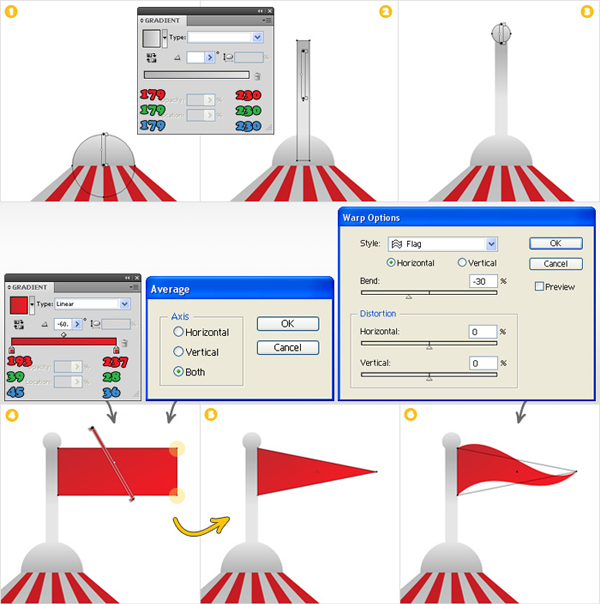
Select the Ellipse Tool (L), hold Shift and create a circle like the one shown in image #1, place it in the top of the tent. Fill this shape with the gradient shown in image #1 and send it to the back. Next, select the Rectangle Tool (M), create a thin shape like the one shown in image #2, fill it with the same gradient and move it in the back of the circle. Reselect the Ellipse Tool (L), create a small circle (image #3), place it in the top of the rectangle and fill it with the same linear gradient.
Continue with the flag. Select the Rectangle Tool (M), create a shape like the one shown in image #4 and fill it with the gradient shown above image #4. Reselect this rectangle, pick the Direct Selection Tool (A), select the right anchor points (highlighted in image #4) then go to Object > Path > Average. Check the Both box and press enter. Select the resulting shape (image #5) then add the Flag effect (Effect > Warp > Flag) shown above image #6.
Step 10
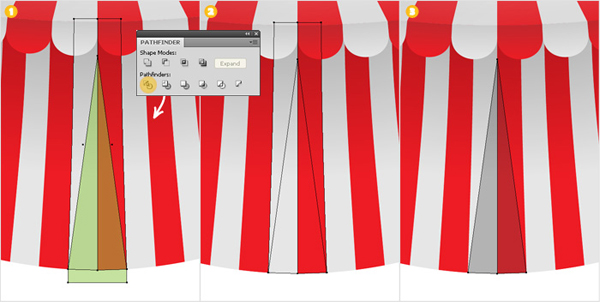
Next, create a little opening in the tent. First lock the "Bottom" shape. Next, select the Pen Tool (P) and create a shape like the green one shown in image #1. Select this new shape along with the other two shapes (shown in image #1) and click on the Divide button from the Pathfinder panel. Keep only the four shapes shown in image #2.
Step 11
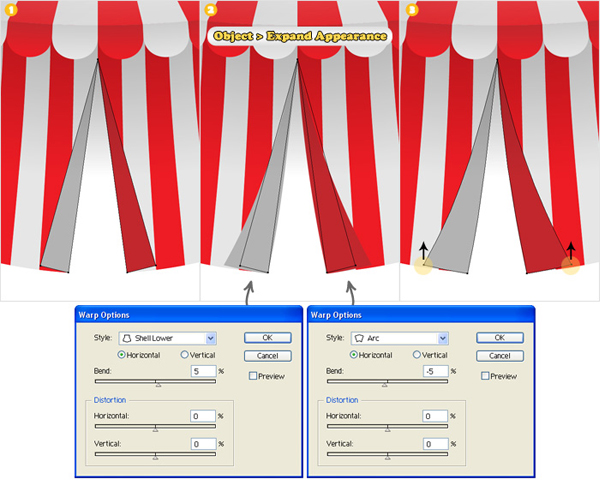
Select the Reflect Tool (O) and move the darker shapes as shown in image #1. Add the Shell Lower effect (Effect > Warp > Shell Lower) for the left shape and the Arc effect (Effect > Warp > Arc) for the right shape then go to Object > Expand Appearance. Next, move the highlighted anchor points (image #3) a few pixels up with the Direct Selection Tool (A).
Step 12
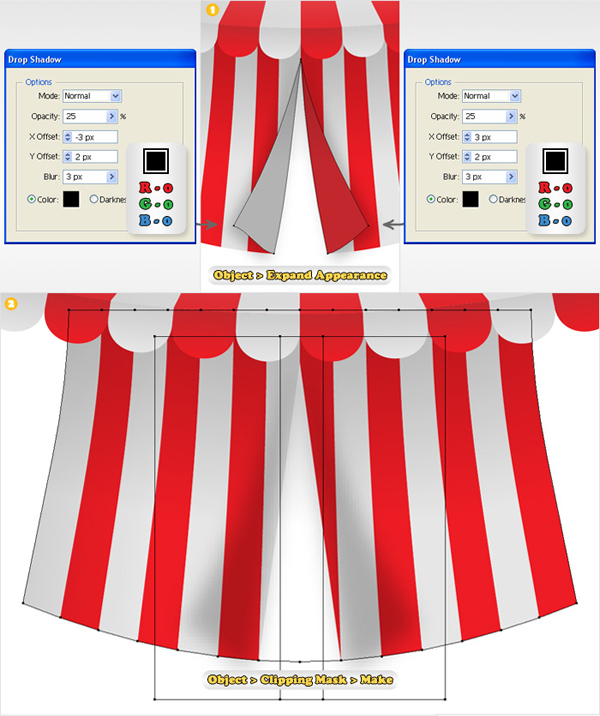
Now, add a discrete drop shadow effect for the darker shapes. Add the drop shadow effects shown in the following image then go to Object > Expand Appearance. You should get four shapes. Turn of the visibility of the two shapes filled with grey and red and group the two < Image > shapes. Unlock the "Bottom" shape and duplicate it. Fill this copy with none and move it above the < Image > group. Next, select this group and the copy of "Bottom" and go to Object > Clipping Mask > Make. Move this masked group below the original "Bottom" shape.
Step 13
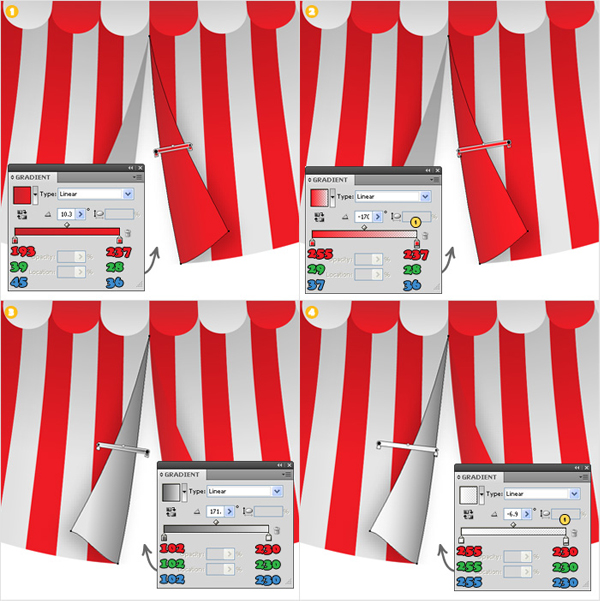
Relock the "Bottom" shape. Turn on the visibly of the two shapes filled with red and grey and move them just below the "Bottom" shape. First focus on the red shapes. Change the fill with the gradient shown in image #1. Add a new fill for this shape and use the gradient shown in image #2. Move to the grey shape. First fill it with the gradient shown in image #3 then add a new fill and use the gradient shown in image #4.
Step 14
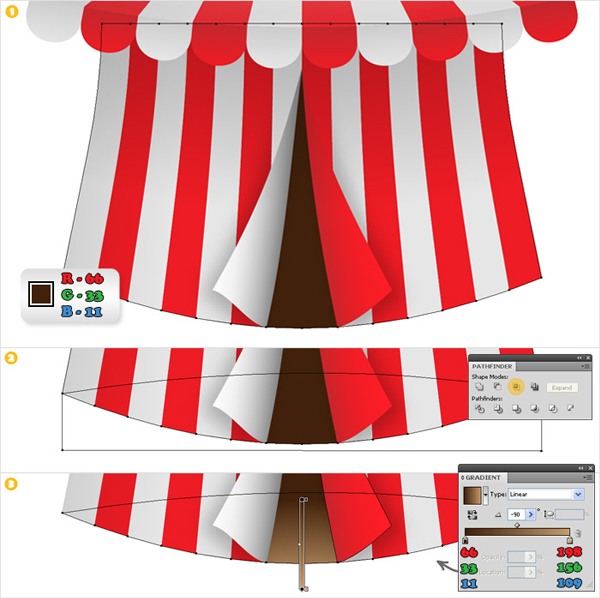
Now for the interior of the tent create a copy of "Bottom" and move it to the bottom of the Layer panel. Fill it with R=66 G=33 B=11, name it "Interior" and duplicate it. Select the Pen Tool (P) and create a shape like the one shown in image #2. Select this new shape along with the copy of "Interior" and click on the Intersect button from the Pathfinder panel. Fill the resulting shape with the gradient shown in the final image then move it just above the original "Interior" shape.
Step 15
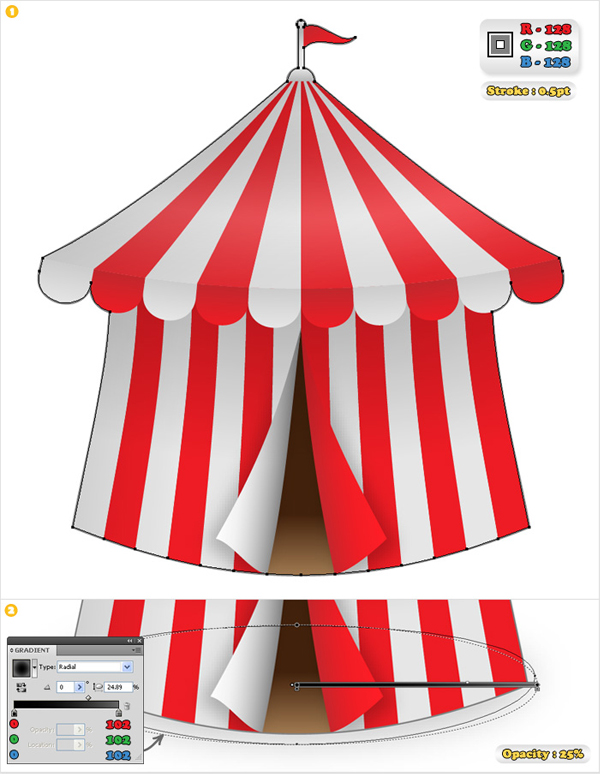
Duplicate the shapes created so far. Select these copies and click on the Unite button from the Pathfinder panel. Fill this new shape with none and add a 0.5px stroke aligned to the outside (color R=128 G=128 B=128). Finally create a circle in the bottom of the tent with the Ellipse tool (L). Send this shape to the back, fill it with the gradient shown in the final image, lower its opacity to 25% and you’re done!
Conclusion
And there you have it, you can now go ahead and make the different icon sizes. I hope you’ve enjoyed this tut.
