Paint Tool SAI is a lightweight, Japanese digital painting program which is very popular among artists due to its simplicity and vast range of tools. This tutorial is a basic guide which will be useful both for beginners and for people who want to learn more about the potential of Paint Tool SAI. Also you’ll learn more about all its panels and tools, how to modify tools to suit your needs, and some tricks. Let’s get started!
Paint Tool SAI Panels
In Paint Tool SAI you have two main panels to work with: the Color and Tool Panel on the right and the Layer Panel on the left. You can change their location in the Window (W). Further controls are available through the Quick Bar at the top.

Step back can assist when you want to go back from the recent action. You can use this step more than 10 times, so you’ll have no worries when something goes wrong. Rotating the canvas can help when you’re drawing from some difficult angles. The Reset button returns the view and rotation to default. Flipping the canvas gives you a fresh view of your artwork and helps you to find possible mistakes.
Get to Know Your Color Panel
All Palette types can be accessed from the top bar of the Color and Tool Panel or in Window (W). We’ll look at each of them now.
Color Wheel is an organization of color hues around a
circle that shows how colors relate to each other. Using this palette you can
easily work with primary, complement and other color combinations. You can find out more about color
combinations in color theory. Inside the wheel is an area with
different shades of a single color.

RGB Slider allows you
to manipulate colors on the Color Wheel, changing their hue and value.

HSV Slider stands for
Hue, Saturation and Value, so that moving this slider you can change these
properties of the color.

Color Mixer in this program uses grayscale to change
values, which can be very helpful if you start drawing with the grayscale first
and then applying color.

Swatches are a place where you can save all your favorite
colors. To do that, first make sure that you’ve selected the desired color, and then
right click on a swatch and choose Set, and this color will be saved in the
Palette. I usually save colors I use the most and skin tone colors.

Scratchpad is a place where you can mix any kind of colors without worries, because it won’t affect your main canvas. After you’ve achieved a nice result, you can apply this color on your artwork or clean the Scratchpad and start over.

What Is the Tool Panel?
Selection Tools
Our first set of tools is all about selection. There we have Selection, Lasso, Magic Wand, Move, Zoom, Rotate, Hand and Color Picker. Also you can change or switch Primary and Secondary color on this panel or make the color transparent.

Transform Tools
Rectangle Selection tool also gives us all transformation tools, such as Transform (Command-T) to scale and rotate. Hint: press Shift if you want to transform an area with the same proportions.
Also there are Scale and Rotate tools—basically they have the same functions as Transform. The Free Distort tool allows you to make perspective and change proportions of the selected area.
Below you can find the Flip Horizontally, Flip Vertically, Rotate 900 CCW, Rotate 900 CW tools, which can also be accessed from the Canvas (C).

Drawing Tools
If you want to be successful with your digital
paintings, you should definitely get to know your Drawing Tools panel.

First of all, I want to mention that every version of Paint Tool SAI can have slightly a different set of tools. For example, some versions can also have Brush or Water Brush, but basically it’s just their naming that differs. So, the Blur tool acts the same as Water Brush and so on. You can change the settings and create an infinite amount of painting possibilities with just one brush. Try it and see what works best for you!
Also you can make your own hot keys for every tool by double-clicking the tool icon, or via Others (O) > Keyboard Shortcuts.

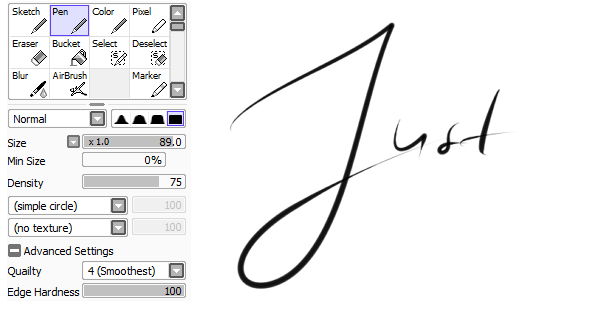
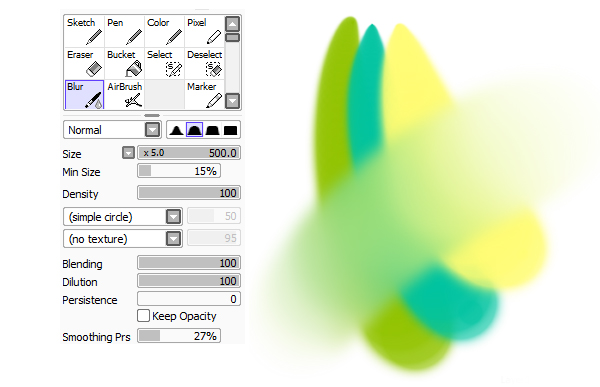
All tools can be customized to your painting needs, but you’ll see that they each have their speciality. For example, Sketch is useful for quick, rough line art, Pen gives you better, smoother lines, and the Color tool is very nice for blending colors—just like working with real watercolors. Blur is generally used for blending as well, but the result of the Blur and Color tools is different. Which tool to choose is up to you, and Paint Tool SAI gives us big variety.

Below the tool panel you can find the main settings for your drawing tools, like Edge Shape, Size, Min Size, Density and Texture, and also some Advanced Settings that could be different in each tool. Get familiar with these settings and experiment with a couple of strokes.

Edge Shape makes your lines soft or hard, which can have an interesting impact on your drawing. Using Size you can make your brush very small for detail or very big for color blocks and solid color areas. Min Size means how much of the color will fill the edges of the stroke. Density in this case controls the opacity of your drawing tool.
Besides, with every version of Paint Tool SAI comes some built-in textures. They will add detailing to your art, making it more visually appealing. However, you can also make these textures on your own or download them, and then add them to the Paint Tool SAI texture folder.

Back to the Blur tool—unlike the Color tool it blends original colors and changes them to a completely different tint. Be careful with that, because sometimes overusing this tool can lead to dirt on your artwork, when colors look unclear and pale.

Select and Deselect are tools that work in a pretty straightforward way. Using them as a brush you cover all places you want to be selected or deselected, and that’s it. After you’ve made a selection, you can move to another layer, and paint there, and still you’ll be working inside the selected area, until you hit Clear Selection on the Quick Bar.

And that’s it for our Color and Tool Panel! Hope you’ve found some useful tips and now have better understanding of how it works. Now we’re moving to the…
Guide for the Layer Panel
First is our Navigator Panel, which can also be used for quick preview. The preview window is helpful for quick navigation or rough overview. It’s a good habit to switch between a small part of an artwork and the overall picture. Canvas zoom and rotation are controlled by moving sliders or buttons.

Then we have the Paint Effects panel, which includes Texture and Effect. Below you’ll see Layer Mode and Opacity with helpful layer tricks below. Let’s look at them closely.

In Paint Tool SAI you can find some built-in textures, or make them by yourself. These textures are applied to the whole layer, and you can add only one texture on each layer. Besides, changing the scale and opacity of the texture you can achieve slightly different results. So again, don’t be afraid of experimenting.

Moreover, Fringe Effect (in some versions of the program called Wet Edges) gives your artwork an almost watercolor feel! It’s like an imitation of the real-life painting which makes your drawings even more interesting.

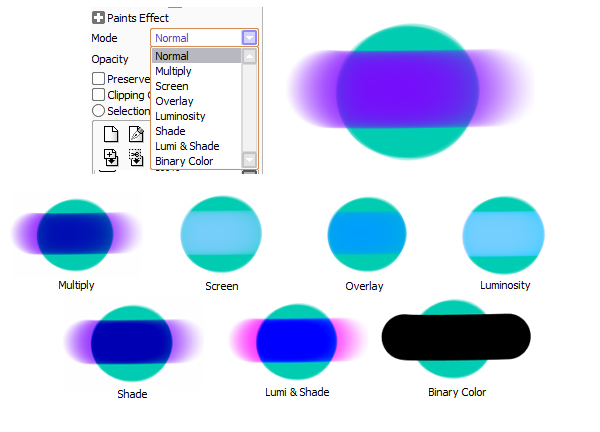
Now let’s get to Layer Mode, which allows us to blend two or more layers into each other.
Normal Mode allows us to cover the layer beneath with a new layer on top, without mixing their colors.
Multiply, Shade and Screen modes are used for darkening and lightening pictures. Screen has the opposite effect of Multiply. Use these layer modes for shadows and highlights.
Luminosity acts almost like Screen mode, but adds even more brightness.
Overlay mode combines Multiply and Screen modes, so light parts beneath this layer mode become lighter, and dark parts become darker. Lumi&Shade works almost the same way, although again this mode adds even more brightness and glow.
The easiest mode is Binary—all it does is just cover everything in black. But try to change the opacity of the layer with Binary mode—it’ll change its color completely.

Below Mode and Opacity you can find two interesting settings: Preserve Opacity and Clipping Group.
Preserve Opacity makes all lines and fills of a layer locked, so you won’t get away from its edges and always paint inside the lines. It’s very useful when you want to change the color of your line art or change blocks of color without affecting other colors and areas.
Clipping Group acts like a mask, and when you paint on the top layer with Clipping Group turned on, your strokes will always be just inside the painted area of the layer beneath.

Next is the Layer Panel, where you can create new layers and groups, merge the content of layers together, clear and delete layers, and also work with layer masks.
New Layer creates a new usual layer, while New Linework Layer opens its vector tools for you. New Layer Set acts like a group of layers, so when working you can organise your layers and won’t get lost.
Transfer Down Layer basically sends the content of the layer to the layer beneath it, while clearing the top layer. Merge Down Layer combines the content of two layers together and deletes the top layer.
Clear Layer empties all its content, while Delete Layer simply gets rid of it.

We Made It!
I hope now you know a lot more about Paint Tool SAI and this guide was useful for you. Once again, if you don’t feel comfortable working in this program yet, just spend some more time and practice in it, and you’ll see how easy it is. Try to experiment with settings, discover something new, and you’ll be inspired to find your way with Paint Tool SAI. Good luck!
{excerpt}
Read More