
Join me and follow
this joyful and meditative tutorial if you wish to learn some simple coloring
techniques in Adobe Illustrator. We’ll use the Mesh Tool while
drawing a cute cartoon cow, floating in the yoga Lotus Pose above a green
meadow. Grab your mouse or tablet pen, relax your mind, and let’s get started!
1. Create the Basic
Cow Shapes From Your Sketch
Step 1
Start by making a
rough sketch either on paper or digitally. You can use my image, which I
doodled with the Pencil Tool (N) right
in Adobe Illustrator.

First of all we are
going to form the basic shapes of the head. Use the Rounded Rectangle Tool with 50 px
Corner Radius to make a smooth shape for the nose, and use the Warp Tool (Shift-R) (you can check my tool settings in the screenshot below) to deform the nose, making a slight bulge on
its upper part. Add the cow’s lower lip and warp it as well, dragging its lower
part down a bit.

Step 2
Change the fill color
on the nose to more of a skin tone, and add an ivory-colored head base with
the help of the Ellipse Tool (L). Send
the head shape to Back (Shift-Control-[)
and draw a pair of rounded shapes with the Pencil Tool (N), or use the Ellipse
Tool (L) as well to add two squashed ellipses.

Step 3
Let’s add the basic
horn shapes to our cow’s head. Form a squashed ellipse and head to Effect > Warp > Arc, setting the Horizontal Bend value to -7% to make the shape blob in the
bottom part. Object > Expand
Appearance and apply the Arc
effect again, this time setting the Vertical
Bend value to 60%, making our
shape slightly arched to the left.

Make a second horn
and place both behind the basic head shape.

Step 4
Move on to the
cow’s body. Create another rounded rectangle, placing it beneath all other
shapes, and edit it with the Warp Tool
(Shift-R), making it wider at the bottom.

Step 5
Draw a curved
trunk-like shape with the Pencil Tool
(N) (increase the Fidelity of
the Pencil Tool to make the shapes smoother) and form a rounded hoof, reminiscent of a horseshoe. Duplicate the
created arm and place its mirrored copy on the other side of the body with the
help of the Reflect Tool (R).

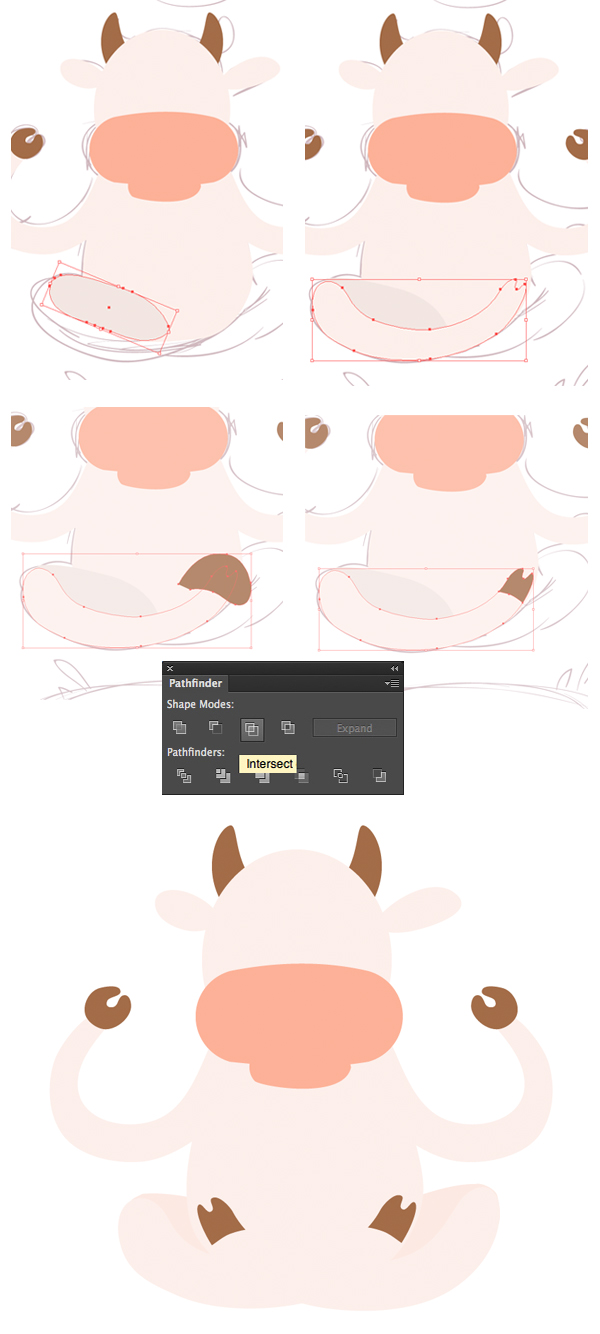
Step 6
Now let’s form the
cow’s legs, putting them in the well-known Lotus pose. Firstly, add a deformed
ellipse for the back part of the leg, filling it with a slightly darker color than
other body parts. Then use the Pencil
Tool (N) to form the curved narrow shape for the front part of the leg.
Make its tip forked, depicting a hoof.
Put a dark-brown freehand shape above
the hoof part and use the Intersect function
of the Pathfinder panel to cut off
the unneeded parts. Don’t forget to duplicate the leg shape before using the Pathfinder features, as it usually
deletes both interacting objects.
2. Use Mesh to
Color & Enliven the Objects
Step 1
Let’s start
enlivening our image from the very first element that we’ve created: the cow’s
nose. Select the shape and go to Object
> Create Gradient Mesh. Set 4
for the Rows and 3 for the Columns quantity in the pop-up options window, and click OK.
Now the fun part!
Arm yourself with the Direct Selection Tool (A) and
start coloring by selecting two upper anchor points in the middle part of the
nose and making them lighter than the basic nose shape. Then select all anchor
points at the edges of our shape and make them darker, forming a shadow along
the perimeter. You will notice the shape becomes more three-dimensional and smooth at
once.
Use the same
technique to color the cow’s mouth, making its upper part darker. You can turn
the shape into mesh directly with the Mesh
Tool (U) by clicking the object and then adding as many rows and columns as
you need by clicking with the Mesh Tool
(U) again in various parts of your shape (I usually click in the center and at the edges of the objects).

Step 2
Let’s add some
ambient lighting in order to make the surface even more realistic. Take the Mesh Tool (U) and click the central
vertical and horizontal lines closer to the edges, this way creating several
additional rows and columns (the lines will be crossing in the spot that you’ve
clicked).
Now take the Lasso Tool (Q) and
select the points on the newly created lines, making them a bit darker. Then select only the outermost points all the way along the edge of the shape. Press and
hold the Shift key if you can’t
select all the points at once. Finally, fill the selected points with lighter
pink color, making the edges glow.

Step 3
Let’s try the same
coloring method for the cow’s head. Firstly, Object > Create Gradient Mesh with 3 Rows and 4 Columns. Add
2 more rows and 2 columns very close to the edge, along every side of the shape, with the help of the Mesh Tool (U). Then
select those pairs of anchor points that are next to the edge and make the fill
color darker beige, leaving the central coloring ivory. As we see, the
shape becomes bulged and looks more like a sphere.

Step 4
Now do the same
trick with the Lasso Tool (Q) to create
an ambient occlusion effect. Select the outer anchor points along the perimeter
of the shape and make them much lighter, as if there is an additional light
source behind our character.

Step 5
When you’re
satisfied with the coloring, deform the head with the Warp Tool (Shift-R), making its lower
part wider than the top.
Move on to the
right ear, this time setting the Rows
value to 3 and the Columns to 2 in the Create Gradient
Mesh options window. Add more mesh lines along the edge of the shape and
apply the same colors as on the cow’s head to preserve the overall character
palette.

Step 6
Add the inner pinky
part of the ear and use the Reflect Tool
(R) to mirror the ear over the Vertical
Axis, placing its copy on the other side of the head.

Step 7
Let’s move on to
the horns and make them shiny and slick! Create a Gradient Mesh with 2 Rows
and 2 Columns and add several
additional rows and columns with the Mesh
Tool (U), making the cells of the mesh grid smaller.
Select a column of the
anchor points closer to the left edge and fill it with light-brown color,
making a bright highlight. Then select the similar column on the opposite side
of the horn and make it darker. Add gentle ambient lighting along the border of
the shape and color the second horn in the same way, or simply replace it with a copy of the finished one.

Step 8
Move to the central
part of the body, making it bulging and three-dimensional, just the same way as we
did with the head.

Step 9
As for the arm, you
might need to tweak the mesh a bit with the Direct Selection Tool (A) as it may look deformed at first when
applied to a curved shape. Select and move the anchor points and their handles
with the Direct Selection Tool (A)
just as we do it with a regular path. Color the arm to match the other parts
of the cow’s body.

Step 10
Start coloring the
“hand” or the upper hoof. Add new mesh lines with the Mesh Tool (U) one by one by clicking on the outline of the shape.
This might seem a bit tricky, but try to lay the lines along the shape, making
them curved, so that the hoof doesn’t look flat. Pick the color from the horns
using the Eyedropper Tool (I) and
make the hoof shiny.

As you can see,
every anchor point in our mesh has four anchor handles. You can move and edit
them with both the Direct Selection Tool
(A) and the Convert Anchor Point
Tool (Shift-C) in order to obtain a realistic result.

Step 11
The next element in
turn is the inner (or upper) part of the cow’s leg. Try making it a bit
darker as it is farther from the viewer than the front part and is covered in shadow from the body.

Step 12
Proceed to the
front part of the leg. Make its tip more rounded in order to make the mesh grid
more even.

Follow the usual
process—add more rows and columns with the Mesh Tool (U), placing them closer to the edges. Finally, apply the
colors, putting a bright overtone in the center and along the boundary of the
shape.

Pay attention to
the area where two parts of the leg overlap, forming a knee. Fill the edge
anchor points with the same color, so that the shapes blend nicely with each
other, making a bent leg.

Step 13
Make the hoof more three-dimensional by coloring it the same way as we did with the “hand” part and with
the horns. Enliven the element with bright hues of brown, achieving a smooth, glossy effect.

We’ve finished with
the main elements of our character and here is how it looks at this stage:

3. Add Minor
Details to the Cow
Step 1
Let’s start with the main parts by forming a pair of nostrils on the cow’s nose. Put a small
ellipse on the left side of the nose and fill it with radial gradient, going
from dark red in the center to bright orange at the edge, emphasizing the depth of the nostril hole. Add another ellipse beneath the first one, making it
slightly larger, and fill it with linear gradient from light pink to white.
Switch to Multiply Blending Mode,
thus forming a gentle shadow around the nostril in order to deepen it a bit
more.

Put two more
ellipses behind the nostril, one larger than the other, select them both and
use the Minus Front function of the Pathfinder panel to cut out a hole.
Fill the newly created shape with linear gradient from dark red to black,
switching to Screen Blending Mode to
make a highlight. Duplicate and reflect the nostril, placing it on the other
part of the cow’s nose.

Step 2
Form a group of
ellipses of various sizes in the upper part of the nose and fill them with
dark-red color, switching to Screen
Blending Mode, thus making the nose spotty and realistic.

Step 3
Let’s return to
the horns and make them more textured and sculpted. First of all, form the
notches by creating a squashed narrow triangle with the Polygon Tool and apply the Arc
effect with 43% Horizontal Bend
value, making the shape curved. Object
> Expand Appearance in order to apply the transformation.

Make several copies
and place the notches in the appropriate position above the horn. Select them
and Make Compound Path (Control-8).
Here we need to cut off those unwanted parts outside the horn. For this purpose, select
the horn and apply Object > Path >
Offset Path with 0 px Offset
value, thus creating a horn silhouette.
Now select the created silhouette and the notches and apply Intersect from the Pathfinder panel. Make another horn silhouette with Offset Path, this time making it
smaller. Switch both the created shape and notches to Screen Blending Mode, creating a glossy overtone, the way we did it
with the spots on the cow’s nose.

Step 4
Apply the Offset Path with 0 px Offset value to the whole body of our cow, creating a single
flat silhouette. Place several circles above the silhouette and cut off the
unneeded parts in the same way as we did with the horn notches. Fill the created
spots with brown color and switch to Multiply
Blending Mode, making them semi-transparent.

Step 5
Let’s form the
cow’s pink tummy. Create a 3×3 Gradient
Mesh and make the shape more spherical and three-dimensional. Use the Warp Tool (Shift-R) to deform the shape
a bit, making it more realistic.

Step 6
Don’t forget to add
the main facial features of our cow. Let’s form the brows. Create an even
circle with the Ellipse Tool (L), drag
its right anchor point further right with the Direct Selection Tool (A), and make the shape slightly curved with
the Arc Warp Effect, setting 45% Horizontal Bend Value.
Add two
half-circled thin strokes for the eyelids and place a red circle between the
brows. Add some gentle shadows under the brows and eyes in Multiply Blending Mode to make the face more sculpted. Place some
more shadows under the cow’s head and on the tummy to separate the body parts
from each other.

Step 7
Now that the cow
is finished, let’s add some compositional elements and a simple background to
give our image a finished look. Form a green ellipse and add a wavy freehand
shape above with the help of the Pencil
Tool (N). Cut out the upper part with the help of the Pathfinder panel. Duplicate the shape and decrease the size of the
upper copy a bit. Add a few green spots, making the meadow more fancy.

Step 8
Select both meadow
copies and apply Object > Blend >
Make. Proceed to the Blend Options
and set the Spacing to Specified Steps with 10 to 20 steps. We also need to add
some grass to give our meadow a natural look. Form a narrow triangle, as we did
for the horn notches, and drag it to your Brushes
panel. Create a new Art Brush with
default settings and draw a few strokes with the Paintbrush Tool (B), creating gentle grass blades. I’ve also added
a subtle elliptical shadow in the middle of the meadow for more realism, as our
cow will be floating above the ground.

To make the ground
more vivid and bright, select the upper shape from our blend group, duplicate
it and apply a radial gradient from dark yellow to black, switching it to Screen Blending Mode and thus creating a
sunny yellowish overtone.

Step 9
Finally, add a big
ellipse in the background, depicting a rising sun. Fill it with pale-yellow
gradient, but don’t make it too bright, so that the sun doesn’t look too
distracting. Fill the white background with a gentle blue color, imitating a
clear sky.

Here You Have It!
Your Meditating Cow Is Finished!
Make a deep inhale
and relax—our bright, calming illustration is ready! I hope you’ve enjoyed
creating subtle color blends with the Mesh
Tool and found these tips and tricks useful for your future tutorials. Keep
creating art and bringing beauty and joy! Peace to everyone!

{excerpt}
Read More