In the previous two parts of this series (Part 1, Part 2), I have talked about setting up your transport panel, activating it, and a few important items in the panel that will improve your workflow, such as the the Arranger track controls, the virtual keyboard and the Jog/Scrub wheel. In this part, I will talk about Pre-Roll and Post-Roll, Punch-In and Punch-Out and Activity Meters.
Pre-Roll and Post-Roll
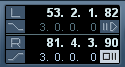
Even though the item in the image above is called as Locator, it contains one
of the most used function which is mostly used during recording sessions. It
allows you to control the playback positions of the cursor while recording or
when playing back the audio.
The Pre-Roll setting allows you to roll back a few measures
before playback. This means that once you set the value for Pre-Roll, the
playback will start exactly after the value has been deducted from the
playback. For example, if you set the cursor on the tenth bar and the
Pre-Roll value is set at three bars, the playback will start from the seventh bar of the song.
This process helps you to save time when doing overdubs or
when working with less experienced singers who tend to make small errors in the
recording phase. This is also helpful while using the Punch-In on the Transport
panel.
The Post-Roll is also similar to the Pre-Roll, except that
it is used to play a few bars after automatic punch out before stopping. You
will have to remember that this function is useful only if you are using
Punch-Out option in the Transport panel and with the Stop After Automatic
Punch Out option is activated.
You can set the required amount for the Post-Roll and
Pre-Roll by clicking on the field to the left of the activation buttons and
typing in a value or dragging the values up or down.
Punch-In and Punch-Out
Punch-In and Punch-Out options are available in the Locator item which has the Pre-Roll
and Post-Roll. They are very useful during the recording phase. They can help
you to automate the recording process and help you keep a calm mind when
recording. They can also help you to set the places where the recording should start and
where the recording should stop. That way you don’t have to worry about when to
start and stop recording or about keeping the cursor on the right place to
start recording.
Punch-In can be activated by pressing the Punch-In option
available in the Transport panel. But before you can start recording using the
Punch-In method, you will have to set the position of the Left locator. You can
do this by moving the Left locator position value up or down. To increase the
value, move it up, to decrease the value, move it down. You have the
option to manually select the position and then clicking on the L with the
Alt key pressed down.
You can check the position of the locators by clicking on
the L or R buttons, and the cursor will automatically point to the location
of the locators.
Punch-Out is also another function that can be used to
reduce the time spent on recording a performance rather than worrying about the
precise timing when the recording should be stopped. It can be found
just below the R locator. This helps you to stop the recording as soon as the
right locator is reached. This will help you to prevent overwriting of takes
and will help you in the editing process as well. The shortcut key for Punch-In
is I and for Punch-Out it is O.
Many engineers prefer to use the Punch-In option when
recording certain parts that need to be corrected. Instead of pressing the
record button at that moment, the engineer can set the time that the
recording should start, and start the playback before the recording area. Once
the playback reaches the area for recording, it automatically starts recording.
If you have set the Punch-Out to the right locator, the recording will stop as
soon as it reaches the right locator, thus saving precious time for both you
and your clients.
Output Level Control
The output level control helps you to control the overall output of the
audio being played. It controls the level of the output channel which contains
all the channels that are being sent to the output channel. You can adjust the
value of this by moving the fader up for increasing the sound, and by moving it
down for reducing the sound.
Activity Meters

Whenever you record, you should always have at least one eye
on the Audio Activity meter. This meter is one of the most important factor
which helps you make better recordings. The levels of the audio going into
your DAW determines the effects that it plays on the song. If the input is
going too hot, then there will be the “louder is better” illusion. It might sound good, but actually have lower quality than you’d expect.
The dreaded clip meters are also found in this area. Both
the Input Clipping and Output Clipping indicators help you to know
if the audio coming in or going out is clipping or not. Once
the audio level goes beyond the limit, the clipping indicator will turn red.
You can turn it back to normal by clicking on it. The meters
also show the highest levels that the audio has reached, which can give you an
idea of how loud your audio is. You can reset this by clicking on it.
Audio that clips might sound good in some genres of music,
but heavy clipping can disturb the listener, sounding bad and distorted. However slight
clipping may not really affect the quality of the audio and is generally
acceptable.
The Audio Output meter and Output Level controller respond
to the Control Room channel if it is activated. Otherwise they refer to the Main Mix
Output Channel that is specified in the VST Connections window.
The MIDI Activity Level shows the MIDI In and MIDI Out that
is being processed by the DAW. You can view the meters go up and down by
sending some MIDI data through your MIDI controller to your DAW.
Conclusion
In this tutorial you have learnt about two very
important aspects of recording:
- The Punch-In Punch-Out controls are really
helpful when doing overdubs and retakes. - The Activity Meters help you to make
the correct decision while choosing the level of the audio that goes in and
comes out of your recording session.
Use these functions in the
next recording session and you will be amazed how your workflow improves!
{excerpt}
Read More