Mixing
any track to a professional standard is a craft that takes time and experience to
master, as well as a good monitoring environment. A great mix will have energy,
excitement, and the potential to make an immediate impact. But at a deeper level, it will feature details and a sonic richness that captivates the listener.
When
you listen up close, nothing in particular sounds out of place—the arrangement
suits the musical style. Yet somehow the end result is so much more than the sum
of the parts—there’s a distinctive flair that sets it apart.
Here’s an example
in an R&B music style from the recent 2014 pop charts:
Of
course, all pop/rock music is a fashion statement of sorts. Opinions about
artistes and their output are often highly subjective and widely diverse! But, focussing
purely on the music and trying to be objective from the mix engineers point of
view, I would suggest that when the main track groove arrives, it seems to
deliver all that’s expected; everything ‘fits’ given the style it sets out to
be.
When mixing, every instrument has its own place within the sonic spectrum, and needs to be treated as such. So how is this achieved?
Developing a good
comprehension of the natural frequency range of each instrument (and vocals) and
learning how they might dovetail together to make a perfect, natural fit is
certainly going to be an invaluable help to us when the time comes to mix that
track!
The Aural Soundstage
Let’s begin by introducing the ‘soundstage’ concept – a three dimensional aural
space that we are going to work within as our track mix comes together. The mix
‘soundstage’ is like the aural equivalent of a theatre stage; it has width—from low frequencies to very high—but also depth, which can be thought of as
volume or level, and positional focus.
For example, in a typical professional rock
mix designed to be listened to within a stereo context, bass drum and snare,
bass guitar and lead vocal will tend to sit in a central position. The rest of
the kit, guitars and keyboards, and any percussion will tend to be offset
against this to some degree; adding width to the track.
The lead vocal, in
particular, will command the track, because the energy and urgency of a great
song performance is obviously crucial. Many mix engineers will spend a great
deal of time and focus right here, getting this exactly right.
The Art of Equalisation: Understanding Frequency Ranges
How can our understanding of EQ transform our ability to mix a track? Every
instrument has a natural frequency range it tends to function within. In
addition to this natural frequency range, there will be associated harmonics
which are usually somewhat less pronounced but these help define the natural
tone or character of the instrument.
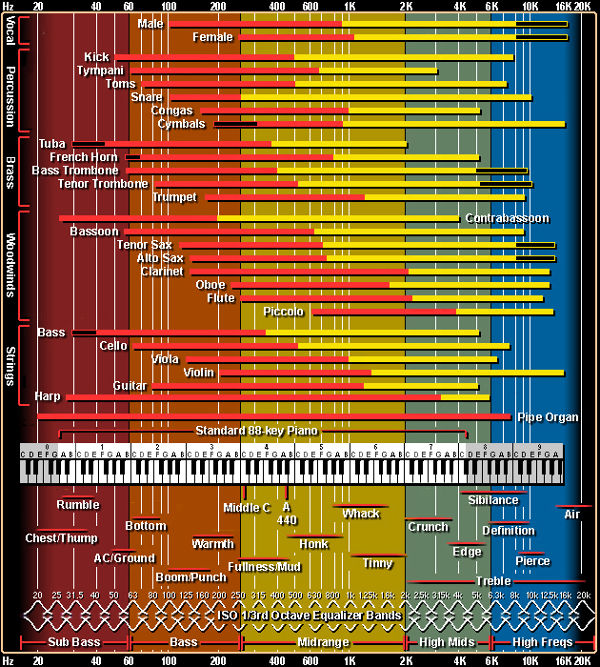
The chart below illustrates this:

You’ll see at the bottom of the chart there are
various descriptive words sound engineers and musicians alike commonly use. Though
these are somewhat vague and certainly not technical terms, they can be helpful
in working out how to EQ more effectively.
For example, a male vocal tends to
work in the 100kHz–1K range. Its area of particular warmth might be around
200 kHz. A female vocal will usually have its area of warmth a little higher
than this—maybe around 400 kHz, depending on the singers range and tone.
Note
that the yellow bar extensions indicate that the upper harmonics of both male
and female vocals range much higher than 1.5kHz. These higher harmonics are
critical in giving character to the voice. Higher still above 8kHz is where
the crispness of the vocal will be heard. The clarity of the diction and the
sibilant sounds ‘s’ and ‘c’ tend to happen here.
Every track poses different
challenges, and only your own ears can be the judge of how to space everything
perfectly across the sonic spectrum. But learning how to EQ the ‘muddiness’ out of that power electric guitar part, or EQ in a little more high end clarity to
that vocal—all of this is key to setting up a great mix.
Track Laying and Mixing: What’s the Difference?
Track
recording and mixing are totally different disciplines. When recording, your
focus will likely be on getting a solid performance at a decent level but without
risking any distortion or overload. Whether you are merely printing a midi
programmed part or capturing a live performance, your aim will likely be to
capture the natural warmth and fullness of the part.
The result may be a rather
fuller and bigger sound than you will actually need when you come to mix later
on, but at this stage this isn’t generally a concern. It fact it’s often better
to have a slightly fuller sound; you can always EQ it a little more tightly by
‘sculpting’ out a little in frequency areas you don’t need later on.
To
illustrate the mix EQ process, here’s a recording of a piano part I made. A tiny bit of compression and EQ was applied on the way in, but mainly just to
ensure the sound was as complete as possible:
Piano Part: no EQ
When
mixing, however, the focus shifts entirely. Now the piano part has to be fitted
into an overall sonic picture within the soundstage.
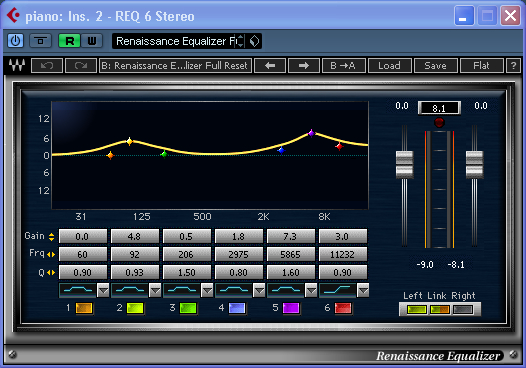
In this classical-sounding
instrumental track, the piano is actually a lead feature, so I decided it needed
a touch more low end at around 100kHz to add some commanding ‘weight’. I also added
a strong lift at 5.8kHz—mainly because I really wanted the high thirds in the
arrangement to sparkle and cut through a touch more.
Here’s a screenshot of the
actual EQ I used at the time using a Waves Renaissance EQ plug-in:

Now
listen to the mixed version of the piano, using the above EQ settings:
Piano Part: EQ now added
The
differences are quite subtle, but clearly audible. In fact, the raw recorded
piano version probably sounds better when heard on its own! But that’s not
untypical—the mixed version has to sit within the context of a busy
arrangement.
Have a listen to the final mix, and judge the end result for
yourself.
Strings: Cutting Weight and Adding Presence
Let’s
look at another example; string parts within a mix. Typically, violins don’t
offer anything below 200kHz, and they are always rich in harmonic overtones so
to capture that classy ‘sizzle’ will likely mean cutting out some of the weight
of the part lower down the frequency range—and maybe finding that sweet spot
higher up to just give them enough of an ‘edge’ or a bit more ‘air’ if they
need it.
Here’s a short excerpt of programmed strings in four parts written for a
cinematic instrumental piece, recorded in the raw:
Strings: no EQ
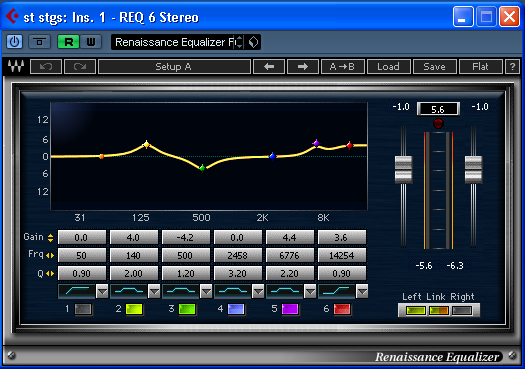
Now here’s the same part with the Waves
EQ screenshot below. Some low end has been added at 140Hz mainly to draw out
the depth of the low cello fifths, but to compensate there is quite a strong cut
at 500Hz with a fairly wide ‘Q’ setting, to get rid of a lot of low-mid
weight. Presence and ‘air’ have been
added higher up:
Strings: EQ added

Have a listen to the final mix here. The strings enter at 0:45″.
A Word about ‘Q’
With a parametric EQ, apart from setting a
frequency and boosting or cutting gain, you can set the width of the frequency
band over which your equalization changes apply. This is called the ‘Q’
setting.
A single octave change is a ‘Q’ value of 1; so anything below 0.7 or
so will be a broad, general equalization change, whereas a ‘Q’ setting of 5 or 6
would be a very narrow, precise notch of frequency cut (or gain). You might use
this to deal with a specific noise issue for example.
In the above REQ plug-in,
the lowest row is where the ‘Q’ setting is applied.
Pads Are Great: But Don’t Lose the Energy!
I’m
a keen user of all kinds of pads within a track; soft, airy, evolving, or
ethereal. They can certainly add drama to a ballad and give a sense of depth to
any mix, but they also come with a risk factor to my mind. If they are too full
sounding or just too loud, they can often seem to drain the energy out of the
track.
To my mind, many manufacturers seem to design pads very rich and full
sounding, maybe just to impress the listener into buying them in the first
place! But the risk is they will just dominate and take over all your available
soundstage space.
So I think the lesson here is: Be brutal when you need to be.
Don’t be afraid to sculpt the EQ weight out of that pad so it doesn’t interfere
with the rhythm section of your track. Some pads have natural ‘air’ which you
might want to emphasise a little, but for me it often seems to be mostly about cutting
away what you don’t need—and keeping the levels well under control.
Do the AB
test. Is the track energy still there? And does the pad add just a little
something indefinable to your track? Maybe that’s all it needs to do.
Plug-Ins: A Complete Signal Processing Chain?
Plug-ins
that sit within your DAW now exist in abundance, and have been commonly used for
a long time now to process sound. There are many examples that are capable of
being highly forensic and do a great job. A few are designed to actually
emulate the whole mix process that top sound engineers go through to obtain a
finished professional sound on certain instruments.
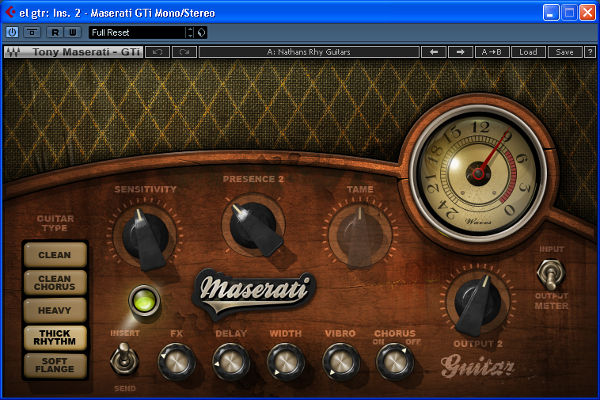
For example, the Waves Maserati plug-ins have settings that emulate closely a chain of processors the
top professional engineer Tony Maserati might commonly use on guitars. They are
very effective, but additionally they also demonstrate how a top mix engineer
might want to sculpt a sound to achieve a professional mix result.
Have a
listen to this pick guitar part with and without the plug-in enhancements. The
delay part was also put through the same process and is included in these MP3
examples:
Pick Guitar Part: no processing
Pick Guitar Part: Maserati Plug-In added
What’s
the difference? A little less weight, it seems to me, and a presence emphasis to
ensure the pick rhythm cuts through. Of course, the guitarist had already
provided plenty of compression—and perhaps a little EQ—to the ‘raw’ recorded
sound through his own amp and pedalboard, so here the mix processing just takes
the same logic a little further.
Here’s the plug-in screenshot. Unfortunately
this plug-in doesn’t say very much about the actual signal chain used, but I
guess the sonic end result is what matters.

A Rough Guide to Instrument Equalisation
Where
to cut and when to boost? Only time and experience can really help you as so
much depends on musical context and style, plus your own ears working within a
familiar monitoring environment.
But here’s a useful guide that might be of
help, if the world of frequency numbers leaves you a touch mystified at times:

In the comments column, I’ve put a
few personal observations that tend to be things I am typically on the lookout
for when mixing, when it comes to that particular instrument.
Conclusion
In this tutorial, I’ve only been able to touch on
a few aspects of what is a highly complex craft. Equalisation is a key aspect
of track mixing, but in practice it is used interactively together with
compression, reverb, delay, and quite possibly various other processes.
In the
next article, I’ll be looking at a couple of other key aspects when it comes to
mixing within the soundstage; reverb and delay.
{excerpt}
Read More