
Follow this tutorial and have fun creating these cute comic egg characters. This is a tutorial dedicated
to the Blend Tool and the Blend options therefore you will use this tool
throughout the entire tutorial. At the
beginning to create a vector egg then to create the eyes and the sparkles in
the eyes, followed by the eyebrows, the rosy cheeks for the female egg
character, the hearts in the eyes of the “in love” egg character and finally
for the shadows. You will use the Specified Steps and the Smooth Color blending
options for all of these things so stay tuned to learn more about the awesome
Blend Tool.
1. Start a New Project
Launch Illustrator then go to File > New to open a blank document. Type
a name and set up the dimensions then select Pixels as Units and RGB as Color
Mode.
Next, go to Edit > Preferences > General and set the Keyboard
Increment to 1px then to Units & Display Performance and set the Units like
in the image. I usually work with these
settings and they will help you throughout the drawing process.

2. Create the Egg
Step 1
First, grab the Ellipse Tool (L) and draw a 130 x 166px ellipse. Next,
use the Direct Selection Tool (A) to select only the bottom point and go to
File > Scripts > Extend Handles. Run the script and apply a percentage of
120.
If you don’t have the Extend Handles script you can go to this article 20 Free and Useful Adobe Illustrator Scripts to
download it then follow the instructions to install it. After that you will be
able to access the script by going to File > Scripts > Extend
Handles. Using this script you can
easily extend, shorten, remove or reverse handles while keeping their symmetry
and angle.

Step 2
Use the Direct Selection Tool (A) to select only the top point then
apply the Extend Handles script choosing a percentage of 85 this time. As a
result you will get smaller handles. Values over 100 lead to an extension of
the handles and values under 100 lead to a shortening of the handles.

Step 3
The last thing to do is to modify the angle of the handles for the left
and right anchor points as shown below. This will be the egg-shape.

Step 4
Next, grab the Ellipse Tool (L) and draw an ellipse in the upper left
side of the egg-shape. Copy and Paste in Front (Control-F) the egg-shape then select
this copy and the ellipse and press Intersect in the Pathfinder panel.

Step 5
Draw another ellipse in the upper left side of the egg-shape like in the
image. Once you’re done, fill the three shapes with the colors indicated.

Step 6
Before you continue, select the egg-shape and make a few copies
because you will need them later. Now, select the three shapes then go to
Object > Blend > Blend Options, choose Smooth Color and hit OK. Go back
to Object > Blend > Make (Alt-Control-B). You have just obtained a vector
egg.

3. Create the Texture on the Egg
Step 1
Take a copy of the egg-shape and bring it in front of everything by
going to Object > Arrange > Bring to Front (Shift-Control-]). Select gray
as the fill color then go to Effect > Texture > Texturizer and apply the
settings shown below. Set this shape to Blending Mode Overlay and 16% Opacity.

Step 2
In order to clean the edges of the egg after the effect was applied you
will use a mask. First, grab another copy of the egg-shape and bring it in
front of everything by going to Object > Arrange > Bring to Front
(Shift-Control-]) then set to fill-none and stroke-none. Now, select this copy
and the shape with the effect applied and go to Object > Clipping Mask >
Make (Control-7).

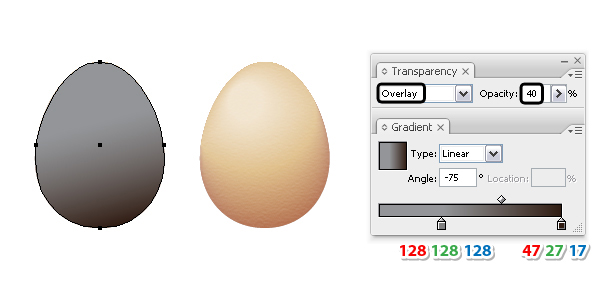
Step 3
Take another copy of the egg-shape and bring it in front. Fill it with
the linear gradient shown at a -75 degrees Angle. Set this shape to Blending
Mode Overlay and 40% Opacity. This will darken the bottom right side of the
egg.
4. Create the Eyes
Step 1
Use the Ellipse Tool (L) to draw a new ellipse having the dimensions
shown. Take the Direct Selection Tool (A) and select only the top point (1)
then go to Object > Transform > Move, type -7px in the Horizontal field
and hit OK. Next, select the bottom point (2) and go to Object > Transform
> Move, type 3px in the Horizontal field and hit OK.

Step 2
Use the Direct Selection Tool (A) to select the points 1, 2 and 3 and
modify the angle of their handles like in the image.

Step 3
Move the shape that you have obtained at the previous step over the egg
and select black as the fill color. Copy and Paste in Front (Control-F) this
shape and replace the fill color with white then use the Direct Selection Tool
(A) to select only the right point and move it a little to the right.

Step 4
Copy and Paste in Front (Control-F) the white shape then move it a
little up and to the right as shown below. For visual reasons I’ve changed the
fill color to gray. Copy and Paste in Front (Control-F) the white shape again
then select this copy and also the gray shape and press Subtract in the
Pathfinder panel.

Step 5
Fill the shape that you have obtained at the previous step with the
color indicated. Before you continue make a few copies of the white shape
because you will need them later. Now, select the two shapes then go to Object
> Blend > Blend Options, choose Smooth Color and hit OK. Go back to
Object > Blend > Make (Alt-Control-B). I will name the resulting
blend-group “white eye”.

5. Create a Smooth Black Art Brush
Step 1
Use the Ellipse Tool (L) to draw a small 5 x 5px circle and fill it with
a black to white radial gradient. Having this circle selected, go to the
Transform panel and type 100px in the Width field instead of 5px. This will
create a flat ellipse.

Step 2
Unfortunately, you can’t save a shape filled with a gradient as a brush
therefore go to Object menu and select Expand. As a result you will get a group
with many ellipses plus a clipping mask and a rectangle as the bounding shape.
Go to the Layers panel, open the group of ellipses and locate the clipping
mask. Select and drag it into the Trash. Next, go to the end of the group and
select the last shape, which should be a rectangle and delete it as well.

Step 3
Now you can save your brush. Select and drag the group of ellipses into
the Brushes panel and choose New Art Brush. Type Smooth Black Art Brush as the
name and leave the rest of the settings as they are.

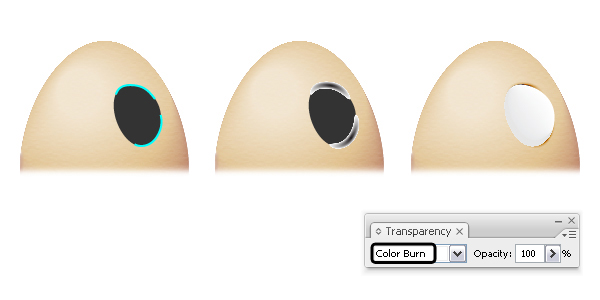
6. Add Shades around the Eyes
Step 1
For the moment hide “white eye”. Grab the Pen Tool (P) and draw two
paths following the edge of the black shape like in the image. Stroke these paths with the Smooth Black Art
Brush then set to Blending Mode Color Burn. Now you can unhide the “white eye”
and send the two stroked paths behind it.
Step 2
Draw another path with the Pen Tool (P) following the left edge of the
eye. Stroke this path with the Smooth Black Art Brush then set to Blending Mode
Color Burn. This one stays in front of the “white eye”.

Step 3
Select all the shapes that make up the right eye and Group (Control-G)
them. Having this group selected, go to Object > Transform > Reflect,
check Vertical and hit Copy. You will get the left eye and all you have to do
is to move it to the right place.

7. Finalize the Eyes
Step 1
Grab the Ellipse Tool (L) and draw two shapes as the irises then fill
them with brown. They’re not perfect circles so use the Direct Selection Tool
(A) to distort them a little. Next, draw two smaller shapes as the pupils and
fill them with black.

Step 2
Zoom on the right eye and draw a circle in the upper left side of the
iris then a smaller one in the center (1). Fill both circles with white but set
the Opacity for the bigger one to 0%. Having both circles selected, go to
Object > Blend > Blend Options, choose 10 Specified Steps and hit OK.
Go
back to Object > Blend > Make (Alt-Control-B) (2). The result will be a
sparkle in the eye. Repeat the same thing or just scale the first one to get a
smaller sparkle in the lower right side of the iris. After you have finished,
do the same thing for the left eye.

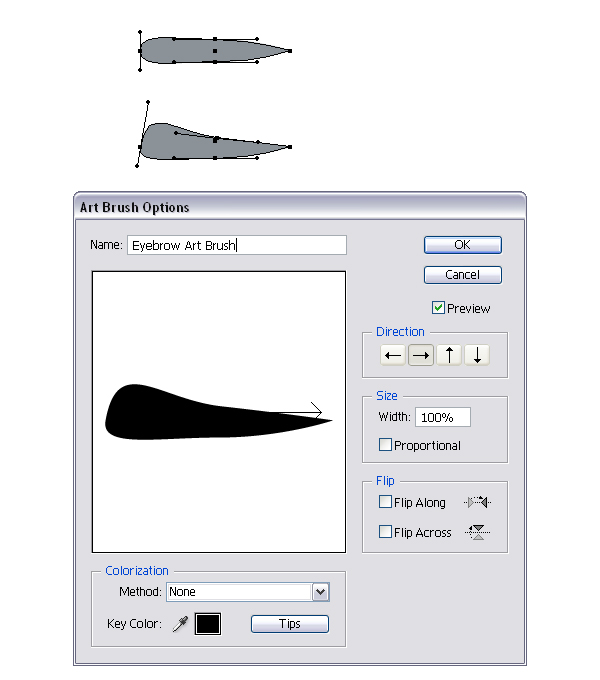
8. Create an Art Brush for the Eyebrows
Step 1
First, grab the Ellipse Tool (L) and draw a 100 x 15px ellipse. Use the
Direct Selection Tool (A) to select only the right point then go to File >
Scripts > Extend Handles and apply a percentage of 0. This will delete the
existing handles of the point. Next, select the left point, run the script
again and apply a percentage of 280 this time. As a result you will get longer
handles.

Step 2
Use the Direct Selection Tool (A) to select the top and left points and
modify the angle of their handles as shown below. Before you save the brush select
black as the fill color for your shape. Drag it into the Brushes panel and
choose New Art Brush. Type Eyebrow Art Brush as the name and leave the rest of
the settings as they are.
Step 3
Take the Pen Tool (P) or the Pencil Tool (N) and draw a path above the
right eye as in the image below. Stroke this path with the Eyebrow Art Brush
then set the Stroke Weight at 0.3 pt.

Step 4
To transform the stroke into a shape, select Expand Appearance from the
Object menu then Ungroup (Shift-Control-G) twice. You will get the shape of the
eyebrow (1). Make a smaller copy of this shape and arrange it in the middle.
Fill both shapes with dark brown but set the Opacity for the bigger one at 0%
(2). Having both shapes selected, go to Object > Blend > Blend Options
and choose 10 Specified Steps. Go back to Object > Blend > Make
(Alt-Control-B) and you will get the right eyebrow (3).

Step 5
Duplicate the right eyebrow, flip vertically and rotate it then move it
above the left eye. You can make it slightly longer using the Selection Tool
(V).

9. Add Expression Wrinkles Under the Eyes
Step 1
Use the Pen Tool (P) or the Pencil Tool (N) to draw a curved path under
each eye. Stroke these paths with the Smooth Black Art Brush and set the Stroke
Weight at 0.75 pt.

Step 2
Still having the two paths selected, go to the Appearance panel and
double click on the brush stroke applied to open the Stroke Options window.
Select Tints as the Colorization and hit OK. Now, select light brown as the
stroke color and the brush will take the color of your stroke. Set both of them
to Blending Mode Multiply (white becomes transparent) and 75% Opacity.

10. Create the Female Egg Character
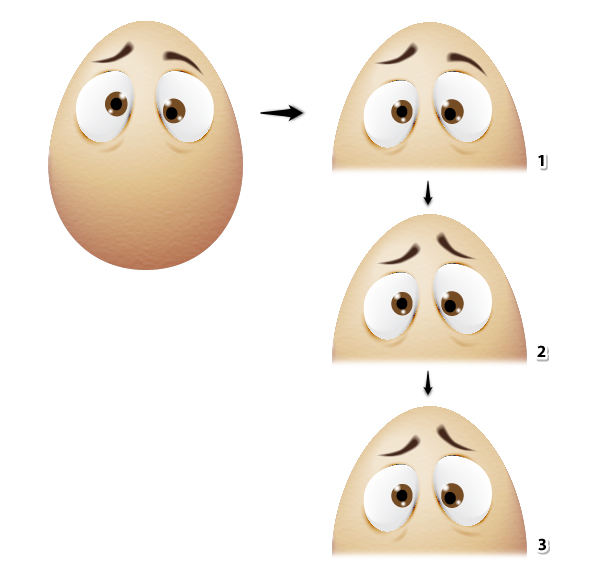
Step 1
The first egg character is ready at this point and you can use it to
create other types of characters. Start by making a copy of the first egg then
focus on the eyes and move the position of the pupils, irises and the sparkles
as in the following image (1). Next change the position of the eyebrows (2) and
finally, change the position of the wrinkles under the eyes by moving them
outwards and rotating them a little (3).

Step 2
Grab the Pen Tool (P) or the Pencil Tool (N) and draw a curved path over
each eye like below (1). Earlier I’ve said that you need to make copies of the
white shapes of the eyes and now is the time to use them (2). Focus on the
right eye then select the copy of the white shape and the path and press Divide
in the Pathfinder panel (2). Ungroup (Shift-Control-G) then delete the shape at
the bottom and you will have the right eyelid. Repeat the same thing for the
left eye (3).

Step 3
Fill the right eyelid with the linear gradient shown then use the same
gradient for the left eyelid but set the Angle to 180 degrees.

Step 4
Having the right eyelid selected, add a new fill under the first from
the fly-out menu of the Appearance panel. Select black as the fill color then go
to Effect > Distort & Transform > Transform, type -1px in the Move
Vertical field and hit OK. As a result you will get the appearance of a black
eyeliner. Repeat the same thing for the left eyelid.

Step 5
Zoom on the right eyelid and use the Pen Tool (P) to draw three paths at
the outer end. Stroke these paths with the Tapered-Sharp Art Brush that you can
find in the Brush Libraries Menu > Artistic > Artistic_Ink then set the
Stroke Weight at 0.1 pt. Repeat the same thing to create the eyelashes for the
left eye.

Step 6
Grab the Ellipse Tool (L) and draw two circles having the dimensions
shown. Fill both of them with pink but set the Opacity for the bigger circle to
0%.

Step 7
Having both circles selected, go to Object > Blend > Blend Options
and choose 10 Specified Steps then go back to Object > Blend > Make
(Alt-Control-B). Set the Blending Mode to Soft Light for the resulting blend-group
then make a copy of this group for the left cheek.

11. Create the “In Love” Egg Character
Step 1
Make another copy of the first egg character then delete the pupils,
irises and sparkles. Select the remaining of the right eye and make it a little
smaller then move the eyes closer to each other (1). Next, change the position
of the eyebrows (2) and the position of the wrinkles under the eyes (3).

Step 2
Draw a heart-shape over the left eye using the Pen Tool (P) and it
doesn’t have to be perfect (1). Make a smaller copy of the heart in the center.
Fill both shapes with red but set the Opacity for the bigger heart to 10% (2).
Having both of them selected, go to Object > Blend > Blend Options and
choose Smooth Color then hit OK. Go back to Object > Blend > Make
(Alt-Control-B) and the result should look like below (3). Duplicate the
resulting blend-group and make it a little smaller for the right eye and after this the third egg character is ready.

12. Create the Crying Egg Character
Step 1
This is the last one and to create it first make a copy of the first egg
character. Move the eyes a little closer to each other, move the left eye a
little down and also make it slightly smaller. Continue with the pupils and
sparkles (1). Next, change the position of the eyebrows (2) then the position
of the wrinkles under the eyes (3).
Step 2
Grab the Pen Tool (P) or the Pencil Tool (N) and draw a wavy path at the
bottom of each eye (1). Next, you need the copies of the white shapes of the
eyes. Select the wavy path and the copy of the white shape for the right eye
and press Divide in the Pathfinder panel (2). Select Ungroup (Shift-Control-G)
then delete the shape from the top (3). Repeat the same thing for the left eye.

Step 3
Fill the water-shape from the right with the linear gradient shown then
use the same gradient for the water-shape from the left but set the Angle to
180 degrees.

Step 4
Select the water-shape from the right and add a new fill under the first
from the fly-out menu of the Appearance panel. Use the shade of blue indicated
as the fill color then go to Effect > Distort & Transform >
Transform, type 1px in the Move Vertical field and hit OK. Do the same thing
for the water-shape from the left.

Step 5
Remember that earlier you have created the Smooth Black Art Brush? Well,
now you need the white version. Start with a 5 x 5px circle filled with a
radial gradient from white to black then change the Width from 5px to 100px.
Select Expand then follow the rest of the explanations from part 5 in order to
save the brush. Name it Smooth White Art Brush.

Step 6
Use the Pen Tool (P) or the Pencil Tool (N) to draw two paths on each
water-shape like in the image below (1). Stroke these paths with the Smooth
White Art Brush and set the Stroke Weight at 0.25 pt (2). Set all of them to
Blending Mode Screen (black becomes transparent) and 60-70% Opacity (3).

Step 7
Let’s continue with the tears. First draw a simple tear-shape and fill
it with the linear gradient shown at a 50 degrees Angle. Set the Blending Mode
to Color Burn (1). Copy and Paste in Front (Control-F) the tear-shape then move
it a little up and to the left. Replace the existing gradient with a white to
gray radial gradient then set to Blending Mode Screen (2). Next, draw a small
path in the upper left side of the tear and stroke it with the Smooth White Art
Brush. Set the Stroke Weight at 0.25 pt and the Blending Mode to Screen (3).

Step 8
Group (Control-G) all the shapes that make up the tear and make a smaller
copy. Arrange them like in the next image and the crying egg character is
ready.

13. Create the Shadows
Step 1
Grab a copy of the egg-shape and send it behind everything by going to
Object > Arrange > Send to Back (Shift-Control-[) (1). Move this shape
down and to the right and also use the Selection Tool (V) to make it bigger
(2).
Next, make a smaller copy of this shape in the center. Fill both shapes
with black but set the Opacity for the bigger one at 0% (3). Having both shapes
selected, go to Object > Blend > Blend Options and choose 30 Specified
Steps then hit OK. Go back to Object > Blend > Make (Alt-Control-B) and
the shadow is ready (4). Since the light falls on the egg somewhere from the
upper left side the shadow should be in the lower right side.

Step 2
Now you can create the shadows for the other brothers and you have
finished.

Congratulation! You’re done.
The entire gang is ready. Let me know which one is your favorite and I
hope that you’ll have fun trying to create them.
{excerpt}
Read More