Reverb
within a mix is near enough mandatory. However, it’s incredibly easy to
overcook a mix with ambience, even though modern mixes are increasingly
becoming less reverb heavy.
Using
reverb effectively can take a mix – and the song – to another level. But with
many productions becoming increasingly busy and complex, the crucial space
for this near-essential effect can become difficult to navigate.
In
this tutorial we’ll look at various ways you can creatively optimize
your use of reverb, particularly in productions which may prove otherwise
tricky.
We’ll use a short drum passage to demonstrate some of the ideas within this
tutorial:
1.
Learn the Rules…
One
of the most universal or commonly known reverb “rules” is to avoid inserting a single reverb on each individual track or channel.
Not only is this
incredibly computer-processor-hungry, you won’t do your mix any great
favors, layering reverb on top of reverb, on top of reverb, and so on! (And if
you’re working out-of-the-box, unless you have stacks of reverb racks this
becomes fairly impossible anyway.)
Here
the drum part with reverb inserted onto each individual track.
As
you can hear, the part is almost immediately swamped, and would certainly not
fit well within a mix when other components are pulled in.
This is an
over-the-top example, but serves well. There are only six tracks (kick, snare,
ride, OH, and two room mics) within this project. Imagine what could happen to
a project with 30 tracks!
The
usual solution is to set up an auxiliary/effects track and send/bus any tracks
you wish to be processed by the reverb. In other words, any tracks within the
mix can now be sent to simply one individual reverb. This is almost a direct
replication of older desk mixes, and keeps the reverb in your mix clean, tight
and under control.
Here
is the passage again, with the same reverb. However, we have now set up an
auxiliary track for this reverb, and have controlled the sends from each track
to the one reverb itself:
There
is clearly a lot of reverb in this mix, but it is now manageable, and ready for
further processing.
2. Then Break the Rules!
Although
this process is extremely common and effective (and for good reason), you may
limit your creativity by sticking to just one general reverb throughout your
entire mix. Now
you have set up an overall reverb sound, there is room to think creatively about
adding additional reverb to individual elements of this particular drum kit
part.
Many
acts want their snare drum to “punch” through the mix, so, for example, let’s
take a look at adding a separate reverb insert solely on the snare drum track, in addition to the general reverb we added earlier.
Here
is the drum passage, with the “general” reverb, and a now separate reverb placed
solely on the snare drum channel:
Now
the snare really pokes through! Although this is deliberately over-the-top for
demonstration purposes, with mixes that need a snare to poke through,
creatively using reverb in this way can really begin to enhance your mix.
3.
Process to Focus
Now
that we’ve used multiple reverbs within this mix, it’s crucial to make sure the
mix doesn’t get swamped. Avoiding this can be both a tricky and delicate
process, so play around and be creative with these three ideas:
Take
the Bus!
If
you bus the extra reverbs to an auxiliary track, rather than placing them
directly on the channel as an insert, you have more freedom to customize the
individual reverb itself. However be careful of track count, you can find your
project gets wildly out of control this way.
Many
reverb plugins have their own in built settings and you can usually customize
the effect to a pretty advanced level within the plugin itself.
EQ
the Reverbs
If
both reverbs are occupying the same space, the chances are that you’ll be
getting unwanted overlap that can fill the space within your mix, and then
some.
Here
is the same passage, now with EQ added to the overall reverb and the snare
reverb.
This
is the exact same level of reverb, purely with EQ processing added. There is
now a lot more clarity within the mix, whilst keeping the integrity of the
reverb you added in the first place.
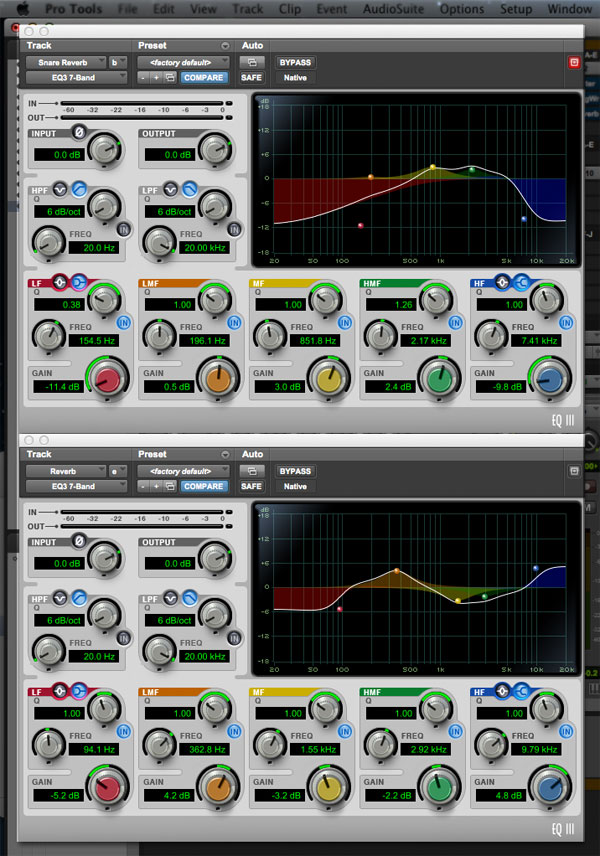
The
screenshot below demonstrates the frequencies processed in this case. As you
can see, both reverbs have now begun to occupy their own space. In effect, we
keep both reverbs but have carved out a space within the mix for them to sit.
Pan
is Your Man
To
create width within your mix, think about creatively panning the reverb to free
up space within the stereo width of your mix.
Here
is the drum passage with the snare reverb panned hard left:
Although
this may be a bizarre example for a drum kit passage, the central and right
space has definitely opened up, ready to be filled with other elements of your
mix.
This
process works especially well on shakers or guitar parts that need both reverb
yet an up-front punch.
Level
Your Levels
Finally,
once you’re satisfied with the reverb you have chosen, make sure you re-assess
the levels. It is wise to do this at all stages of your mix – reverb often has
the “less is more” effect.
Here
is the final example of our drum passage, with the levels of reverb re-balanced. In this instance we’ve reduced the overall level of reverb, whilst
maintaining the snare reverb at a fairly highly, centralizing the panning we
processed in the step above.
4.
Place Your Space
Now
we’ve established that using multiple reverbs doesn’t have to be a sin, it is
very useful to imagine how you might chose the most appropriate reverbs for
your mix.
If
you’re struggling, this scenario always gets the juices flowing for me. Imagine
you are seeing the artist/act live. It’s just you in the audience, and them on
stage.
Use this checklist for inspiration:
- What is the size of the room? Is it
an arena? A small club? Bar? - What is your position? Are you be
sitting at the back? Standing at the front? (Hopefully it’s not running to the
bar for a beer!) - What is the stage layout? Is the
singer off-center? Is the keyboard player at the side? Does the guitarist run
around? Is the band static? Would anyone come out into the crowd?
There
are endless more variables but this is just another way of helping to visualize
yourself within a 3D space. If you consider these points, you are more equipped
to make creative decisions about the reverb you may choose and where you’d like
the components to sit within a full mix.
For
example, a left-field band who stay aloof on a dark stage in a underground
venue in New York, may benefit from a dryer blend of reverb, a smaller size,
shorter pre-delay and generally lower levels of this effect.
However
if you’re a stadium band, with a huge light show, masses of audience
participation, you may want to think about a larger reverb, longer tail, and a
longer pre-delay to match the ethos of the group.
These
are creative decisions that usually impact the perception of your mix with the
band, their management, A&R etc. You could even be daring and take the mix
in a completely different direction to contrast the perception of the band.
This is essentially down to you as the mix engineer/producer – be creative!
Conclusion
Reverb
is one of the most powerful effect tools you can use to enhance a mix. Rarely a
mix passes through without at least some reverb processing.
Nowadays,
the use of over-the-top reverb has gone wildly out of fashion – it has to be
extremely appropriate and reflect the creative output of the act in question.
However, a mix without reverb is usually not a mix at all.
The
processes in this tutorial have demonstrated ways in which you can think about
reverb in a modern context, keeping your mixes fresh and contemporary without
having to ditch reverb altogether.
However
the real way to see the results is to get experimenting with the effect and
using these tools in a way that’s individual for you, and therefore the track
you’re mixing. And it’s those unique stamps that will help you rise to the top
of your game.
{excerpt}
Read More