For our first tutorial in "Mastering Calligraphy", we’re going to start with an easy alphabet that uses the two basic strokes we learned in the easy introduction. Just those two strokes make up a majority of the letters in the Roundhand Script alphabet. We’ll be breaking the letters into similar groups and mastering both the lowercase and uppercase letters. So let’s get started!
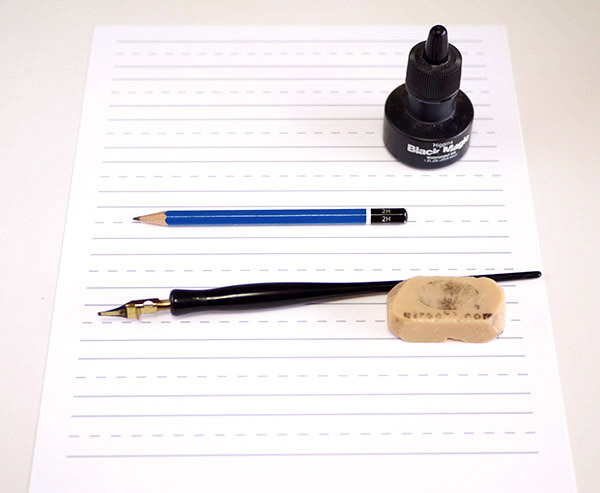
What You’ll Need

- Pencil
- Eraser
- Black Ink (preferably Speedball or Higgins waterproof ink)
- Practice sheet
- Pen holder (the black part of the pen above)
- Flat tipped pen nib (the shiny gold part of the pen above)
1. Review the Introduction Lesson
Before we dive into Roundhand Script, let’s warm up our hands. We’re going to go back to the introduction lesson and do a line or two of the basic strokes again to make sure we’re ready to go.
Step 1
Print out four or five of the practice sheets on a nice card stock or Bristol paper.
Step 2
Practice the basic downward stroke for one or two lines to warm up.

Step 3
Practice the basic curve stroke for one or two lines to warm up.

Okay! Now we’re ready to start. In this lesson on mastering calligraphy, we’re going to learn a very simple-to-write alphabet called Roundhand Script.
2. Roundhand Script Lowercase Alphabet
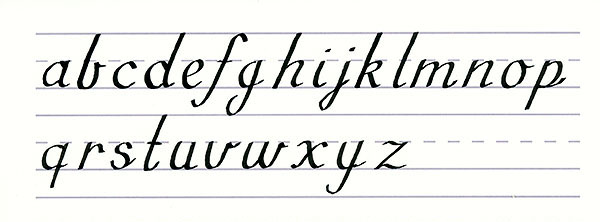
Let’s take a look at the Roundhand Script alphabet. As you can see, it’s a nice blend of print and cursive lettering. This means that you can either join your letters when you write words or leave them separate. It’s up to you. The blue arrows above show the directions of the pen strokes and the numbers below tell you how many strokes make up each letter. We’re going to start with the lowercase alphabet and break it up into two sections: downward stroke letters and curve stroke letters. So let’s start with the downward stroke letters!

Step 1
Print out a copy of the alphabet above so that you have it handy for reference.
3. Downward Stroke Lowercase Letters
Step 1
The letters b, f, h, i, j, k, l, m, n, p, r, s, t, x, and z all begin with the downward stroke. Some have strokes that fill up the entire height of the line and others only reach to the dashed line. Some, like the ‘f’ even reach below the bottom line. To start, I’m going to show you broken apart letter so you can see how many stokes make up each letter.
However, since it’s much harder to ink broken apart letters, we’re going to make the real ones. You can always sketch out the letters using your pencil first to feel more comfortable. Then you can simply follow the pencil lines with your pen.

Step 2
Let’s start with the ‘h’ since it’s easiest. Place your pen tip on the top line. Make a downward stroke all the way to the bottom line. Lift your pen and place it just below where the dashed line and downward stroke you just made intersect. Then arc up, over to the right, and down to the bottom line, ending in a small curl up. Voila! You have a Roundhand Script ‘h’. Not too hard, was it?

Step 3
Repeat making the letter ‘h’ two or three times so that you get the feel of it. Many letters, such as the d, f, and k are very similar to the ‘h’. Once you have the ‘h’ down, it’s easy to see how other letters are made.

Step 4
Let’s try a harder letter: k. The ‘k’ starts the same as the ‘h’ with the downward stroke. You then put your pen tip in the same spot, just below the intersection of the dashed line and the downward stroke you just made.
This time, instead of arcing all the way down to the bottom line, you’ll curve back into the downward stroke about halfway between the dashed line and the bottom line. Then do a diagonal downward stroke to the right, ending in a little curl. Not too hard, right?

Step 5
Repeat making the letter ‘k’ two or three times so that you get the feel of it.

Step 6
Slowly make your way through the rest of the curved stroke lowercase letters, using the guide of the strokes as reference.
4. Curved Stroke Lowercase Letters
Step 1
The letters a, c, d, e, g, o, q, u, v, w, and y all begin with the curved stroke. To start, I’m going to show you broken apart letter so you can see how many stokes make up each letter. However, since it’s much harder to ink broken apart letters, we’re going to make the real ones. You can always sketch out the letters using your pencil first to feel more comfortable. Then you can simply follow the pencil lines with your pen.

Step 2
Let’s start with the ‘c’ since it’s easiest. Place your pen tip on the dashed line. Arc down and around to the right, making the majority of the letter. Then lift up your pen and return it to the starting point. The second stroke for the ‘c’ starts at the same place but arcs down just a tiny bit. Voila! You have a Roundhand Script ‘c’. Not too hard, was it?

Step 3
Repeat making the letter ‘c’ two or three times so that you get the feel of it. Many letters, such as the e and o are made up of two curved strokes that swing out and meet at the bottom. Once you have the ‘c’ down, it’s easy to see how other letters are made.

Step 4
Let’s try a harder letter: q. Make the same start to the ‘q’ as you did the ‘c’. Now, put your pen back at the starting point and draw a straight line down. For the little connecting flourish, place your pen where the curve and downward stroke meet on the bottom line and make a slight curve upward.

Step 5
Repeat making the letter ‘q’ two or three times so that you get the feel of it. The letter ‘q’ is very similar to the letters d, g, and p. So once you have this one down, you can do the rest!

Step 6
Slowly make your way through the rest of the curved stroke lowercase letters, using the guide of the strokes as reference.
5. Write the Lowercase Alphabet
Now that you’ve written each letter multiple times, it’s time to put it all together and write out the alphabet.

6. Roundhand Script Uppercase Alphabet
The uppercase alphabet always plays by different rules and is generally much more elaborate. The curved strokes are much bigger and the downward strokes have a bit more flair. Besides that, the uppercase letters are just as simple to write as the lowercase. You can always sketch out the letters using your pencil first to feel more comfortable. Then you can simply follow the pencil lines with your pen. When it comes to uppercase letters, I prefer to pencil mine out beforehand.

Step 1
Since most of the letters begin with the curved stroke, I didn’t divide the alphabet into groups. Instead, we’ll simply work our way through it, using the guide above to see how many strokes each letter is made of and what direction the strokes go. So let’s start with an easy letter.
Again, we’ll start with the letter ‘c’. Place your pen tip on the top line. Arc down and around to the right, making sure to curl back up nicely at the end. Then lift up your pen and return it to the starting point. The second stroke for the ‘c’ starts at the same place but arcs down into the ‘c’ with a nice flourish. Voila! You have a Roundhand Script uppercase ‘c’. Not too hard, was it?

Step 2
Repeat making the letter ‘c’ two or three times so that you get the feel of it. When it comes to uppercase letters, the more flourish, the better so don’t be scared to make some big curls and sweeping lines. As in the lowercase alphabet, many letters, such as the ‘e’ and ‘o’ are made up of two curved strokes that swing out and meet at the bottom. Once you have the ‘c’ down, it’s easy to see how other uppercase letters are made.

Step 3
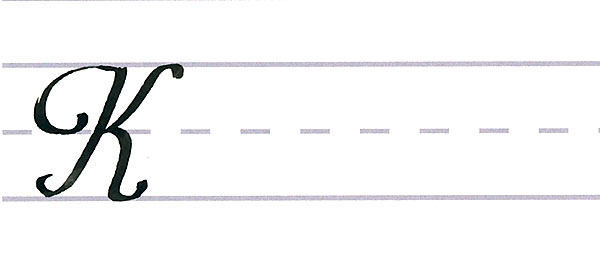
Let’s try a harder letter: k. Place your pen tip on the top line and curve out and down toward the dashed line, curling up a tiny bit at the end. Go back up to the start of the curve and draw a big downward stroke to the bottom line, curling up on the end. Place your pen tip just shy of the top line. Curl up to the top line and then down and to the left toward where the downward stroke meets the dashed line. Then, from that meeting point, arc down and to the right, ending with a curl. A bit superfluous but not too hard, right?

Step 4
Repeat making the letter ‘k’ two or three times so that you get the feel of it. The letter ‘k’ is very similar to the letters b, d, f, h, i, j, p, q, r, t, u, w, x, and y. So once you have this one down, you can do the rest!

Step 5
Slowly make your way through the rest of the uppercase letters, using the guide of the strokes as reference.
7. Write the Uppercase Roundhand Script
Now that you’ve written each letter multiple times, it’s time to put it all together and write out the alphabet.

8. Putting it all together
Let’s write something a bit more exciting! A good way to mix uppercase and lowercase letters is to write out your name. Now, since you’ve gotten so good at Roundhand Script, let’s make you a pro!

You’ve Just Mastered the Roundhand Script!
Everyone likes to think that calligraphy is hard but if you just break every letter down into its basic strokes, you start to see the patterns. The more you practice, the easier it will be to ink the letters and the faster you’ll be at writing. In future tutorials, we’ll learn some slightly more complicated scripts.

{excerpt}
Read More