The Bristle Brush in Adobe Illustrator mimics the look and feel of paintbrushes. From acrylic to watercolor to oil, the style of the brush can be customized to a high degree and allows the user to create paint-like vector pieces. Let’s take its options for a spin to get everything you can from this brush type.
1. Make a Bristle Brush
Step 1
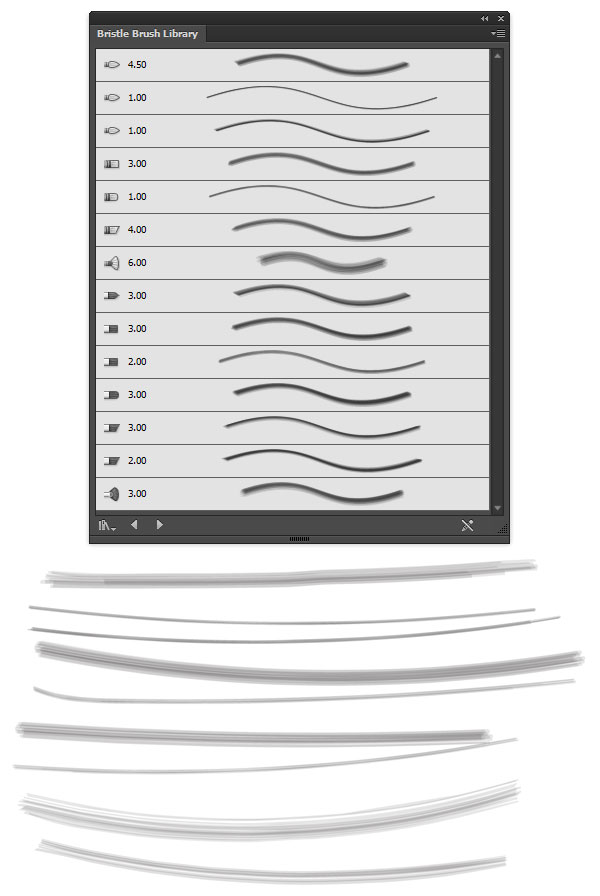
To start, create a New Document, select the Paintbrush Tool (B) and open the Brushes panel in Illustrator. Select Options and hit Open Brush Library > Bristle Brush > Bristle Brush Library. You’ll get Illustrator’s default library of bristle brushes with which to play. Below, see nine of them in action.

Step 2
Default brushes are lovely, but what about making your own? In the Brushes panel, go to Options > New Brush and select Bristle Brush. In addition to this step (the dialogue box that pop up is in the next step), you can also adjust the Paintbrush Tool’s (B) options so the tool acts in the way you’re expecting after you’ve played with each brush’s options.

Step 3
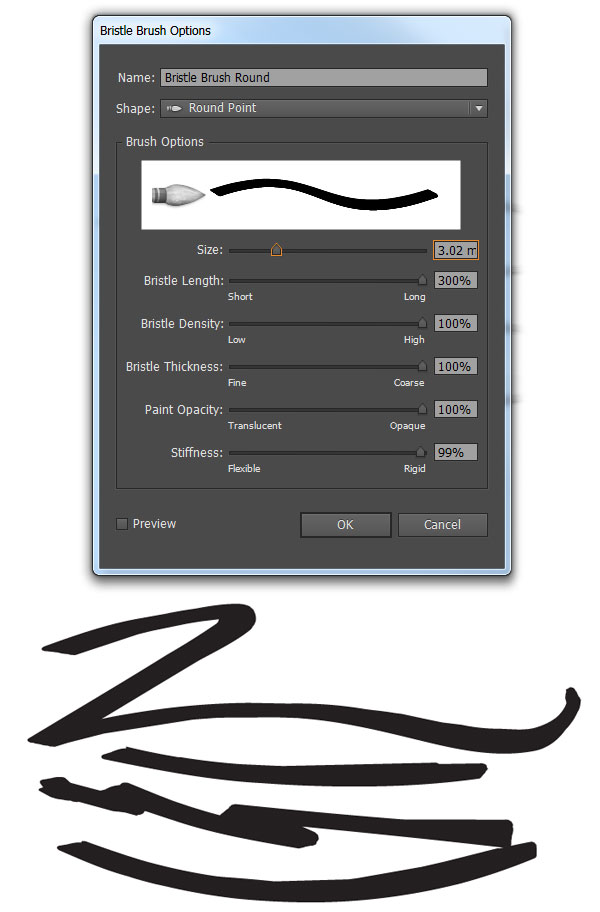
When you create a new brush this is the dialogue box that pops up. There’s a lot to customize. For starters, let’s create a simple Round Point Brush. In this case I’m keeping the Bristle Length relatively Short, the Density High, the Thickness Fine, the Paint Opacity fairly Opaque, and the Stiffness Rigid. Doing so will create the brush seen below.
Now the Bristle Brush works best with a pressure-sensitive tablet, as these options are best employed with a stylus whose tilt and pressure are registered by the tablet’s sensors. Notice how the strokes begin on the left and end on the right. The right side tapers on account of the tablet’s features. Unlike the Calligraphic Brush, the pressure and tilt sensitivity are already enabled.

Step 4
To show how extreme you can make the bristle brush (i.e. negating its cooler effects), push all of the sliders (except for Size) to the right and notice how it’s fully dense, opaque, and rigid. It’s practically a Calligraphic Brush at this point. Pushing all of the sliders to the left results in a very wispy and light brush with bristles spaced quite far apart.

Step 5
Below, there are three sets of brush strokes. The first shows separate strokes placed near each other but not really overlapping. The second shows strokes on a single path overlapping each other. And the third shows separate strokes overlapping each other. All three techniques can lend itself wonderfully to different styles of painting with vectors.

2. Other Brush Shapes
Step 1
Looking at the Bristle Brush Options again you can check out the drop-down menu under Shape. I’ve selected a Round Angle brush. The strokes below the options show the following:
- Small brush with short bristles and low density.
- Larger brush with longer bristles coarser thickness and higher density.
- Low opacity, small brush, stiff, and mid-way between low and high density.
- The last two are denser and more opaque showing flexible versus rigid.

Step 2
The Angled Bristle Brush is fantastic for sketching out under painting-styled pieces, later fully rendered with an assortment of other designs. Note the two odes seen below, Preview and Outline (toggle both with Control-Y), for how many paths are involve in the sketch without expanding the brush’s strokes.

Step 3
The Fan Brush is one of the Flat Shaped brushes available to customize. Below the options you’ll notice three examples showing density, opacity, and how the stylus’s pressure and tilt can effect the brush shape when you set the Stiffness to Flexible.

Step 4
Below there’s one path drawn with my tablet’s stylus showing the Flat Fan Brush in action, what the stroke looks like once I take the stylus off the tablet, and what the Outline Mode of the path looks like. Often the Bristle Brush’s strokes look very painterly while you’re drawing a path and the moment you draw an additional stroke or unclick your mouse it will render itself into scalable, vector-form which is often far less painterly.

Step 5
Another brush shape is the Flat Blunt Brush. This one mimics the look of an acrylic or oil brush quite nicely. The options below are those I used in the strokes further down. The difference in the opacity, size, and shape are all due to pressure and how each stroke is made. Horizontal strokes are broad, Vertical strokes are thin and look denser, Diagonal strokes taper at the end, and Circular strokes combine all three aspects.

Step 6
The last bristle brush to be showcased in this Quick Tip is the Round Point Brush. I’ve kept the size small at 1mm, the Bristle Length Short, Density High, Thickness relatively Coarse, Opacity moderately Opaque, and the Stiffness midway between Flexible and Rigid. It works quite well for sketching as you would with a sharpened pencil (the larger strokes for the hair were done with a thicker, coarser brush).

Step 7
Combining brush shapes for sketching and painting can lead to interesting results. In the case below I sketches out a lily with the Round Point Brush from Step 6 and “painted” it with both the Flat Fan Brush and the Flat Blunt Brush from Steps 3 and 5. This is a quick example of sketching in a painterly fashion with bristle brushes.

Conclusion
The Bristle Brush is fantastic for bringing a painterly style to your vector work in Illustrator. It allows for an imitation of traditional media while staying scalable and easily manipulated through each brush’s options before or after the paths are drawn. Additionally, bristle brushes can be applied to any stroke created in Illustrator: Pencil Tool (N), Polygons, Pen Tool (P), etc.

{excerpt}
Read More