In this tutorial we’re going to learn about the majestic deer. No matter if it’s a huge moose, or a small and timid roe deer, after this lesson you’ll know how to draw every one of them with correct anatomy and colors – and those beautiful antlers of theirs!
1. Deer Skeleton and Their Silhouette
Step 1
Every anatomy lesson should start from a skeleton of the animal. This way you’ll understand which poses are natural and which aren’t. As you can see, deer have a strong, long neck, thin legs similar to a horse, and a powerful chest. However, they’ll never look as noble and proportionate as horses.

Step 2
Skeletons are useful, but they don’t need to be learnt by heart – they’re hidden under muscles, after all. What we really need are proportions and a pose. Choose one of them and we can go further!
Let’s start with a silhouette of a red deer or an elk (wapiti). They’re almost identical, so we’ll treat them as one for this part of the tutorial.

Step 3
Here comes the reindeer (caribou)!

Step 4
The moose…

Step 5
…and the fallow deer.

Step 6
Meet the roe deer.

Step 7
Here comes Bambi – the white-tailed deer. This silhouette can be also used for the black-tailed deer and the mule deer, since they’re closely related.

Step 8
When it comes to a fawn, start with proportions like below.

Step 9
Now you can draw a pose for your chosen species. I chose a red deer, as they look so powerful and noble (in fact, the Polish name for this deer is “noble deer”). If you want to learn more about the movement and different poses, horse anatomy comes in handy.

2. Muscles and Advanced Proportions
Step 1
Let’s build a body for our deer. You can start with simplified blocks of muscles like below:

Step 2
When you want to draw a powerful buck, well defined muscles can be very useful. In reality they’re usually hidden under thick fur, but drawing has its own rules. Learning the muscles will also help you understand what’s going on with the body when it moves.

Step 3
There isn’t one universal body for a deer. There are many species, each of them with their own unique features.
Red deer and wapiti are both very large deers. When drawing them, don’t forget about a massive, wide barrow, long legs, short tail stuck to the body and a mane on the neck (although it’s not obligatory).

Step 4
As you can see, a reindeer is very similar to other deers. Its legs are short and barrow long. The mane hangs loosely, giving an impression the neck is more powerful. The tail is short and round, and the hooves are wide to make walking on the snow easier. A reindeer should look a bit clumsy – giving it a noble shape of a horse is a mistake!

Step 5
A moose can’t be confused with any other deer – it’s the biggest of them, with unique antlers and a big hump on the back. The legs are long and look a bit fragile on comparison to the massive barrow. The hooves are wide to help at walking on the swamp. There’s a flap of skin called dewlap under the neck.

Step 6
A fallow deer has a classic smaller deer body – a slim barrow, long, proportionate legs and a slender neck without a mane. The tail is quite long and narrow.

Step 7
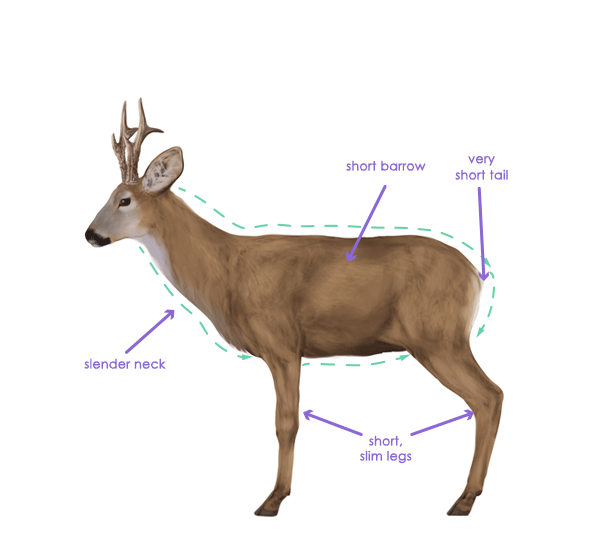
A roe deer is the most popular deer species in Europe. It’s quite small, with short barrow, slim legs and slender neck. The tail is so short that it’s almost invisible.
Step 8
A white-tailed deer isn’t too big, but very slim and finely built. Its barrow is short, but slim. The neck and legs are slender. The tail is quite long and wide. This kind of body is proper for a black-tailed deer too, but for a mule deer use a shorter, stronger neck.

Step 9
When drawing a fawn, don’t just resize an adult body. A fawn, just like a foal, looks a bit grotesque – its legs are very long in comparison to a tiny body. The head is small and attached to very short neck. Bambi is a good reference here!

Step 10
So, you can now draw a proper silhouette for your deer. Start with the muscles and then erase the places where they cross.


3. Deer Hooves
Step 1
Deers are even-toed, what means their hooves are made of two toes. They also have two dewclaws – little hooves at the back of each foot. Just like horses, they walk on their fingertips, and the dewclaws are attached to the wrist.

Step 2
To draw a foot for your deer, add three lines to every leg – two for the toes and one for a visible dewclaw.

Step 3
The toes should end with triangles.

Step 4
Draw an oval between the wrist and the triangles.

Step 5
Now you have everything to draw a correct foot. Use the shapes as guide lines.

Step 6
Here is my deer with his feet added:

4. Draw a Deer Head
Step 1
To draw a deer head start with a circle. Draw two tangents for it.

Step 2
Draw a line between the middle of the circle and the crossing of the tangents.

Step 3
Now draw a smaller circle (mouth) in the corner created by the tangents. For a deer with a shorter head (like roe deer or white-tailed deer) draw it closer to the big circle.

Step 4
Draw a bigger circle crossing the mouth.

Step 5
To place the eye for any deer except the reindeer and the moose drive a line in the middle of the left half, then cross this line with two others, in 1/3 and 2/3 of its length.

Step 6
Add an ear and a bone to start the antlers (only for males).

Step 7
Use the guide lines to draw the lines of the head.

Step 8
Let’s come back to the reindeer. Its eyes are a bit smaller and further placed, so instead of dividing the left half into halves again, make it the thirds.

Step 9
The antler base is flatter here:

Step 10
Creating lines for the reindeer head keep in mind it should be more narrow, without strong cheeks.

Step 11
Moose have very small, weak eyes, so using the same base as of other deers would be a mistake. Divide the left half into fourths and place the eye in one of them.

Step 12
You can skip the antler base here.

Step 13
When adding the main lines, remember about the “humpy” mouth. The cheek can be strong as the red deer (especially if you want to draw a big, strong buck) or more narrow.

Step 14
When drawing a doe, keep her skull more gentle and narrow, without any antler base. The head may look longer than the males.

5. Deer Head Details: Eyes, Nose, Ears
Step 1
A deer eye is similar to a horse’s. They’re dark, with a horizontal pupil that isn’t really visible, and big bone masses around. They’re the same for every species – the only difference is size and color of fur around the eye.

Step 2
Reindeer and moose don’t have a defined nose. The rest of deers have a patch of thick skin ingrown into the mouth, without any hump like at dogs or cats. The patch can cover the upper part of nostrils too, giving an impression whole mouth is a nose.

Step 3
The ear shape varies among the species, but the general rule stays the same. They’re narrow at the base and wider in the middle. Some of them will have a sharp tip, others – round. We’ll talk about it in a moment.

Step 4
We’ll now learn about unique features of every species’ head.
The red deer and wapiti:
- The ears are long, narrow and sharp;
- The eyes are big, round, with well defined tear mark. Make the eye more narrow to achieve noble look;
- The mouth is ended with a big, dark nose;
- The cheeks are wide, strong, a bit horse-like.

Step 5
The reindeer:
- The eyes are small, round, placed far from the mouth, with a grey patch around;
- The nose is covered with soft, white fur – no thickened skin here. The rest of the mouth is dark;
- The ears are long and sharp;

Step 6
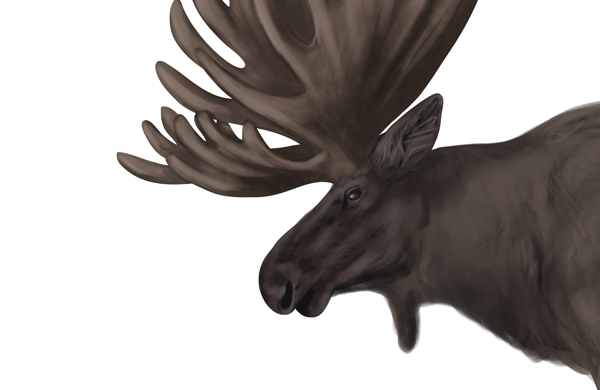
The moose:
- The eyes are small, round and weak;
- The nostrils are wide, falling downwards;
- The nose isn’t covered with a thickened skin;
- The ears are long and big.
Step 7
The fallow deer:
- The eyes are big and round, with light hair around;
- The ears are big and rounded;
- The nose is dark, placed on a lightly colored mouth.

Step 8
The roe deer:
- The head is short, with a grey patch on the face;
- The eyes are very big in comparison to small head, yet not “childish”;
- The ears are very big and round;
- The nose is dark;
- There’s a dark line driven from the nose to the chin.

Step 9
The white-tailed deer:
- The ears are big and round;
- The eyes are big, round, with a white patch around;
- The nose is dark, there’s also a dark line crossing the mouth;
- There’s a light, rectangular patch under the throat.

Step 10
I added the head for my red deer:

6. Colors of Deer
Step 1
Although red deer and wapiti are almost the same (some people say they are one species), you can use different colors for them to stress the difference.
Wapiti/elk/stag:
- The mane, legs and head can be darker than the rest of the body;
- The base color is more yellowish than reddish;
- In the winter the fur becomes thicker, lighter and less saturated.

Red deer:
- The fur is mostly consistent, but the mane can be darker too;
- The fur is generally more reddish than the wapiti.

Step 2
Reindeer:
- The colors can be very different depending on the season;
- The mane is generally grey and legs dark. The rest can be very mixed, becoming more consistent in winter.

Step 3
Moose:
- The fur is very consistent, dark, with a bit lighter legs;
- Moose don’t have a special winter coat.

Step 4
Fallow deer:
- It keeps its spots after growing up;
- There are four main coats of a fallow deer. The spotted ones are most common, the melanistic and leucistic are rare;
- The lower body is lighter than the upper;
- There’s a dark line at the white tail;
- In some places spots merge into lines.

Step 5
Roe deer:
- The fur is rather consistent, orange brown in summer and grey in winter;
- The face is greyish, and there’s a light patch under the throat;
- The rump patch is very light, without a distinguished tail.

Step 6
White-tailed deer:
- The fur is consistent, with a light belly and rump patch;
- There’s a rectangular, white patch under the throat;
- The tail is wide, with a black/brown tip, but white in general.

Step 7
As it was said before, white-tailed, black-tailed and mule deer are close relatives. They’re very similar to each other in color and silhouette, but they can be distinguished with their tails and antlers.
- White-tailed deer have antlers with prongs growing in a row. The tail is wide, white, sometimes with dark covering, but not on the whole length;
- Black-tailed deer have branched antlers and a tail covered with black patch;
- Mule deer have branched antlers and a white tail with rounded, black tip. Also notice the black patch on the forehead.

Step 8
The fawns are rather similar at every species, so feel free to use a bright orange brown fur with light spots.

7. Draw the Antlers
The antlers are characteristic to each species and they’re the easiest way to distinguish deers. They’re made of bone, they’re full, not empty inside, and they’re being shed every year. Females don’t grow antlers, with one exception – the reindeer.
Step 1
How to draw red deer antlers:

Step 2
How to draw reindeer antlers:

Step 3
How to draw moose antlers:

Step 4
How to draw fallow deer antlers:

Step 5
How to draw roe deer antlers:

Step 6
How to draw white-tailed deer antlers:

Step 7
The antlers usually grow as simple spikes the first year, and then gain more prongs (tines). The amount of tines isn’t strictly connected to the age, rather to the condition of the buck, since they’re testosterone driven.
Freshly grown antlers are “alive”, filled with blood and covered with a velvet that makes them look soft. Right before the mating season (usually autumn) the antlers get dry and die, and the velvet is being rubbed away. After the mating season the antlers are being shed.

Step 8
My buck got his antlers. It only needs to be polished now!

Congratulations!
Wasn’t it an interesting tutorial? Now you can draw every deer you want – there’s so many of them!
{excerpt}
Read More