Today we’ll discuss something really interesting. I discovered that electronic dance melodies can be really cool if you add a multiband compressor after the effects chain.
This technique can be handy when you are playing a melody in different octaves. These melodies can have a wide dynamic range—especially if you’re using distortion effects on your synth. But EDM lead melodies are not meant to have much dynamic range.
It can also help when some notes are not loud enough compared to others. With this technique, you can easily rewrite the dynamic range of melodies.
What’s Multiband Compression?
According to Wikipedia:
Multiband (also spelled multi-band) compressors can act differently on different frequency bands. The advantage of multiband compression over full-bandwidth (full-band, or single-band) compression is that unneeded audible gain changes or “pumping” in other frequency bands is not caused by changing signal levels in a single frequency band.
Multiband compressors work by first splitting the signal through some number of band-pass filters or crossover filters. The frequency ranges or crossover frequencies may be adjustable. Each split signal then passes through its own compressor and is independently adjustable for threshold, ratio, attack, and release. The signals are then recombined and an additional limiting circuit may be employed to ensure that the combined effects do not create unwanted peak levels.
Multiband expansion is similar, but widens the dynamic range, rather than narrowing it.
Every note has its own frequency; for example, middle C is 261.63Hz. Every octave has a frequency band; for example, C1 to C3 is 32.7-261.63Hz.

It’s good to become familiar with these frequencies, so you can more easily set up the frequency bands of the multiband compressor based on your melody notes. Of course, you could always set them up with your ears.
Step 1. Create a Melody
Create the melody you see in the image below. As you can see, all notes are between the F2-F4 octaves. I used a basic Sylenth patch. If you’d like to use it, you can download it in the Playpack above.

Use a lot of distortion, but give different bands different distortion values, as in the image below.

Add some reverb and delay. Listen the sound without any compression:
You can hear that the lower notes are not as loud compared to notes in the mid and high range. This is especially true for notes in the F3 octave.
Step 2. Configure the Multiband Compressor
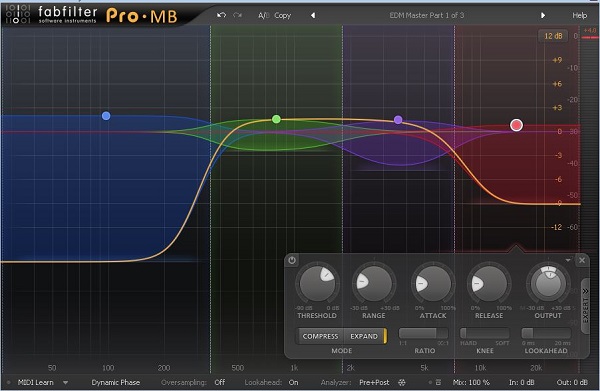
Drag and drop any kind of multiband compressor onto the project. A good choice would be Fabfilter Pro MB, which is easy to calibrate.
Split the frequency spectrum into four bands with the following crossover frequencies:
- Band1: 353Hz
- Band2: 1.8kHz
- Band3: 7.2 kHz.
I decided on these frequencies by ear.
There are lot of approaches to reaching the desired effect—to make the lower frequencies louder than the higher ones. I decided to use an expander on these frequencies, and compression on the middle bands to decrease their volume. My aim was that every frequency band have the same level.
Use the parameters in the images below. If you’re not familiar the basic compressor/expander parameters, check out Mo Volans’ tut on multiband compression, or browse our creative session on compression.


Listen the the melody now:
You can hear that the lower notes are now a lot louder, and the middle ones are not as loud, especially when the melody jumps from C3 to E4. In the original melody, you can hear a huge volume increase at that jump. Now you can’’t—the multiband compressor is doing its job.
Listen the melody in context:
In that last audio example I used different settings, and expanded all of bands, but with different values.
Conclusion
I hope you learned a lot from this quick tip. It was quite advanced, but if you want to become a good producer, you’ll need to know how to use multiband compressors and expanders on your melody to add impact to your track.
Happy music making!
{excerpt}
Read More