Even people who don’t really like insects are fascinated by the beauty of their wings. In this tutorial I will show you how to draw wings of the most distinctive species and how to design your own wings following universal butterfly rules. Good news is realistic butterflies can be drawn even by total beginners! Sounds interesting? Let’s get started then!
1. Draw a Butterfly Body
Step 1
To draw butterfly wings first we need a body to attach them. You can draw it very figuratively, or spend a few more minutes on it for a more realistic effect. If it’s a winged fantasy creature you want to draw, you can skip this step.
Here’s what you need to know about a butterfly anatomy:
- Wings are attached to the thorax and they overlap each other when folded – the hindwing is on top then;
- The thorax is covered with soft fur;
- The abdomen is longer than the thorax and visibly segmented. It can also be covered with fur;
- Every butterfly has three pairs of legs, but the first pair is always shorter – sometimes it’s so short that almost unnoticeable (so there’s no need to draw it);
- The most important sensors on a butterfly’s head are antennae and palpi. Palpi look like short antennae, except they’re heavily covered with fur;
- The eye of a butterfly is big, oval and compound;
- A butterfly doesn’t have jaws, only a direct “drinking straw” – proboscis – that can be coiled up and extended when needed;
- Whole body can be colored and spotted to fit the wings.


Step 2
To draw a butterfly body from an aerial view:
- Draw three oval overlapping each other: one small, one big and round, one long and narrow;
- Divide the smallest oval into halves and add the ovals for eyes;
- Add the antennae and palpi at the top of the head;
- Divide the abdomen into segments;
- Cover the thorax with fur.

2. Butterfly Wing Anatomy
Butterfly wings can be very different, small or big, wide or narrow, colorful or transparent, round or ragged. However, there are features common to all kinds of butterflies.
Step 1
The forewings can be equal or bigger than hindwings – never smaller.

Step 2
If the hindwings are kept close to the abdomen, they may need to be bent when wings are expanded.

Step 3
Usually front (top) side of the wings are the most colorful, while the back (bottom) one are less distinctive. It helps the butterfly blend into the environment when in danger.

Step 4
When it comes to the structure of the wings, it’s the same for all butterflies. Butterfly wings are basically triangular, with three margins that round their shape – costal, outer and inner one. The forewings have also an apex that makes them longer.

3. Draw Butterfly Wings
Step 1
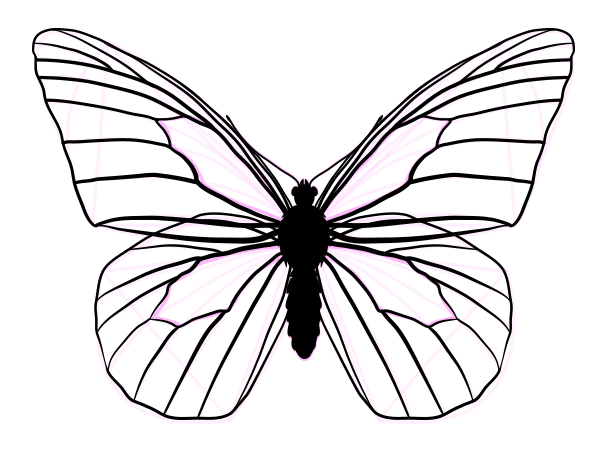
Start with four triangles attached to the body. They can be any size you need.

Step 2
Add the round margins. Inner margin of forewings overlaps the costal margin of hindwings. The size of the margins and their angle can be adjusted to your needs.

Step 3
Attach an apex at each of the wings. An apex can be small and almost non-existent, or long and protruding.

Step 4
Draw arcs bursting on curves from the base of the wings.

Step 5
Cross the costal margins with arcs.

Step 6
Separate the inner margins with rough straight lines.

Step 7
Now connect a few of the arcs at every wing, creating a cell in the middle called discal cell.

Step 8
It’s done! Now you just need to add various widths to all the lines to make them more natural.

4. Draw a Monarch Butterfly
Step 1
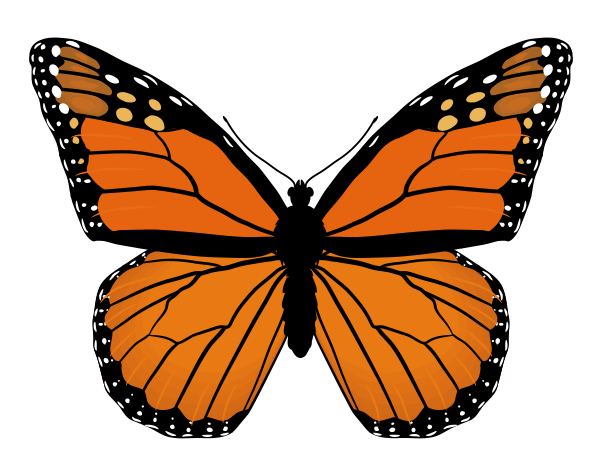
Let’s start with the most popular species of North America – the monarch butterfly. We can use the sketch from the previous exercise.

Step 2
Fill the costal and inner margin with black.

Step 3
Fill the outer margin with black too, creating a wavy border attached to the veins.

Step 4
Add a black patch in the upper part, leaving the apex clear.

Step 5
Time to add the spots! Draw very thin, short lines at the borders, then two circles right over them. Every cell should have two of these groups.

Step 6
Now we can add the colors. Both wings are bright orange, with the hind ones being a bit more yellow. The spots near the apex are yellow. The apex itself is a bit darker, because the veins are so close to each other at this place.

5. Draw a Mountain Blue Butterfly
Step 1
Papilio ulysses, also called mountain blue, is a beautiful, big butterfly from Australasia. Its wings have a long, regular costal margin and wavy borders in the hind, with so called tails.

Step 2
In forewing fill costal margin, apex and outer margin with black, leaving a little space next to the discal cell. Blacken the costal and outer margin of the hindwings too, keeping the wavy border.

Step 3
In the forewings, add grey “leaves” along the veins of the outer margin. They should be only a bit lighter than the black around.

Step 4
Add a little black triangle at the top of discal cells of forewings.

Step 5
You can now add the colors. The hindwings will be a bit lighter than the forewings, with a slight greenish shade. You can also add a few narrow spots at the border of hindwings.

6. Draw a Common Yellow Swallowtail
Step 1
Did you know that calling this butterfly the swallowtail is a mistake? It’s actually a name of a whole family, not just this particular species. Anyway, back to drawing. Its wings are pretty similar to the monarch, with the characteristic tails in the hindwings added.

Step 2
Fill all the outer margins of the forewings with black. In the hindwings, blacken the zone right next to the outer margin, and make the blackness running down the veins. Add a “comma” in the inner margin, and also stress the top of the discal cell.

Step 3
In the forewings, fill half of the discal cell with black, and add a thick stripe in the other half. In the hindwings, add black stripes connecting the veins right before the border. Blacken half of the inner margin too.

Step 4
In the forewings, blacken the top of the discal cell. Stress some of the veins touching the discal cell. Blacken a base of the apex and then add black stripes in the costal margin, connecting them with other black patches.

Step 5
Let’s add colors! The base colors for our butterfly is light yellow. Add blue, diffused spots to the blackness in the hindwings. Don’t forget to add the distinctive red spot in the inner margin! In the forewing decorate the outer margin with base colored spots.

Step 6
Our butterfly doesn’t use all its veins as decoration. Some of them are strongly covered with the base color. Also, the blackness in the inner parts of the wings (next to the body) are mix of black and base color.

7. Draw an Amazon Angel
Step 1
Time for my personal favorite, a rain forest butterfly of the chorinea family. It’s quite rare, but hey, it has transparent wings! When it comes to its wings structure, the hindwings have an interesting shape and very long tails. The body itself is pretty stocky.

Step 2
In the forewings, blacken costal and outer margins with straight lines. In the hindwings, fill the outer and inner margins with black, merging them above the tails.

Step 3
Cross the wings with straight, thick lines touching the discal cells.

Step 4
Some of the veins are transparent too, giving an impression there is more big cells. The membrane is transparent and clear like a foil.

Step 5
There are some colors too! Add blue spots right next to the inner margin, and a bright red patch below.

8. Design Your Own Butterfly
Step 1
If you want to create your own butterfly, start with your chosen wing shape. As you’ve already noticed, wings can be round and short or long and narrow, with a characteristic tail. You can also let your imagination run wild and add even more tails! That’s your butterfly and you can do anything with it, as long as you follow the general rules.

Step 2
The wings can be fully expanded or folded. The angle between them will change the general shape of the wings – even narrow and long wings look rounder when folded.

Step 3
The easiest way to start with a pattern is to blacken/darken one or more of the margins. You can also use a mix of them, for example blacken costal and outer margin of the forewing, and inner margin of the hindwing. The margins can be straight or merging into the veins.

Step 4
Blackened areas are great to place contrasting spots on them. They can be any shape, any size, and they don’t need to be symmetrical.

Step 5
Thick stripes can be used to fill the middle area of the wings. You can place them next to the margins or play with them, drawing completely crazy patches.

Step 6
You can also stress the base elements of the wings, veins and cells, to create interesting patterns.

Step 7
A lot of butterflies have “eyes” on their wings to scare the predators. To create them, draw contrasting, roughly concentric ovals. Black and white give the best effect, but you can also use colors for them.

Step 8
Last but not least, colors! It’s the easiest thing, but here’s a few tips. Forewings are usually darker than hindwings, sometimes even their colors are totally different. Always pick a base color first, then check what colors will fit for the other elements.

Great Work, You’re Now Done!
Now you should be able to draw any butterfly you want. If you’d like to share your result, feel free to post it in the comments section.
{excerpt}
Read More