Active camouflage is a sci-fi concept, usually seen in the form of a suit that allows the wearer to become almost invisible. It can be seen in movies such as Predator and Die Another Day, and games like Halo and Crysis.
This tutorial shows you how to achieve such an effect in Flash by animating a displacement filter using a sequence of bitmaps. Not only is the effect cool, but this technique is rarely seen in online tutorials.
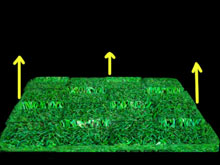
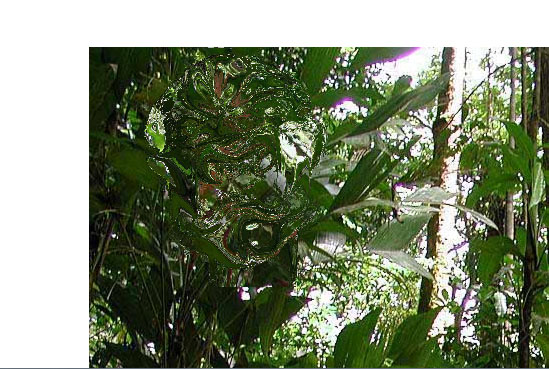
Final Result Preview
Let’s take a look at the final result we will be working towards:
Step 1: Displacement Mapping in Flash
Displacement mapping is a texture map that is used to modulate the displacement strength. Displacement means literally moving the pixels of a surface out of place. In most 3D applications, the pixels are displaced along the surface normal. In Adobe Flash, the displacement happens in 2D space, along the X and Y coordinates of an image.
Displacement filters in Flash are usually animated by dynamically changing their intensity (the scaleX, and scaleY parameters), changing the position of the displacement bitmap (the mapPoint parameter), or by manipulating the color channels. This tutorial will further explain these techniques, but we’ll also study a different one, which uses a bitmap sequence to draw a new displacement map on every frame.
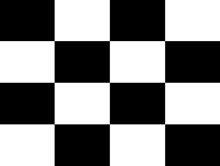
Example of displacement along the surface normal.

Example of displacement mapping in flash, along the X and Y axes.
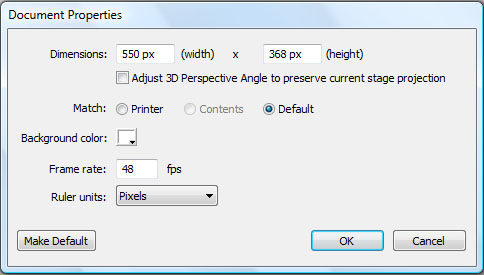
Step 2: Flash Document
Open a new document in Flash and set up the size to 550×368 so it matches our background image. Set the frame rate to 48fps. The displacement filter is actually going to run at 12fps, but in case you want additional animation later on it would look smoother at 48fps.
Click File > Publish Settings > ActionScript 3.0 Settings and turn off “auto-declare stage instances”.
Step 3: Import the Background
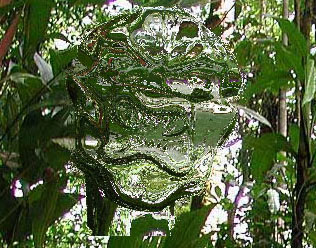
Import rainforest.jpg to the stage.

Press Ctrl+K to align and match the canvas size. This is going to be our background image.

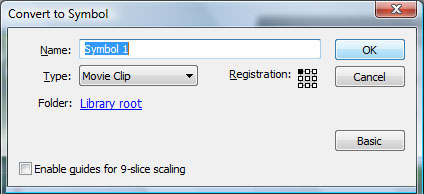
Now with the image selected, press F8 to convert it to a Symbol. Select “Movie Clip” in the type menu.
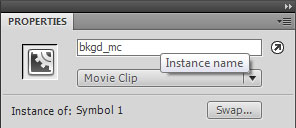
If the properties window is closed, press Ctrl + F3 to open it. We are going name the movie clip that was just created. On the instance name field, type “bkgd_mc”.
Step 4: Import the Bitmap Sequence
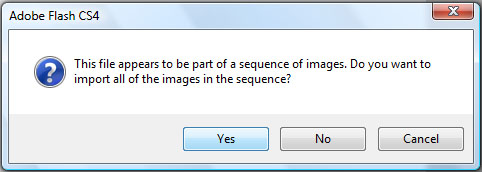
Now press Ctrl+F8 to create a new movie clip altogether. We aren’t naming this just yet. First we’re going to import the bitmap sequence inside this movie clip. Go to File > Import > Import to Stage. Select the first image of the sequence, which is called ” pred0001.jpg ” . Flash is going to ask if you want to import all images in this sequence. Click yes.
Step 5: Convert The Bitmap Sequence
You will notice that each bitmap is placed on a keyframe along the movie clip time line. Starting on frame 1, select the image and press F8 to covert it to movie clip. Do this on every frame until the end of the sequence. Do it in order, from first to last and make sure you don’t skip any frames, otherwise it will mess up the animation.
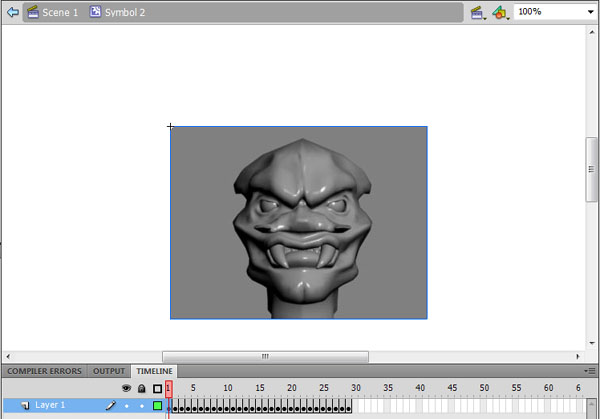
Once you are done, each key frame should have one movie clip containing a frame of the character’s face. Select frame one again and press enter to see the animation.
Step 6: Distribute to Layers
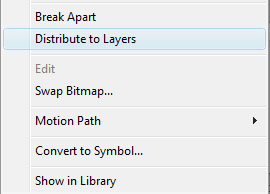
Select the movie clip on frame 1. Right-click and distribute to layers. Again, do it to all movie clips on all frames. When you’re finished you will no longer be able to see the animation, only the image on the top layer.
Step 7: Drag the Movie Clip to the Stage
Press Ctrl + L to open up the library, and drag “Symbol 2″ to the stage. In the properties tab name this instance “displ_mc”. This movie clip will be used in our displacement filter.
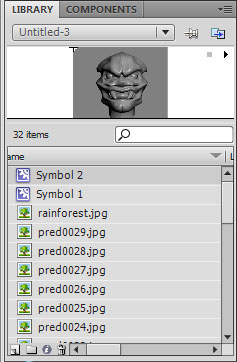
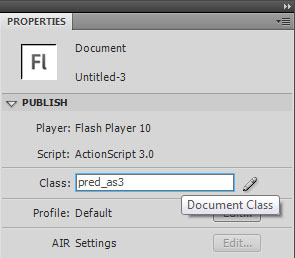
Step 8: Create the Document Class
We are going to write the code for our displacement map filter inside a document class file. Create a new Actionscript file and name it “pred_as3″. Now paste this code:
package {
import flash.display.MovieClip;
import flash.display.BitmapData;
import flash.display.IBitmapDrawable;
import flash.display.BitmapDataChannel;
import flash.filters.DisplacementMapFilter;
import flash.filters.DisplacementMapFilterMode;
import flash.geom.Point;
import flash.events.Event;

	public class pred_as3 extends MovieClip {
                                                }
}
Go back to the flash document and name the class pred_as3.
As you can see we’ve already imported all the classes that we’ll need in this tutorial, now let’s continue writing the document class. Add this code to it:
private var clipcont= new Array();// all the animated frames will be stored in this array
private var count:Number; //part of the enterframe loop; tells which frame of animation will be shown
private var timer:uint = 0;//sets the speed of the animation

public var displ_mc:MovieClip;
public var bkgd_mc:MovieClip;
We are stating a few variables that will be used later on. They need to be declared before the class constructor if they are to be used by more than one function in the document class.
Step 9: Create The Displacement Filter
Right below the last line, we begin to write the parameters and the constructor of the displacement map filter.
private var strength1:int = 120; // the value of scaleX and scaleY - sets the intensity of the displacement filter
private var mapBitmap:BitmapData = new BitmapData(320,240);// the size of the displacement map in pixels
private var mapPoint:Point = new Point(0,0);// the position of the displacement bitmap
private var componentX = BitmapDataChannel.GREEN;// which color channel is used; doesn't really matter since it's in shades of gray;
private var componentY = BitmapDataChannel.GREEN;
private var spe:int = 1;//changes the strenght of the displacement filter

//all variables are then applied to a new filter
private var filter:DisplacementMapFilter = new DisplacementMapFilter(mapBitmap, mapPoint, componentX, componentY, scaleX, scaleY);

private var filterList = new Array();//  a filter list array.
So we’ve set parameters for strength, size, position and RBG channel. Let’s take a closer look at each one of these parameters..
Step 10: Displacement Strength
As mentioned earlier, displacement in flash is only possible along the X and Y axes. The parameters that set the displacement strength for X and Y are scaleX and scaleY respectively. In this tutorial we’re going to use the same strength on both X and Y axes, so we’re using the same variable strength1 for both parameters. Below is an example of displacement along the horizontal axis, with scaleY set to zero (left image), and the vertical axis, with scaleX set to zero (right).

Step 11: Size of the Displacement Map
Notice how the size is set to 320×240. We already know the size of the bitmaps in the animation and the constructor must have the same size as them. If the value in the constructor is greater than that of the bitmaps, there’s going to be displacement in areas where it should not happen. The #808080 gray around the character’s head is a neutral color, on the other hand any area that is empty, or a transparent bitmap would actually displace the background image.

Example of the value set in the constructor being larger than the actual displacement map: The empty areas displace the background.
Step 12: RGB Channel
The displacement filter uses only one of the 3 RGB channels on a bitmap for each axis. When using a colored bitmap as a displacement map, each channel will give very different results as shown in the example below. In this tutorial we’re using an image in shades of gray, so the channel is irrelevant. ComponentX and componentY are set to green, but the same effect would be obtained using the red or blue channels.
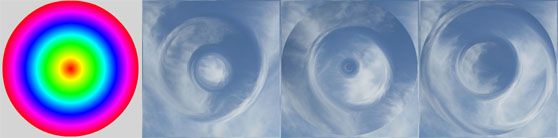
The different results obtained using the green channel, red channel or the blue channel.
Step 13: MapPoint
The parameter mapPoint sets the position of the displacement map. The position is relative to the object that it’s applied to, and not the stage. By setting the position to (0,0), the displacement map appears in the top left corner of our background image, which won’t always coincide with the top left corner of the stage, as shown below.
The mapPoint parameter is relative to the object, not the stage.
Step 14: Apply The Filter
Now let’s apply the displacement filter to our background image “displ_mc”. The displacement filter is pushed into an array of filters, and we do this inside the class constructor. We’re also adding our two main movie clips to the stage with the addchild method. In AS3 the class constructor is the first function to be executed in a document class and it’s called automatically, so it’s better that any functions or methods that need to be run upon loading are called from inside a class constructor.
public function pred_as3() {

addChild(displ_mc);
addChild(bkgd_mc); // add both Movie Clip instances to the stage
filterList.push(filter);// add the displacement map filter to the array.
bkgd_mc.filters = filterList; // applies the array of filters to the target movie clip.
storeClips();

}
The last line of code is calling a function that hasn’t been written yet. As the name suggests this function will store all animated movie clips in an array. So let’s go ahead and write that now.
Step 15: Store The Animation Into an Array
So we created a displacement map filter and applied it to the movie clip, but we haven’t added any bitmaps to the filter yet. We are going to do this in two steps: First we are going to store the animation in an array, then later we will add this animation to the filter.
private function storeClips():void //stores the animation in an array
{
	count = displ_mc.numChildren;//the total number of movieclips inside displ_mc

for (var i:int = 0; i < displ_mc.numChildren; i++)//finds all movieclips inside displ_mc
	{

	clipcont.push(displ_mc.getChildAt(i));// frames are pushed inside the clipcont array

        }
}
This function uses a for loop to scan all the movie clips inside displ_mc. We want the animation frames that were converted to movie clips earlier in this tutorial. Remember when I said to convert them frame by frame? We did that so the frames could be sorted properly and later on accessed using the getChildAt() method. Since we didn’t name any of those instances, Flash sorts them internally by order of creation. If the bitmaps were randomly converted into movie clips, the animation would never play correctly. So the frames can now be pushed into the clipcont array, one by one.
The code so far should look like this:
package {
	import flash.display.MovieClip;
	import flash.display.BitmapData;
	import flash.display.IBitmapDrawable;
	import flash.display.BitmapDataChannel;
	import flash.filters.DisplacementMapFilter;
	import flash.filters.DisplacementMapFilterMode;
	import flash.geom.Point;
	import flash.events.Event;

	public class pred_as3 extends MovieClip {

private var clipcont= new Array();// all the animated frames are stored in this array

private var count:Number; //part of the enterframe loop; tells which frame of animation is being shown
private var timer:uint = 0;
public var displ_mc:MovieClip;
public var bkgd_mc:MovieClip;

private var strength1:int = 120; // sets the intensity of the displacement filter
private var mapBitmap:BitmapData = new BitmapData(320,240);// the size of the displacement map in pixels
private var mapPoint:Point = new Point(0,0);// the position of the displacement bitmap
private var componentX = BitmapDataChannel.GREEN;// which color channel is used; doesn't really matter since it's in shades of gray;
private var componentY = BitmapDataChannel.GREEN;
private var spe:int = 1;

//all variables are then applied to a new filter
private var filter:DisplacementMapFilter = new DisplacementMapFilter(mapBitmap, mapPoint, componentX, componentY, scaleX, scaleY);

private var filterList = new Array();//  a filter list array.

//CLASS CONSTRUCTOR
public function pred_as3() {

addChild(displ_mc);
addChild(bkgd_mc); // add both Movie Clip instances to the stage
storeClips();
filterList.push(filter);// add the displacement filter to the array.
bkgd_mc.filters = filterList; // applies the set of filters to the target movie clip.

}

private function storeClips():void //stores the animation in an array
{
	count = displ_mc.numChildren;//the total number of movieclips inside displ_mc

for (var i:int = 0; i < displ_mc.numChildren; i++)//finds all movieclips inside displ_mc
	{

	clipcont.push(displ_mc.getChildAt(i));// frames are pushed inside the clipcont array

        }
}

}
}
Step 16: Animate the Displacement Filter
Now that we have the animation ready to use, let’s put it in the displacement filter. We are going to access the clipcont array with a “time released” loop using the Event.ENTER_FRAME class. Every 4 frames, a new bitmap in the array is accessed, and then applied to the filter using the draw() method. After the last frame in clipcont is drawn, the loop starts over and the first frame in clipcont is drawn. It’s an endless loop.
  private function animate(e:Event) {

    filter.scaleX = strength1;  //sets the value of scaleY and scaleX
    filter.scaleY = strength1;

if(timer > 3) // a new frame is drawn every 4 frames
{
	if(count <= 0)
	{
		count = clipcont.length;// setting an infinite loop

	}
count--;
timer = 0;

}

	if (clipcont[count])
	{
		filter.mapBitmap.draw(clipcont[count]);// a new frame of animation is drawn
	}
	bkgd_mc.filters = filterList;//updates the filter

 }
Copy the above lines to your actionscript file. Now let’s make this run by adding an event listener to the class constructor.
public function pred_as3() {

addChild(displ_mc);
addChild(bkgd_mc); // add both Movie Clip instances to the stage
filterList.push(filter);// add the displacement map filter to the array.
bkgd_mc.filters = filterList; // applies the set of filters to the target movie clip.
storeClips();
addEventListener(Event.ENTER_FRAME, animate); //calls the animate function on enter frame

}
Update the class constructor with the addEventListener method. Now the animate function has been added to the stage and is called on every frame. Test the effect pressing Ctrl + Enter. You should see the animated face on the top left corner of your movie.
Step 17: Make it Follow the Mouse
We have an animation loop running in the corner of the movie. Let’s make the displacement map follow the mouse, this way you will be able to see how the active camouflage effect looks against different parts of the background. Paste this line inside the animate function:
  private function animate(e:Event) {

    filter.scaleY = strength1; //sets the value of scaleY and scaleX
    filter.scaleX = strength1;

	timer++;

if(timer > 3) // a new frame is drawn every 4 frames
{
	if(count <= 0)
	{
		count = clipcont.length;// setting an infinite loop
	}
count--;
timer = 0;

}

	if (clipcont[count])
	{
		filter.mapBitmap.draw(clipcont[count]);// a new frame of animation is drawn
	}

        filter.mapPoint = new Point(mouseX-160, mouseY-240);  //  displacement map follows the mouse

	bkgd_mc.filters = filterList;
 }
This way we update the displacement map position on an enter frame basis using the mouseX and mouseY properties. Press Ctrl+Enter to test it. The head should now follow the mouse.
Step 18: Change the Filter Strength
In the last step of this tutorial we are going to play a little bit with the strength of our filter, increasing the value of the scaleX and scaleY parameters over a period of time, then decreasing back to the initial value. What we’re trying to achieve with this is to make the effect look more dynamic and… visible. While the whole point of a camouflage in real life should be to make things less visible, what we’re trying to do here is to make it look cool. Let’s freeze the animation so you can understand what I’m talking about. In the animate function, replace the line
filter.mapBitmap.draw(clipcont[count]);
with this line instead:
filter.mapBitmap.draw(clipcont[20]);
Instead of drawing the animation, we’re telling flash to draw the same frame over and over again. Press Ctrl+Enter to test it.
The effect looks completely static and boring. Let’s give it some movement. Paste the code below inside the animate function:
  private function animate(e:Event) {

        filter.scaleY = strength1; //updates the value of scaleY and scaleX
	filter.scaleX = strength1;

	timer++;

if(timer > 3) // a new frame is drawn every 4 frames
{
	if(count <= 0)
	{
		count = clipcont.length;// setting an infinite loop
	}
count--;
timer = 0;

}

	if (clipcont[count])
	{
		filter.mapBitmap.draw(clipcont[20]);// a new frame of animation is drawn
	}
    filter.mapPoint = new Point(mouseX-160, mouseY-240);  //  displacement map follows the mouse

	if (filter.scaleX > 220 || filter.scaleX < 120) // filter keeps changing it's intensity, making the effect more dynamic
	{
		spe *= -1;
	}
	strength1 += spe;

	bkgd_mc.filters = filterList;
 }
Now test it with Ctrl+Enter.
See how much better it looks? Ok so you can now restore the animation, fix the line that has been altered:
filter.mapBitmap.draw(clipcont[count]);
This effect is also helpful in case you want to attach a static body to the facial animation later on. It would look more active next to the bitmap animation.
Conclusion
The file may be a little heavy if you use jpeg quality 100, which is what I recommend. In a lower quality the effect loses a bit of its charm. If you want a smaller movie you can compress the images even more in photoshop, but make sure you’re keeping the color scheme right. The color around the character’s head should always be #808080 or you’ll see a box around it.
So this is it. The first tutorial I’ve ever written, it was fun doing it and I hope you had fun reading and make good use of it. I’d very much appreciate your feedback. Thanks for reading!