In this tutorial we are going to create our very own 303 synthesizer sound using the TS404 Bassline Synthesizer plugin in FL Studio. As you might know, there are already five 303 presets that come with Sytrus and a whole lot more with the TS404, so why would I want to make my own sound? Well, I’ve never been a big fan of presets and as Image-Line put it themselves, the 303 presets are “303ish”.
Step 1: Setting up our Project
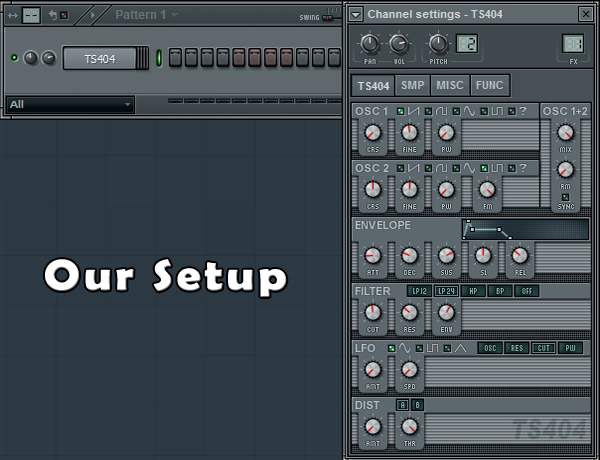
Start of by opening up a new project, right click on kick and replace it with a TS404 bassline synthesizer. As we won’t need the Clap, Hat and Snare it’s probably best if we delete these from the step sequencer to avoid any kind of confusion. I’ve also set the tempo of this project to 130 bpm.
Step 2: Piano Roll Sequence
Now we’re set up we need to create a melody in the piano roll to give us something to work with. To do this, right click on TS404 in the step sequencer and select piano roll. OK, it’s now time to create our bassline. You can use the image below to copy my pattern, download the score file from below or you can create your own. If you’re creating your own pattern try to use a variety of notes, it’s good to see how our 303 will sound if we change from C4 to D#4 in the piano roll.
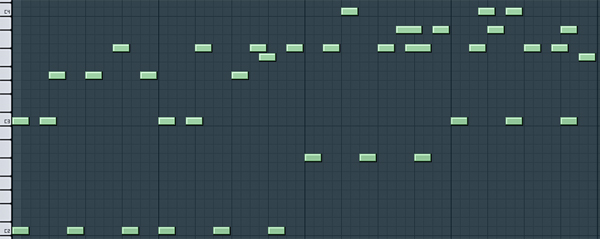
If you’ve used my pattern you should have something that sounds like this.
Download audio file (audioclip1.mp3)
Step 3: TS404 Channel Settings
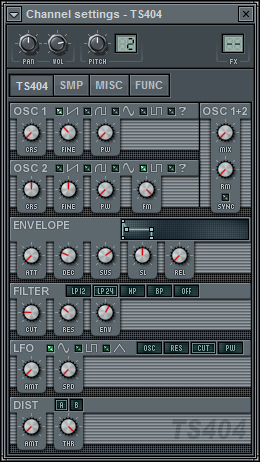
Now we are ready to start tweaking our TS404. So, let’s bring the Step Sequencer back up, click on TS404 and we’ll start. The first thing we need to do is to turn the Mix Dial all the way down. By doing this we’re now only using 1 Oscillator. Our Oscillator uses a Sawtooth shape. (The Mix Dial is the top right dial underneath OSC 1+2.)
Step 4: TS404 Envelope and Filter Setting
Under the Envelope settings we need to turn our Attack completely off. To do this, turn the ATT dial all the way down. If we had Attack on, it would take our note longer to reach its peak. If you turn the ATT dial up about half way you’ll see what I mean. Next we need to do the same for the release, turn it off by turning the REL dial all the way down. The amount of release we have on determines how long it takes our note to reach nil or finish. Once again experiment by turning the dial up and down.
For our filter settings we need to move our CUT dial to left middle and we also need to make sure we have LP24 selected.
LP12 short for Low Pass 12, LP24 short for Low Pass 24, HP short for High Pass and BP short for Band Pass are different types of filters. Once we’ve finished this tutorial, have a play around with each filter remembering to play around with the CUT dial too. It’s all about experimenting
Step 5: TS404 Function Setting
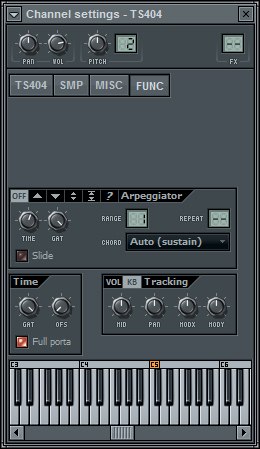
We now need to click the FUNC tab inside our TS404 Channel Settings. All we need to do inside this section is adjust the Gate. So, if we look towards the bottom of the FUNC area we will see the Time section. We will now turn the GAT Dial all the way up.
Download audio file (audioclip2.mp3)
Step 6: Saving Our Progress
Now we’ve finished configuring our TS404 synthesizer settings we are going to add some effects to really get things going. But, before we do this, it might be a good idea for us to now save our TS404 settings as a new preset. To do this we click the little arrow in the top left hand corner, select save channel state as, type our desired name and then click save.
Step 7: Fruity Blood Overdrive
We will now send our TS404 to a free mixer track. To do this we click the arrow in the top left hand corner of our TS404 settings panel and then select assign free mixer track. Next we click the arrow on slot 1 and add Fruity Blood Overdrive which is used as a distortion effect. Now to configure our Overdrive, use the settings from the image below.

Step 8: Fruity Fast Dist
On our next effects slot we will add Fruity Fast Dist. Like Overdrive, Fast Dist is a distortion effect which I’m using to give our 303 a nice gritty feel. Again, use the following settings from the image below.

Download audio file (audioclip3.mp3)
Step 9: Reverb and Delay
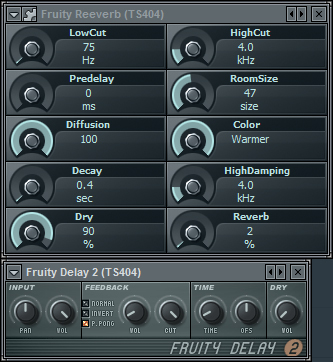
In my opinion, the sound is a little too dry. To get around this we can add some Reverb and Delay to effects slots 3 and 4. These will give our sound more character. The image below shows us the settings I decided on using but I’d recommend you having a little play too. I find these types of effects are best left to personal preference. Some people like dry sounds, others like echoed, ping pong delay effects. So, see if you can create your own settings. You can get some great results by messing around with these two effects.
Download audio file (audioclip4.mp3)
Step 10: Does It Work
Although the Roland TB-303 sound has been around for some some time now, it still sounds great, especially in harder types of dance music. Below I’ve created a small loop with a kick drum, snare, hats and a pad to show you how our 303 sounds within a track. There have been a few changes though. I’ve made our original melody less complicated, side-chained it to the kick drum and I’ve automated a fruity free filter to it so it slowly builds up.
I hope you enjoyed the tutorial.
Download audio file (audioclip5.mp3)