Today is the time to create something new! Have you ever wondered how to improve your simple noise sweep? I’m going to show you how to do the trick – step-by-step guide from the basics.
Step 1: Setting Up Subtractor
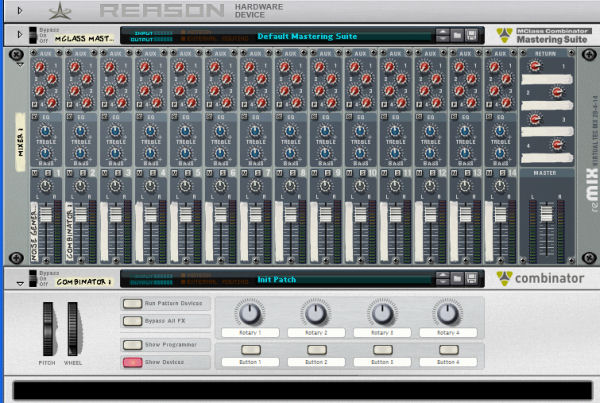
Before we do anything, we need a mixer and a Combinator in our rack. If you don’t already have one, right-click and choose create > Mixer 14:2. Do the same process with the Combinator. This will be what our synth is fed into, so we can control it’s overall volume

When you’re done, right-click on Reason’s interface inside the Combinator and click Create > Subtractor Polyphonic Synthesizer. This will make a brand new instance of Subtractor that we can get started on. The Combinator is a very important device in our project, because later on, we are going to program some parameters to create more flexible sweeps.
At first, we have to create a Subtractor in our Combinator which will generate the noise. Right-click Subtractor and click “Initialize Patch” to remove the default (or any existing) patch settings and give us a clean workflow to work with. Also, before we forget – double-click on the name tag and change it to “Sweeping Noise”, because it will make us easier to see what device is it in the mixer.
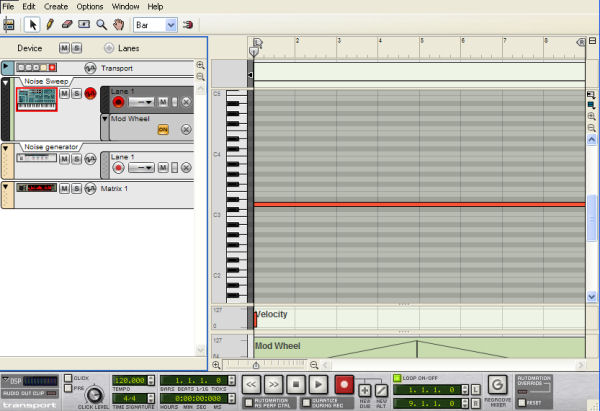
Now it’s time to add a long note. I’ve drown an eight bar loop so I can easily hear what’s going on while the noise are moving. Click the Loop On/Off button to turn on the loop – make sure that the L and R loop points are around the whole area you’ve created. In other words, make sure that you’re hearing the entire loop.

As you see I’ve already drawn some automation. You’ll find out why I’ve done this just in a few lines.
Step 2: Make the Noise Oscillator
Now it’s time to start making the synth patch. We’ll be using the noise generator to make a massive, white noise sound.
We won’t be using Oscillator 1, but unfortunately we can’t turn it off. Important note: If two waves have the same frequency and are 180 degrees out of phase with an other, one waveform reaches its peak while the second is at its trough, which means, that no sound will be produced. Using this kind of principle will change the phase 180 degree and the signal will cut, so the result is going to absolute silence.
We just need a simple noise generator which would pass through Oscillator 2 before it enters the signal chain.
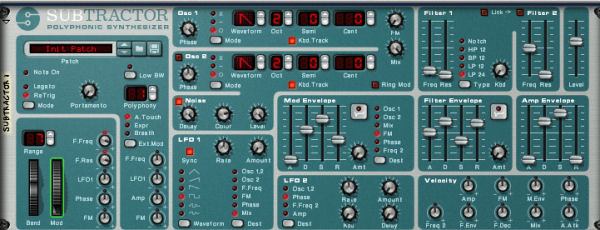
Turn the decay and level to maximum, and the color to 3 – you can change these settings depends on what kind of noise you are going to work with. We omit the filter and mod envelope.
The amp envelope settings are the following A:0 D:91 S:111 R:0. Because we’re working with long notes in our loop, you might notice they are losing volume over time. To prevent this, turn the “S” up in the “Amp Envelope” section to full – this is the sustain of the note. This means that it will not lose any volume at all, which is great for big synth sounds or noises.
One essential part of a great sweep line for me is the inclusion of a resonant low pass filter. We are going to use low pass filter 24 because it more dramatic than the 12. Set the filter cut off to almost 0, and turn the resonance to 0 as well. Now turn the resonance and filter frequency knobs to maximum – they’re right next to the modulation wheel so we can simply automate the modwheel to archive the sweeping effect.
It’s worthy of note that you don’t need automate if you are using filter envelopes, but I personally use the modwheel and automate by myself, so I can see how the filter cuts are moving. With this method, I have more control. Subtractor looks like the following:

Step 3: Create a Matrix Pattern Sequencer
So we already have the Subtractor. If you’re curious how is the sound looks like so far, here’s a sample.
Download audio file (simple noise.mp3)
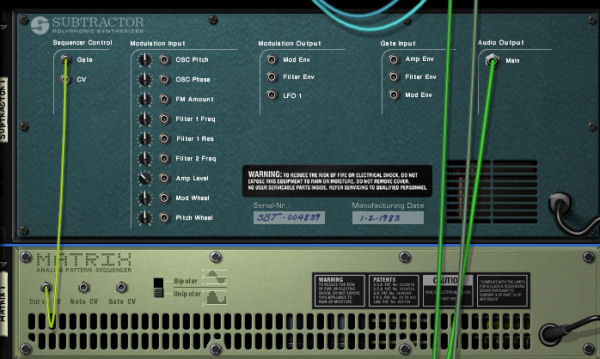
Now the fun part begins. Create a matrix pattern sequencer by pressing and holding shift while right-clicking, and create a matrix from the pop up hardware selector so we create our own routing schematic. Press tab and put the curved CV cable to the Subtractor gate underlay. Routing of the pattern to the gate is achieved by using a simple cable. Now switch bipolar from unipolar, because we would like to control the gate so that it can’t become a negative value.

Next press tab and draw some columns on the pattern sequencer which will give the gradual sweeping effect. You can change the resolution, it’s up to you. I suggest you to create several patterns – don’t worry, I’m going to explain you how to change between these patterns.

Step 4: Apply Some Distortion
So we now have the noise and the gate toy, but we need some more anticipation. One simple and effective way to increase your sweeping noise (and also the perceived volume) is to use some form of saturation. Scream 4 is very good sound destructor unit which has several distortions and saturation abilities. It’s mainly used to add ‘colour’ and ‘character’ to a sound. These processors are extremely simple to use and features few controls. I’ll use feedback this time, which will give some excitement during the sweep. It looks like this:

I always turn off the body feature because it just gets confusing and overkills the signal. You can play with the knobs in the Damage section. Watch out for the damage control parameter and don’t turn it too much, because the result will be devastated by distortion, and bear in mind it can also cause clipping.
Step 5: The Effects
Do you want some depth and wide or some phasing effect? Of course you do! To the average listener, wide stereo sounds are immediately impressive. Apply some reverb on this sweep and you get a much wider sweep. By the time your finished, you should have more decorative sound spanned nicely across the stereo field. I created an own patch from RV7000 reverb unit, which is looks like this:

</
At the end of the signal I applied a heavy phaser effect. P-90 is the obvious choice, but you can also try different effects.

</
Step 6: Programing Custom Controls
The final step here was to create some custom controls for the Combinator. Thanks to the excellent programming system the Props have put together for us, this process is pretty straight forward.
So we have a lot of effects and many sequences, but it’s confusing and hard to automate, so we have to simplify our project. The Combinator programming section can be handy now. First rename the knobs and the buttons as I did. I started with adding controls for the really key features of the effect such as Damage types and pattern select for the navigation among the patterns on the matrix. pattern sequencer. I also added on/off buttons for each effects. The damage type knob controls the ‘damage type’ on the Scream 4 unit.

When we’re done, open up the programmer and select Matrix 1 from it. Set the Rotary 1 to Pattern Select and give the value 0-9.

After that, select Scream 1 and set Rotary 2 to Damage Type – values are 0 and 9 again. Set Rotary 3 to Parameter 1 and give the values 0-127. Do the same for Rotary 3. Finally, set Button 1 to Enabled and give the values 1-2.

Our next job is the reverb. Set Button 3 to Enabled with the values 1-2, because the 0 means off and the signal will close and the sweep will silence in a moment – and actually no one will want that.

Our next objective is the phaser. It’s the same as the reverb, just instead of Button 3 choose Button 2.

Once the patch is finished, save it for later use. It’s probably a pretty good idea to save the settings of any key devices within complete patches like this, for instance saving the Subtractor’s filter settings may save you time when constructing other effects patches.
Download audio file (sweeping noise effected.mp3)
So that’s all. Now we can easily automate and create different noise sweeps and apply to our projects. Thanks for reading, and don’t forget leave your comments!