This tutorial is an introduction to the Hierarchical Model View Controller(HMVC) pattern, and how it applies to web application development. For this tutorial, I will use examples provided from the CodeIgniter from Scratch series and demonstrate how HMVC can be a valuable modification to your development process. This introduction assumes you have an understanding of the Model View Controller (MVC) pattern. We suggest you read our introduction to MVC to get acquainted with the topic before tackling this tutorial.
What is HMVC?
HVMC is an evolution of the MVC pattern used for most web applications today. It came about as an answer to the salability problems apparent within applications which used MVC. The solution presented in the JavaWorld web site, July 2000, proposed that the standard Model, View, and Controller triad become layered into a “hierarchy of parent-child MCV layers“. The image below illustrates how this works:
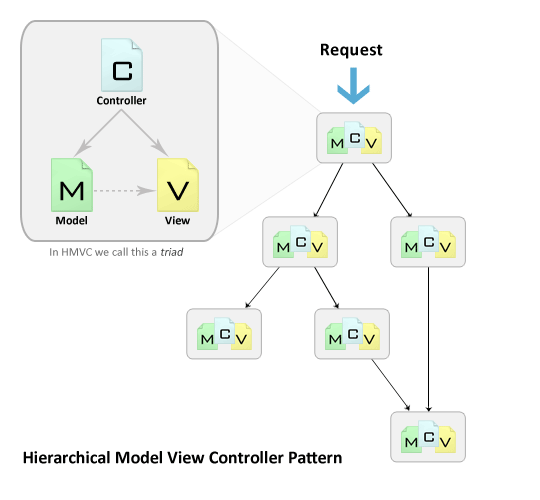
Each triad functions independently from one another. A triad can request access to another triad via their controllers. Both of these points allow the application to be distributed over multiple locations, if needed. In addition, the layering of MVC triads allows for a more in depth and robust application development. This leads to several advantages which brings us to our next point.
Why should I use HMVC?
Key advantages to implementing the HMVC pattern in your development cycle:
- Modularization: Reduction of dependencies between the disparate parts of the application.
- Organization: Having a folder for each of the relevant triads makes for a lighter work load.
- Reusability: By nature of the design it is easy to reuse nearly every piece of code.
- Extendibility: Makes the application more extensible without sacrificing ease of maintenance.
These advantages will allow you to get M.O.R.E out of your application with less headaches.
Setting up HMVC in CodeIgniter
To add extra depth to the CodeIgniter from Scratch series, we will be viewing today’s examples in CodeIgniter. I will lead us though the steps needed to get CodeIgniter working with HMVC. Once we’re done with that, I’ll provide a couple of examples. Let’s begin!
Preface
To run web applications, you need a web server on your computer if you are not working remotely. Here are recommendations with links to installation instructions:
- Windows: XAMPP 1.7.3 – Installation Instructions
- Mac: Turn on your “Personal Web Sharing” – Installation Instructions
Step 1. Download and Install CodeIgniter
Go to codeigniter.com and click the “Download CodeIgniter” link. If you know how to install it and want to skip past this step click here
Extract the contents of the zip file to your web server’s document root.
Rename the “CodeIgniter_1.7.2” folder to “hmvcExample“.
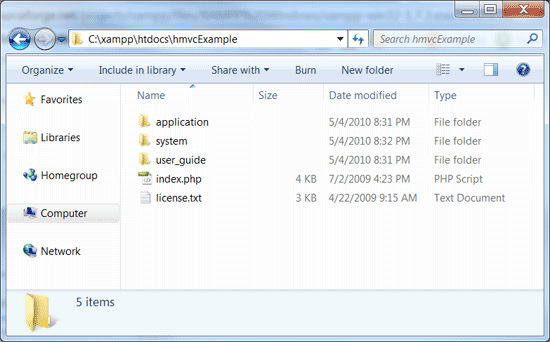
Move the “hmvcExample/system/application” folder to “hmvcExample/application“. This is common practice with CodeIgniter. The purpose of doing this is to separate the application from the core of the framework. We should now have a directory that looks like the image below:
Open “hmvcExample/application/config/config.php” in your editor of choice.
Edit the site base url to match the location of your install. In my case I would change
$config['base_url'] = "http://example.com/";
into
$config['base_url'] = "http://localhost/hmvcExample/";
Save your changes and close “hmvcExample/application/config/config.php“
Test that we have a working version of CodeIgniter. Open your browser and check your “http://yourhost/hmvcExample/”.
You should be greeted with the “Welcome to CodeIgniter” screen below:
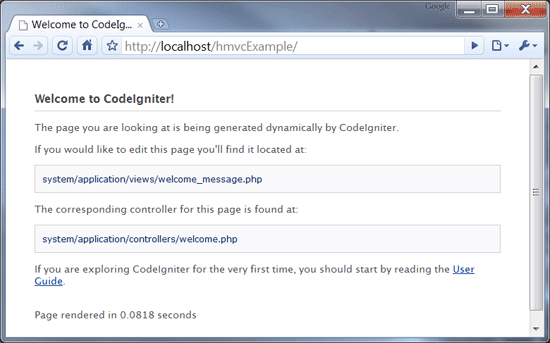
That’s it! You have successfully downloaded and installed CodeIgniter. Now we will move on to making it work with the HMVC extension.
Step 2. Download and Install HMVC Extension
Download version 5.2 of the modular extension from the CodeIgniter Wiki.
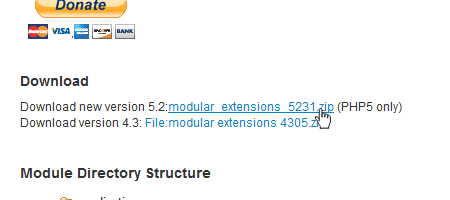
In the contents of the zip file are three php files:

Move these three files into the “hmvcExample/application/libraries/” folder.
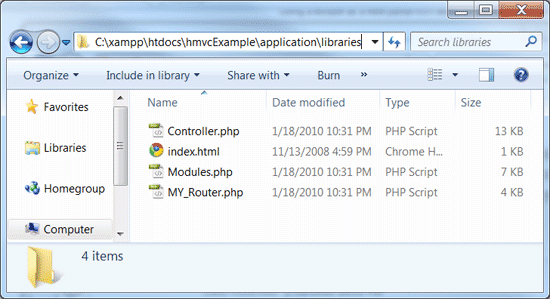
Recheck your browser. You should still see the Welcome to CodeIgniter screen.
It’s time to add the modules. Create the following directory structure “application/modules/welcome/controllers/“.
Move the “application/controllers/welcome.php” to “application/modules/welcome/controllers/welcome.php“.
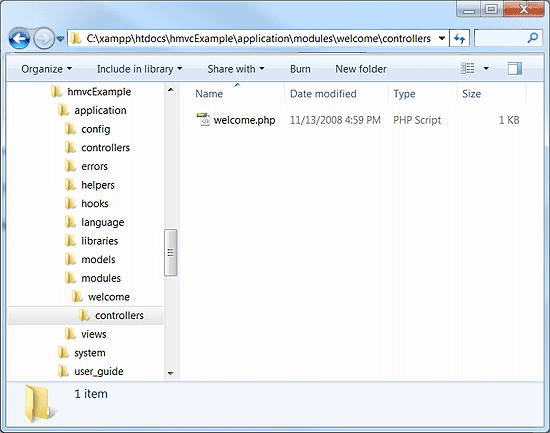
Recheck your browser. You should still see the Welcome to CodeIgniter screen.
Create the folder “application/modules/welcome/views/“
Move the “application/views/welcome_message.php” to “application/modules/welcome/views/welcome_message.php“.
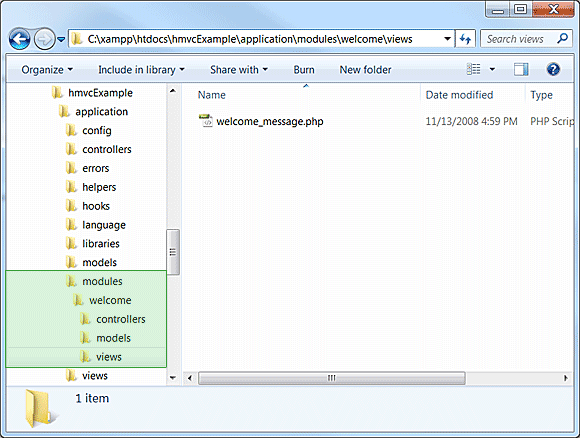
Do a final check on your browser. You should still see the Welcome to CodeIgniter screen.
That’s it! Modular Extensions is installed correctly.
Login Module Example
Now that we have our HMVC enabled instance of CodeIgniter, I will demonstrate some short examples. For our first example I will show how you can apply user access restrictions to pages or entire modules.
Download and unzip CodeIgniter from Scratch Day 6 source files into your web server. You should end up with a folder called “ci_day6/” alongside our “hmvcExample/“
Create the “login” module in our “hmvcExample/application” directory. It should end up looking like this
	hmvcExample/application/modules/login/controllers/
	hmvcExample/application/modules/login/models/
	hmvcExample/application/modules/login/views/
Create the “site” module in our “hmvcExample/application” directory. It should end up looking like this
	hmvcExample/application/modules/site/controllers/
	hmvcExample/application/modules/site/models/
	hmvcExample/application/modules/site/views/
TIP: When working with modules I keep a folder named RENAME with the three empty folders controllers, models and views. This saves me a little bit of time anytime I wish to create a new model.
Now we copy over the login module files from “ci_day6/” to our “hmvcExample/“.
	ci_day6/application/controllers/login.php
	ci_day6/application/models/membership_model.php
	ci_day6/application/views/login_form.php
	ci_day6/application/views/signup_form.php
	ci_day6/application/views/signup_successful.php
Copy/Move each of the above files over as listed below
	hmvcExample/application/modules/login/controllers/login.php
	hmvcExample/application/modules/login/models/membership_model.php
	hmvcExample/application/modules/login/views/login_form.php
	hmvcExample/application/modules/login/views/signup_form.php
	hmvcExample/application/modules/login/views/signup_successful.php
Next we copy over the site module files from “ci_day6/” to our “hmvcExample/“.
	ci_day6/application/controllers/site.php
	ci_day6/application/views/logged_in_area.php
Copy/Move each of the above files over as listed below
	hmvcExample/application/modules/site/controllers/site.php
	hmvcExample/application/modules/site/views/logged_in_area.php
The last files to copy over are the global views and CSS and image files. The asterisk (*) denotes folder and all its contents including sub folders
ci_day6/css/*
ci_day6/img/*
ci_day6/application/views/includes/*
Copy each of the above folders and all their content over as listed below
hmvcExample/css/*
hmvcExample/img/*
hmvcExample/application/views/includes/*
Open “hmvcExample/application/config/autoload.php” and edit it to look like the this:
$autoload['libraries'] = array('database', 'session');	// Need to Autoload DB and Session

/*
| -------------------------------------------------------------------
|  Auto-load Helper Files
| -------------------------------------------------------------------
| Prototype:
|
|	$autoload['helper'] = array('url', 'file');
*/

$autoload['helper'] = array('url', 'form');		// Need to autoload url and form.
If you have not already done so from step one, open “hmvcExample/application/config/config.php” and edit it so that the base url is set to your appropriate location.
$config['base_url'] = "http://localhost/hmvcExample/"; // web address. WARNING keep trailing /
Open “hmvcExample/application/config/database.php” and add the appropriate links to your database.
$db['default']['hostname'] = "localhost";		// location of DB server
$db['default']['username'] = "YOUR USERNAME HERE";	// username you use to connect
$db['default']['password'] = "YOUR PASSWORD HERE";	// associated password
$db['default']['database'] = "ci_series";		// The database you want to use
Open your browser to test that the login page displays “http://localhost/hmvcExample/index.php/login“
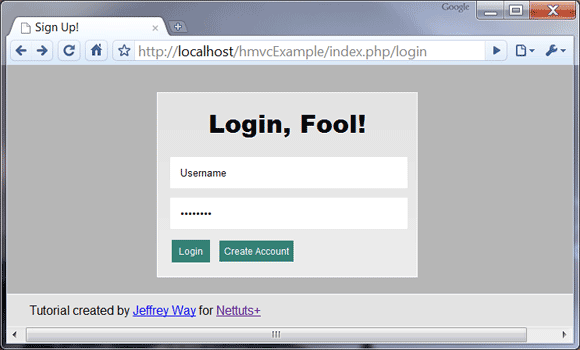
Now to make this login function, we need to create the membership database table. For this, we need to create a table in your PHPMyAdmin.
Select or create your “ci_series” database.
In the sql tab paste the sql code below into the textarea and click go
CREATE TABLE  `ci_series`.`membership` (
`id` INT( 11 ) NOT NULL AUTO_INCREMENT PRIMARY KEY ,
`first_name` VARCHAR( 32 ) NOT NULL ,
`last_name` VARCHAR( 32 ) NOT NULL ,
`email_address` VARCHAR( 64 ) NOT NULL ,
`username` VARCHAR( 32 ) NOT NULL ,
`password` VARCHAR( 32 ) NOT NULL
) ENGINE = MYISAM ;

With the membership table created, we click on the create account link on the login page and add a user to the database.
Login in as the user and confirm that you are now in the “site/members_area” of the site. It should look similar to the image below:
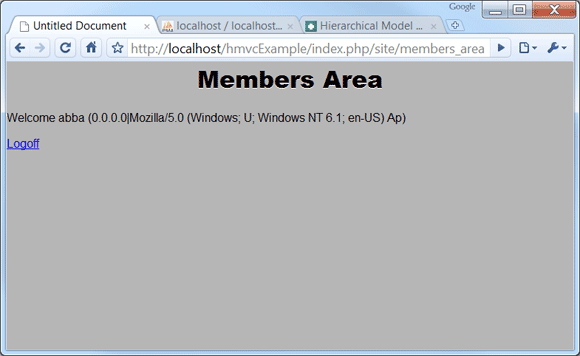
Click “logoff” link and try to manually go back to the members area. you will see that you no longer have permission to do so.

So we have our triads grouped, but we are still not quite in HMVC mode yet. In the site controller we find a function called is_logged_in().
	function is_logged_in()
	{
		$is_logged_in = $this->session->userdata('is_logged_in');
		if(!isset($is_logged_in) || $is_logged_in != true)
		{
			echo 'You don\'t have permission to access this page. Login';
			die();
		}
	}
This is a login related function. In MVC mode, this is required because site cannot access login. With HMVC we can fix this.
Cut the is_logged_in() function out of “applications/modules/site/controllers/site.php“
Save site.php without the is_logged_in() function.
Open “applications/modules/login/controllers/login.php“.
Paste the is_logged_in() function into the class.
Save login.php
Open “applications/modules/site/controllers/site.php“.
	function __construct()
	{
		parent::Controller();
        $this->is_logged_in();
	}
In the __Construct() function, we make the HMVC call to login’s is_logged_in() function, as seen below:
	function __construct()
	{
		parent::Controller();
        // Format: modules::run('module/controller/action', $param1, $param2, .., $paramN);
        modules::run('login/is_logged_in');
	}
MVC 101 Complete
There you have it! We have successfully altered day six code into HMVC format. The site module now requests the login check instead of having to use its own. While outwardly we observe no difference, the site design has fundamentally been changed. All login functions are now where they belong: inside the login triad. This may seem like a lot of work with small reward but it is not so. Any login changes can be made once. The internal structure of the triad can be edited without having to change the entire application in response. Code replication for other controllers is no longer required. Last but not least, all the related code is in one handy location. This tiny step may not WOW you but when we delve deeper into bigger, complex applications, the M.O.R.E. apparent it will become how effective the HMVC pattern is.
Members Section Example
We are now going to uncover more of HMVC’s power. We just demonstrated how to call a module from a controller. There are other places you can do that as well. HMVC was build with the User Interface (UI) in mind. We get to call modules from our views as a result. This is where the power of HMVC can really shine.
When calling HMVC from a view you will use the same modules::run(). There is only one requirement when doing this. The resulting output from the call must be a html snippet and not a complete view. This is because we are already inside a view at the time we call the run function. We will see this in action down the page as we edit the site module views.
Step 1. Edit Login Controller
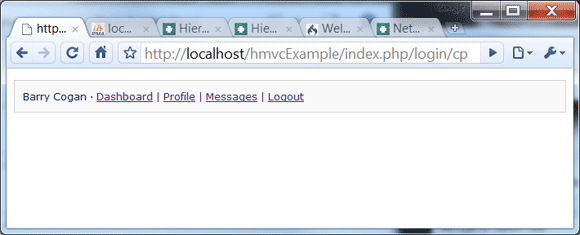
We are going to create a block which appears on the top of every page with our user’s name, important links, and logout option. Widgets like this are commonplace on sites today. The image below illustrates the end result.

Open “applications/modules/login/controllers/login.php“.
    function cp()
    {
        if( $this->session->userdata('username') )
        {
            // load the model for this controller
            $this->load->model('membership_model');
            // Get User Details from Database
            $user = $this->membership_model->get_member_details();
            if( !$user )
            {
                // No user found
                return false;
            }
            else
            {
                // display our widget
                $this->load->view('user_widget', $user);
            }
        }
        else
        {
            // There is no session so we return nothing
            return false;
        }
    }
Paste/Write the code above into the login controller.
cp() receives information from the membership_model function, get_member_details(), which we create in the next step. If a user is found we will display the view snippet detailed in step three. From there we should get the desired block illustrated above.
Save the changes you made to login.php
Step 2. Edit Membership Model
You will notice that we called a get_member_details() from the membership_model. This function gets our user information from the database and will be accessed from a few different sources. We are going to work on that now.
Open “applications/modules/login/models/membership_model.php“.
	function get_member_details($id=false)
	{
		if( !$id )
		{
			// Set Active Record where to the current session's username
			if( $this->session->userdata('username') )
			{
				$this->db->where('username', $this->session->userdata('username'));
			}
			else
			{
				// Return a non logged in person from accessing member profile dashboard
				return false;
			}
		}
		else
		{
			// get the user by id
			$this->db->where('id', $id);
		}
		// Find all records that match this query
		$query = $this->db->get('membership');
		// In this case because we don't have a check set for unique username
		// we will return the last user created with selected username.
		if($query->num_rows() > 0)
		{
			// Get the last row if there are more than one
			$row = $query->last_row();
			// Assign the row to our return array
			$data['id'] = $row->id;
			$data['first_name'] = $row->first_name;
			$data['last_name'] = $row->last_name;
			// Return the user found
			return $data;
		}
		else
		{
			// No results found
			return false;
		}
Comment your code! It’s best practice and will help you and others understand what you wrote.
Line 01: The function call has a default variable $id. This allows us an option of finding a user by ID rather than by username. This made optional by setting it to false in the declaration.
The rest of the function is straight forward and well commented. We query the membership table for a user via username or ID. The result is saved to the $data array and returned. All other outcomes return false.
Save the changes you made to membership_model.php
Step 3. Create User Widget View
The third and final piece to the widget we are creating is the xhtml snippet, which we can put into any other view. This is called by the login controller’s cp() function which we just wrote.
Open “applications/modules/login/views/user_widget.php“.
<code style="font-family: Monaco, Verdana, Sans-serif;
font-size: 12px;
background-color: #f9f9f9;
border: 1px solid #D0D0D0;
color: #002166;
display: block;
margin: 14px 0 14px 0;
padding: 12px 10px 12px 10px;">
<?php echo $first_name.' '.$last_name; ?> ·
<?php echo anchor('site/members_area', 'Dashboard'); ?> |
<?php echo anchor('site/profile/'.$id, 'Profile'); ?> |
<?php echo anchor('site/messages/'.$id, 'Messages'); ?> |
<?php echo anchor('login/logout', 'Logout'); ?>
</code>
Note: It is not a good practice to use inline styling. I opted to put this one instance of inline style for the sake of remaining on topic.
This styled code block takes the information passed from the cp() function. We generate the links using CodeIgniter’s URL helper’s anchor() function. More information about the user guide can be found on codeigniter.com.
After working on those three files we will test the “login/cp” page. We should see something like the image below. Note: You need to be logged int to see it. Be sure to do so before checking the page or you will see nothing.
Step 4. Edit Site Controller
The links in the snippet to profile and messages will return an error for the moment. This is ok because we have not created those functions yet. Lets do that now.
Open “applications/modules/site/controllers/site.php“.
<?php
class Site extends Controller
{
	function __construct()
	{
		parent::Controller();
	}

	function members_area()
	{
		modules::run('login/is_logged_in');
		$this->load->view('logged_in_area');
	}
__construct()
For the purpose of this example we shall remove the
modules::run('login/is_logged_in');
from the function so that we can make specific parts private and have other parts public.
members_area()
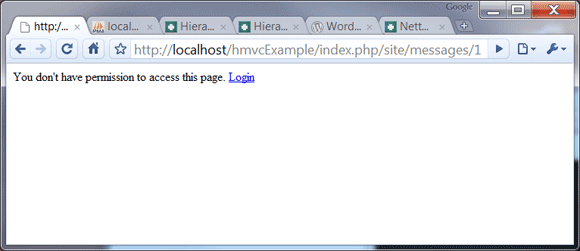
We want only logged in users to access the members dashboard area. So we will use the modules:run HMVC function and call the is_logged_in check from the login controller. We then load the logged_in_area view file which will be edited further down the page.
	function messages()
	{
		modules::run('login/is_logged_in');
		$this->load->model('login/membership_model');
		$user = $this->membership_model->get_member_details($this->uri->segment(3));
		if( !$user )
		{
			// No user found
			return false;
		}
		else
		{
			// display our widget
			$this->load->view('member_messages', $user);
		}
	}
messages()
Like members_area(), we only want logged in users so we have included the is_logged_in check. We have already written the code on how to get user details from the database so we will load the login model, membership_model. This will allow us to get the user information via the get_member_details() function. The third URI segment being passed into that function is an id for the user we wish to get messages for. For example, if the url was:
http://localhost/hmvcExample/index.php/site/messages/43
Then our function get_member_details() would be receiving “43″ as an input variable. Depending on the result of get_member_details(), we are either shown the view: member_messages or we get nothing (as a result of a failed query).
	function profile()
	{
		$this->load->model('login/membership_model');
		$user = $this->membership_model->get_member_details($this->uri->segment(3));
		if( !$user )
		{
			// No user found
			$data['main_content'] = 'member_profile';
			$data['notice'] = 'you need to view a profile id';
			$this->load->view('includes/template', $data);
		}
		else
		{
			// display our widget
			$user['main_content'] = 'member_profile';
			$this->load->view('includes/template', $user);
		}
	}
}
profile()
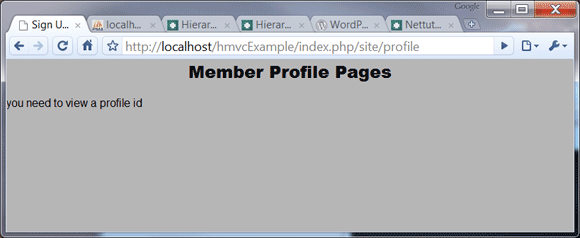
Just like any social network; we want the profile pages to be public. So we have not included the is_logged_in check. Just like messages, we call the login triad’s membership_model and query the database for our desired user. In this case, if no user is found, we quit a bit more gracefully. We also notify the visitor that an id needs to be specified. With a successful result, we see the member’s profile.
Step 5 Edit Logged In Area View
Open “applications/modules/site/views/logged_in_area.php“.
<!DOCTYPE html>
<html lang="en">
<head>
	<meta http-equiv="Content-Type" content="text/html; charset=utf-8">
	<title>untitled</title>
</head>
<body>
	<?php echo modules::run('login/cp');?>
	<h2>Welcome Back, <?php echo $this->session->userdata('username'); ?>!</h2>
     <p>This section represents the area that only logged in members can access.</p>
</body>
</html>
Overwrite the contents of the file with the code above.
Line 08: HMVC is put into action here. Our view calls the “login/cp” function, and echoes out the html snippet exactly where we tell it. Notice how we didn’t have to prepare anything ourselves? It’s all handled internally by login for us. Handy isn’t it?
Save the changes you made to logged_in_area.php. Your finished page should display like:

Step 6. Create Member Messages View
Create a new view: “applications/modules/site/views/member_messages.php“.
<!DOCTYPE html>
<html lang="en">
<head>
	<meta http-equiv="Content-Type" content="text/html; charset=utf-8">
	<title>untitled</title>
</head>
<body>
	<?php echo modules::run('login/cp');?>
	<h2><?php echo $first_name; ?>'s Messages</h2>
     <p>This could be where the messaging system gets displayed</p>
</body>
</html>
Write or paste the code above into the newly created file.
This view is pretty much just a clone of the members area to test that login holds on multiple pages. There is one difference: we fished some information from the login module’s membership_model. This is shown as the $first_name variable.
The point of getting user information here would be to pass it on to a module which would return a snippet with the user’s messages.
Save the changes you made to member_messages.php. Your finished page should display like:

Step 7. Create Member Profile View
Create a new view: “applications/modules/site/views/member_profile.php“.
	<?php echo modules::run('login/cp');?>
    <?php if( isset($notice) ): ?>
    <h2>Member Profile Pages</h2>
    <p><?php echo $notice; ?></p>
    <?php else: ?>
	<h2><?php echo $first_name; ?>'s Profile</h2>
     <p>Put all the good wholesome profile info here!</p>
	<?php endif; ?>
Write or paste the code above into the newly created file.
We have an if statement which detects whether a user was found or not. If not, we get brought to an error page stating we need an ID to view a profile.
Again, we retrieve the user information. Just like messages we would use this to retrieve the user’s friend list, latest blog entry, and activity feed, etc.
Save the changes you made to member_profile.php. Your finished page should display like:

What Happens When We Logoff?
Because we want the profile pages to be public, it should still display. Minus the user widget of course.
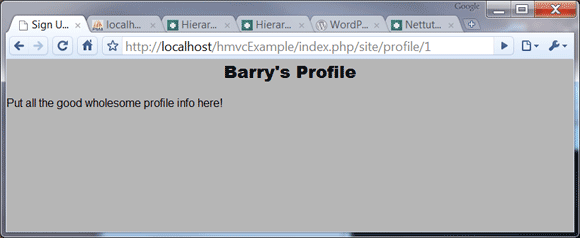
When logged in, and we go to profile without a third uri segment we see our own profile. Logded off, we will be shown the error below.
We should not be able to view the message or dashboard. When we check the messages page we are greeted with this:
We’re Done
That’s it! We have added more depth to our initial example and demonstrated the different ways to use HMVC.
- Call modules::run() from a controller.
- Echo modules::run() from a view to display a HTML snippet.
- Load a model from another module.
I hope this has been an enlightening experience. HMVC is an extraordinary pattern which makes applications more robust. It is well worth the investment. Give it a try. I promise you won’t ever want to go back to vanilla MVC!