Ableton Live has a macro control mapping function similar to the Reason’s Combinator Device. In this tutorial I’ll try to explain how to use it on effect devices and control many parameters with one macro knob.
In this tutorial we are going to create an Audio Effects Rack which consists of a Filter, a Reverb and a Distortion. We will map multiple parameters of these effects to single Macro Knobs and do different mapping combinations for easy effects manipulation.
Step 1: Creating the Effect Rack
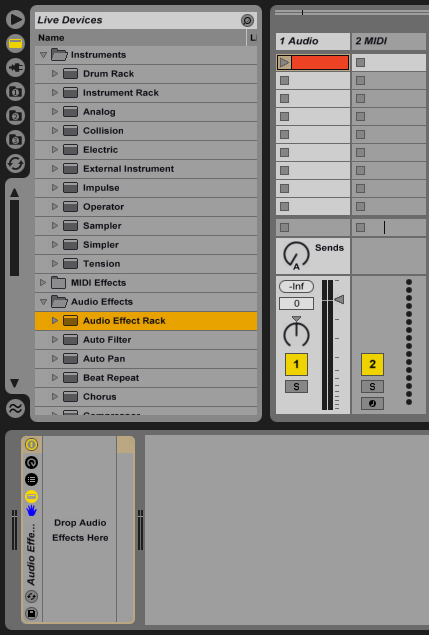
First drop a sample on an empty audio track. The loop I used on this tutorial is in the playpack, you can use any loop though. Go to the Live devices and create a new Audio Effects Rack on this audio track.
Step 2: Low Pass Filter
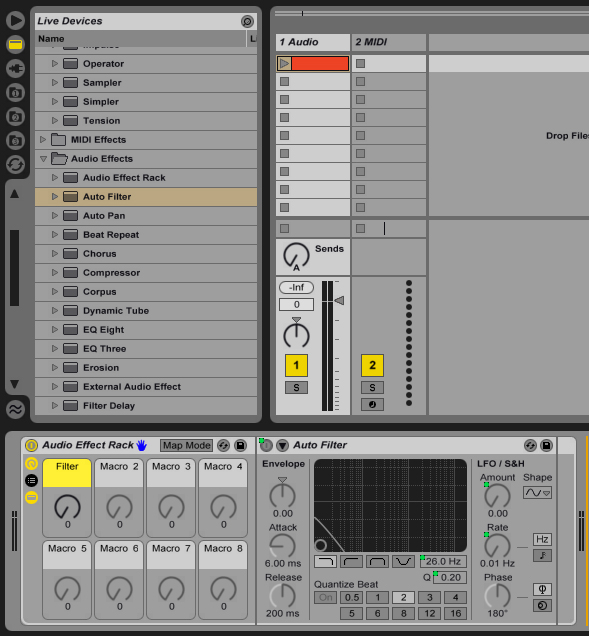
In this Effect Rack we will create several effects and map these to macro controls. Let’s start with a filter, go to audio effects and drop an Auto Filter into the Audio Effects Rack. Right Click on the “Filter Freq” and select “Map to Macro 1″, then do the same for “Filter Q”, “LFO Amount”, “LFO Rate” and “Device On/Off”; map all these parameters to Macro 1 and rename it to “Filter”. I also gave it a nice yellowish color. Notice that as we map the parameters to macros, the parameter becomes disabled and a green dot appears next to it.
The idea here is when we move this knob effect will be enabled and works as a smooth low pass filter. To do this we have to have different control on the parameters we have mapped to Macro 1. On the Audio Effects Rack device bar click the “Map Mode” button, a window like this should appear.
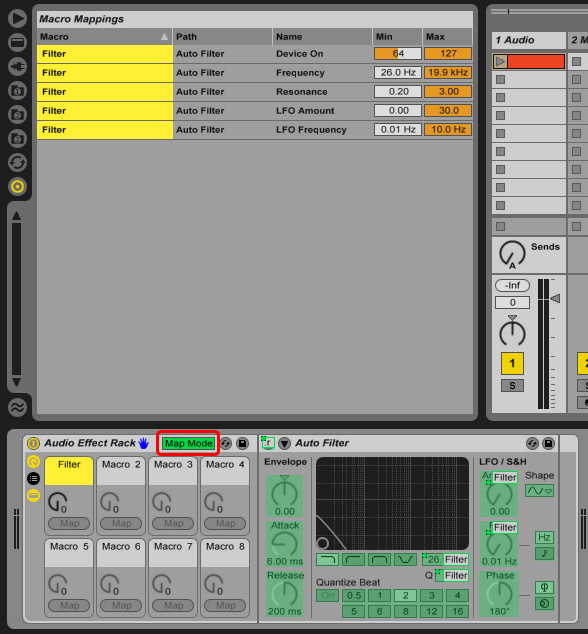
Now the values I use n the filter is:
- Device On > Min: 1, Max: 0
- Freqency > Min: 6.70 kHz, Max: 130 Hz
- Resonance > Min: 0.77, Max: 2.10
- LFO Amount > Min: 0.00, Max: 15.0
- LFO Freq > Min: 0.04 Hz, Max: 10.0 Hz
And it sounds like this:
Download audio file (Audio 1.mp3)
As you see when I move Filter Macro up, more low pass is applied with a slight LFO and when it’s at zero the effect is disabled.
Step 3: Reverb
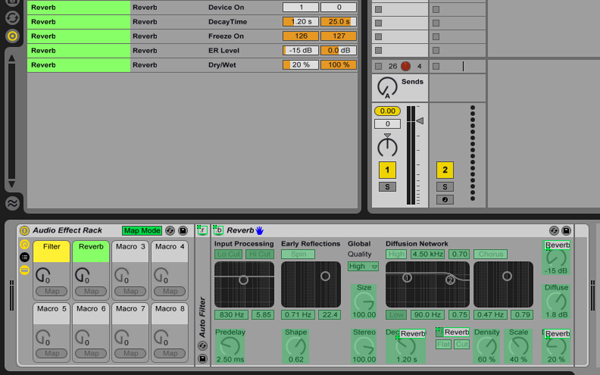
Drop a Reverb device after the Auto Filter, map the “Dry/Wet”, “Decay Time”, “Reflect”, “Device On/Off” and “Freeze” to Macro 2.
Let’s click on the “Map Mode” and configure Reverb controls like this:
- Device On > Min: 1, Max: 0
- Decay Time > Min: 1.20 s, Max: 25.0 s
- Freeze On > Min: 126, Max: 127
- ER Level > Min: -15 dB, Max: 0.0 dB
- Dry/Wet > Min: 20 %, Max: 100 %
This is a nice setting on the Reverb which disables it at “0″ and freezes the signal at “127″. I also tweaked the Reverb a little to make it sound better. Here’s How it sounds:
Download audio file (Audio 2.mp3)
Step 4: Vinyl Distortion
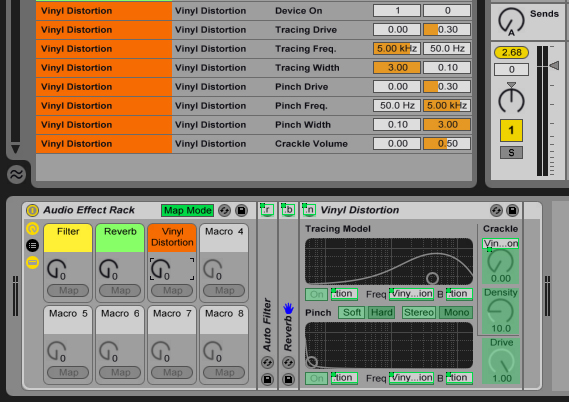
Now add a Vinyl Distortion at the end of the chain, then map “Crackle”, “Tracing Drive”, “Tracing Freq”, “Tracing Width”, “Pinch Drive”, “Pinch Freq”, “Pinch Widht” and “Device On/Off” to the Macro 3. Here’s the mapping for these parameters:
- Device On > Min: 1, Max: 0
- Tracing Drive > Min: 0.00, Max: 0.30
- Tracing Freq > Min: 5.00 kHz, Max: 50.0 Hz
- Tracing Width > Min: 3.00, Max: 0.10
- Pinch Drive > Min: 0.00, Max: 0.30
- Pinch Freq > Min: 50.0 Hz, Max: 5.00 kHz
- Pinch Width > Min: 0.10, Max: 0.50
- Crackle Volume > Min: 0.00, Max: 0.50
Feel free to tweak all these mappings as you wish, with my settings it applies a slight cracke which shoud sound nice after the reverb.
Download audio file (Audio 3.mp3)
Step 5: Wet/Dry Control
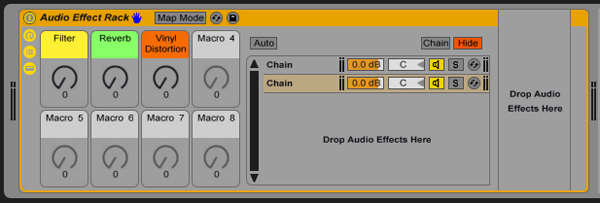
To create a Wet/Dry control, open up the Chain Selection panel on the Audio Effects Rack. We’re going to do a trick here, grab any audio effect -Let’s say an Auto Filter- and drop it below the first Chain. After you have created the chain, delete the effect device so you have an empty chain, this is how it looks:
Name the first chain as “Wet” and the empy one as “Dry”. Right click on the chain volume levels and map them to Macro 4, then rename Macro 4 as “Wet/Dry”. Then go to the Map Mode and:
- Wet Mixer > Min: -inf dB, Max: 0 dB
- Dry Mixer > Min: 0 dB, Max: -inf dB
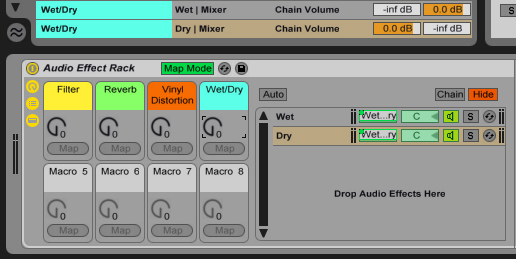
This will create a crossfader between the original and effected sound.
I hope it is all clear and you find it useful. This tutorial should give you the basic idea of mapping the macro controls to multiple parameters. We’ll go for more advanced effect devices in the next tutorials.