Using Twitter’s @Anywhere Service in 6 Steps
Last week, Twitter released @Anywhere, which, with only a few added lines in your code, can bring all of Twitter’s platform functionalities into your website. @Anywhere can allow for anything, ranging from converting a simple @username into a clickable link, to even creating new tweets directly from your personal site. I’ll show you exactly how to do so in this tutorial!
Before you Begin, Create an Application
In order to begin using @Anywhere, you must have an API key. What? You don’t have it? No problem. Just go here and register a new application (don’t register it from here).
- If you have a local server installed, set it to a domain (developertutorial.com, for example), as it won’t work with your localhost (if you don’t know how, check out this tutorial, the hosts file part is particularly important).
- If you don’t have a local server, then leave this section blank. Just remember that for production, you will have to set it to the domain you are working on.
And finally, set the default access type to Read & Write. This is very important!
Now, you will be redirected to the application settings page. Copy the consumer key (API Key), and let’s get started using @Anywhere.
Including @Anywhere’s Javascript
Open your new HTML file, and, inside the <head> tag, include:
<script src="http://platform.twitter.com/anywhere.js?id=APIKey&v=1" type="text/javascript"></script>
Your code should look like:
<!DOCTYPE HTML>
<html>
<head>
<title>@Anywhere</title>
<meta http-equiv="Content-Type" content="text/html; charset=UTF-8" />
<link href="styles.css" rel="stylesheet" type="text/css" />
<script src="http://platform.twitter.com/anywhere.js?id=APIKey&v=1" type="text/javascript"></script>
</head>
<body>
...
</body>
</html>
Replace APIKey with the Application’s API Key you got in the previous step. The parameter v=1 is the version. Perhaps in the future, Twitter will add new features and maybe new syntaxes. To prevent breaking the existing @Anywhere code, they will be preserving old code if specified. Version 1 supports every major browser, including IE6.
After including this JavaScript file, we can access the twttr object, which will invoke the anywhere() function with a parameter when @Anywhere is ready:
twttr.anywhere(function(twitter) {
	// Actions when @Anywhere is ready
});
The parameter (in this case twitter) is the object we will be using, similar to jQuery’s $.
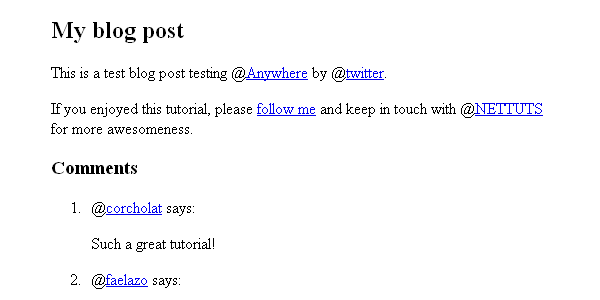
Next, we need to create an HTML base. Copy and paste the following code, and place it within the “body” tag.
<div id="main">
	<div class="post">
		<h2>My blog post</h2>
		<div class="content">
			<p>This is a test blog post testing @Anywhere by @twitter.</p>
			<p>If you enjoyed this tutorial, please <a href="http://twitter.com/faelazo" class="hovercard">follow me</a> and keep in touch with @NETTUTS for more awesomeness.</p>
		</div>
	</div>
	<div class="comments">
	<h3>Comments</h3>
	<ol>
		<li><span class="author">@corcholat</span> says:
			<p>Such a great tutorial! </p>
		</li>
		<li><span class="author">@faelazo</span> says:
			<p>You should also follow @smashingmag</p>
		</li>
	</ol>
	</div>
</div>
Now let’s dig in.
1. linkifyUsers: Convert @something into Links
@Anywhere lets us to convert @mentions into links. This functionality is called linkifyUsers, and is pretty straight-forward: it sets the HTML element you wish to convert to a link.
Since we want all the document’s @mentions to be converted into links, we just call the linkifyUsers() function in the body element:
twttr.anywhere(function(twitter) {
	twitter("body").linkifyUsers();
});

As mentioned previously, the “twitter” parameter, inside the callback function, is much like jQuery’s “$” alias; f we want to convert @mentions into links, but only those within a certain section, we can use a CSS selector, as shown below.
twttr.anywhere(function(twitter) {
	twitter(".post").linkifyUsers();
});
linkifyUsers() accepts an object as a parameter, with two properties: className and success. With className, you can specify a class to be applied when the @mentions are found; so, for example, you could add an unsemantic ‘red’ class and specify in your CSS:
.red { color:#f00; }
Here’s the code.
twttr.anywhere(function(twitter) {
	twitter("body").linkifyUsers({
		className:'red'
	});
});
2. hovercards: Display Additional Information on Hover
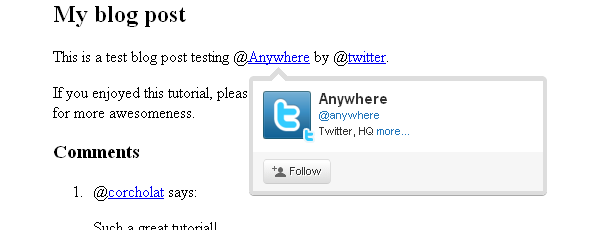
hovercards() converts @mentions to links, but also loads a small pop-up tooltip on mouseover. Here’s a basic example of its usage.
twttr.anywhere(function(twitter) {
	twitter.hovercards();
});

However, hovercards() is flexible enough to include certain elements even if they don’t have a @mention in them. In the HTML, I’m linking “follow me” to http://twitter.com/faelazo; but @anywhere is smart enough to convert this link to a hovercard. By adding a class of “hovercard” to the anchor tag, Twitter will handle the rest!
twttr.anywhere(function(twitter) {
    // Find the @mentions and linkify as usual
    twitter("body").hovercards();

    // Let's find the elements which has a hovercard class
    twitter(".hovercard").hovercards({
        username: function(node){
            var twitter_regexp = /twitter\.com\/([a-z0-9_]*)\/?(.*)?/gi;
            if(node.href.match(twitter_regexp) && (twitter_match = twitter_regexp.exec(node.href))){
                return twitter_match[1];
            }
            return '';
        }
    });
});
The username parameter takes a function with a parameter that will be the object found (in this case node). Here’s what happens inside the function, line by line.
var twitter_regexp = /twitter\.com\/([a-z0-9_]*)/gi;
This is a regular expression. It will match a twitter.com/ string with alphanumeric values and an underscore.
if(node.href.match(twitter_regexp) && (twitter_match = twitter_regexp.exec(node.href))){
If the regexp matches the href property from the node element, then set the variable twitter_match to capture the values in an array.
return twitter_match[1];
It will return the match found.
We add a “return” just in case the element does have a class, but does not refer to twitter.com; so there will be no match. If it returns false or NULL, the script throws an error. With an empty string, it shows a hovercard but with no user found.
Now, if this is a bit too complicated, you can always simplify the process, and add the username as the title attribute of the anchor tag.
<a href="http://twitter.com/faelazo" class="hovercard" title="faelazo">follow me</a>
And just return the node’s title attribute. Much easier, right?
twitter(".hovercard").hovercards({
    username: function(node){
        return node.title;
    }
});
“hovercards” can be applied to any element (even a div), just as long as it specifies a username.
twitter("#main").hovercards({ username: function(){ return 'therrorcom'; }});
3. followButton: Invite to Follow with Just One Click
followButton() will append a button to follow the username parameter in the element previously specified.
The following code will append a button to follow Nettuts+ in the #main div.
twttr.anywhere(function(twitter) {
    twitter("#main").followButton("nettuts");
});

followButton() expects one parameter: the username to follow. Simple enough, eh?
4. tweetBox: Tweets From your Site
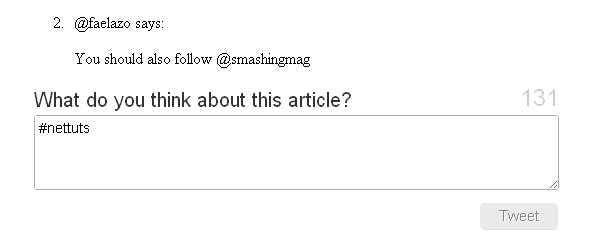
tweetBox() will append a box in which the users can enter their comments and tweet them via your site.
tweetBox can receive an object as parameter, with the following properites:
counter(boolean, default true)
Whether or not to show the counter for remaining characters.height(integer, default 65)
The height of the box, in pixels.width(integer, default 515)
The widht of the box, in pixels.label(string, default “What’s happening?”)
The text above the box.defaultContent(string, default none)
You can enter by default the URL, a @mention, a #hashtag, etc.onTweet(function)
It’s called after the tweet button is pressed. It receives two arguments: plain text tweet and HTML tweet.
A default tweetBox can be called after the element with the comments class with the following snippet.
twttr.anywhere(function(twitter) {
    twitter(".comments").tweetBox();
});
So if you want a custom label, content, and a callback when the tweet has been sent, use this code.
twitter(".comments").tweetBox({
    label: 'What do you think about this article?',
    defaultContent: '#nettuts ',
    onTweet: function(plain, html){
        // Actions when tweet is sent
    }
});

onTweet might be useful if you are planning to replace the default comment area with the CMS you are using. You would still need a database and a table to show the comments, right? So you can hack the CMS a little and make a AJAX request with the onTweet event to insert the tweet into your database.
5. connect: Sign in a User to your Application
As you probably saw, the two last methods require confirmation to grant permission to the application. @Anywhere has a method to check if the user is logged in with the application (not on twitter). You can use conditionals to whether or not to show certain elements.
This snippet will append the connect button in the element with a comments class.
twttr.anywhere(function(twitter) {
	twitter(".comments").connectButton();
});

If you need a button with a different size, you can pass an object literal with the property size and value small, medium, large or xlarge. Note that “medium” is the default value.
twttr.anywhere(function(twitter) {
	twitter(".comments").connectButton({ size: 'large' });
});
The Twitter object includes some extra goodies; one is currentUser, which is an object; the other is isConnected(), which is a function that returns a boolean. From here, we can create some conditional statements.
twttr.anywhere(function(twitter) {
	if(twitter.isConnected()){
		alert('Welcome, you are connected');
	} else {
		twitter(".comments").connectButton();
	}
});
If isConnected() returns true, we can show some user information, such as the username (screen_name), profile picture (profile_image_url), followers or following. Here’s a list for the information that the application can access. Let’s see the currentUser object in the final roundup.
6. Final Roundup: Mixing it All Together
I will be modifying the div with the comments class.
<div class="comments">
	<h3>Comments</h3>
	<ol>
		<li><span class="author">@corcholat</span> says:
			<p>Such a great tutorial! </p>
		</li>
		<li><span class="author">@faelazo</span> says:
			<p>You should also follow @smashingmag</p>
		</li>
	</ol>
	<div class="add">
		<h3>Add comment</h3>
		<div class="author"></div>
		<div class="box"></div>
	</div>
</div>
Now let’s include jQuery to make things a bit easier. Insert, between <head> and </head>, the following code:
<script src="http://ajax.googleapis.com/ajax/libs/jquery/1.4.2/jquery.min.js" type="text/javascript"></script>
Now we have a space to add comments. First, let’s use the isConnected() conditional to show a button if the user is not signed into our application; this button will be appended to the element with an "add" class.
if(twitter.isConnected()){
    twitter(".comments").connectButton();
}
Now let’s use Twitter’s currentUser object. This object can retrieve information with the data() method. So the following snippet will retrieve the user’s screen_name.
twitter.currentUser.data('screen_name');
@Anywhere lets us specify callback functions for the connectButton feature. As an argument, it accepts an object with two properties: authComplete and signOut; both are functions, so when signOut is invoked, we could refresh the page. The same holds true for authComplete. Let’s replace the connectButton() line with this snippet:
twitter(".comments > .add").connectButton({
    authComplete: function(user) {
        location.reload();
    },
    signOut: function() {
        location.reload();
    }
});
This is pretty straightfoward: we pass an object as the argument, then set both the signOut and authComplete functions to reload the page. Note that I’ve dropped the else clause for the isConnected() conditional in order to set the signOut event.
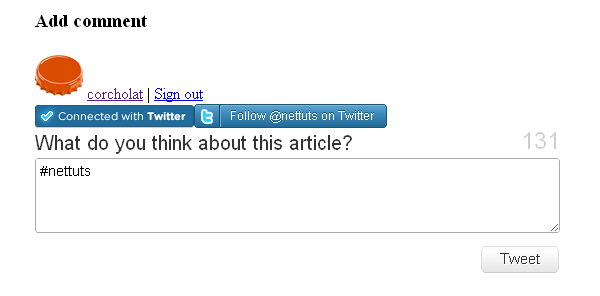
Next, let’s add a tweetBox inside the conditional.
if(twitter.isConnected()){
    $(".comments > .add > .author").html('<img src="'+ twitter.currentUser.data('profile_image_url') +'" /> <a href="http://twitter.com/'+ twitter.currentUser.data('screen_name') +'">'+ twitter.currentUser.data('screen_name') +'</a> | <a href="javascript:twttr.anywhere.signOut();">Sign out</a>');
    twitter(".comments > .add").tweetBox({
        label: 'What do you think about this article?',
        defaultContent: '#nettuts '
    });
}
If the user is logged in, a follow button should be there. Again, inside the conditional:
twitter(".comments > .add").followButton("nettuts");
Here is the whole conditional, rounding up all of the @Anywhere features.
if(twitter.isConnected()){
    $(".comments > .add > .author").html('<img src="'+ twitter.currentUser.data('profile_image_url') +'" /> <a href="http://twitter.com/'+ twitter.currentUser.data('screen_name') +'">'+ twitter.currentUser.data('screen_name') +'</a> | <a href="javascript:twttr.anywhere.signOut();">Sign out</a>');
    twitter(".comments > .add").tweetBox({
        label: 'What do you think about this article?',
        defaultContent: '#nettuts '
    });
    twitter(".comments > .add").followButton("nettuts");
}

Conclusion
@Anywhere is obviously Twitter’s response to Facebook Connect. They’re hoping to bring this platform to as many sites on the web as possible; and while the service is still young, and the documentation could definitely be improved, it’s definitely promising! Please show us what you’ve done with @Anywhere in your own websites!
