In the following tutorial you will learn how to create a classic baby stroller illustration. If you’re looking to create vintage stroller art, modern baby stroller graphics, for stock art or to illustrate your next graphic project, then jump into this tutorial and learn every detail: from constructing the bassinet area, carriage handle, to wheels and more.
Step 1
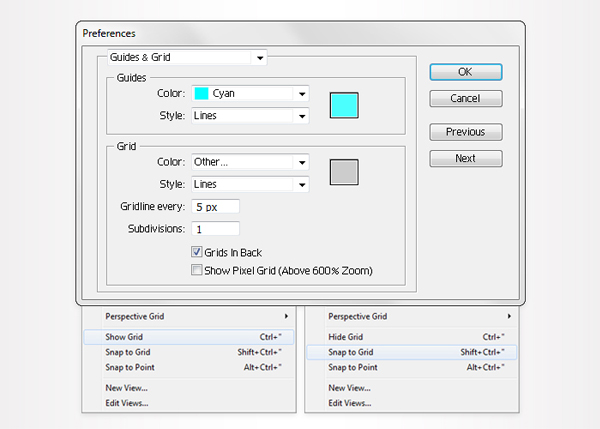
Create a 700 by 700px, RGB document. First, turn on the Grid (View > Grid) and the Snap to Grid (View > Snap to Grid). Next, you’ll need a grid every 5px. Go to Edit > Preferences > Guides > Grid, enter 5 in the Gridline every box and 1 in the Subdivisions box.
You can also open the Info panel (Window > Info) for a live preview with the size and position of your shapes. Do not forget to replace the unit of measurement to pixels from Edit > Preferences > Unit > General. All these options will significantly increase your work speed.
Step 2
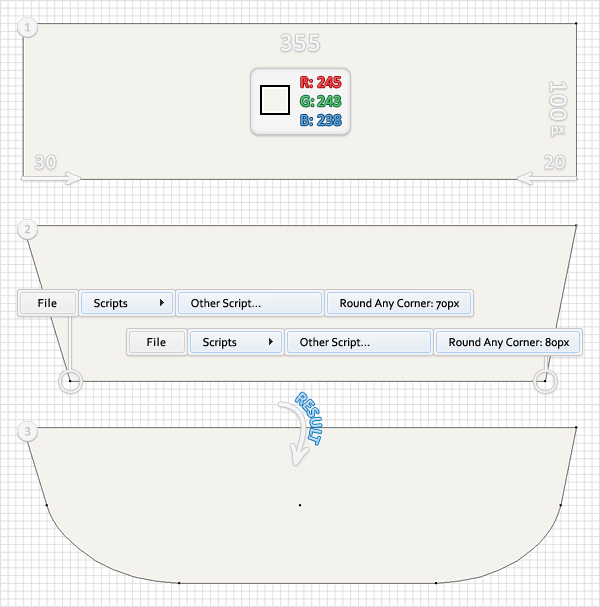
Pick the Rectangle Tool (M), create a 355 by 100px shape and fill it with R=245, G=243, B=238. Switch to the Direct Selection Tool (A), select the bottom, left anchor point and move it 30 px to the right. Move to the bottom, right anchor point, select it and move it 20px to the left. Now, you need to add some roundness for bottom anchor points. The Round Any Corner script will come in handy for this. You can find it in the Vectortuts+ article 20 Free and Useful Adobe Illustrator Scripts.
Save it to your hard drive and grab the Direct Selection Tool (A). Select the bottom, left anchor points and go to File > Scripts > Other Script. Open the Round Any Corner Script, enter a 70px Radius and click OK. Move to the left anchor point, select it and go to File > Scripts > Other Script. Open the Round Any Corner Script, enter a 80px Radius and click OK. In the end your shape should look like the third image shown.
Step 3
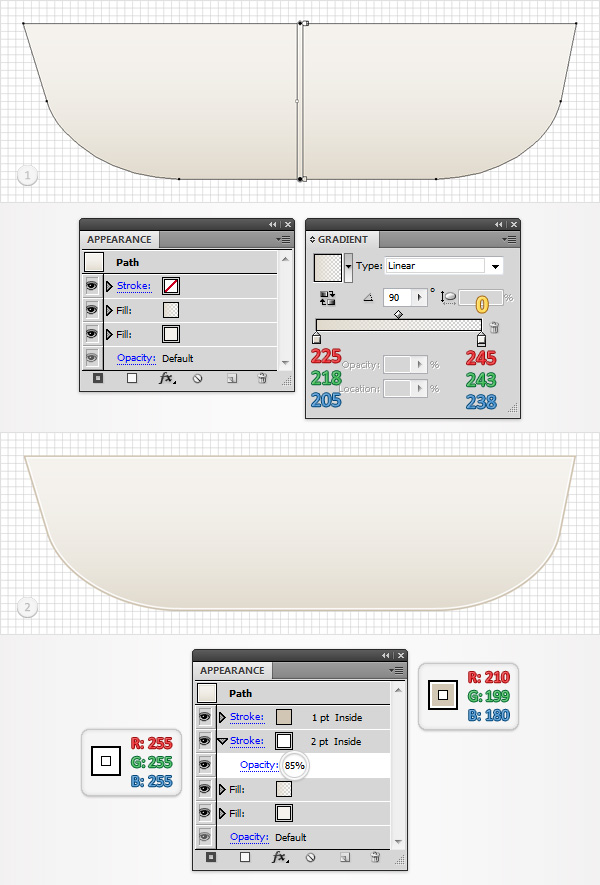
Reselect the shape made in the previous step and go to the Appearance panel (Window > Appearance). Select the existing fill and click on the Duplicate Selected Item button from the bottom of the Appearance panel. Obviously, this will add a copy of the selected fill. Select this new fill and use the linear gradient shown below.
The yellow zero from the gradient image stands for Opacity percentage. Return to the Appearance panel and add a stroke. Make it 2pt wide, align it to inside and set the colors at R=255, G=255, B=255 (white).
Select it and click again on the Duplicate Selected Item button. Select the new added stroke, make it 1pt wide and set its color at R=210, G=199, B=180. Return to the white stroke, select it from the Appearance panel and lower its Opacity to 85%.
Step 4
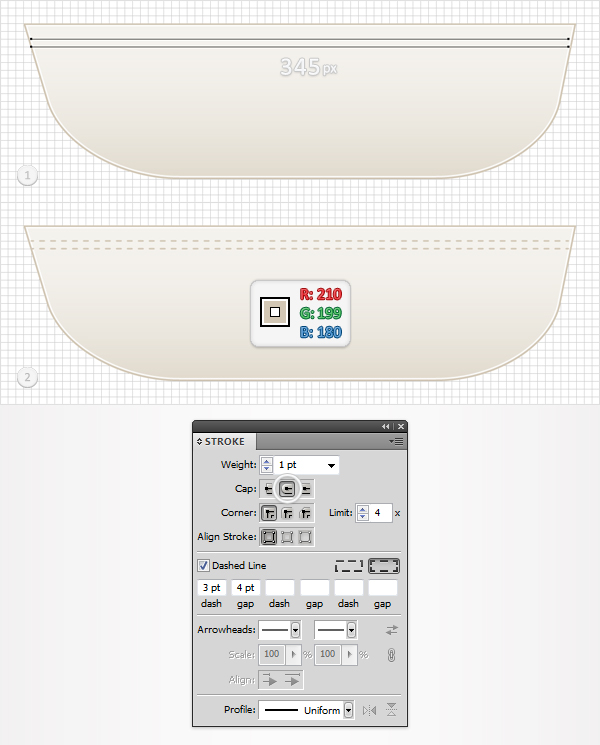
Pick the Pen Tool (P), draw two horizontal paths (345px long) and place them as shown in the first image. The Snap to Grid will ease your work. Add a 1pt stroke for both paths and set its color at R=210, G=199, B=180, and then go to the Stroke panel (Window > Stroke). First, check the Round Cap button from the Cap section. Next, check the Dashed Line box and then enter 3pt in the dash box, and 4pt in the gap line.
Step 5
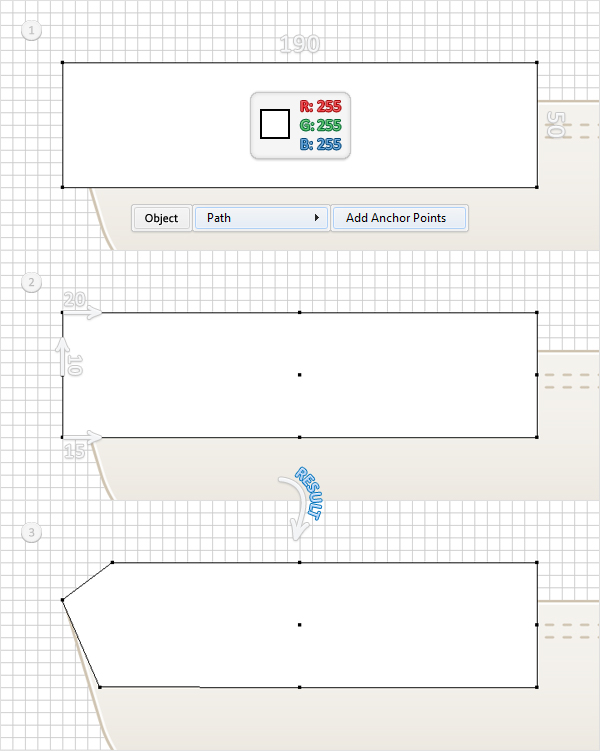
Pick the Rectangle Tool (M), create a 190 by 50px shape and fill it with white. Place it as shown in the first image, then go to Object > Path > Add Anchor Points. Pick the Direct Selection Tool (A), select the top anchor point and move it 20px to the left.
Move down to the next anchor point, select it and move it 10px up. Finally, select the bottom, left anchor point and move it 15px to the left. In the end your new shape should look like the third image shown.
Step 6
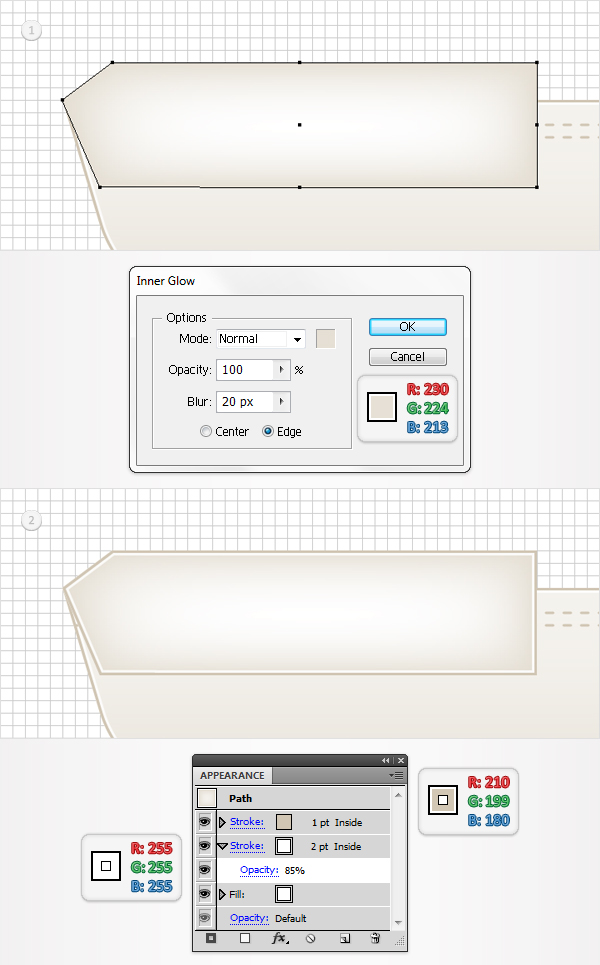
Select the shape created in the previous step and go to the Appearance panel. Select the existing fill and go to Effect > Stylize > Inner Glow. Continue adding a stroke. Make it 2pt wide, align it to the inside and set the colors at R=255, G=255, B=255.
Select this white stroke and click again on the Duplicate Selected Item button. Select this second stroke, make it 1pt wide and set its color at R=210, G=199, B=180. Return to the white stroke, select it from the Appearance panel, and lower its Opacity to 85%.
Step 7
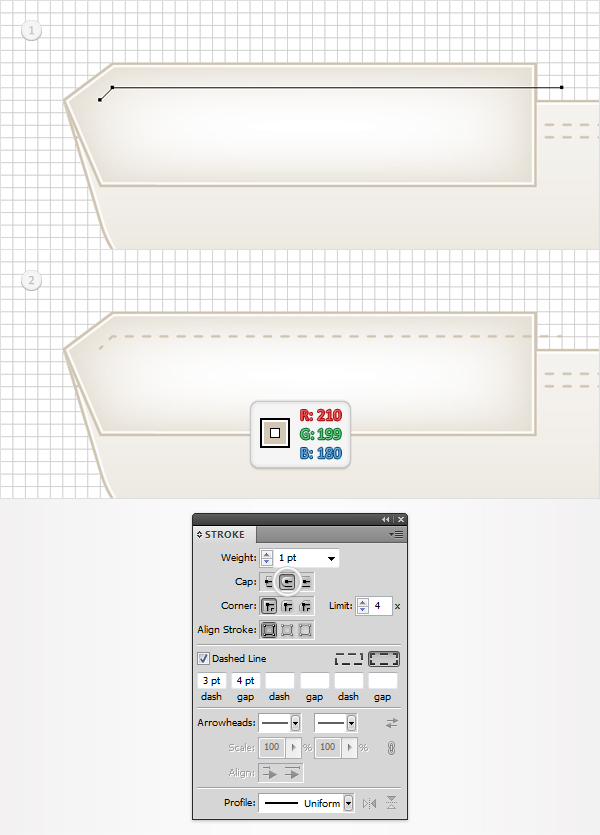
Pick the Pen Tool (P) and draw a simple path like the one shown in the following image. Fill it with none and add a dashed stroke like you did in the forth step.
Step 8
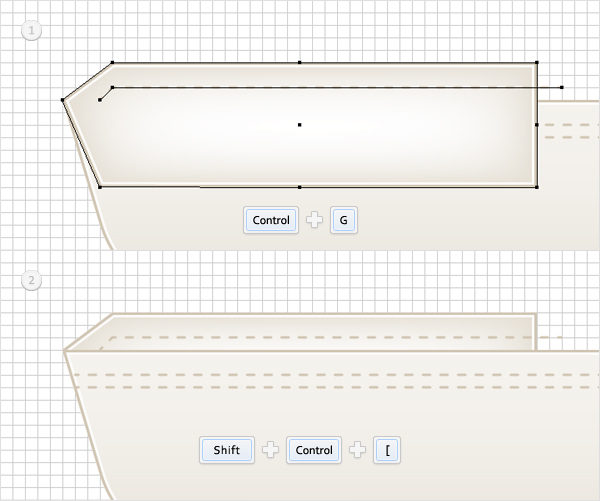
Select the two shapes created in the last three steps and group them (Command + G). Select this group and send it to back (Shift + Command + Left Bracket key).
Step 9
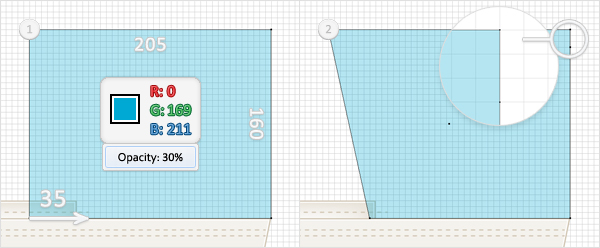
Pick the Rectangle Tool (M) and create a 205 by 160px shape. Fill it with R=0, G=169, B=211, lower its Opacity to 30%, and place it as shown in the first image.
Pick the Direct Selection Tool (A), select the bottom, left anchor point and move it 35px to the left. Pick the Add Anchor Point Tool(+), focus on the left side of this new shape and add a new anchor point, as shown in the second image.
Step 10
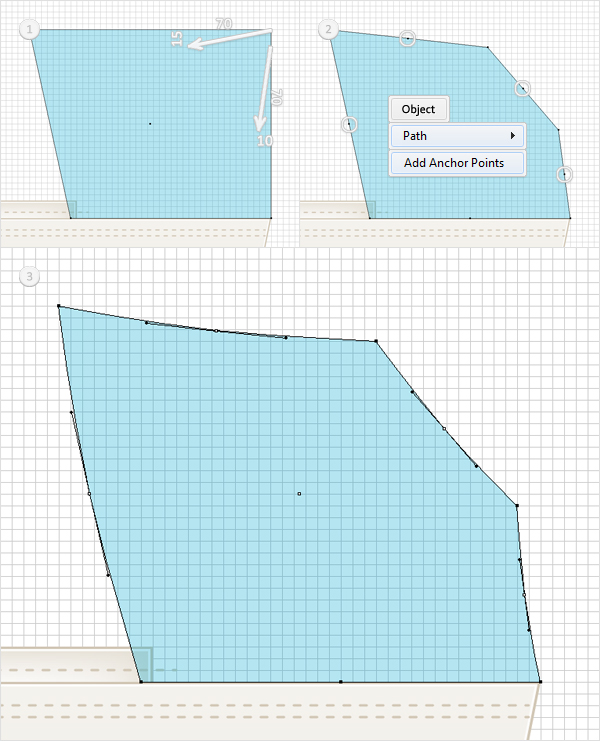
Pick the Direct Selection Tool (A), select the top, left anchor point and move it 15px down and 70px to the left. Select the anchor points added in the previous step and move it 70px down and 10px to the left. In the end your shape should look like the second image shown. Select it and go to Object > Path > Add Anchor Points.
Disable the Snap to Grid (Shift + Command + "). Pick the Convert Anchor Point Tool (Shift + C) and add some roundness for the four anchor points highlighted in the second image. In the end your shape should look roughly like the third image.
Step 11
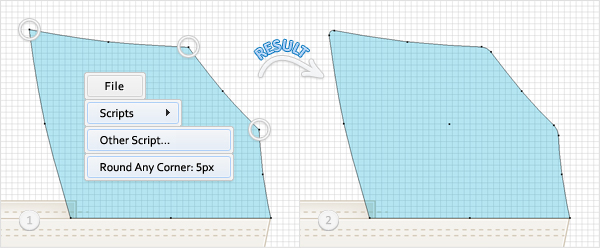
Re-enable the Snap to Grid (Shift + Command + "). Again, you will need the Round Any Corner script. Pick the Direct Selection Tool (A), select the three anchor points highlighted in the first image and go to File > Scripts > Other Script. Open the Round Any Corner Script, enter a 5px Radius and click OK.
Step 12
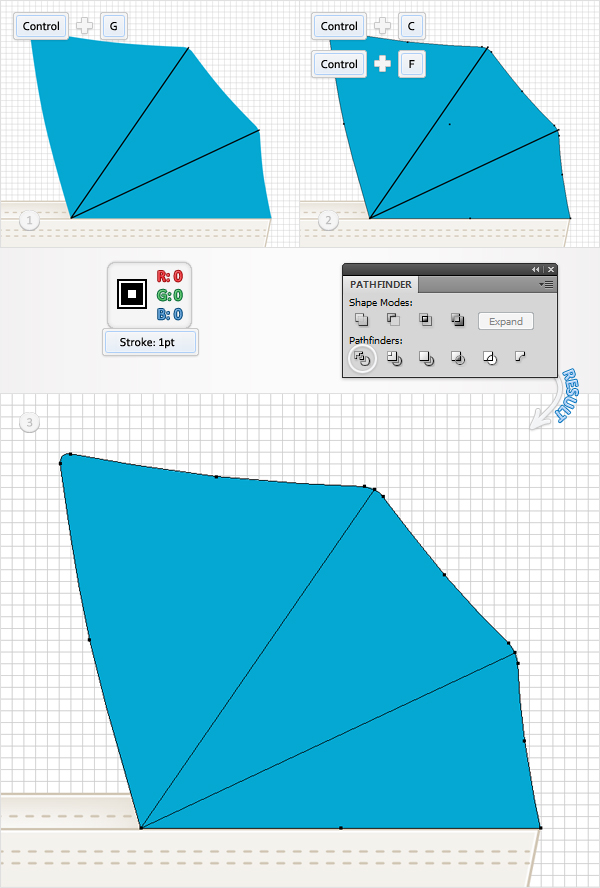
Reselect the shape edited in the previous step and raise its Opacity to 100%. Pick the Pen Tool (P) and draw two oblique paths as shown in the first image. Once again, the Snap to Grid will ease your work. Add a 1pt, black stroke for these two paths so that you can distinguish them from the rest of the shapes.
Select them, along with the blue shape, and group them. Make a copy of this group (Command + C > Command + F) and make it invisible. Move this invisible group somewhere in the bottom of the Layers panel. You will need it later. Return to the visible group, select it and click on the Divide button from the Pathfinder panel. This will create a group with three blue shapes. Ungroup it (Shift + Command + G).
Step 13
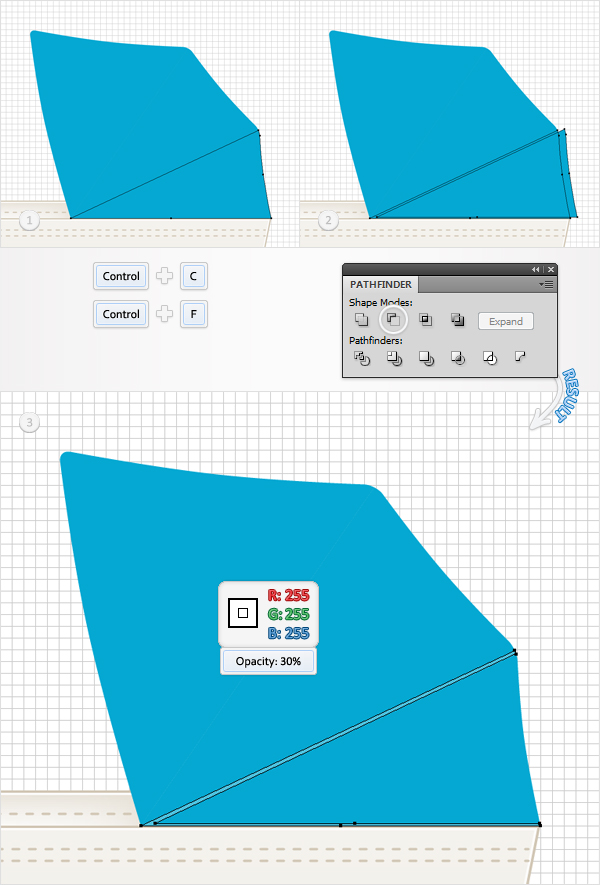
Disable the Snap to Grid (Shift + Command + " ). Let’s focus on the shapes created in the previous step. Start with the bottom. Select it and make two copies in front (Command + C > Command + F > Command + F). Select the top copy and hit the right arrow six times and the up arrow once. Reselect both copies and click on the Minus Front button from the Pathfinder panel. Fill the resulting shape with white and lower its Opacity to 30%.
Step 14
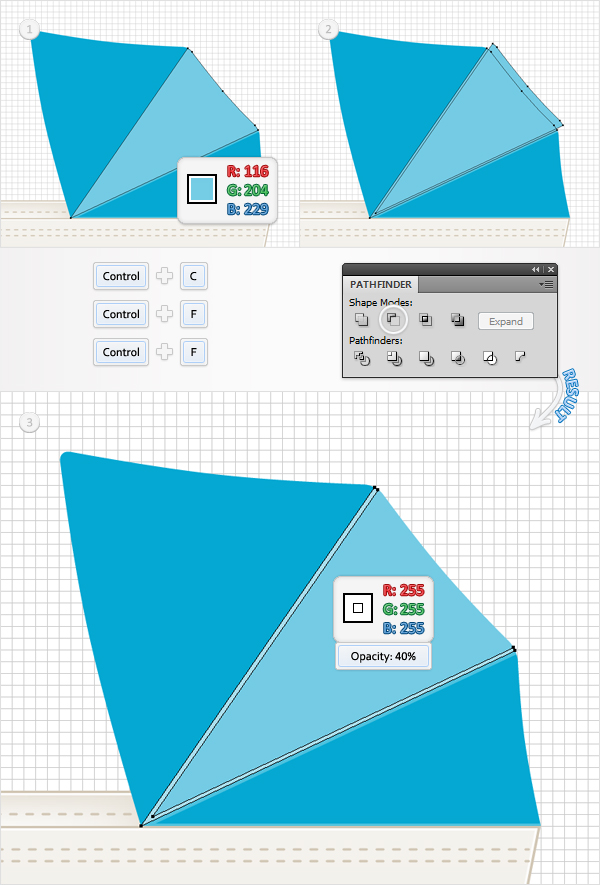
Move up to the next blue shape. Replace the existing color with R=116, G=204, B=229, then make two copies in front (Command + C > Command + F > Command + F). Select the top copy and hit the right arrow five times and the up arrow four times. Reselect both copies and click on the Minus Front button from the Pathfinder panel. Fill the resulting shape with white and lower its Opacity to 40%.
Step 15
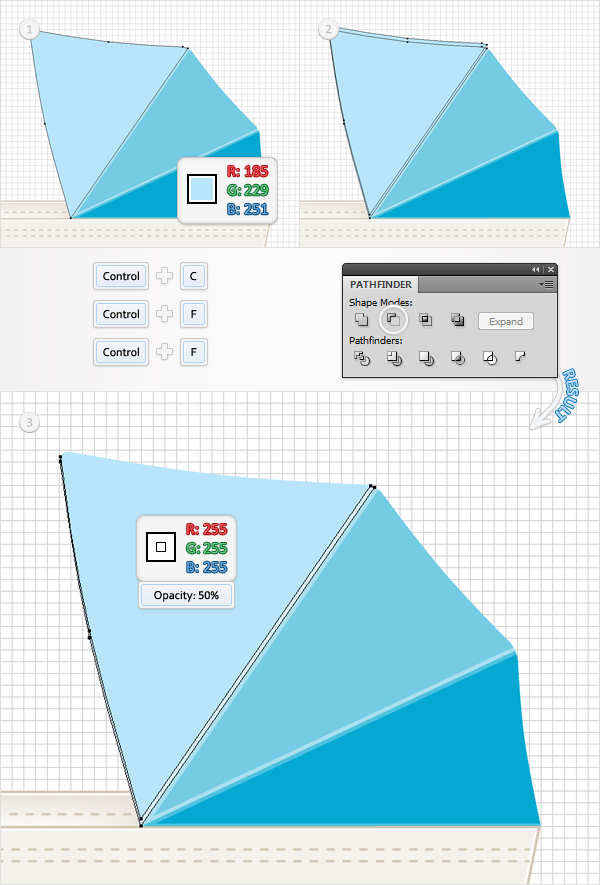
Move up to the top blue shape. Replace the existing color with R=185, G=229, B=251. Now make two copies in front (Command + C > Command + F > Command + F). Select the top copy and hit the up arrow three times. Reselect both copies and click on the Minus Front button from the Pathfinder panel. Fill the resulting shape with white and lower its Opacity to 50%.
Step 16
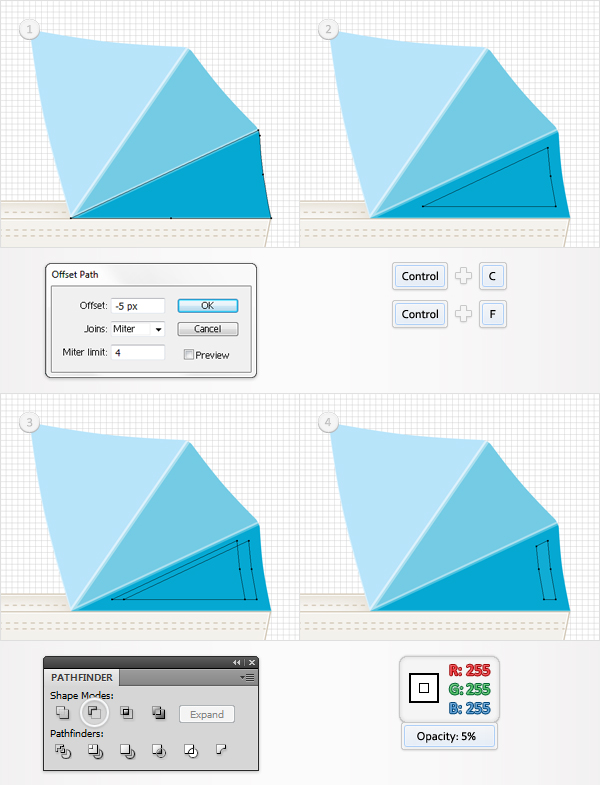
Return to the bottom, blue shape and go to Object > Path > Offset Path. Enter a -5px Offset and click OK. Select the resulting shape and make a copy in front (Command + C > Command + F). Select this copy and hit the left arrow 10 times, then reselect both shapes and click on the Minus Front button from the Pathfinder panel. Fill the resulting shape with white and lower its Opacity to 5%.
Step 17
Move up to the next blue shape and go to Object > Path > Offset Path. Again, enter a -5px Offset and click OK. Select the resulting shape and make a copy in front (Command + C > Command + F). Select this copy and hit the left arrow and the down arrow 10 times. Reselect both shapes and click on the Minus Front button from the Pathfinder panel. Fill the resulting shape with white and lower its opacity to 10%.
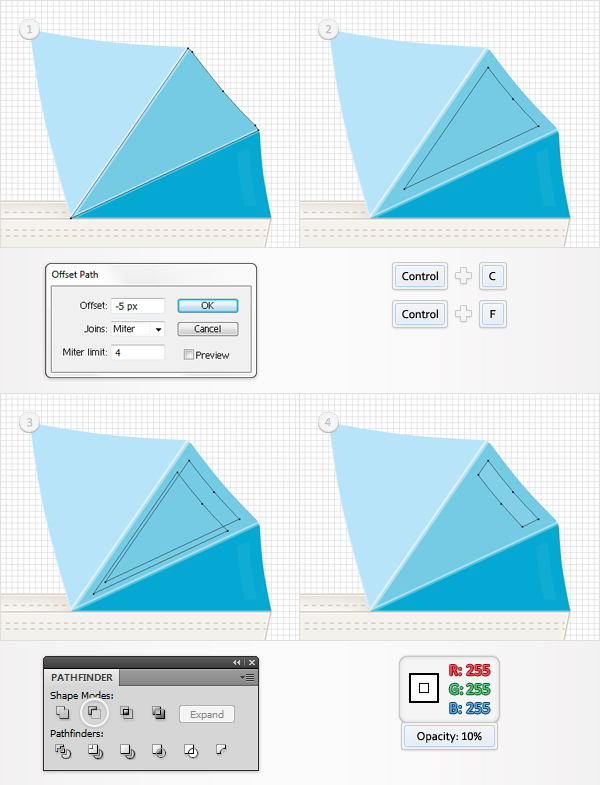
Step 18
Move up to the top, blue shape, and go to Object > Path > Offset Path. Once again, enter a -5px Offset and click OK. Select the resulting shape and make a copy in front (Command + C > Command + F). Select this copy and hit the down arrow 10 times. Reselect both shapes and click on the Minus Front button from the Pathfinder panel. Fill the resulting shape with white and lower its Opacity to 20%.
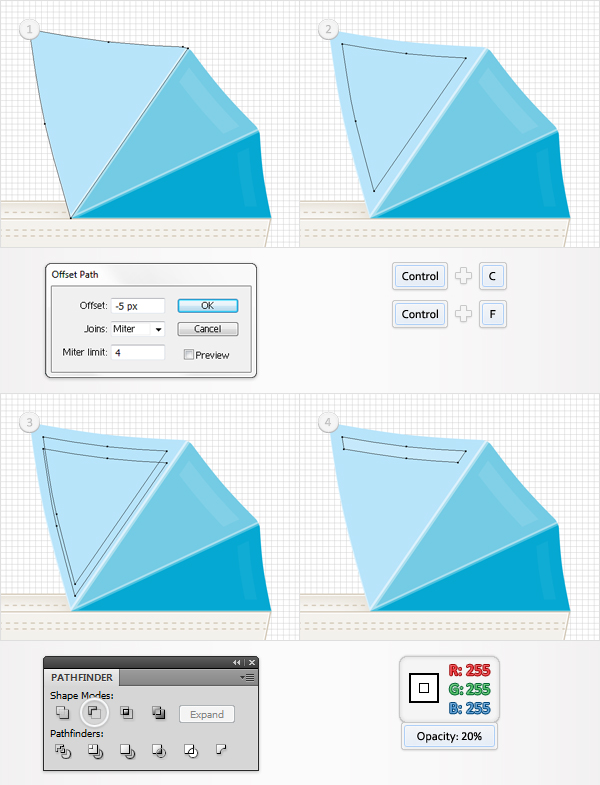
Step 19
Return to the bottom, blue shape. Select it, add two new fills and use the linear gradients shown below. Go to the Appearance panel, select the second fill and lower its Opacity to 50%.
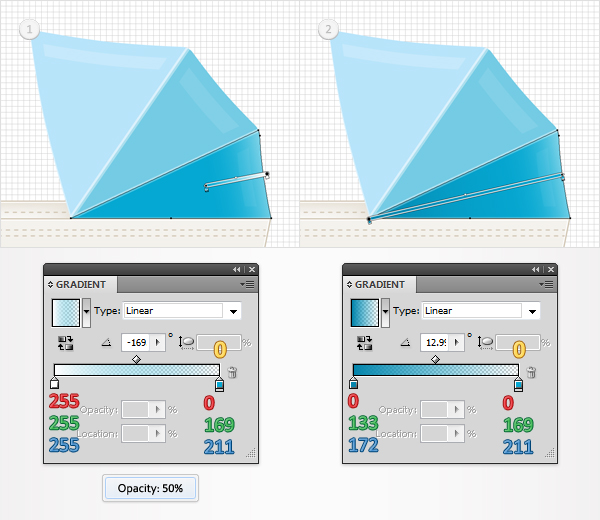
Step 20
Move up to the next blue shape. Select it, add two new fills and use the linear gradients shown below. Go to the Appearance panel, select the second fill and lower its Opacity to 50%.
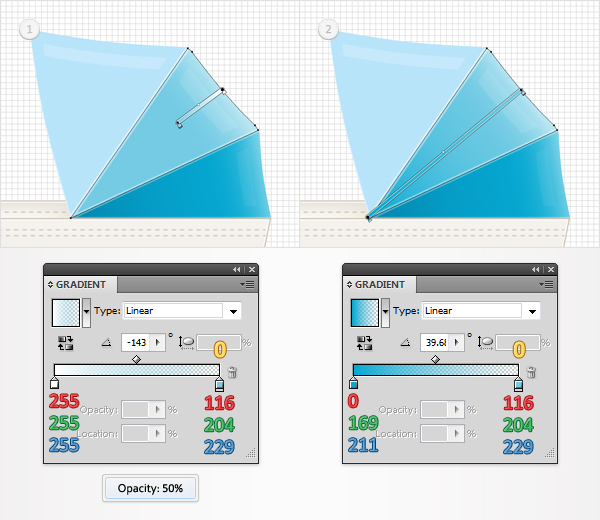
Step 21
Move up to the top blue shape. Select it, add two new fills and use the linear gradients shown below. Go to the Appearance panel, select the second fill and lower its Opacity to 50%.
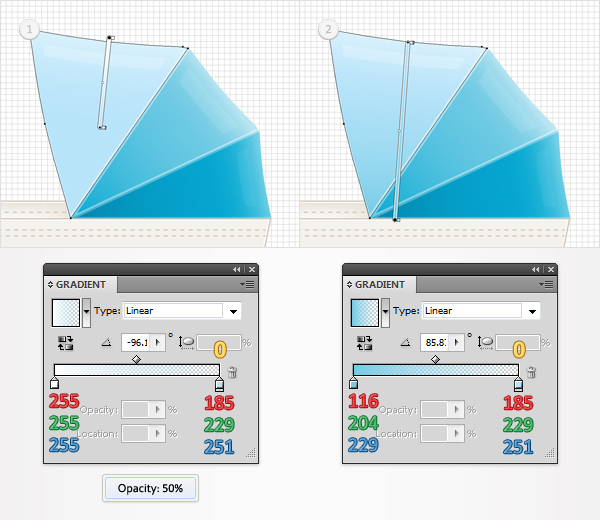
Step 22
Go to the Layers panel and find the invisible group created in the twelfth step. Make it visible and bring it to front (Shift + Command + Right Bracket key). Select the two oblique paths, go to the Appearance panel and replace the black with R=0, G=133, B=172.
Select the large, blue shape, replace the blue with white and bring it to front (Shift + Command + Right Bracket key). Now, select this white shape, along with the two obliques paths, and go to the Transparency panel (Window > Transparency). Open the fly-out menu and click on Make Opacity Mask. In the end, your group should look like the fourth image shown.
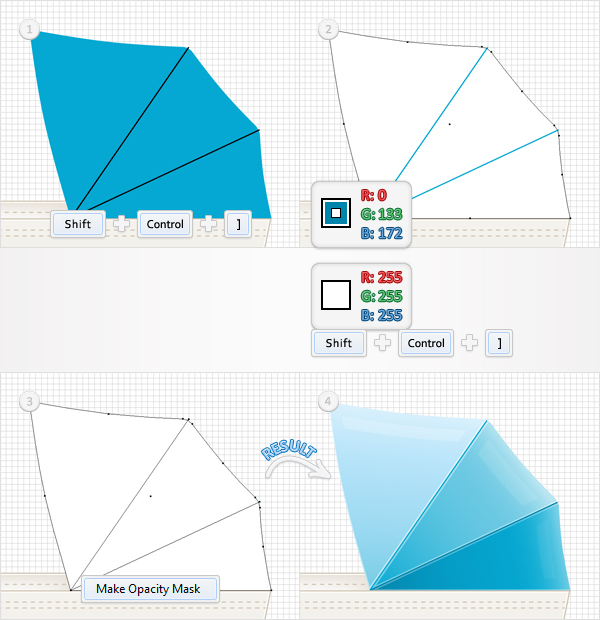
Step 23
Re-enable the Snap to Grid (Shift + Command + "). For the following step you will need a grid every 0.3px. Go to Edit > Preferences > Guides > Grid. Then enter 0.3 in the Gridline every box. Pick the Rectangle Tool (M), create a 3 by 3px shape, and fill it with R=128, G=130, B=133.
Continue with the Rectangle Tool (M) and create a second shape. Make it 3px wide and 0.6px tall. Now fill it with R=230, G=231, B=232, and place it as shown in the first image. Select these two rectangles, go to Object > Blend > Make, and then go to Object > Blend > Blend Options.
Select Specified Steps from the Spacing drop down menu, enter 15 in the box and click OK. In the end, your blend should look like the second image. Reselect the Rectangle Tool (M) and create three new shapes (3px wide and 0.3px tall). Fill them with the colors shown below, then place them as shown in the third image.
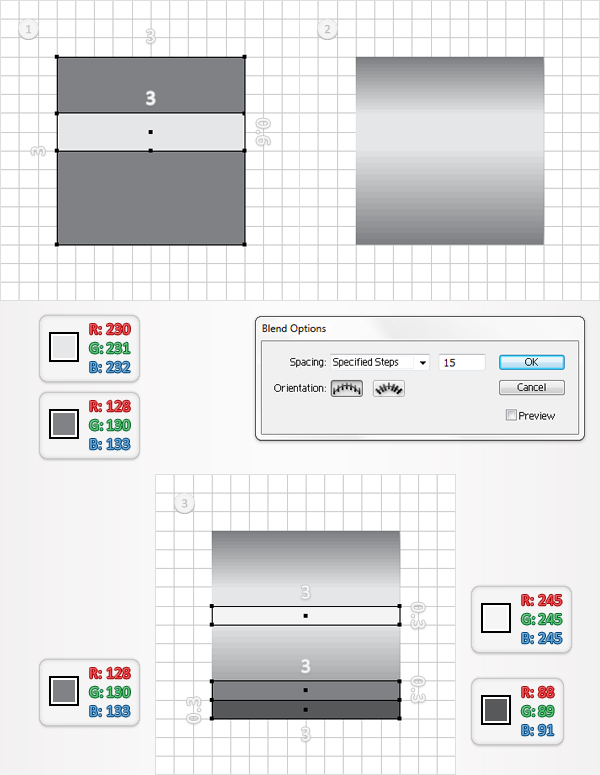
Step 24
Open the Brushes panel. Select all the shapes created in the previous step and group them (Command + G). Select this new group, open the fly-out menu of the Brushes panel, and click on New Brush.
Check the Pattern Brush button and click OK. This will open a new window where you can set the properties for your new pattern brush. Follow the data shown below, name it Pattern Brush 1, and click OK. Have a look in your Brushes panel and you’ll find your first pattern brush.
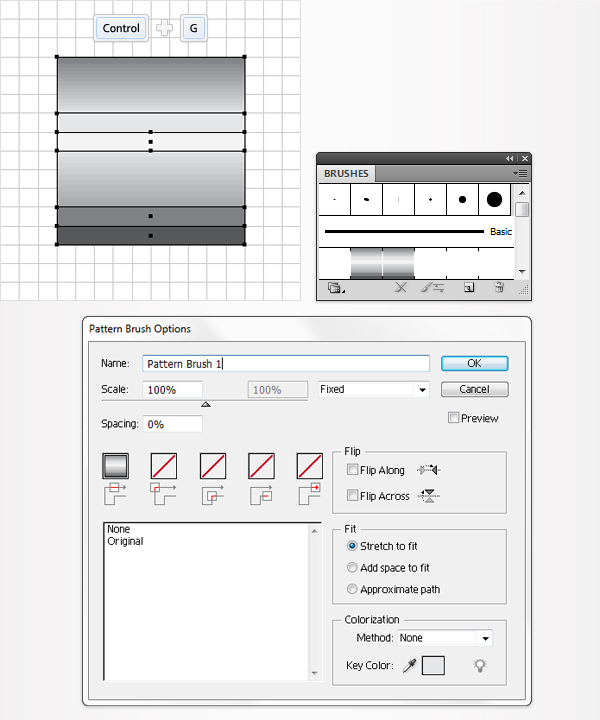
Step 25
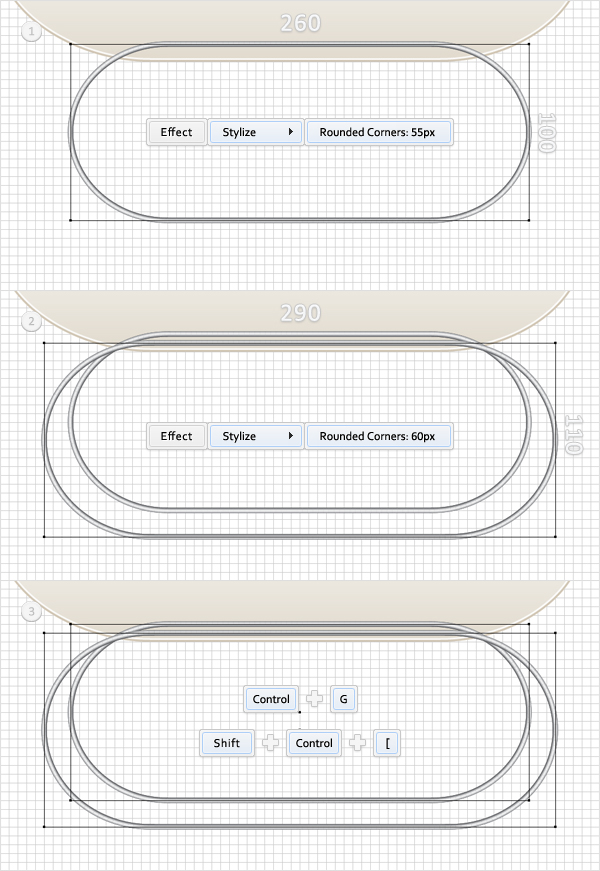
Return to "gridline every 5px grid." Go to Edit > Preferences > Guides > Grid, then enter 5 in the Gridline every box. Pick the Rectangle Tool (M), create a 260 by 100px shape, and place it as shown below. Fill it with none, add the pattern brush created in the previous step, and go to Effect > Stylize > Rounded Corners. Enter a 55px radius and click OK.
Continue with the Rectangle Tool (M), create a 290 by 110px shape, and place it as shown in the second image. Fill it with none, add the pattern brush, and go to Effect > Stylize > Rounded Corners. Enter a 60px radius and click OK. Reselect both rectangles, group them (Command + G), and send them to back (Shift + Command + Left Bracket key).
Step 26
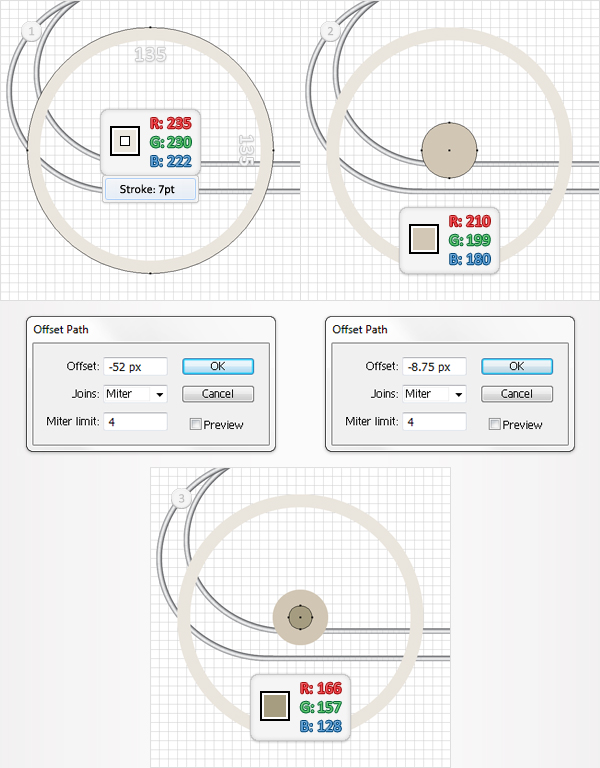
Pick the Ellipse Tool (L), create a 135 by 135px shape, and place it as shown in the first image. Fill it with none and add a 7pt stroke. Align it to inside and set its colors at R=235, G=230, B=222, and then go to Object > Path > Offset Path. Enter a -52px Offset and click OK.
Select the resulting shape, remove the stroke, fill it with R=210, G=199, B=180, and go to Object > Path > Offset Path. Enter a -8.75px Offset and click OK. Fill the resulting shape with R=166, G=157, B=128.
Step 27
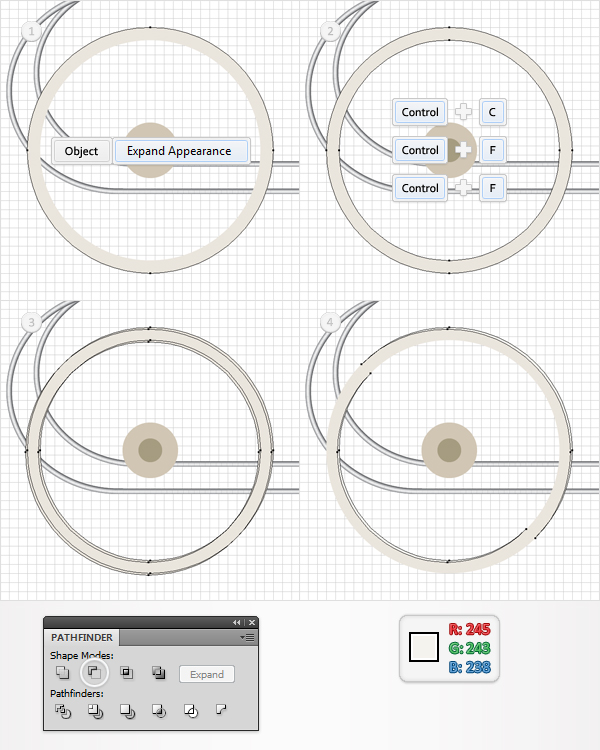
Disable the Snap to Grid (Shift + Command + "). Reselect the largest circle created in the previous step and go to Object > Expand Appearance. Select the resulting shape and make two copies in front (Command + C > Command + F > Command + F).
Select the top copy, hit the down arrow, and the left arrow once. Reselect both copies and click on the Minus Front button from the Pathfinder panel. Fill the resulting group of shapes with R=245, G=243, B=238.
Step 28
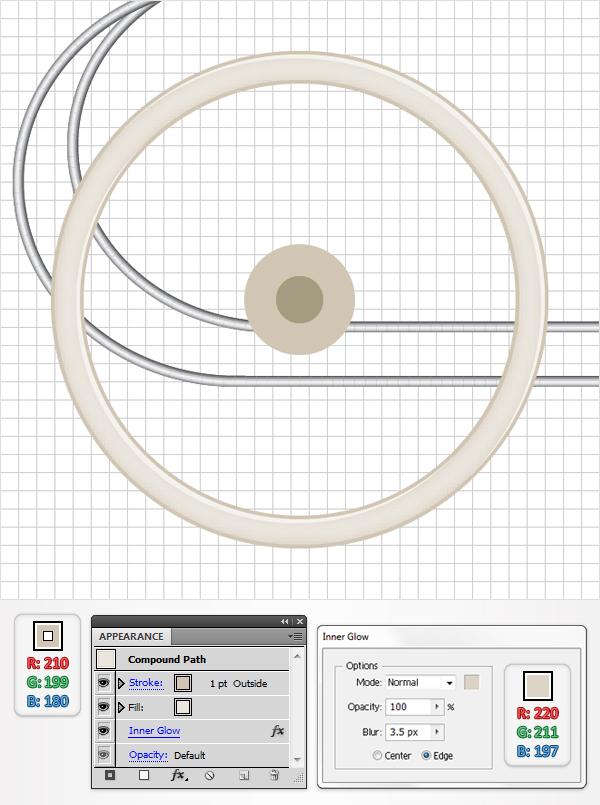
Reselect the shape created in the previous step (the expanded stroke) and go to the Appearance panel. Select the fill and go to Effect > Stylize > Inner Glow. Enter the data shown below, click OK, then add a stroke. Make it 1pt wide, align it to outside, and set its color at R=210, G=199, B=180.
Step 29
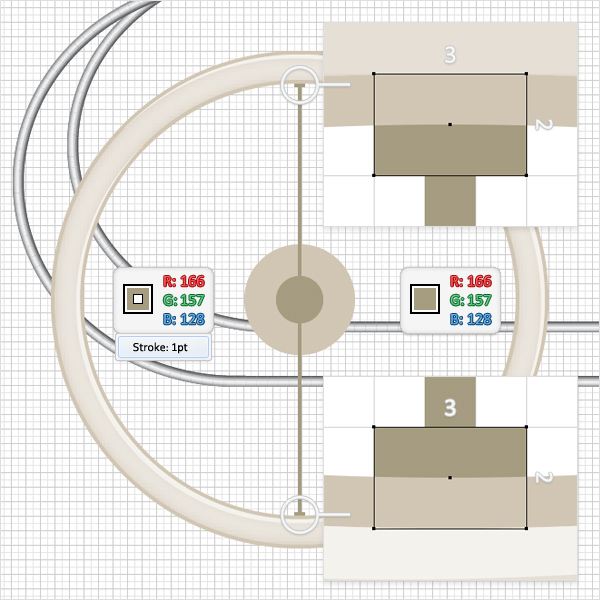
Re-enable the Snap to Grid (Shift + Command + "). For the following step you will need a grid every 1px. Go to Edit > Preferences > Guides > Grid and enter 1 in the Gridline every box. Pick the Pen Tool (P), draw a vertical path (135px tall), and place it as shown in the following image.
Add a 1pt stroke for this fresh path and set its colors to R=166, G=157, B=128. Switch to the Rectangle Tool (M), and create two 3 by 2px shapes. Fill them with R=166, G=157, B=128. Now place them as shown in the zoomed images.
Step 30
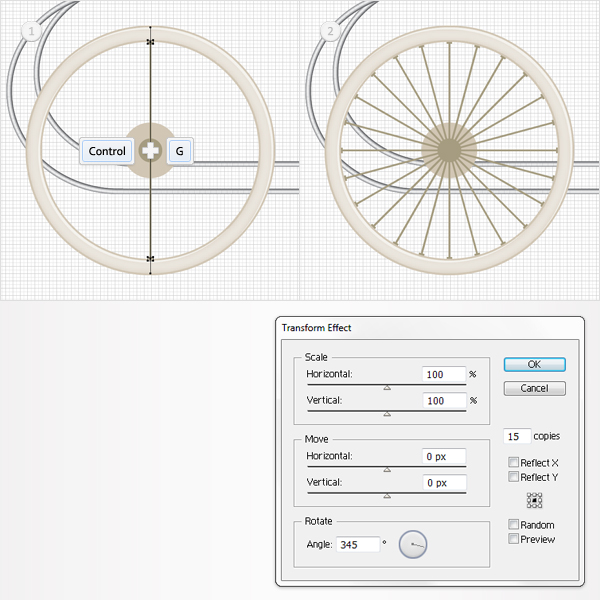
Select the three shapes created in the previous step and group them (Command + G). Select this fresh group and go to Effect > Distort & Transform > Transform. Enter 15 in the copies box, and 345 in the Angle box, then click OK.
Step 31
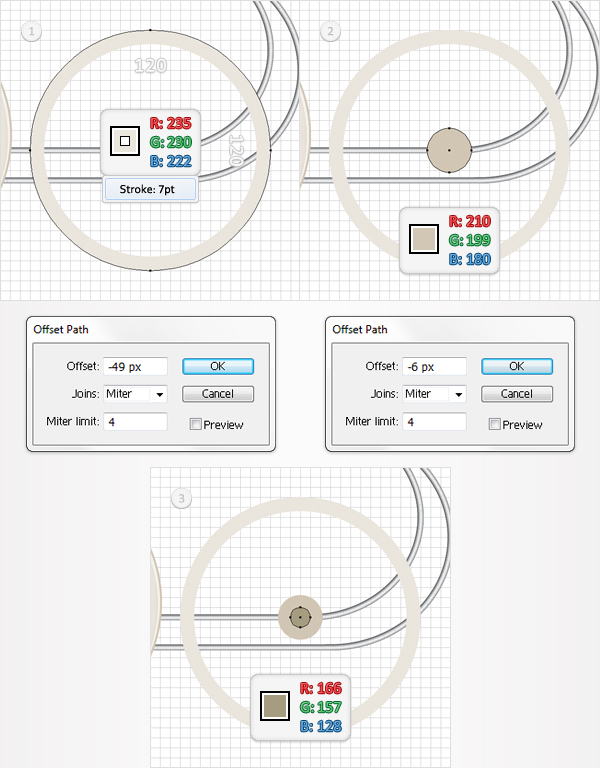
Return to "gridline every 5px grid." Go to Edit > Preferences > Guides > Grid. Now enter 5 in the Gridline every box. Pick the Ellipse Tool (L), create a 120 by 120px shape, and place it as shown in the first image.
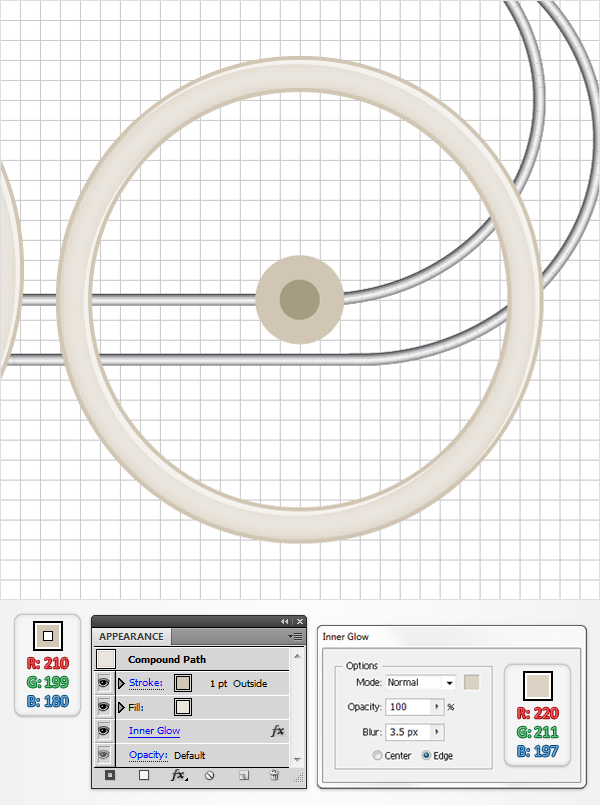
Fill it with none and add a 7pt stroke. Align it to inside and set its colors at R=235, G=230, B=222. Then go to Object > Path > Offset Path. Enter a -49px Offset and click OK. Select the resulting shape, remove the stroke, fill it with R=210, G=199, B=180, and go to Object > Path > Offset Path. Enter a -6px Offset and click OK. Fill the resulting shape with R=166, G=157, B=128.
Step 32
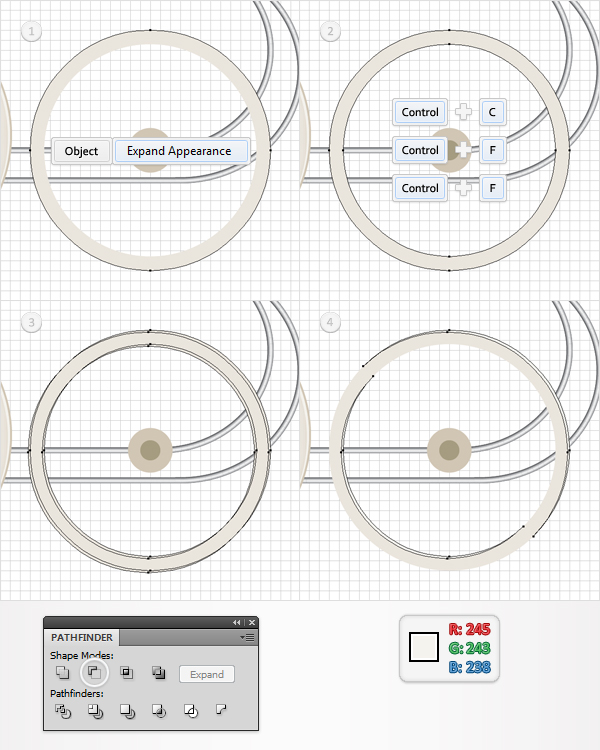
Disable the Snap to Grid (Shift + Command + "). Reselect the largest circle created in the previous step and go to Object > Expand Appearance. Select the resulting shape and make two copies in front (Command + C > Command + F > Command + F).
Select the top copy, hit the down arrow, and the left arrow once. Reselect both copies and click on the Minus Front button from the Pathfinder panel. Fill the resulting group of shapes with R=245, G=243, B=238.
Step 33
Reselect the shape created in the previous step (the expanded stroke) and go to the Appearance panel. Select the fill and go to Effect > Stylize > Inner Glow. Enter the data shown below, click OK, then add a stroke. Make it 1pt wide, align it to outside, and set its color to R=210, G=199, B=180.
Step 34
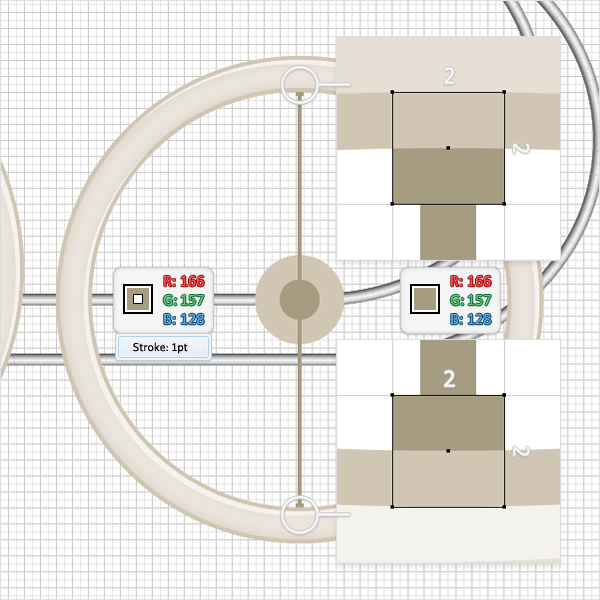
Re-enable the Snap to Grid (Shift + Command + "). For the following step you will need a grid every 1px. Go to Edit > Preferences > Guides > Grid, and enter 1 in the Gridline every box. Pick the Pen Tool (P), draw a vertical path (120px tall), and place it as shown in the following image.
Add a 1pt stroke for this fresh path and set its colors to R=166, G=157, B=128. Switch to the Rectangle Tool (M), and create two 2 by 2px shapes. Fill them with R=166, G=157, B=128, and place them as shown in the zoomed images.
Step 35
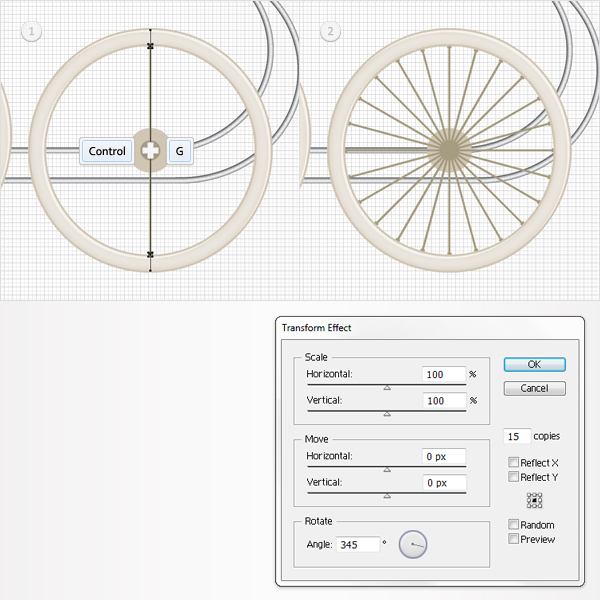
Select the three shapes created in the previous step and group them (Command + G). Select this fresh group and go to Effect > Distort & Transform > Transform. Enter 15 in the copies box, 345 in the Angle box, and click OK.
Step 36
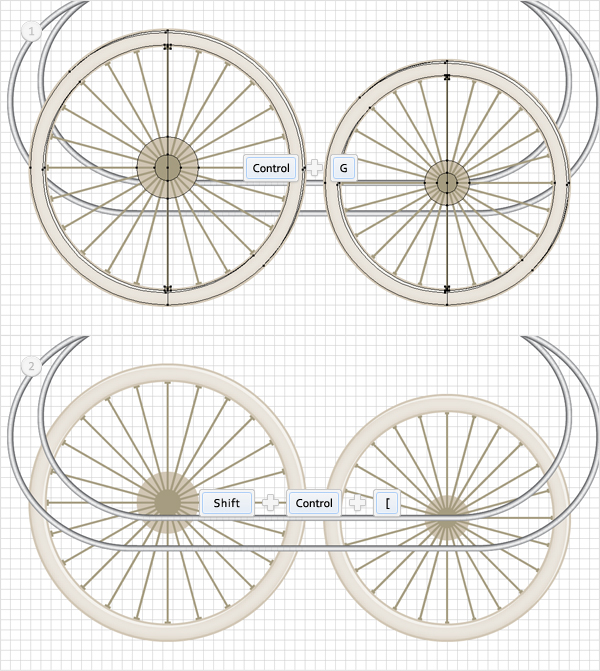
Return to "gridline every 5px grid." Go to Edit > Preferences > Guides > Grid and enter 5 in the Gridline every box. Select all the shapes that make up the two wheels, and group them, then send this group to back (Shift + Command + Left Bracket key).
Step 37
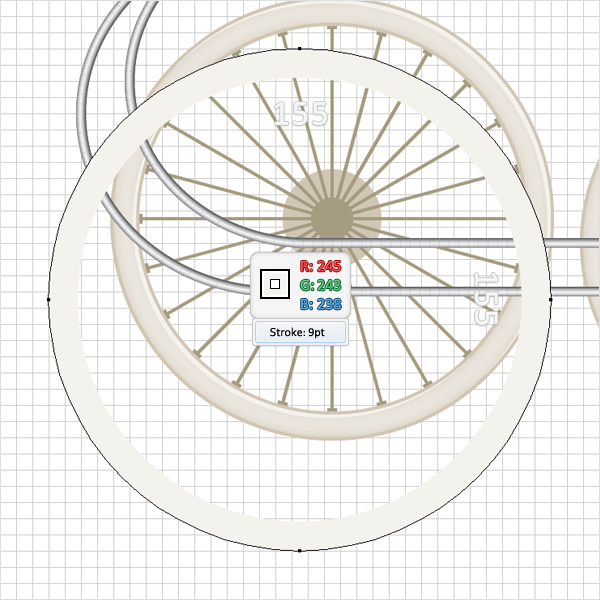
Pick the Ellipse Tool (L), create a 155 by 155px shape, and place it as shown in the following image. Fill it with none and add a 9pt stroke. Align it to inside and set its colors at R=245, G=243, B=238.
Step 38
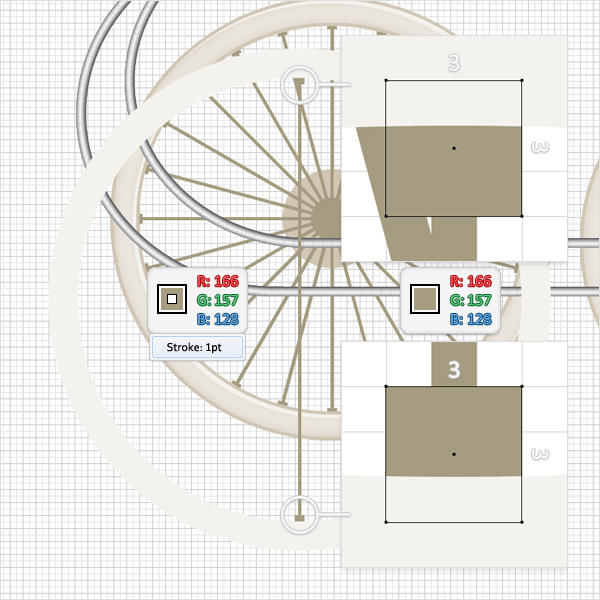
For the following step you will need a grid every 1px. Go to Edit > Preferences > Guides > Grid, and enter 1 in the Gridline every box. Pick the Pen Tool (P), draw a vertical path (155px tall), and place it as shown in the following image.
Add a 1pt stroke for this fresh path and set its colors at R=166, G=157, B=128. Switch to the Rectangle Tool (M), and create two 3 by 3px shapes. Fill them with R=166, G=157, B=128, and place them as shown in the zoomed images.
Step 39
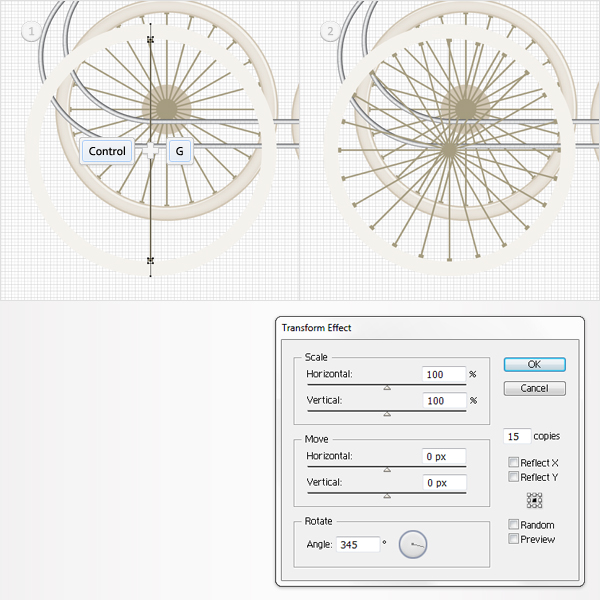
Select the three shapes created in the previous step and group them (Command + G). Select this fresh group and go to Effect > Distort & Transform > Transform. Enter 15 in the copies box, 345 in the Angle box, then click OK.
Step 40
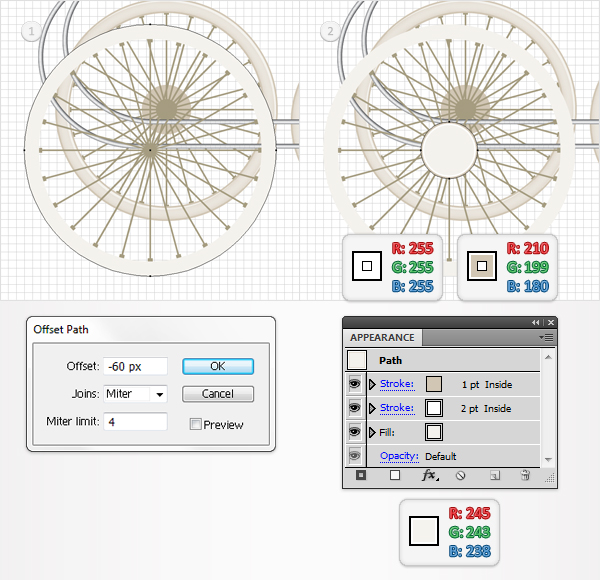
Return to "gridline every 5px grid." Go to Edit > Preferences > Guides > Grid and enter 5 in the Gridline every box. Select the shape created in the thirty-seventh step and go to Object > Path > Offset Path. Enter a -60px Offset and click OK.
Select the resulting shape, remove the existing stroke, and fill it with R=245, G=243, B=238. Add a new stroke for this shape, make it 2pt wide, align it to inside and set the color at R=255, G=255, B=255. Add a second stroke for this path, make it 1pt wide, align it to inside and set the color at R=210, G=199, B=180.
Step 41
Select the shape made in the previous step and go to Object > Path > Offset Path. Enter a -10px Offset and click OK. Select the resulting shape and remove the 2pt stroke. Fill it with R=255, G=218, B=205, then set the color for the 1pt stroke at R=210, G=199, B=180.
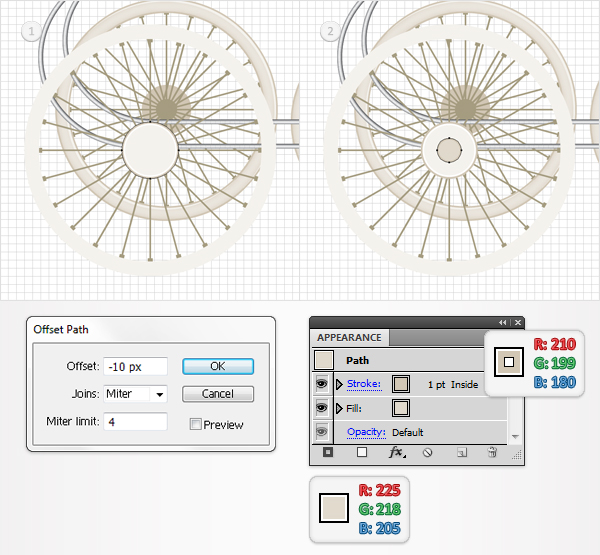
Step 42
Disable the Snap to Grid (Shift + Command + "). Reselect the shape created in the thirty-seventh step and go to Object > Expand Appearance. Select the resulting shape and make two copies in front (Command + C > Command + F > Command + F).
Select the top copy, hit the down arrow, and the left arrow twice. Reselect both copies and click on the Minus Front button from the Pathfinder panel. Fill the resulting group of shapes with white.
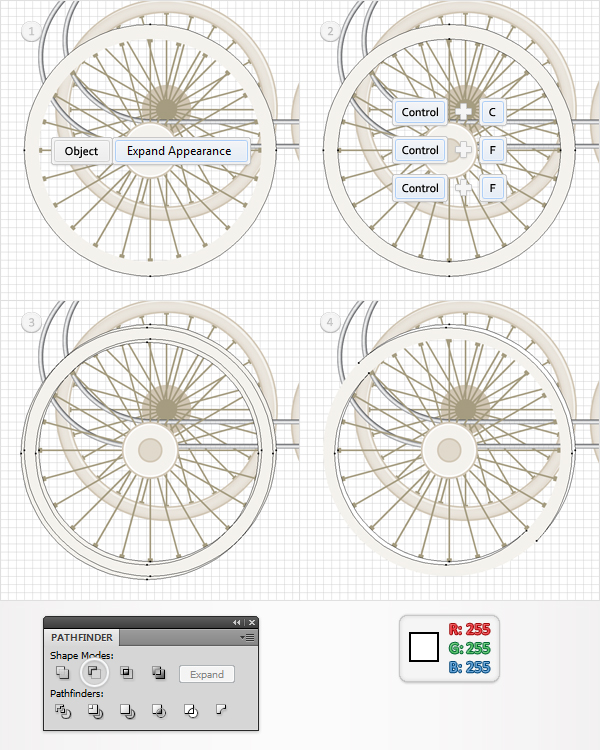
Step 43
Reselect the shape created in the previous step (the expanded stroke) and go to the Appearance panel. Select the fill and go to Effect > Stylize > Inner Glow. Enter the data shown below, click OK, then add a stroke. Make it 1pt wide, align it to outside and set its color at R=210, G=199, B=180.
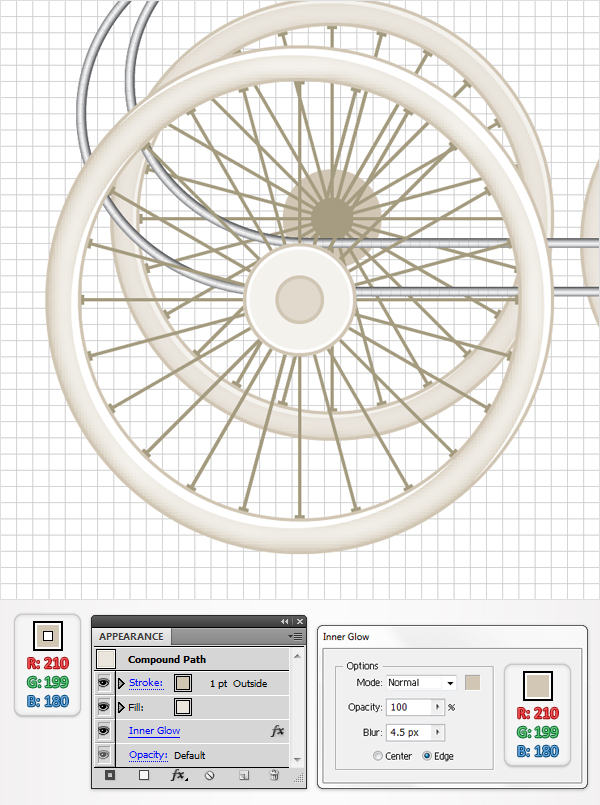
Step 44
Re-enable the Snap to Grid. Pick the Ellipse Tool (L), create a 135 by 135px shape, and place it as shown in the following image. Fill it with none and add a 9pt stroke. Align it to inside and set its colors at R=245, G=243, B=238.
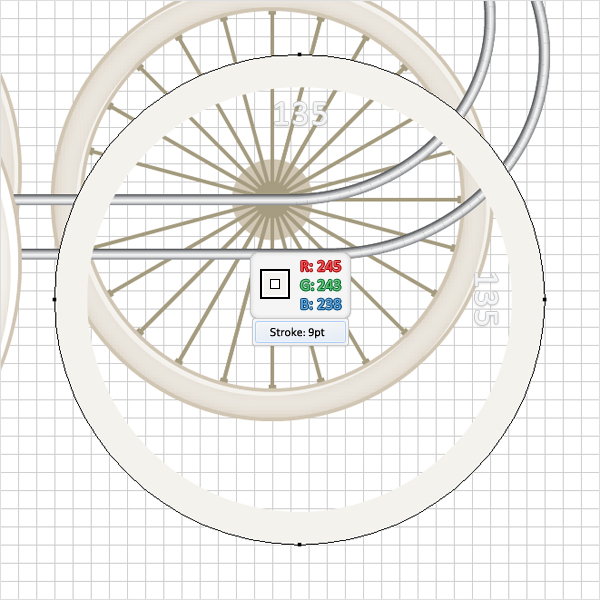
Step 45
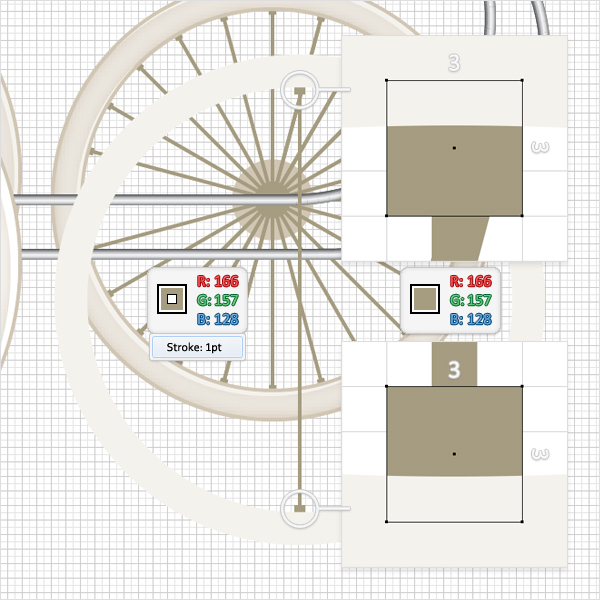
For the following step you will need a grid every 1px. Go to Edit > Preferences > Guides > Grid and enter 1 in the Gridline every box. Pick the Pen Tool (P), draw a vertical path (135px tall), and place it as shown in the following image.
Add a 1pt stroke for this fresh path and set its colors at R=166, G=157, B=128. Switch to the Rectangle Tool (M), and create two 3 by 3px shapes. Fill them with R=166, G=157, B=128, and place them as shown in the zoomed images.
Step 46
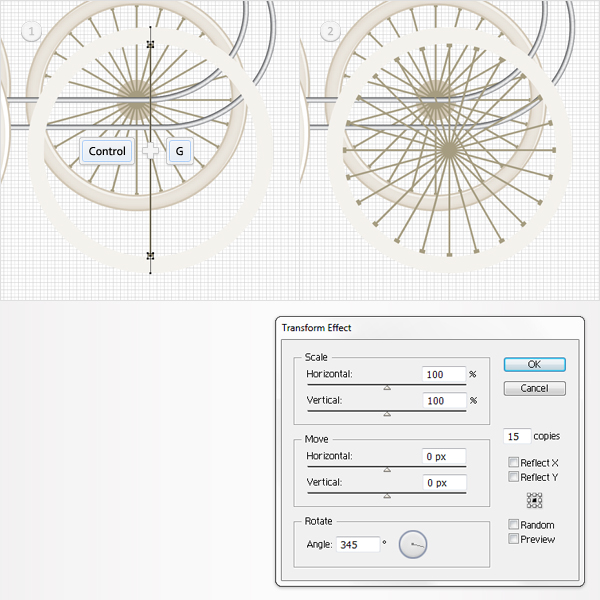
Select the three shapes created in the previous step and group them (Command + G). Select this fresh group and go to Effect > Distort & Transform > Transform. Enter 15 in the copies box, 345 in the Angle box, then click OK.
Step 47
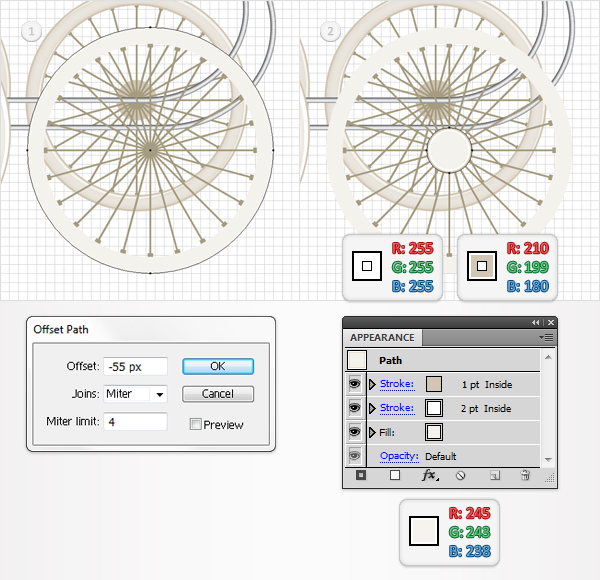
Return to "gridline every 5px grid." Go to Edit > Preferences > Guides > Grid and enter 5 in the Gridline every box. Select the shape created in the forty-forth step and go to Object > Path > Offset Path. Enter a -55px Offset and click OK.
Select the resulting shape, remove the existing stroke, and fill it with R=245, G=243, B=238. Add a new stroke for this shape, make it 2pt wide, align it to inside, and set the color at R=255, G=255, B=255. Add a second stroke for this path, make it 1pt wide, align it to inside, and set the color to R=210, G=199, B=180.
Step 48
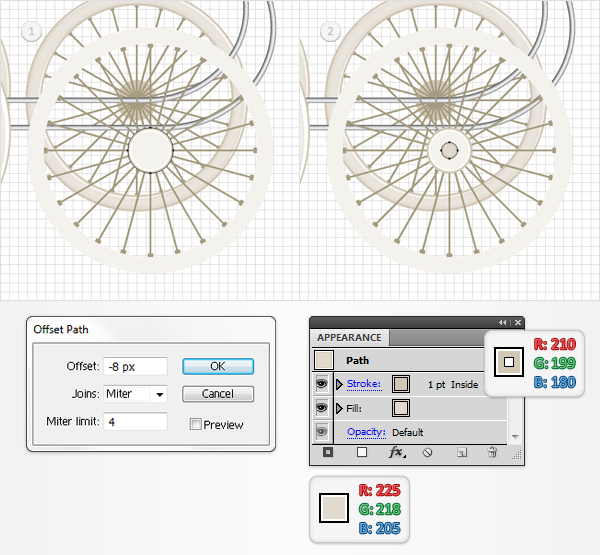
Select the shape made in the previous step and go to Object > Path > Offset Path. Enter a -8px Offset and click OK. Select the resulting shape and remove the 2pt stroke. Fill it with R=255, G=218, B=205 and set the color for the 1pt stroke at R=210, G=199, B=180.
Step 49
Disable the Snap to Grid (Shift + Command + "). Reselect the shape created in the forty-forth step and go to Object > Expand Appearance. Select the resulting shape and make two copies in front (Command + C > Command + F > Command + F).
Select the top copy, hit the down arrow, and the left arrow twice. Reselect both copies and click on the Minus Front button from the Pathfinder panel. Fill the resulting group of shapes with white.
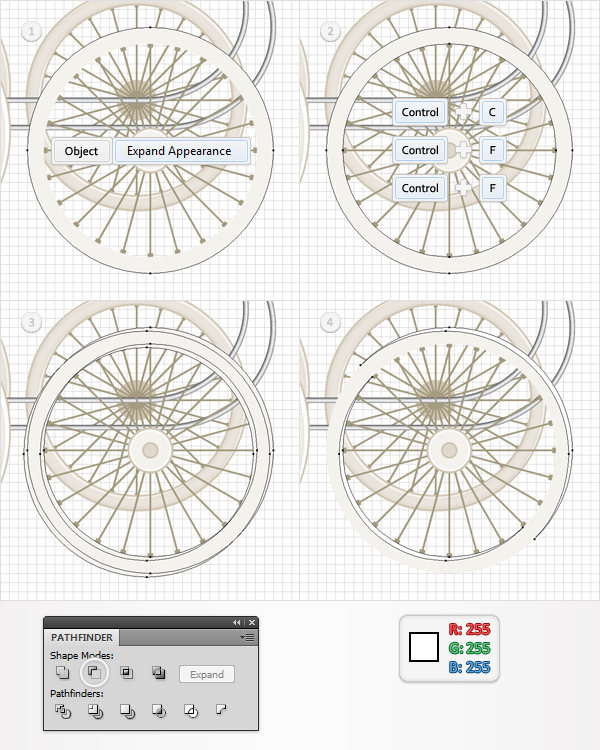
Step 50
Reselect the shape created in the previous step (the expanded stroke) and go to the Appearance panel. Select the fill and go to Effect > Stylize > Inner Glow. Enter the data shown below, click OK, then add a stroke. Make it 1pt wide, align it to outside, and set its color at R=210, G=199, B=180.
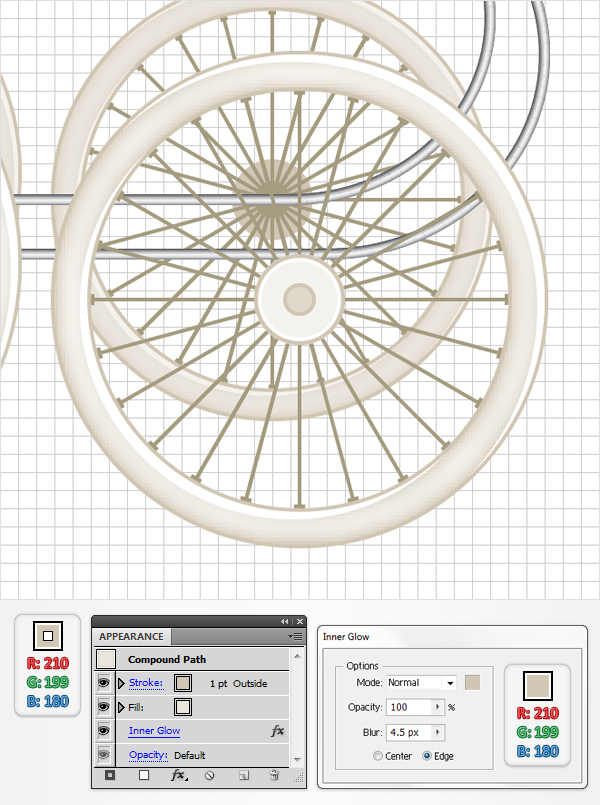
Step 51
Enable the Smart Guides (Command + U), and create two simple paths, as shown in the following image. Add a 4pt stroke for the right path and 7pt stroke for the left path. Set the color at R=128, G=130, B=133. Now go to the Stroke panel and click on the Round Cap button.
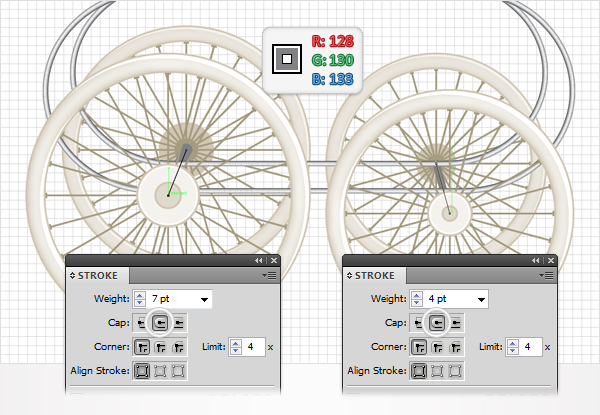
Step 52
Disable the Smart Guides (Command + U) and enable the Snap to Grid (Shift + Command + "). Pick the Rectangle Tool (M) and create a 100 by 20px shape. Fill it with R=147, G=149, B=152, and place it as shown in the following image.
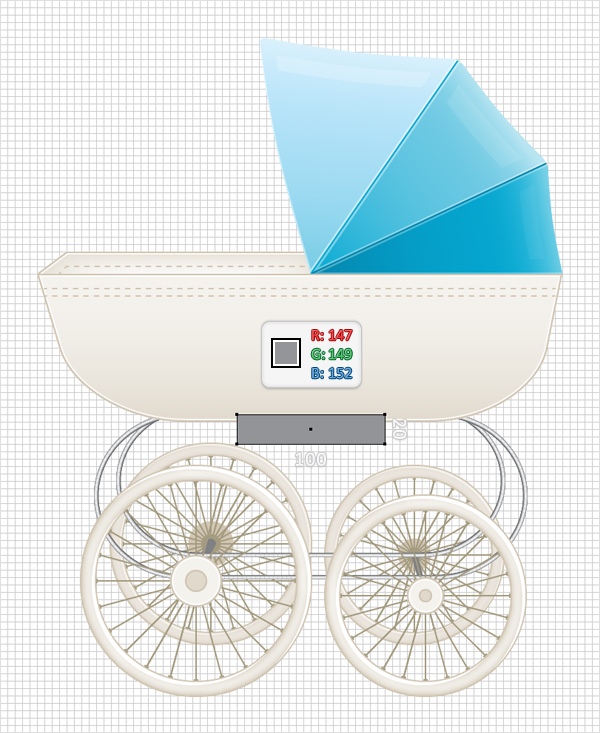
Step 53
Select the shape created in the previous step, add two new fills, and use the linear gradients shown below.
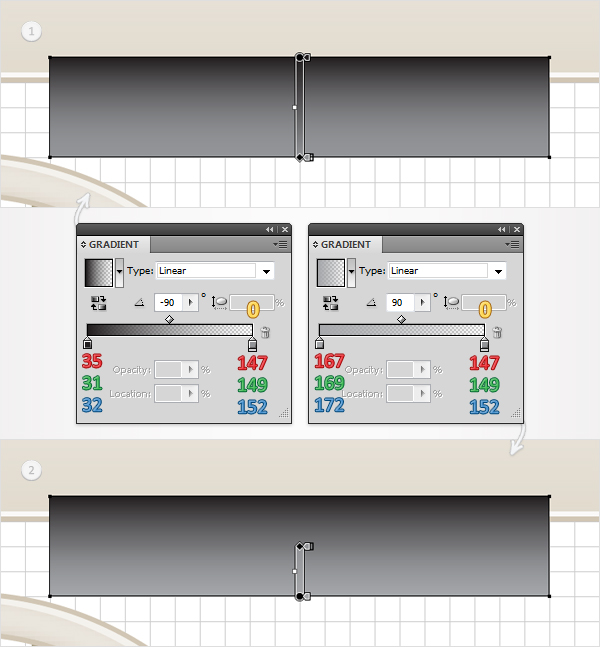
Step 54
Reselect the rectangle edited in the previous step and add a 2pt, white stroke. Align it to inside, lower its Opacity to 30%, and then add a second stroke. Make it 1pt wide, align it to inside, and set the color at R=109, G=110, B=113.
Reselect the entire rectangle and go to Effect > Stylize > Rounded Corners. Enter a 5px radius, click OK, then send this shape to back (Shift + Command + Left Bracket key).
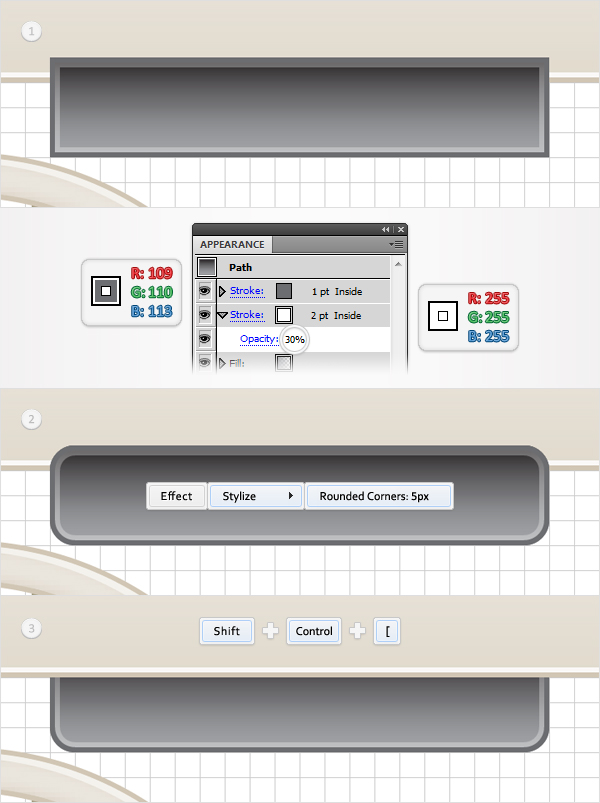
Step 55
For the following step you will need a grid every 0.25px. Go to Edit > Preferences > Guides > Grid and enter 0.25 in the Gridline every box. Pick the Rectangle Tool (M), create a 10 by 10px shape, and fill it with any color.
Switch to the Pen Tool (P), draw five horizontal paths (11px long), and place them as shown in the following image. Select all these paths, along with the rectangle, and click on the Divide button from the Pathfinder panel. This will create a group with six simple rectangles. Fill them with the colors shown below.
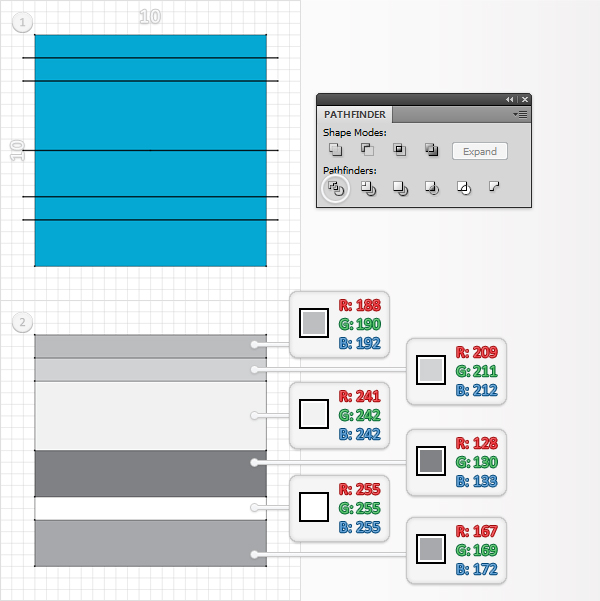
Step 56
Pick the Ellipse Tool (L), create a 10 by 10px shape, and fill it with any color. Switch to the Pen Tool (P), draw five horizontal paths (11px long), and a vertical path, then place them as shown in the following image.
Select all these paths, along with the circle, and click on the Divide button from the Pathfinder panel. This will create a group with twelve shapes. Remove the left half of this group and fill the resulting shape with the colors shown below.
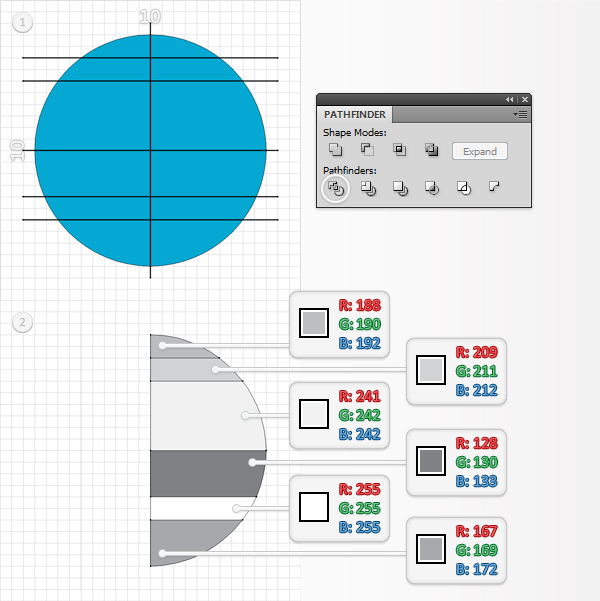
Step 57
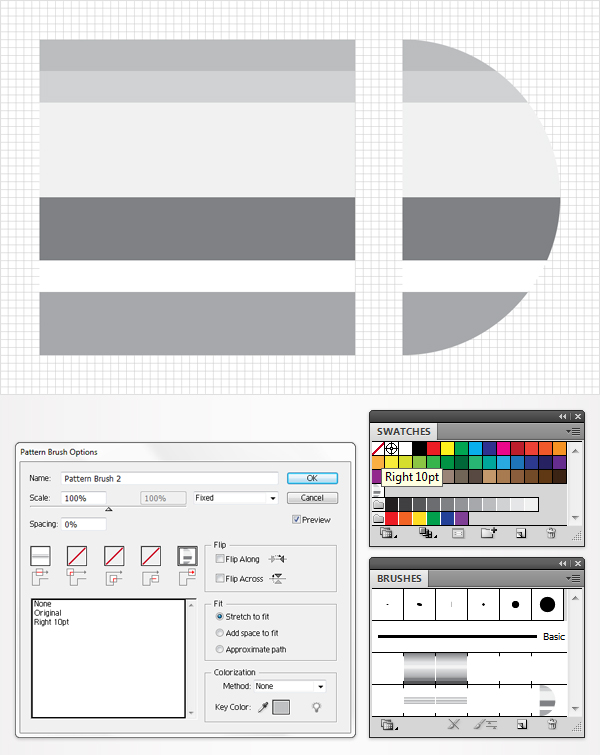
Let’s create a second pattern brush. You will need the group of shapes created in the last two steps. Select the group of shapes that make up the half circle and drag them into the Swatches panel. This will create a new pattern.
Double-click on it and name it “Right 10pt.” Select the group of shapes that make up the rectangle and go to the Brushes panel. Open the fly-out menu and click on New Brush. Check Pattern Brush and click OK. Click on the End Tile box, then move down, and select Right 10pt from the large, white box. Name it “Pattern Brush 2″ and click OK.
Step 58
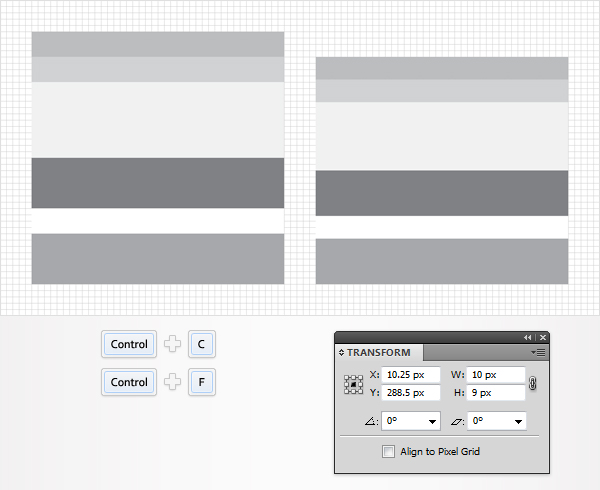
Reselect the group of shapes that make up the half circle and duplicate it. Select this copy, move it a few pixels to the right, and go to the Transform panel (Window > Transform). Enter 10 in the width box and 9 in the height box. Your group copy should look like the following image.
Step 59
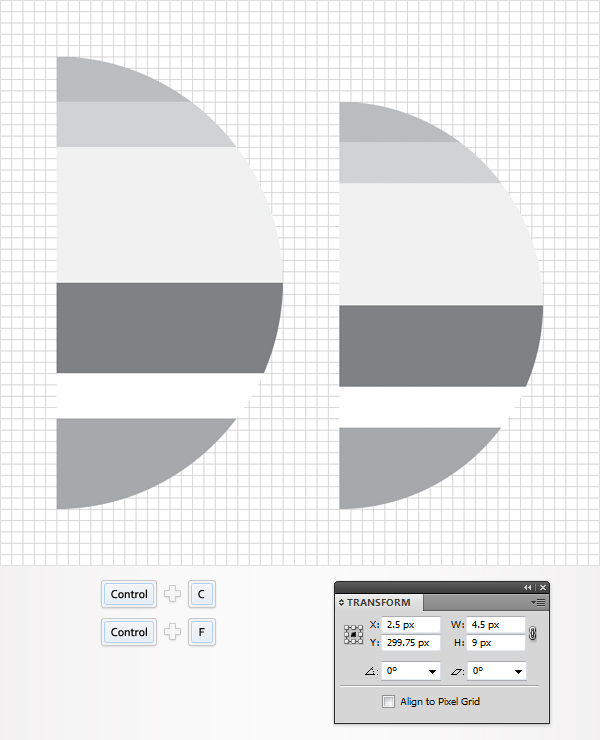
Reselect the group of shapes that make up the half circle and duplicate it. Select this copy, move it a few pixels to the right, and go to the Transform panel (Window > Transform). Enter 4.5 in the width box and 9 in the height box. Your group copy should look like the following image.
Step 60
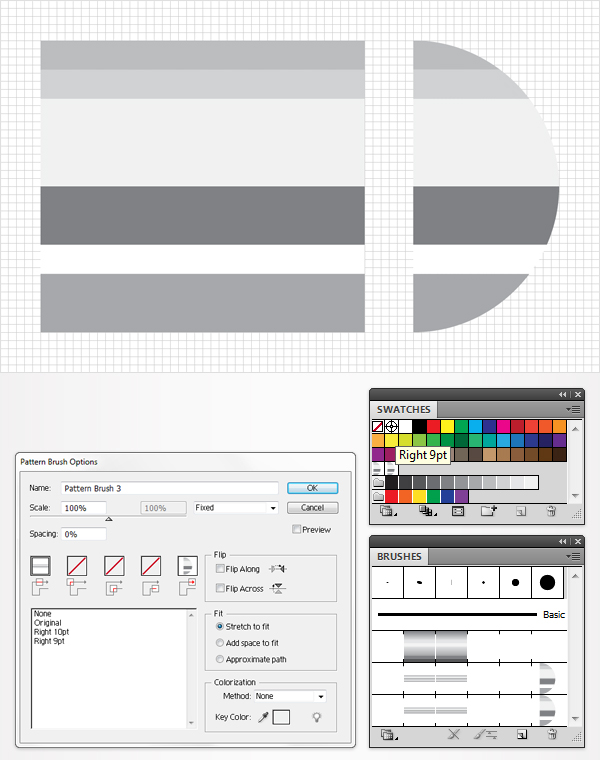
Let’s create a third pattern brush. You will need the group of shapes created in the last two steps. Select the shapes that make up the half circle and turn them into a pattern. Name it Right 9pt.
Select the group of shapes that make up the rectangle and go to the Brushes panel. Open the fly-out menu and click on New Brush. Check Pattern Brush and click OK. Click on the End Tile box, then move down, and select Right 9pt. Name it Pattern Brush 3 and click OK.
Step 61
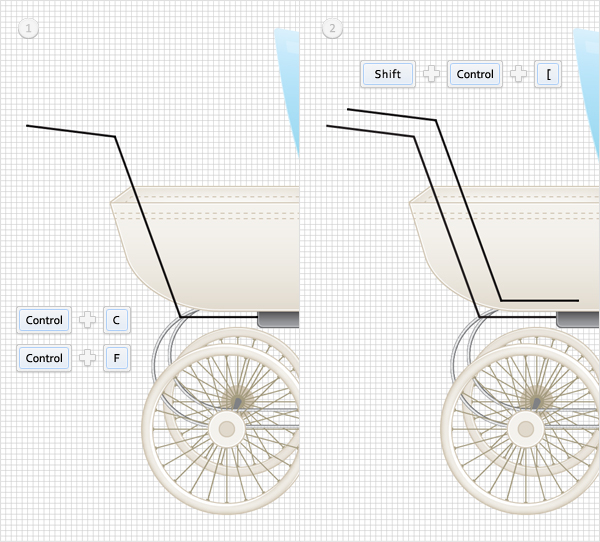
Return to "gridline every 5px grid." Go to Edit > Preferences > Guides > Grid and enter 5 in the Gridline every box. Pick the Pen Tool (P) and draw a path like the one shown in the first image. Start drawing it at the bottom. Make a copy of this path and place it as shown in the second image. Select this copy and send it to back (Shift + Command + Left Bracket key).
Step 62
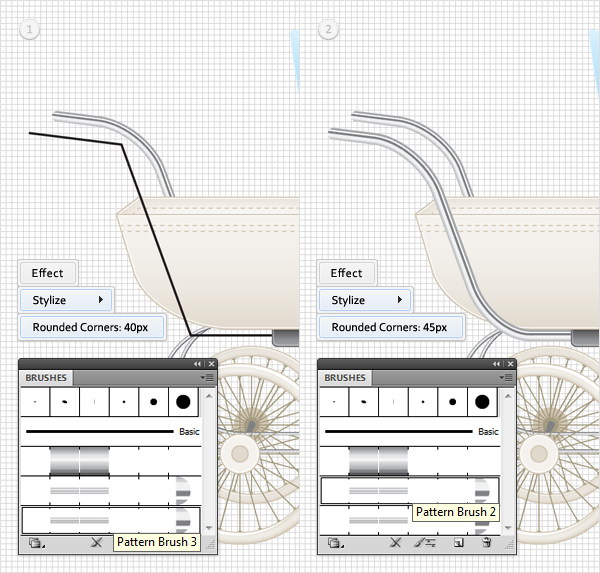
Focus on the shapes created in the previous step. Select the one in the back, add the Pattern Brush 3, and go to Effect > Stylize > Rounded Corners. Enter a 40px radius and click OK. Select the front path, add the Pattern Brush 2, then go to Effect > Stylize > Rounded Corners. Enter a 45px radius and click OK.
Step 63
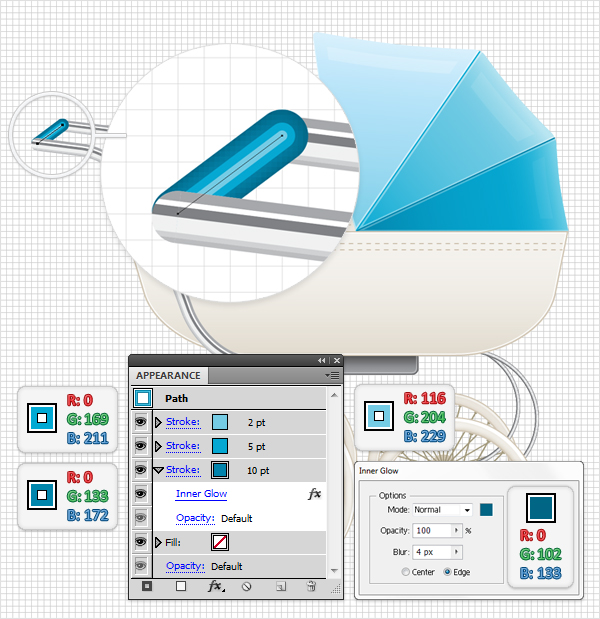
Pick the Pen Tool (P) and draw a simple, oblique path as shown in the following image. Add a 10pt stroke. Set its colors to R=0, G=133, B=172. Now go to the Stroke panel and click on the Round Cap button. Add a second stroke. Make it 5pt wide, set the color to R=0, G=169, B=211, and click on the Round Cap button from the Stroke panel.
Add one final stroke. Make it 2pt wide, set the color at R=116, G=204, B=229, and click on the Round Cap button. Return to the 10pt stroke. Select it from the Appearance panel and go to Effect > Stylize > Inner Glow. Enter the data shown below and click OK.
Step 64
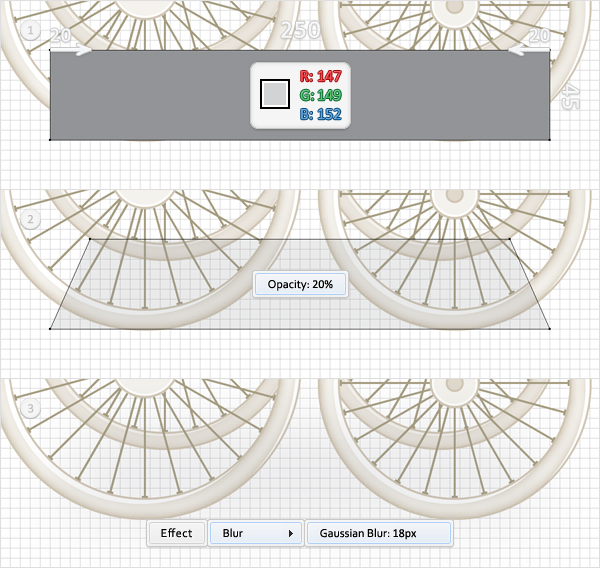
Pick the Rectangle Tool (M) and create a 250 by 45px shape. Fill it with R=147, G=149, B=152, and place it as shown in the first image. Switch to the Direct Selection Tool (A). Select the top, left anchor point, and move it 20px to the right.
Select the top, right anchor point, and move it 20px to the left. Lower the Opacity of this shape to 20 and go to Effect > Blur > Gaussian Blur. Enter a 18px radius and click OK.
Step 65
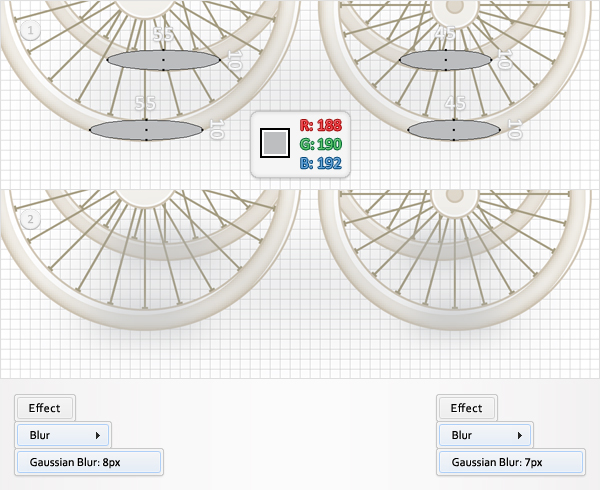
Pick the Ellipse Tool (L), create two 55 by 10px shapes, and two 45 by 10px shapes. Place them as shown in the first image and fill them with R=188, G=190, B=192. Select the 55 by 10px shapes and go to Effect > Blur > Gaussian Blur. Enter an 8px radius and click OK. Select the 45 by 10px shapes and go to Effect > Blur > Gaussian Blur. Enter a 7px radius and click OK.
Step 66
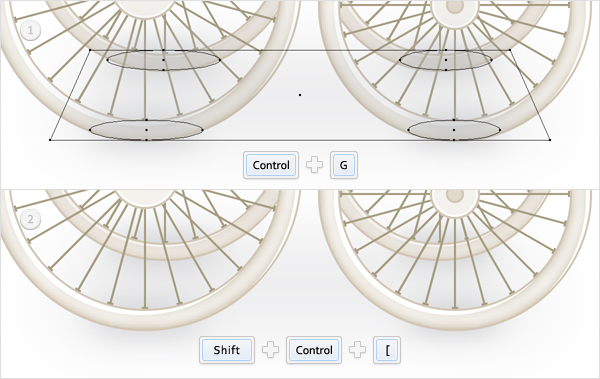
Select the shapes created in the last two steps and group them. Select this group and send it to back (Shift + Command + Left Bracket key).
Step 67
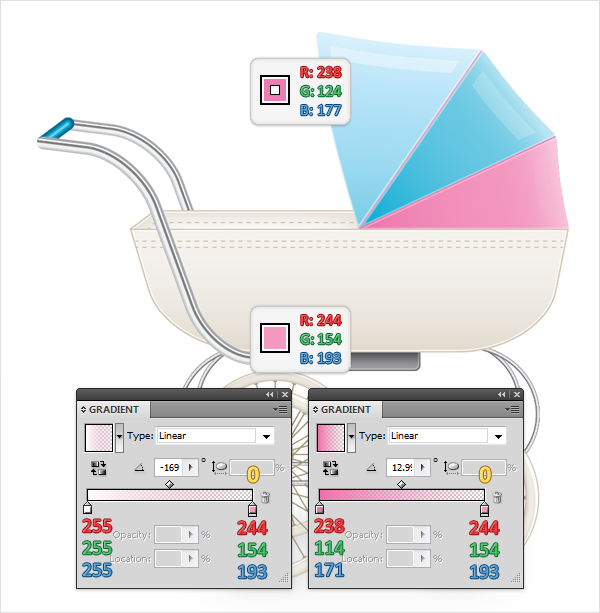
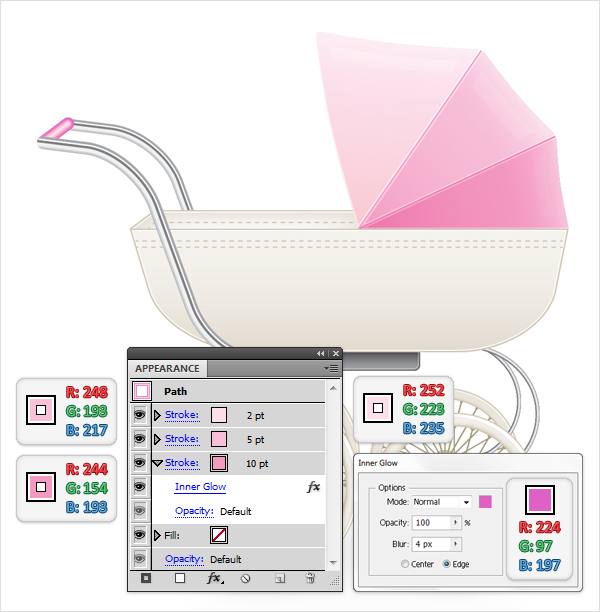
If you prefer the pink version of the stroller here are the colors that you need to use. First the colors for the masked strokes and the bottom pink shape.
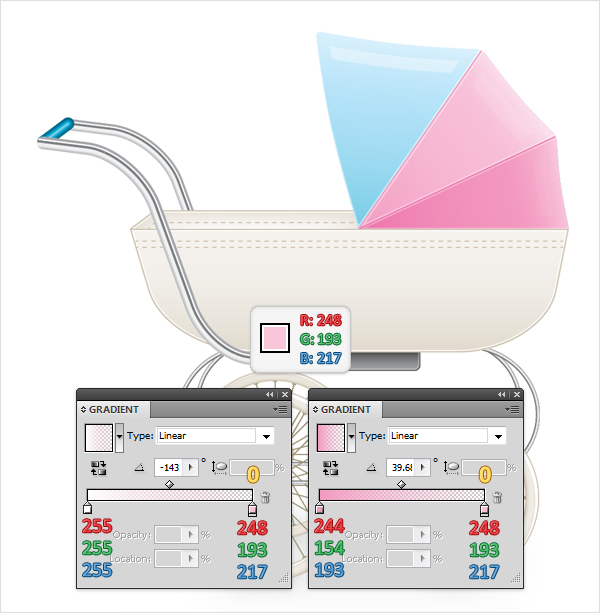
Next, the colors for the second pink shape.
And the colors for the top pink shape.
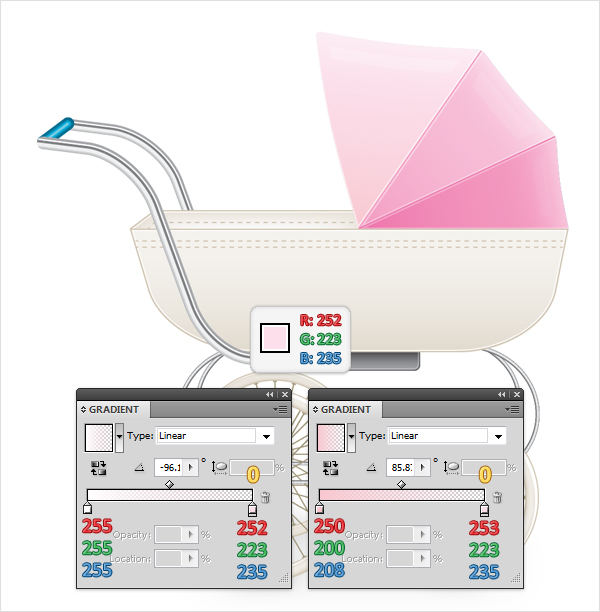
Finally, the colors for the pink handle.
Conclusion
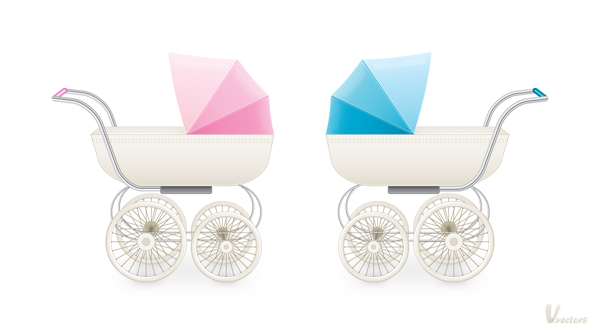
The final image is below. We’ve reviewed how to create a a classic baby stroller illustration. If you need a cute illustration for an “it’s a boy card” or “it’s a girl” sticker, then apply this to your next baby focused project.
{excerpt}
Read More