Today I will show you how to build a simple trance gate using Ableton’s gate device! The trance gate is a very popular way to create interesting patterns from pads sound or long sustained notes. Many synth has the ability to use this kind of trance gate method in order to create exciting patterns during the breakdown or during the whole track. You can use it several ways but the most important thing before you do that is to create a trance gate pattern. So let’s do it!
Step 1: Create Channels and Devices
First of all we need a gate trigger sidechain channel which will send the signal in our gate synth
So create a MIDI track. Next grab and drop a simpler into the channel. Next thing is to find a percussion or drum sound which will operate the gate synth through the Simpler. I used an open hi-hat because I found it can be useful in our purposes. The sample was too long so I turn the length button down to 8.73% because if it is longer the gate won’t take his job. Very important thing is the length of the percussion. If it is too long it won’t work properly. So be careful when you choose.
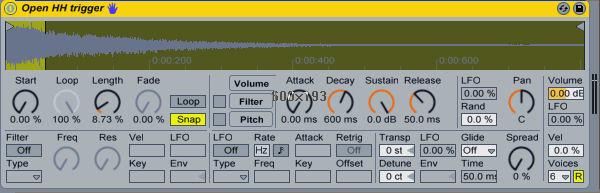
When you are ready just create a random midi pattern. You can change pattern at any time as you like. Another thing is to mute the channel because the hit-hat just trigger the gate synth so we wouldn’t like to hear. You can do this easily if you mute the side chain channel or in the IO section turn the audio to into send only. In this case you won’t hear any drum sound.

Step 2: Make a Synth with Long Sustained Notes
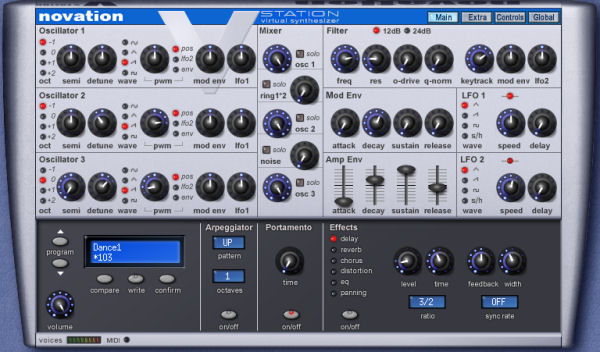
The next thing is make an instrument on a different MIDI channel. I used a Novation V-station because I really like how it is sounds, but you can use another VST instruments. I used the Dance 1 preset tweaked a little bit adjust the high frequencies and used heavy distortion with a massive chorus. I create a random pattern again. The note length has to be long because if it is short the gate won’t do anything! So always use long notes at least half bars like in pad patterns.

So here how is it sounds so far:
Download audio file (gate synth.mp3)
Step 3: Create Gate Effect with a Gate Device
You can hear that it is long sustained note pattern. The magic just begins! Grab and drop a gate device from Ableton’s audio effect devices. Click on the sidechain indicator represented by a small triangle top of the gate effect.
Now you can see the sidechain parameters. Enabling this section with the Sidechain button allows you to select another track from the choosers below. This causes the selected track’s signal to act as the gate’s trigger, instead of the signal that is actually being gated.
Set the audio from to gate trigger channel or that channel which you use for gate triggering. I labeled to gate trigger. I lower the gain into -4 dB because the channel volume was too high.
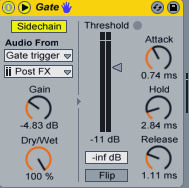
The Gate effect passes only signals whose level exceeds a user-specified threshold. So the threshold amount is very important.
The Threshold slider sets the gate’s sensitivity. If the gate is open and passing signal (i.e. the signal exceeds the gate threshold), the green LED lights. The Attenuation slider, located beneath the Threshold fader, can attenuate signals below the threshold rather than just cutting them off. If set to -inf dB, a closed gate will mute the input signal.
In our case is very important that the attenuation signal has to be -inf dB because the trance gate like effect built from mute and unmuted passage patterns.
The Attack time determines how long it takes for the gate to switch from closed to open when a signal goes from below to above the threshold. You can play with different values I set to 0.60 sec. When the signal goes from above to below the threshold, the Hold time kicks in. After the hold time expires, the gate closes over a period of time set by the Release parameter.
I set the hold parameter very low (2.84) because I would like that the pattern can be hear clearly. Release too. You can use another values of course. And if you want you can automate the hold parameter in order to make your synth pattern different for time to time.
You can hear now how is it working:
Download audio file (gate synth with gate.mp3)
Step 4: Make Some Effects
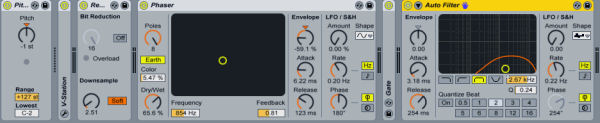
Finally, I used some effects to spice things up. In our case I used a redux bitcrusher to make my synth more aggressive, a phaser to create some frequency modulation and finally an auto filter with band pass adjustment. I created a ping pong delay return channel to make my synth wider.
Final sample:
Download audio file (gate synth with gate plus effects.mp3)
I hope you can understand now how the trance gate effect works in Ableton! Happy music making!!
{excerpt}
Read More