The first thing that you should keep in mind is that there isn’t just one right way of doing things. Especially when you’re working with expressions, try to get knowledge of the basics of the syntax using the reference guide or either looking for it over the internet, so that you can use your thinking and write the code with your own knowledge. That’s a good way of learning, by trying, making mistakes and figuring out the answers to your problems.
Step 1
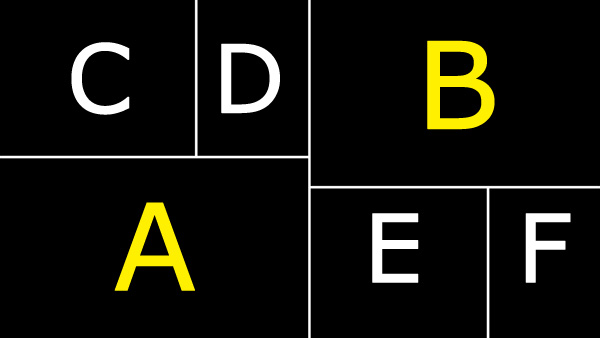
In this example I decided to build the grid like this:
Step 2
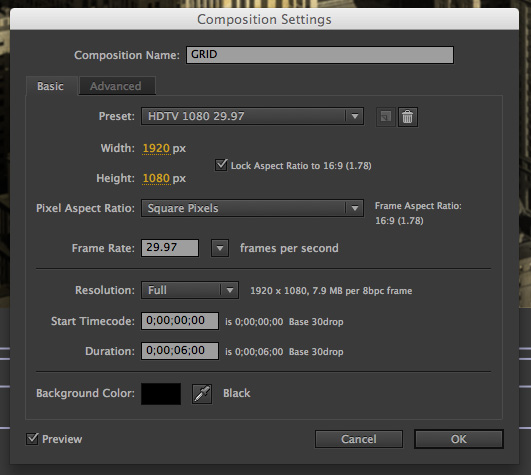
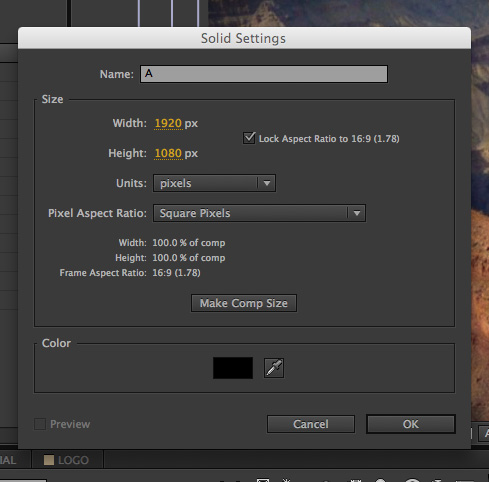
Start by choosing Layer/New/Solid or use the short key: Command+Y (Mac) or Ctrl+Y (PC). This will open the Solid Settings dialog box. Go ahead and name it "A" and click OK. You don’t need to worry with the color or size for now because we are going to use expressions to do so. In the project files you’ll realize I used Shape Layers. For this matter it doesn’t make any difference. If you want to use Shape Layers make sure you don’t have any layer selected and double—click the Shape Icon on the Toolbar. It will create a Shape Layer exactly the same size of the Comp.
Step 3
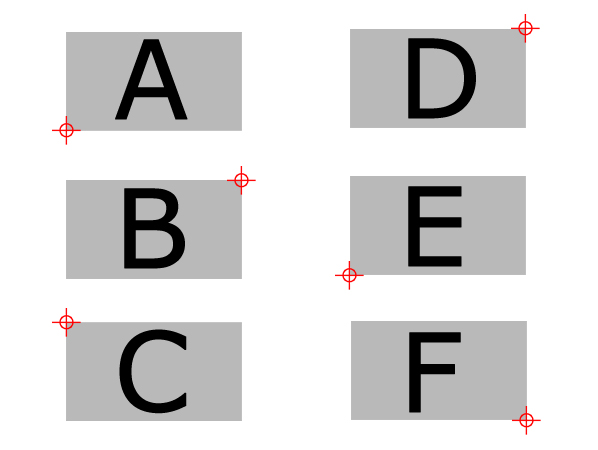
Repeat this Step five more times (or either with solids or shape layers), naming those in alphabetical order: "B", "C"…Now this is the time for us to reposition the anchor points in order for the expressions to work properly. Arrange them as in the picture:
Step 4
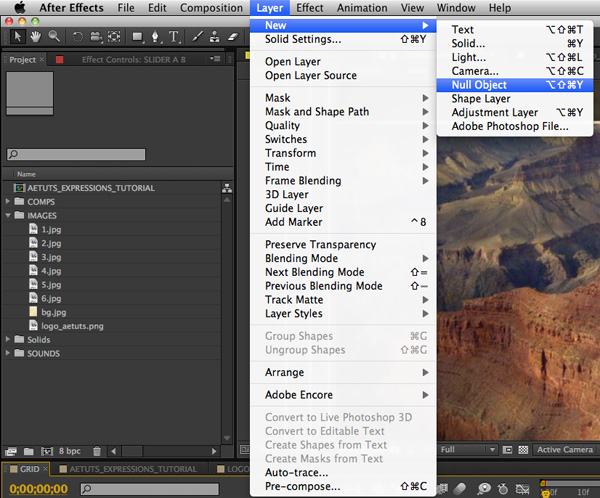
Now it’s time to put our logics to work. What we want to do is to be able to create a grid which we can change the cells size and keep a fixed size gap between them.To do so we need to put some ideas together. First of all, we should keep in mind that, as I said before, layer "A" width + layer "B" width will be always equal to the comp width witch in this case is 1920 px. The same way, layer "A" height plus layer "C" or Layer "D" height will be equal the comp height witch in this case is 1080 px. Second, to control widths and heights we will use Null Objects with the effect Slider Control applied on them, so that we can gather the animation controls to just a few layers.This being said we can begin creating a new Null Object by choosing Layer/New/ Null Object or pressing Command+option+shift+Y
(Mac) or Ctrl+shift+alt+Y (PC). Name it "SLIDER A B" and click OK.
Step 5
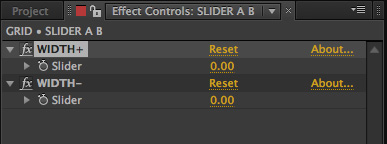
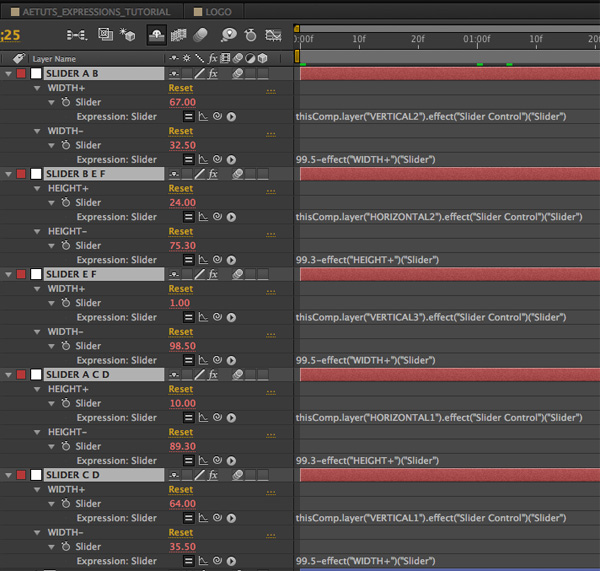
Now go to Effects/Expression Control/Slider Control and choose it to create a slider control that you will name "WIDTH+". Repeat this Step and name the second slider "WIDTH—". You’ll use
"WIDTH+" to control the width of layer "A" and
"WIDTH—" to control the width of layer "B". Lets establish a little gap between the two layers by adding an expression on the "WIDTH—" effect slider, by alt+clicking the slider stopwatch for the "WIDTH—" effect on the Timeline Panel:
99.5—effect("WIDTH+")("Slider");
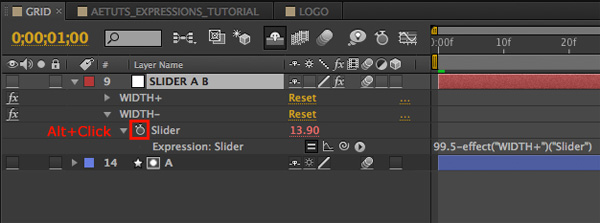
As the slider value goes from 0 to 100, this expression will keep layer "A"and layer "B" distant from each other by .5 percent of the comp width.
Step 7
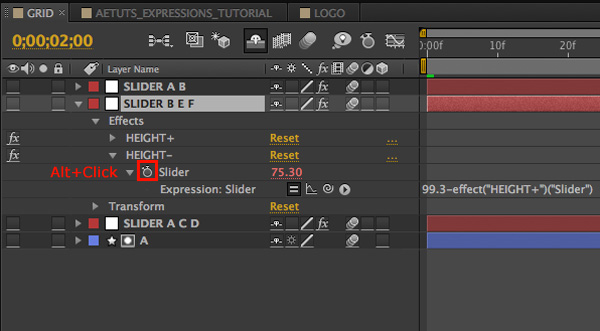
Create another Null Object and name it "SLIDER A C D", apply the Slider Effect and name it "HEIGHT +". This layer will be responsible for layers "A", "C" and "D" heights. Apply the Slider Control Effect one more time and name it
"HEIGHT —" .Then Alt+click the "HEIGHT—" slider stopwatch and type in the expression that will keep the gap between the grid cells:
99.3—effect("HEIGHT+")("Slider");
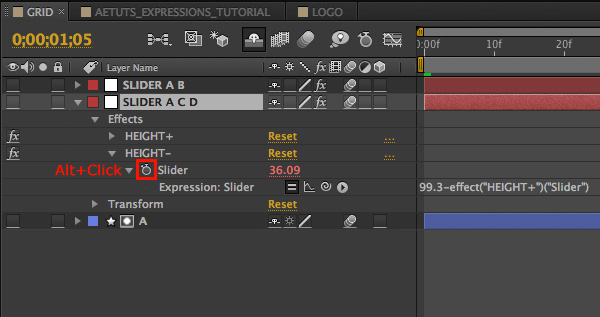
In this case we set a gap of .7 percent to compensate the composition format and make the vertical and horizontal gaps look alike.
Step 8
Now, let’s type in the expressions for layer "A". Select layer "A" and press "S"on the keyboard. This will show the scale property for this layer. Hold the "Alt" key and click on the scale stopwatch. This will activate the expressions for the scale property. Type in:
wscale=thisComp.layer("SLIDER A B").effect("WIDTH+")("Slider");hscale=thisComp.layer("SLIDER A C D").effect("HEIGHT+")("Slider");[wscale,hscale];
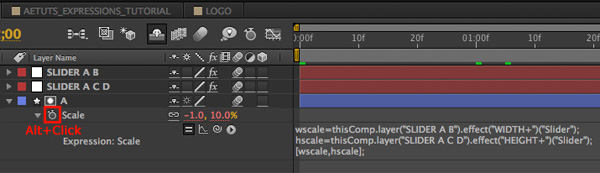
The first line will create a variable named "wscale" which will be equivalent to the value imputed on the "WIDTH+"Slider Effect on "Slider AB" layer.The second layer will set the "hscale" variable, that will be equal to the value contained in the Slider Effect "HEIGHT+" on "SLIDER A C D"layer.The third line will set the variables to the x and y coordinates.
Step 9
Create another Null Object and name it "SLIDER B E F", apply the Slider Effect and name it "HEIGHT +". This layer will be responsible for layers "A", "C" and "D" heights. Apply the Slider Control Effect one more time and name it
"HEIGHT —" .Then Alt+click the "HEIGHT—" slider stopwatch and type in the expression that will keep the gap between the grid cells:
99.3—effect("HEIGHT+")("Slider");
Now, let’s type in the expressions for layer "B". Select layer "B" and press "S"on the keyboard. This will show the scale property for this layer. Hold the "Alt" key and click on the scale stopwatch. This will activate the expressions for the scale property. Type in:
wscale=thisComp.layer("SLIDER A B").effect("WIDTH—")("Slider");hscale=thisComp.layer("SLIDER B E F").effect("HEIGHT+")("Slider");[wscale,hscale];
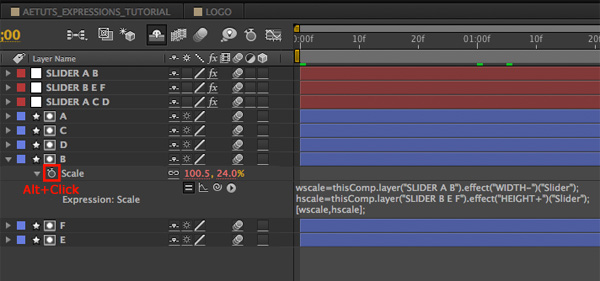
By the end of those Steps you will get layers "A" and "B" working properly.
Step 10
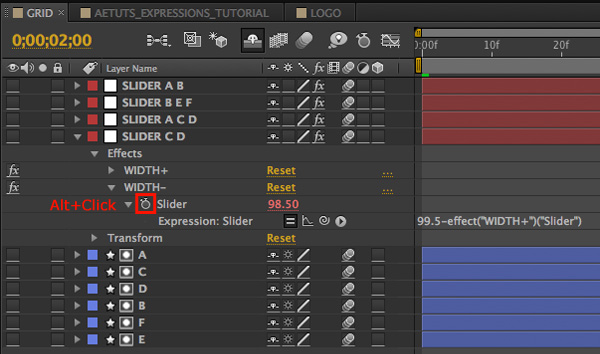
Time to get our thinking over layers "C" and "D", "E" and "F". Now, this is the tricky part. To begin this Step, let’s create another Null Object, call it "SLIDER C D" and apply two times the effect Slider Control and name the first one
"WIDTH+" and the second "WIDTH—". This layer is going to work to set the values for layers "C" and "D" widths. Alt+click the stopwatch for the "WIDTH—" effect and type:
99.5—effect("WIDTH+")("Slider");
Step 11
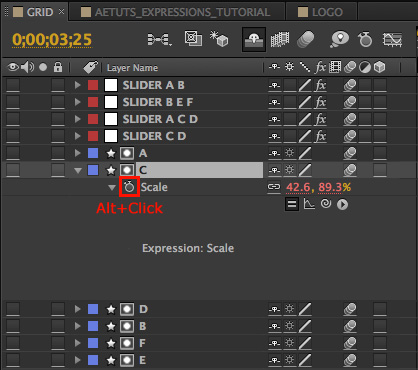
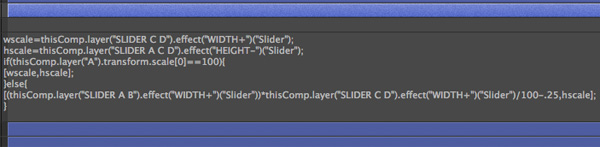
With layer "C" selected, press "S" on the keyboard and Alt+Click the scale property stopwatch to insert an expression:
wscale=thisComp.layer("SLIDER C D").effect("WIDTH+")("Slider");hscale=thisComp.layer("SLIDER A C D").effect("HEIGHT—")("Slider");[wscale,hscale];
Ok, this would be the guess on how this two layers would be distributed on the screen if and only if we consider that layer "C" width plus layer "D" width would be equal to 100 percent of the comp width. As this premisse is not true, because we depend on what value we get from "SLIDER A B" layer, we should change the expression to:
wscale=thisComp.layer("SLIDER C D").effect("WIDTH+")("Slider");hscale=thisComp.layer("SLIDER A C D").effect("HEIGHT—")("Slider");if(thisComp.layer("A").transform.scale[0]==100){[wscale,hscale];}else{[(thisComp.layer("SLIDER A B").effect("WIDTH+")("Slider"))*thisComp.layer("SLIDER C D").effect("WIDTH+")("Slider")/100—.25,hscale];}
Now this means that only when the "x"coordinate in layer "A" scale property is equal to 100, the result will be as set on the variables wscale and hscale. Otherwise the "x" coordinate will be defined considering the space set on "SLIDER A B" effect "WIDTH+". On the third line, we refer to the "x" coordinate using the number 0 between the brackets. "0"will stand for "x" coordinate, "1" for the "y" coordinate and "2" for the "z" coordinate. When you compare two different values as in line 3 "if" condition, use two signs of equal "==".
Step 12
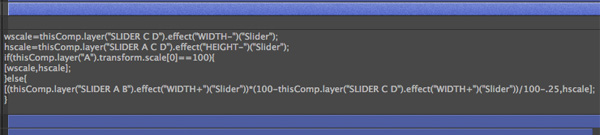
To calculate the height and width of layer "D", alt+click the layer’s scale property stopwatch and insert the code:
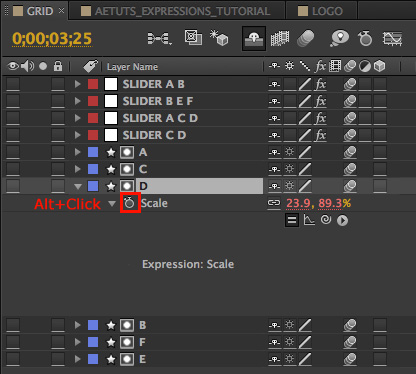
wscale=thisComp.layer("SLIDER C D").effect("WIDTH—")("Slider");hscale=thisComp.layer("SLIDER A C D").effect("HEIGHT—")("Slider");if(thisComp.layer("A").transform.scale[0]==100){[wscale,hscale];}else{[(thisComp.layer("SLIDER A B").effect("WIDTH+")("Slider"))*(100—thisComp.layer("SLIDER C D").effect("WIDTH+")("Slider"))/100—.25,hscale];}
Note that on line 6 we are calculating the values just using the "WIDTH+" slider value. That’s because we don’t want to use the value of
"WIDTH—" because it includes the gap size.
Step 13
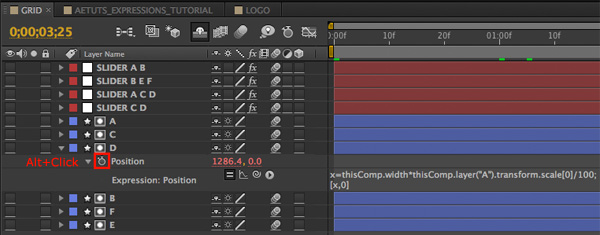
Done this Steps you’ll note that something is wrong. Layer "D" is not positioned right. To position it in the right place, we need to insert a code connecting it to the right bound of layer "A". So type in this code on the position property:
x=thisComp.width*thisComp.layer("A").transform.scale[0]/100;[x,0];
This expression just converts the siz of layer "A" from pixels to percentage, in order to allow us to use this value with the scale property. As the Anchor Point of this layer is on the top—right corner, this expression will place the layer on the right position.
Time for us to focus on layers "E" and "F". It is basically the same logic that we used to work with layers "C" and "D". Begin creating a new Null Object and call it "SLIDER E F". Apply two times the Slider Control effect and name the first one
"WIDTH+", and the second "WIDTH—". Alt+click the scale property on layer "F".
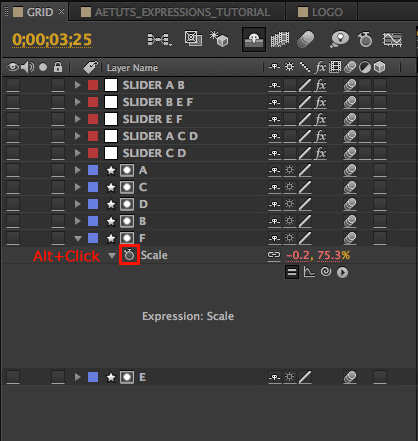
We’ll deal with layer "F" first because it is the one located on the right bottom of the comp, and we don’t need to insert a code for the position.
wscale=thisComp.layer("SLIDER E F").effect("WIDTH+")("Slider");hscale=thisComp.layer("SLIDER B E F").effect("HEIGHT—")("Slider");if(thisComp.layer("B").transform.scale[0]==100){[wscale,hscale];}else{[(100—thisComp.layer("SLIDER A B").effect("WIDTH+")("Slider"))*thisComp.layer("SLIDER E F").effect("WIDTH+")("Slider")/100—.5,hscale];}
Don’t forget to set the gap on "Slider EF" "WIDTH—" slider:
99.5—effect("width=")("Slider");
Step 14
Jump to layer
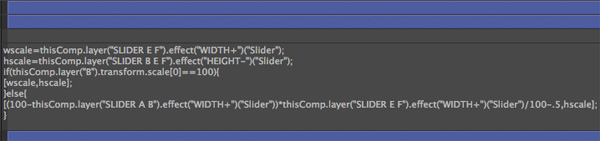
"E". On the scale property, alt+click the stopwatch and type in:
wscale=thisComp.layer("SLIDER E F").effect("WIDTH+")("Slider");hscale=thisComp.layer("SLIDER B E F").effect("HEIGHT—")("Slider");if(thisComp.layer("B").transform.scale[0]==100){[wscale,hscale];}else{[(100—thisComp.layer("SLIDER A B").effect("WIDTH+")("Slider"))*(100—thisComp.layer("SLIDER E F").effect("WIDTH+")("Slider"))/100—.5,hscale];
}
Step 15
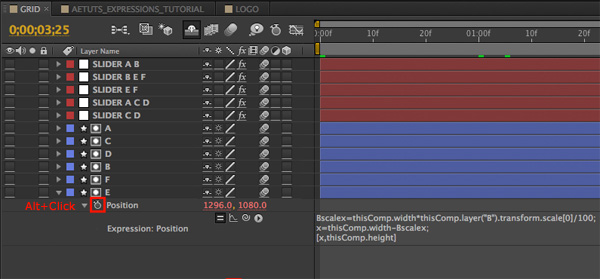
Now go to the position property and type in the code:
Bscalex=thisComp.width*thisComp.layer("B").transform.scale[0]/100;x=thisComp.width—Bscalex;[x,thisComp.height];
This code will get layer "E" on the right position calculating the width of the comp minus the value of the size of layer "B".
Step 16
Ok, now the grid is ready. There’s just a few things we can do now to make it easier to use, like clamping the values from the sliders.
To visualize the controls better, I created other Null Objects the I named after the "gap" that they represent visually. Then I inserted the clamp code (limitates the value between two other values) by setting and checking how it was working and came with this set:
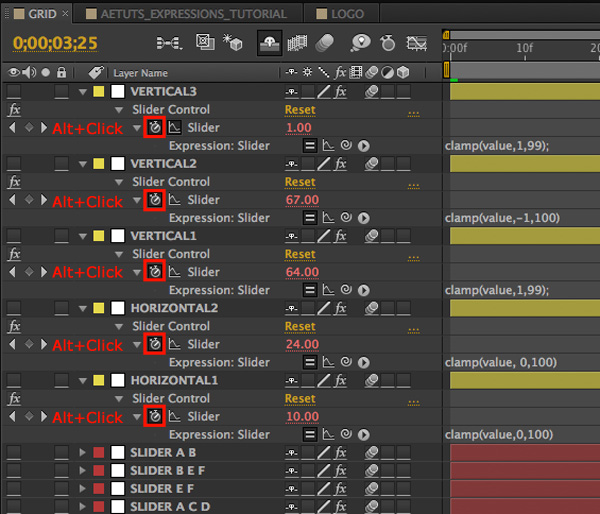
Null Object "VERTICAL1" : represents the first vertical line from left to right of the grid. I inserted this code on the Slider Control effect that I applied on it:
clamp(value,1,99);
Null Object "VERTICAL2" : represents the second vertical line of the grid. Insert this code:
clamp(value,—1,100);
Null Object "VERTICAL3" : represents the third vertical line of the grid. Insert this code:
clamp(value,1,99);
Null Object "HORIZONTAL1" : represents the first vertical line from top to bottom of the grid. Insert this code:
clamp(value,1,100);
Null Object "HORIZONTAL2" : represents the second vertical line from top to bottom of the grid. Insert this code:
clamp(value,1,100);
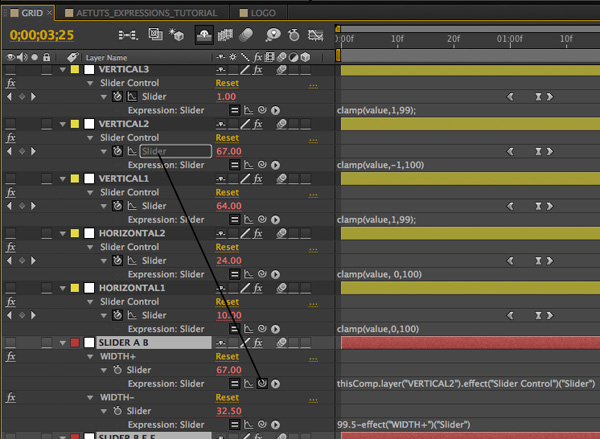
Now let’s link them to the "WIDTH+" and "HEIGHT+" sliders in order for this to work. Let’s do that with the pick whip. It shoud look like this:
Step 17
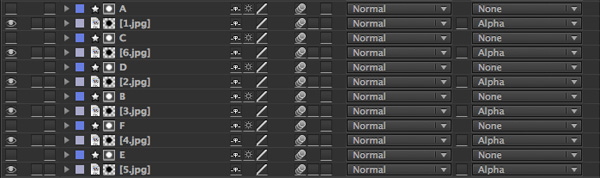
Everything set, it’s time for us to insert the pictures. Select picture number 1 from the Project Panel. Click and drag it under the layer "A" on the Timeline Panel. Choose Alpha Matte "A" from the Track Matte drop down menu. Repeat this Steps for layers "B",
"C", "D", "E" , "F", placing the picture as you like. In my case I set them like the picture:
Step 18
To create a movement I set keyframes for some of the picture layers position and scale properties. Lets animate the grid. Feel free to animate as you like, set keyframes and test the movie.
Step 19
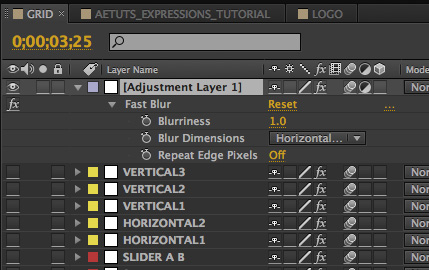
I added some finishing touches to the composition to make it looks better. First I created an Adjustment Layer by choosing Layer/New/Adjustment Layer or clicking Command+Option+Y (Mac)/Ctrl+Alt+Y (PC) and applied the Fast Blur filter under Effect/Blur and Sharpen/Fast Blur. You can find it easier just by typing the effect name on the Effects & Presets Panel. Set the blurriness to 1.0.
Step 20
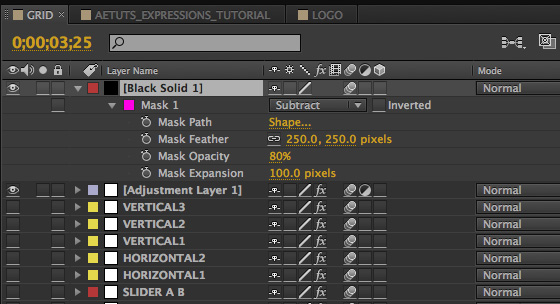
Then create a Black Solid, apply a ellipse mask on it by double clicking the Ellipse Mask icon on the Toolbar. Press "MM" on the keyboard to reveal the mask properties or "F" to show just the Mask Feather Property and set it to 250, then, if you just revealed the Mask Feather Property, press "TT" on the keyboard to show the Mask Opacity Property and set it to 80%. Choose Subtract on the Mask drop—down menu. This will create a vignette that will give more emphasis to what’s happening on the center of the screen.
Step 21
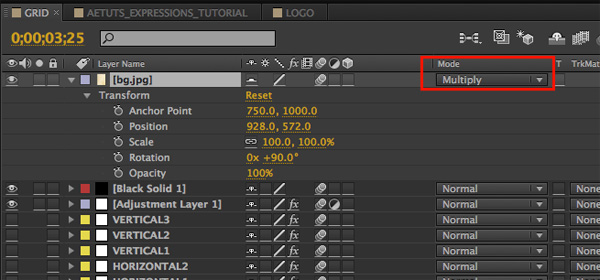
On top of it all, let’s place a paper texture, called "bg". Position it as you like and set the layer mode to Multiply on the drop—down menu.
Step 22
Now let’s place the AETUTS+ logo. Create a new comp, name it LOGO and drag the logo image into it. Under this layer create a black solid and set it’s opacity to 35%. Apply the Ramp effect by choosing Effect/ Generate/ Ramp and make a gradient from black to white that should look like this:

Step 23
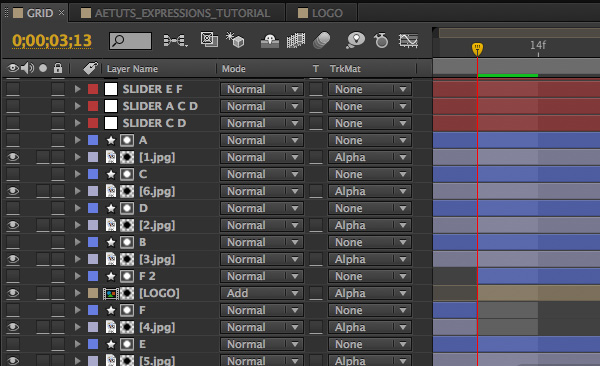
Now to insert it, duplicate layer "F" on the "GRID" comp splitting it in two around 0;00;03;13 by placing the Current Time Indicator on that time and pressing Command+Shift+D (MAC), or Ctrl+Shift+D (PC) on the keyboard. Place the new created composition
"LOGO"under the split layer "F2". Set the track matte to Alpha Matte "F2" on the "LOGO"layer. Choose mode ADD. Position it and scale it a bit to center the space of the grid cell.
Step 24
Next Step, create a new Composition, name it AETUTS_EXPRESSIONS_TUTORIAL and click OK.Drop the GRID comp into it. Let’s apply some sound effects. Drag and drop on the comp the file
"Timesusp—Cosmic_D—190.wav". On time 0;00;05;16 insert a keyframe for the Audio Levels property. Leave the value as it is, jump to 0;00;05;26 and change the value to —48.00dB. Drag and drop on time 0;00;02;00 the second audio file named
"Eerie_sp—Cosmic_D—191".

Conclusion
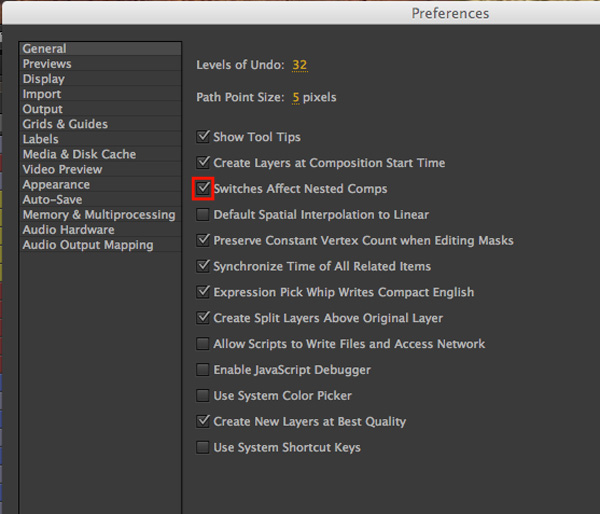
Now preview the movie. Click Shift+0 (from the numeric pad) to preview it. If you like you can turn on the Motion Blur for the comp. Don’t forget that if you want Motion Blur to work you should habilitate the Motion Blur button for the layers you want the effect to be applied on. In this case, as we use nested compositions, we should turn on the Motion Blur button in the GRID composition and Logo composition as well. You can change this by editing the preferences and enabling the Switches Affect Nested Compositions in the General Preferences Category. This kind of expression based animation is usefull when you have a lot of repetitive work within your project and you want to simplify it by writing this kind of code. I made some final changes to make it look the way I thought would look the best as you can see on the final movie preview and on the project files. I used this one in a large project that I had to animate lots of photos on different subjects. In this example you can play a lot with timing and the overall construction of the image on the screen. Try different things always!
Creative Commons images: 1.jpg http://www.flickr.com/photos/aigle_dore/5854362904/sizes/l/in/photostream/
2.jpg http://www.flickr.com/photos/structures—nyc—photos/5601731544/sizes/o/in/photostream/
3.jpg http://www.flickr.com/photos/vincentjoly/3923658550/sizes/o/in/photostream/
4.jpg http://www.flickr.com/photos/twicepix/2181066232/sizes/o/in/photostream/
5.jpg http://www.flickr.com/photos/tsuda/235922699/sizes/o/in/photostream/
6.jpg http://www.flickr.com/photos/neilspicys/2348877473/sizes/o/in/photostream/
Sounds downloaded at Flashkit Author: Cosmic Dreamer http://www.cosmcidreamer.be
{excerpt}
Read More