Let’s say you created your mix in your favorite sequencing software. You’ve laid out all tracks with crossfades, filter and effects automation and you would like to burn the results onto a CD for distributing to record labels, duplication houses or your friends. I am going to show you a great, streamlined way of achieving just that.
I will be exporting my DJ set from Ableton Live, then importing the resulting material into Sound Forge 10 to create a track compilation with no pauses in between. Finally, I will use Sound Forge’s professional CD authoring tools to burn the compilation onto CD.
Setting Up
In Ableton Live, it’s very easy to warp tracks and arrange them in the Arrange view along with any fades, effects and tempo automation. In this example, I’ve used two audio tracks to compose my mix.
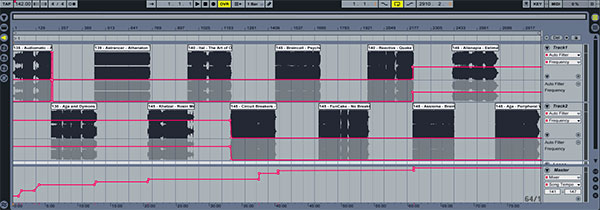
A typical two track layout with effects and master tempo automation
One thing to consider here is that the length of your mix should not exceed 79.8 minutes as described in the Red Book CD standard specifications.
Now, I could export the whole mix as one file and then add separate markers in Sound Forge to create CD tracks but it would definitely help me if I had the tracks as separate audio files so that I could utilize Sound Forge’s authoring tools to create CD tracks out of these files.
In Live, create a locator at the beginning of your set, then create a second one at the point where the second track comes in. Similarly, continue as such for the third track and so on until you have as many locators as the number of your existing tracks. Obviously the last locator is going to be placed where the last track of your set is introduced.
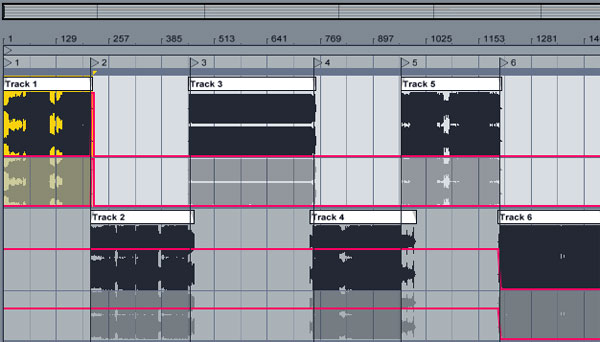
Locators positioned between tracks
Exporting
Now, we are ready to export our tracks one by one. Right click the first locator and choose Loop to Next Locator. The loop brace encompassed the range of our set we have defined as our first track. Select File->Export Audio/Video… On the Export Audio/Video Options window, select 32 as Bit Depth, Sample Rate of 44100 Hz and leave Normalize and Render as Loop to Off. Then click OK, select a name for the track and click Save to save it in a folder of your choosing.
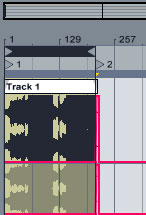
Loop to Next Locator

Audio/Video Export Settings
Proceed similarly, by selecting the second locator, right click and select Loop to Next Locator to select the second file to be exported repeating the steps described above to export the second track with identical export settings as the first track saving the second track in the same folder you did for the first one. You will end up with a number of audio files all located in the same folder. We are now, ready to start authoring in Sound Forge.
Authoring in Sound Forge
After launching Sound Forge, select View->Windows Layout->Red Book Authoring. This will change the interface layout to a more helpful arrangement for our needs.
Red Book Authoring window layout.
Next, select Options->Preferences. There are a number of options here that interests us. Click on the CD Settings tab. In CD preferences, we can have the Use strict Red Book specification for DAO validation option checked. With this option selected, the software will notify us if any of our settings don’t strictly agree with the Red Book Audio specifications. Another option that we need to have checked is the Prepend up to 2 seconds of silence for DAO Burning. On the Default time CD tracks (seconds:frames) option, enter 0 since we are aiming for a gapless playback on our final CD so we won’t be needing the default pause time of 2 seconds. On the Default CD length (minutes) select the appropriate time for the duration of your mix. I know the duration of my mix was 79 minutes and 56 second so I selected 80 from the drop down list. Click OK to exit the Preferences dialog box.
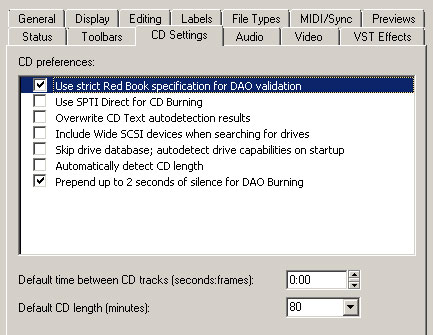
Sound Forge’s Preferences CD Settings.
Select File->Open, navigate to the folder where you exported your audio tracks and select them all by SHIFT clicking them or hit CTRL+A. At the option further down, put a check mark on the Append to current data window and the Open as CD tracks options and click Open.
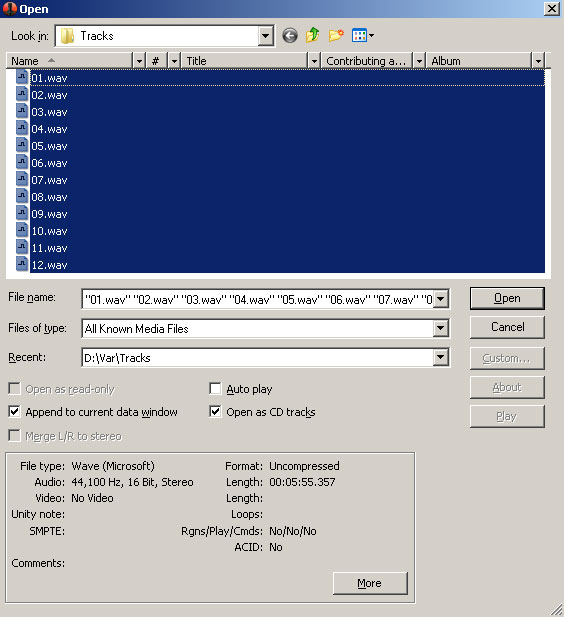
Sound Forge’s Open dialogue box.
Select View->Zoom Time->Out Full to view how Sound Forge loaded all of our files and converted them into CD tracks. At the bottom of the audio stereo file we can drag and drop CD tracks to reposition them. By clicking and dragging a track, move it left or right to reposition it. A black down pointing arrow will appear, showing you the tracks new location before you release the mouse button.
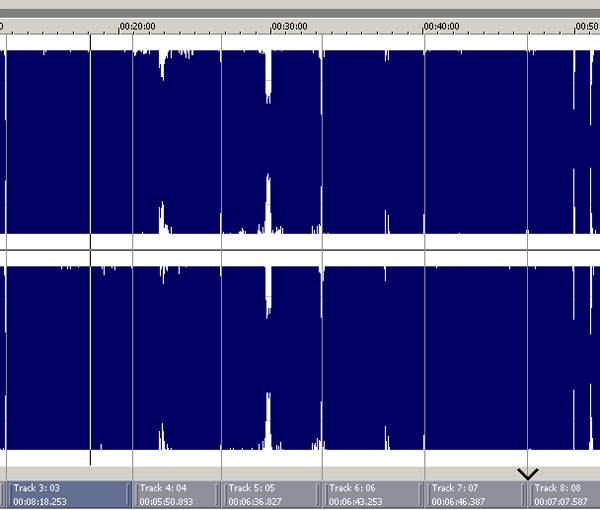
In this example, I am dragging Track 3 and repositioning it after Track 7.
At this point you can optionally normalize the whole mix by hitting CTRL+A and selecting Process->Normalize. At the bottom of the interface, we can find the Track List and CD Information tabs. In the Track list tab, we can also enter information about the start and stop of each track. Updating the information there will also update the graphical display of the actual tracks further up the waveform. We can also enter Title and Artist name for each track to be displayed as CD Text on CD audio players that support it and also modify the pause time for each track. Reordering tracks from this tab is also possible, just click on a track number on the left, drag it and release it onto its new location.

Track List and CD Information tabs.
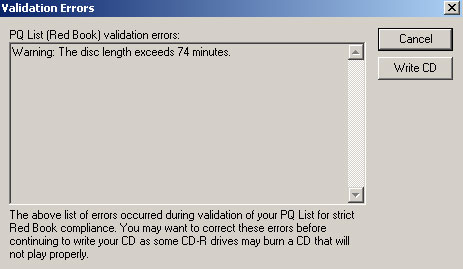
You can also add a final Dither algorithm by selecting Process->Bit Depth and selecting either Bit-Depth Converter or iZotope MBit+ Dither. When you are done, select Tools->Burn Disk-at-Once Audio CD. If your mix is longer than 74 minutes you will get a warning that the disc exceeds 74 minutes. That’s because we had previously activated the strict Red Book Audio validation in Sound Forge’s Preferences. If you plan to send your disk for mass duplication, it’s necessary to contact the duplication plant and ask them if they actually do 80 minute long premasters.
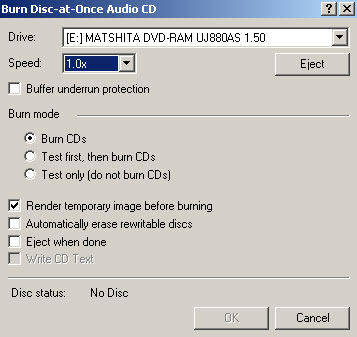
Insert a blank CD that can fit your desired length of tracks you plan on burning. Click on Write CD. For Speed, select the slowest speed available from the drop down list to avoid burning errors in higher speeds. The Buffer underrun protection can also be selected but ONLY if you plan to do a one off burning. If you are plan on sending the CD as a premaster to a duplication plant or make further copies of it, it’s best not to activate this option since it’s possible that it will introduce a small amount of errors. Another great and recommended option to choose, though, is to Render a temporary image before burning since the software will first render an image on your hard drive before starting to burn the disk thus taking the strain off your processor during the burning procedure. You can also test the burn before burning it or just test it without burning it to disk. Hit OK when you are done!
Sound Forge is only available for PC users but there are many excellent tools available for Mac users. Logic Pro has a great tool called Waveburner. Wavelab and Peak are other great alternatives.
That’s all for this tutorial. In part 2 we are going to examine how to complete the same task with another great software geared more towards CD authoring, called CD Architect.