Everybody hates the System Overload panel that can pop up at any given time in Logic Pro. What’s worse is when as your deciphering the subtle tones of your mix and it starts to stutter. Both these problems can be put down to the CPU and sometimes the HD.
Firstly What are CPU and HD?
The CPU and HD indicators can be found at the bottom of your Logic Pro window. CPU stands for Central Processing Unit, the bar indicates processor speed which is just as it sounds, the speed at which the sounds, plugins and synthesizers are processed.
The HD bar represents your Hard Disk and the amount of temporary space on it. If this ever gets too high simply make more space on your computer.

Freezing Tracks to Save Processor Power
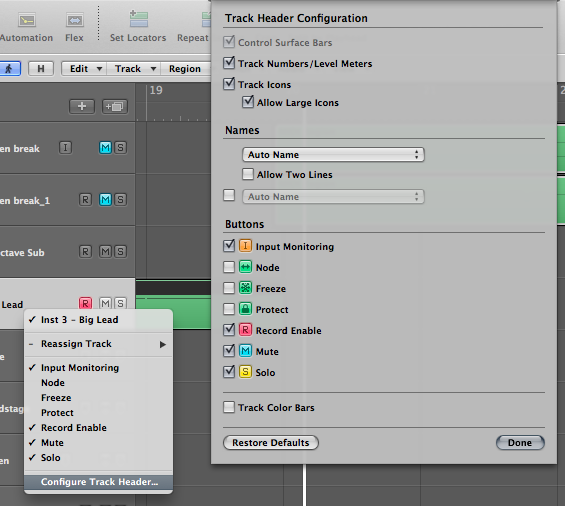
A very easy way to save processing power is to freeze individual tracks. To do this simply right click on your track, now you can either click freeze, or go to configure track header (as displayed in the image below) and select freeze. This will show the freeze icon on all your tracks.
Freezing your tracks does exactly what it says. It means you can’t make changes to your track and it is essentially frozen. This is very effective at times, but can also create problems when you want to make minor adjustments.
It does increase the speed of Logic’s processor by a very large amount. It means the MIDI track turns into pure audio temporarily and Logic doesn’t have to process each plugin and automation live.

Reducing Undo Steps
Freezing tracks may not work for everyone, depending on what stage of making your song you’re at, and depending on your style. But do not worry there are other ways of controlling and making the most out of your processor.
Logic automatically gives you a huge number of undo steps as a standard. This takes up a very large amount of processing power. Now if your one of those producers who is constantly undoing rather than saving efficiently, this may not be the best solution.
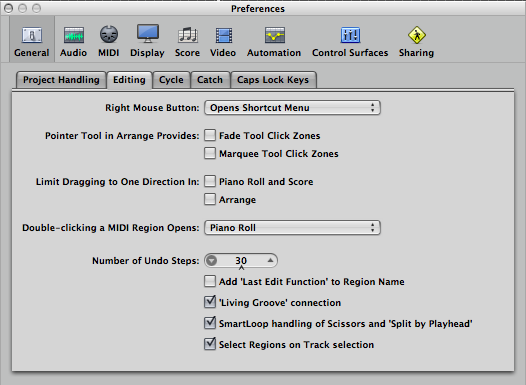
Go to Preferences>General>Editing and you will see an option to reduce the number of undo steps (as you can see in the image below). As a factory setting it’s at 30 which is far more than a normal producer needs. Ten is absolutely fine for me, but if you’re worried 15 will also make a huge difference.

Increasing the Buffer Size
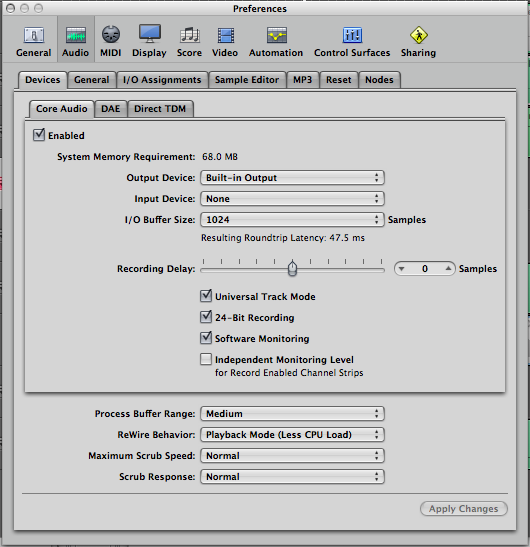
Logic Pro as a standard has a very low input/output buffer size. A huge way to free up processor power is to increase it to its maximum size this should be 1024.
To do this simply go to your Preferences>Audio>Devices>CoreAudio the image below shows the path. The only reason you wouldn’t want to do this, is if you experience delay with an external MIDI device. If this happens, simply turn it down (lowest should be 128).

I hope this quick tip has helped, please leave any comments you might have below, I would love to answer any questions.