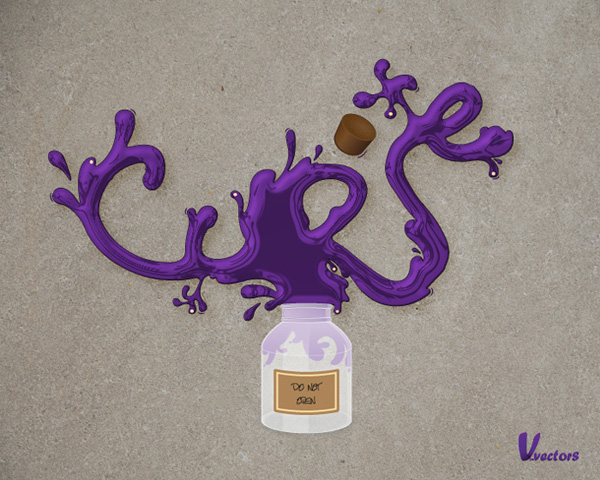
In the following tutorial you will learn how to create a jar illustration and splashy, purple text effect. We’ll craft this with numerous, layered shapes and with various opacities. We’ll work with paths and the Pathfinder tools to enhance our text, give it dimension, and style. Let’s get started!
Step 1
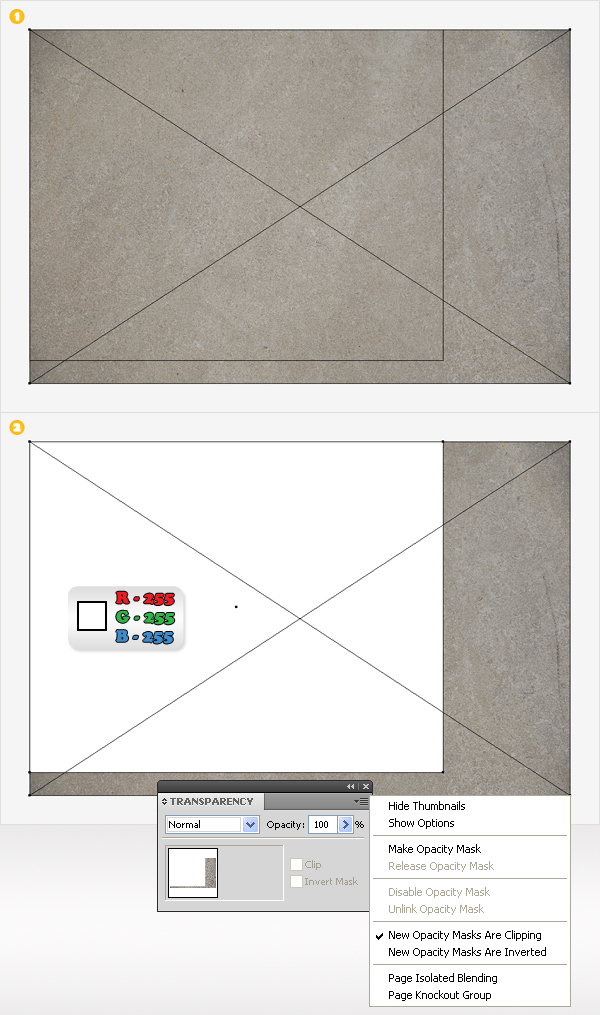
Create a 700px by 560px, RGB document. Start with the background. You’ll need this photo. Save it in your hard drive, then drag it inside your illustrator document. Make sure that it covers your entire artboard.
Now pick the Rectangle Tool (M). Create a shape the size of your artboard, fill it with white, then open the Transparency panel (Window > Transparency). Select this fresh shape along with the photo, open the fly-out menu of the Transparency panel, then go to Make Opacity Mask. Finally, lock this masked shape to make sure that you don’t select or move it accidentally.
Step 2
Turn off the visibility for the masked shape made in the previous step. Next, you’ll create the starting shapes for the jar illustration. First, turn on the Grid (View > Grid) and the Snap to Grid (View > Snap to Grid). You’ll need a grid every 5px. Go to Edit > Preferences > Guides & Grid, enter 5 in the Gridline every box and 1 in the Subdivisions box.
You can also open the Info panel (Window > Info) for a live preview with the size and position of your shapes. Do not forget to replace the unit of measurement to pixels from Edit > Preferences > Unit > General. All these options will significantly increase your work speed.
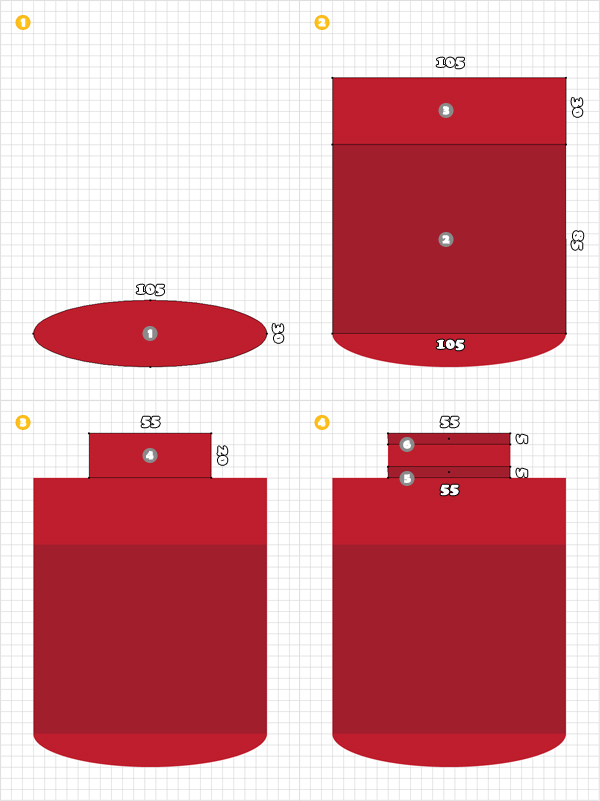
Now, let’s create these shapes. Start with the Ellipse Tool(L) and create a 105 by 30px shape. Fill it with any color, then double-click on it (in the Layers panel) and name it “1.” Continue with the Rectangle Tool (M). First, create a 105px by 85px shape, then create a 105px by 30px shape.
Place these two shapes as shown in the second image, then name them “2″ and “3.” Create a third rectangle. Make it 55px wide and 20px tall, place it as shown in the third image and name it “4.” Finally, create two similar rectangles. Both shapes must be 55px wide and 5px tall. Place them as shown in the final image and name them “5″ and “6.” For the moment the fill colors do not matter. I used different tints of red so that you can distinguish them from each other.
Step 3
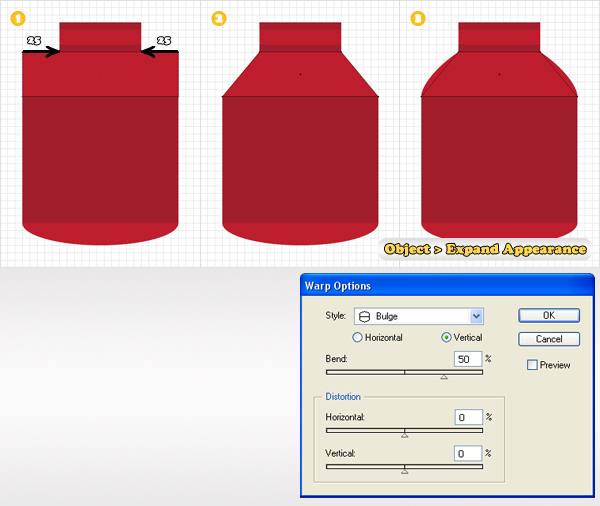
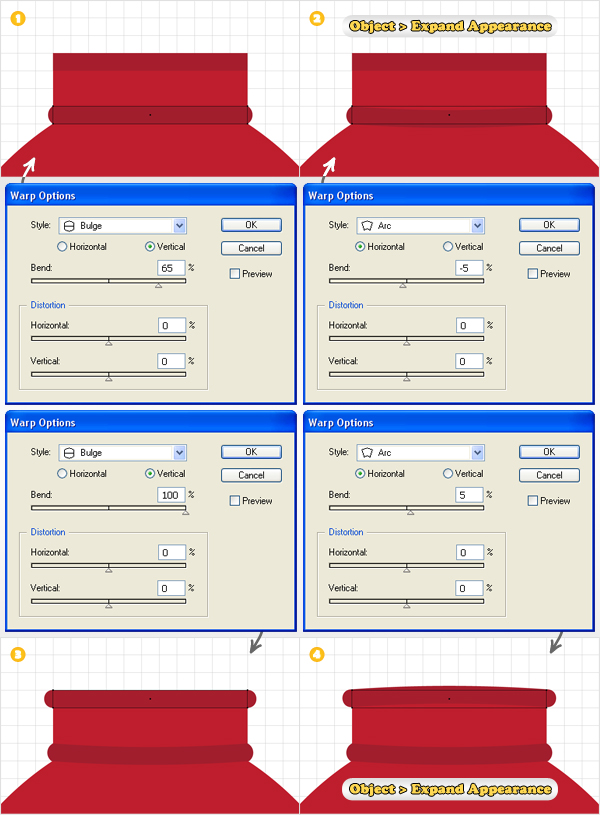
Let’s make some changes for the shapes made in the previous step. Pick the Direct Selection Tool (A) and focus on shape number 3. Select the top, left anchor point and move it 25px to the right. Now select the top, right anchor point and move it 25px to the left. Now, your shape should look like a trapezoid. Reelect it and go to Effect > Warp > Bulge. Enter the data shown below, click OK, then go to Object > Expand Appearance. Double-click on the resulting shape and rename it “3.”
Step 4
Continue with shape number 5. Select it and go to Effect > Warp > Bulge. Enter the data shown below image #1, click OK, then go to Effect > Warp > Arc. Enter the data shown below image #2, click OK, then go to Object > Expand Appearance.
Move to shape number 6. Select it and go to Effect > Warp > Bulge. Enter the data shown above image #3, click OK, then go to Effect > Warp > Arc. Enter the data shown above image #4, click, OK then go to Object > Expand Appearance. Do not forget to rename the resulting shapes “5″ and “6.”
Step 5
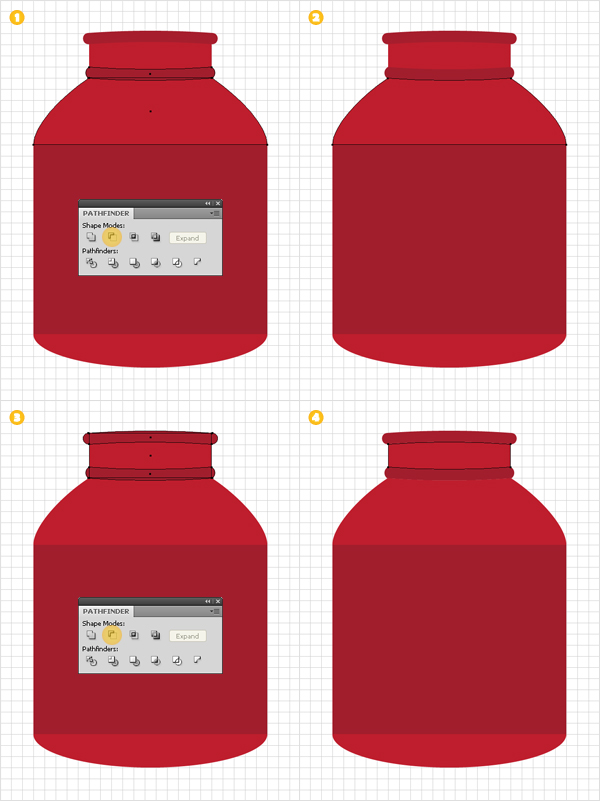
Make a copy of shape number 5 (Command + C > Command + F). Select this copy along with shape number 3, and click on the Minus Front button from the Pathfinder panel. Duplicate shapes 5 and 6. Select these two copies along with shape number 4, and click on the Minus Front button from the Pathfinder panel.
Step 6
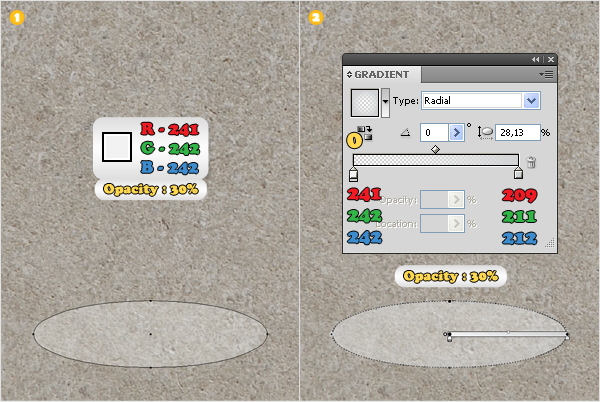
Turn back to visible the background image. Now, let’s add some color for the jar shapes. Start with shape number 1. Fill it with R=241, G=242, B=242, then select the fill from the Appearance panel and lower it’s Opacity to 30%.
With the fill still selected, move to the bottom of the Appearance panel, and click on the Duplicate Selected Item icon. This will add a copy of the selected fill. Select this new fill and replace the fill color with the radial gradient shown in the second image. Take a closer look at the gradient image and you’ll notice a yellow zero. It stands for Opacity percentage.
Step 7
Turn off the Snap to Grid (View > Snap to Grid), then go to Edit > Preferences > General and enter 0,5 in the Keyboard Increment box. Make two copies of the shape from the previous step (Command + C > Command + F).
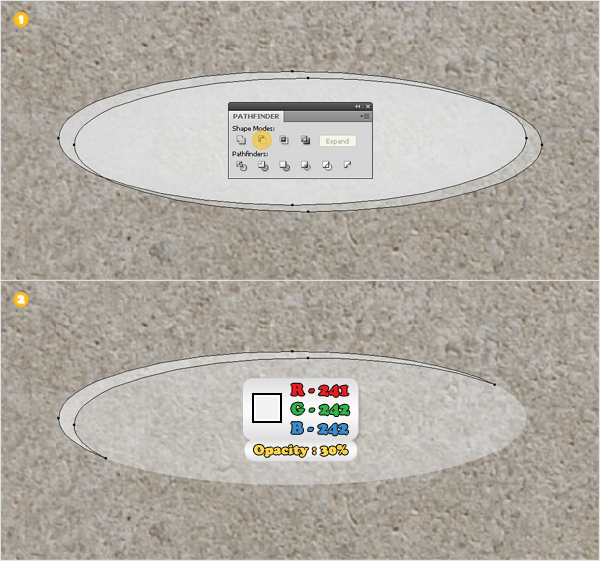
Select the top copy, then hit the right arrow seven times, and the down arrow three times. Reselect both copies and click on the Minus Front button from the Pathfinder panel. Select the resulting shape and remove the second fill (the one with the radial gradient).
Step 8
Again, make two copies of this oval shape. Select the top copy and hit the down arrow only once. Reselect both copies and click on the Minus Front button from the Pathfinder panel. Select the resulting shape and remove the fill with the gradient.
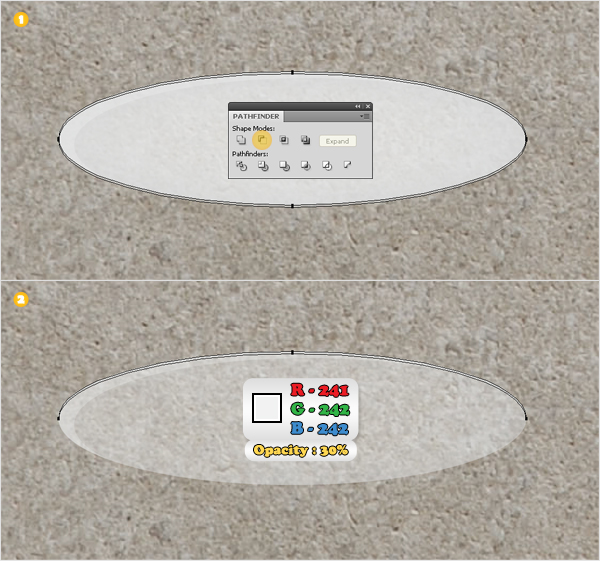
Step 9
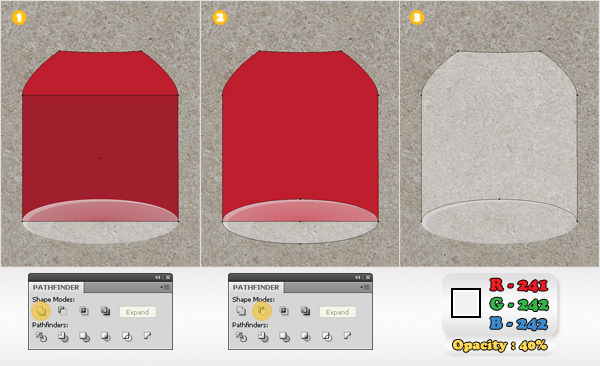
Let’s move up to shapes number 2 and 3. First, make a new copy of the oval shape, then select these two shapes, and click on the Unite button from the Pathfinder panel. Select the resulting shape, and the copy of the oval shape, then click on the Minus Front button from the Pathfinder panel. The resulting shape should look like the third image. Fill it with R=241, G=242, B=242, and lower its Opacity to 40%.
Step 10
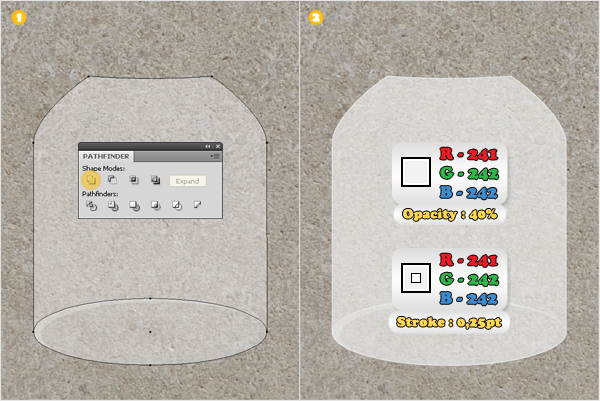
Once again, make a copy of the oval shape, then duplicate the shape made in the previous step. Select these fresh copies and click on the Unite button from the Pathfinder panel. Make sure that the resulting shape is filled with R=241, G=242, B=242, (Opacity 40%), then add a 0.25pt stroke. Align it to outside and set the color to R=241, G=242, B=242.
Step 11
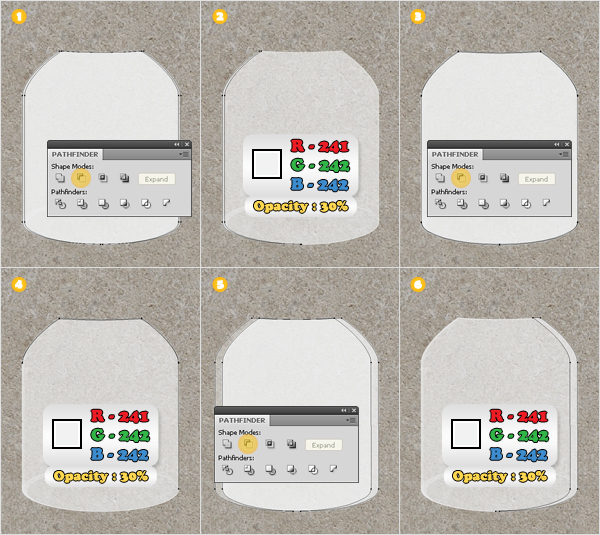
Select the shape made in the previous step and make two copies. Select the top copy and hit the right arrow three times. Reselect both copies and click on the Minus Front button from the Pathfinder panel.
Select the resulting shape, remove the stroke and lower its Opacity to 30%. Again, make two new copies of the shape made in the previous step. Select the top copy and hit the down arrow once. Reselect both copies and click on the Minus Front button from the Pathfinder panel.
Again, select the resulting shape, remove the stroke and lower its Opacity to 30%. One more time, make two copies of the shape made in the previous step. Select the top copy and hit the left arrow ten times. Reselect both copies and click on the Minus Front button from the Pathfinder panel. Select the resulting shape, remove the stroke, and lower its Opacity to 30%.
Step 12
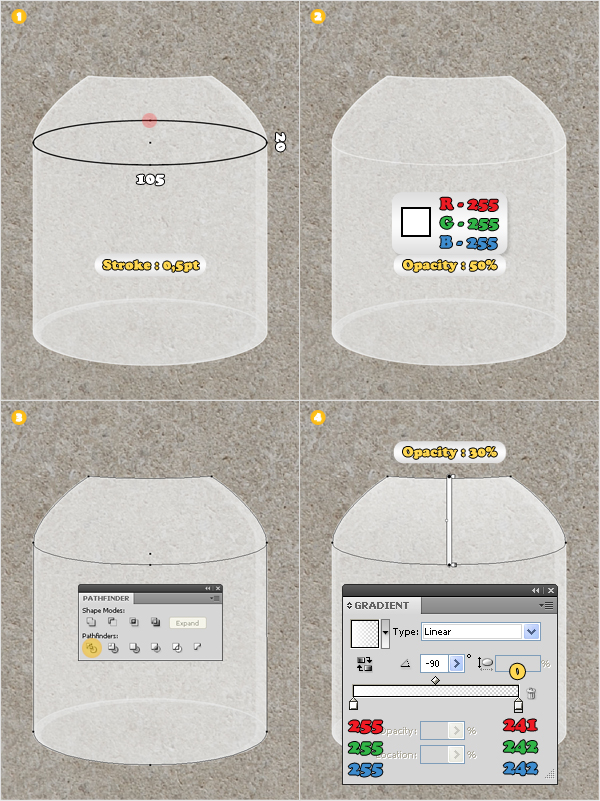
Enable the Snap to Grid (View > Snap to Grid). Pick the Ellipse Tool (L), create a 105px by 20px shape, and place it as shown in the first image. Fill it with none and add a 0,5pt stroke (any color). Pick the Direct Selection Tool (A), select the top anchor point, then hit the Delete button. Select the stroke of the resulting path, make it white, and lower its Opacity to 50%.
Make a copy of this path and the shape made in step number 10. Select both copies and click on the Divide button from the Pathfinder panel. You will get a group of two shapes. Ungroup them and then select the top shape. Fill it with the linear gradient shown in the final image and lower its Opacity to 30%. You will need the other shape in the next step.
Step 13
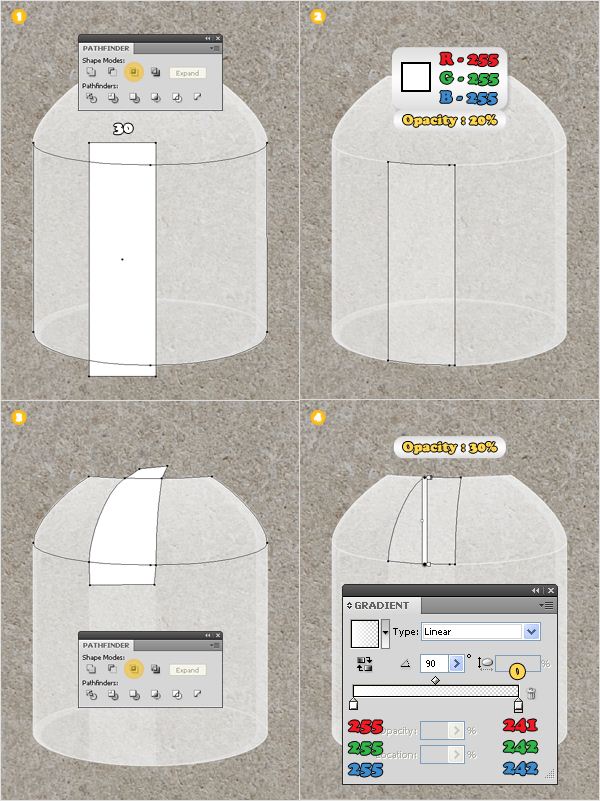
Pick the Rectangle Tool (M) and create a shape like the white one shown in the first image. Select it along with the bottom shape made in the previous step, and click on the Intersect button from the Pathfinder panel. Fill the resulting shape with white and lower its Opacity to 20%. Disable the Snap to Grid.
Duplicate the top shape (made in the previous step), then pick the Pen Tool (P), and create a shape like the white one shown in the third image. Select these two shapes and click on the Intersect button from the Pathfinder panel. Fill the resulting shape with the linear gradient shown in the final image, and lower its Opacity to 30%.
Step 14
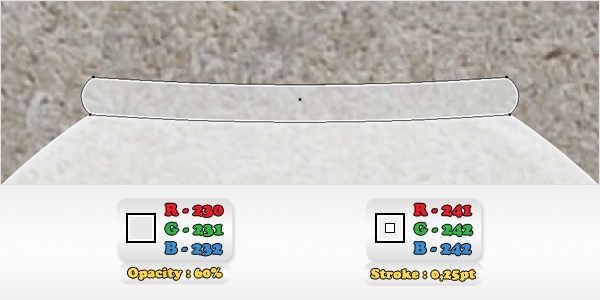
Select shape number 5. Fill it with R=230, G=231, B=232, then select the fill (from the Appearance panel), and lower its Opacity to 60%. Add a 0,25pt stroke for this shape, align it to inside, and set the color to R=241, G=242, B=242.
Step 15
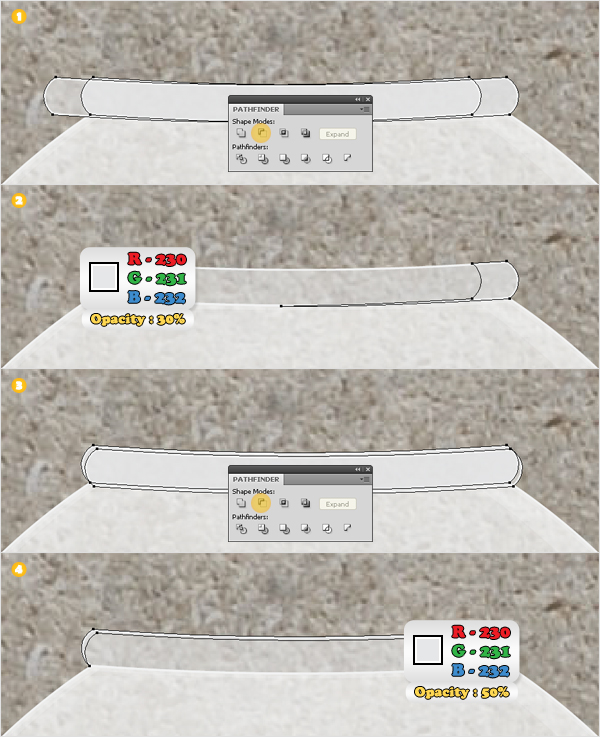
Make two copies of shape 5. Select the top copy and hit the left arrow ten times. Reselect both copies and click on the Minus Front button from the Pathfinder panel. Now focus on the resulting shape. Remove the stroke, then select the fill and lower the Opacity to 30%.
Make two new copies of shape 5. Select the top copy, then hit the down arrow and the right arrow once. Reselect both copies and click on the Minus Front button from the Pathfinder panel. Again, remove the stroke of the resulting shape, then select the fill and lower its Opacity to 50%.
Step 16
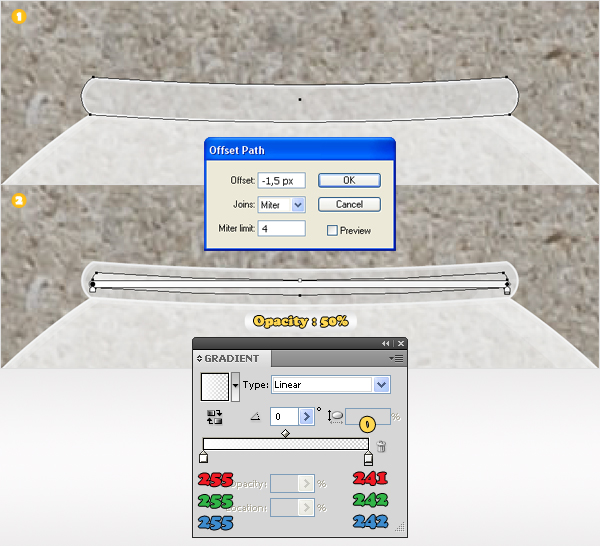
Reselect shape number 5 and go to Object > Path > Offset Path. Enter a -1,5px Offset and click OK. Fill the resulting shape with the linear gradient shown in the second image, lower its Opacity to 50%, and remove the stroke.
Step 17
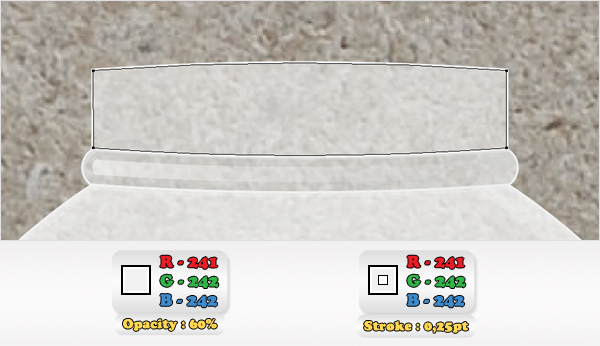
Let’s move to shape number 4. Fill it with R=241, G=242, B=242, then select the fill (from the Appearance panel) and lower its Opacity to 60%. Add a 0,25pt stroke for this shape, align it to outside and set the color to R=241, G=242, B=242.
Step 18
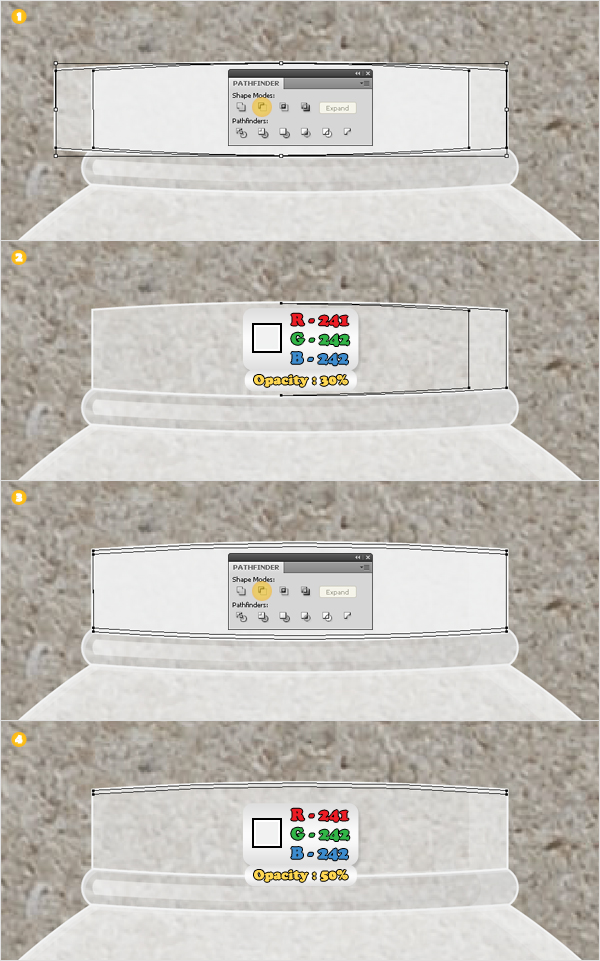
Make two copies of shape 4. Select the top copy and hit the left arrow ten times. Reselect both copies and click on the Minus Front button from the Pathfinder panel. Now focus on the resulting shape. Remove the stroke, then select the fill, and lower the Opacity to 30%.
Make two new copies of shape 4. Select the top copy and hit the down arrow once. Reselect both copies and click on the Minus Front button from the Pathfinder panel. Again, remove the stroke of the resulting shape, then select the fill, and lower its Opacity to 50%.
Step 19
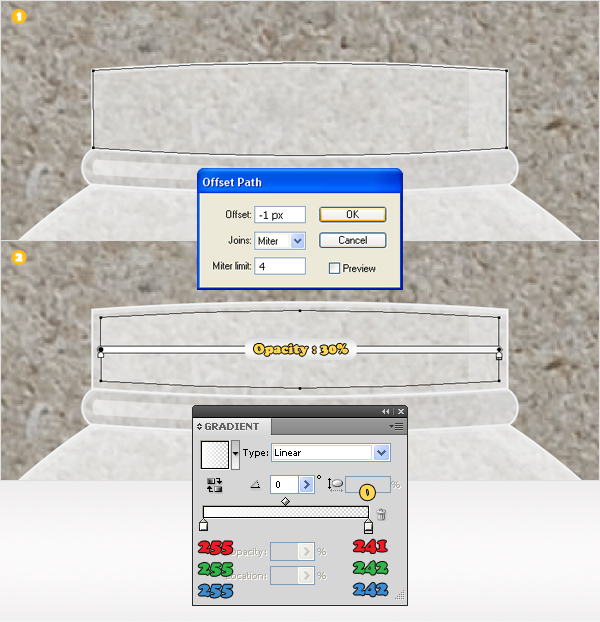
Reselect shape number 4 and go to Object > Path > Offset Path. Enter a -1px Offset and click OK. Fill the resulting shape with the linear gradient shown in the second image, lower its Opacity to 30% and remove the stroke.
Step 20
Finally, focus on shape number 6. Fill it with R=230, G=231, B=232, then select the fill (from the Appearance panel), and lower its Opacity to 60%. Add a 0,25pt stroke for this shape, align it to outside, and set the color to R=241, G=242, B=242.
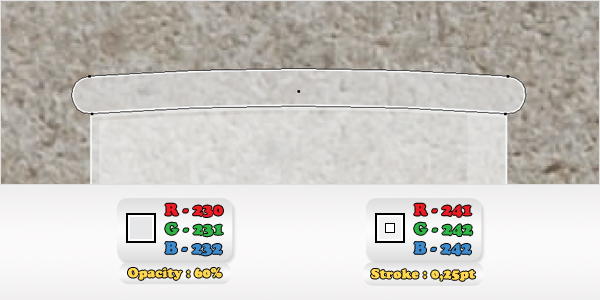
Step 21
Make two copies of shape 6. Select the top copy and hit the left arrow ten times. Reselect both copies and click on the Minus Front button from the Pathfinder panel. Now focus on the resulting shape. Remove the stroke, then select the fill, and lower the Opacity to 30%.
Make two new copies of shape 6. Select the top copy, then hit the down arrow and the right arrow once. Reselect both copies and click on the Minus Front button from the Pathfinder panel. Again, remove the stroke of the resulting shape, then select the fill, and lower its Opacity to 50%.
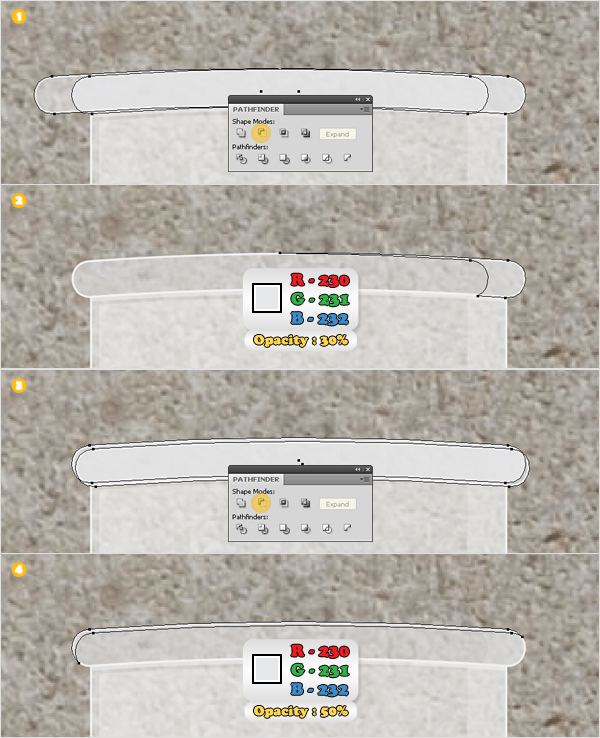
Step 22
Reselect shape number 6 and go to Object > Path > Offset Path. Enter a -1,5px Offset and click OK. Fill the resulting shape with the linear gradient shown in the second image, lower its Opacity to 50%, and remove the stroke.
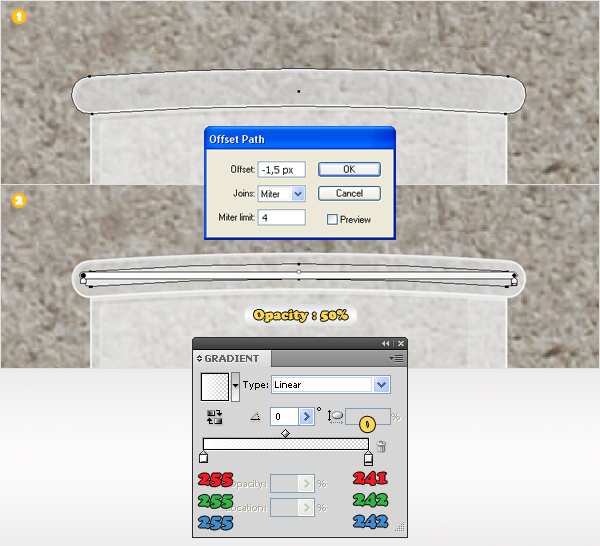
Step 23
Select the oval shape that stands for the bottom of the jar and go to Object > Path > Offset Path. Enter a 3px Offset and click OK. Fill the resulting shape with R=109, G=110, B=113, lower its Opacity to 30%, then go to Effect > Blur > Gaussian Blur. Enter a 3px radius and then click OK.
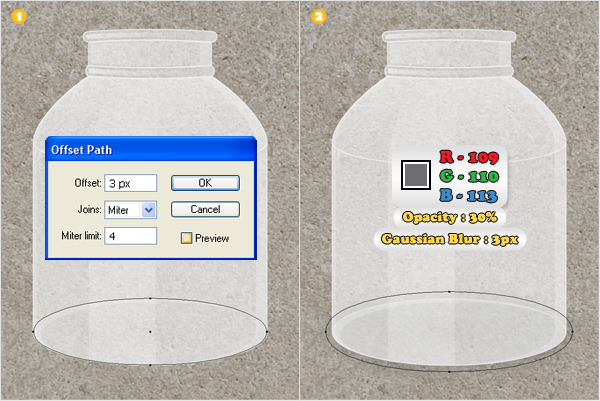
Step 24
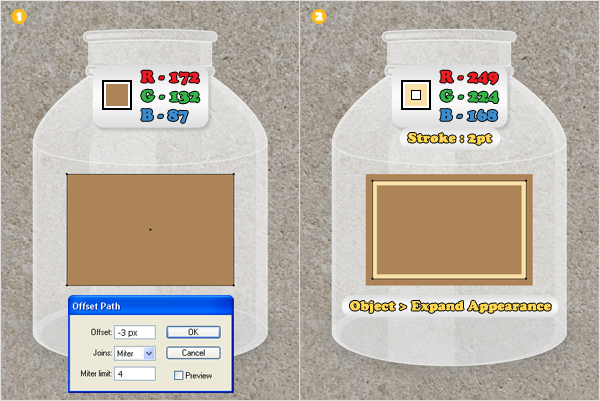
Let’s create the etiquette. First, re-enable the Snap to Grid (View > Snap to Grid). Pick the Rectangle Tool (M), create a 75px by 50px shape and place it as shown in the first image. Fill it with R=172, G=132, B=87, then go to Object > Path > Offset Path. Enter a -3px Offset and click OK. Fill the resulting shape with none and add a 2pt stroke. Align it to the inside, set the color to R=249, G=224, B=168, then go to Object > Expand Appearance.
Step 25
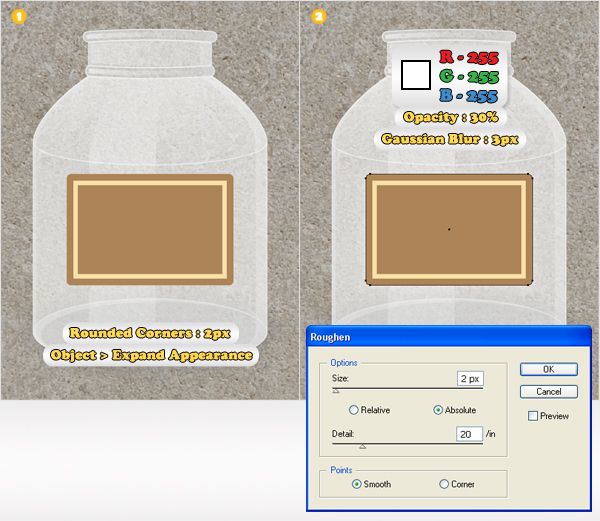
Select the brown shape made in the previous step and go to Effect > Stylize > Rounded Corners. Enter a 2px radius, click OK, then go to Object > Expand Appearance. Select the resulting shape and make a copy in back (Command + C > Command + B).
Select this copy, fill it with white, lower its Opacity to 30%, then go to Effect > Distort & Transform > Roughen. Enter the data shown in the second image, click OK, then go to Effect > Blur > Gaussian Blur. Enter a 3px radius and then click OK.
Step 26
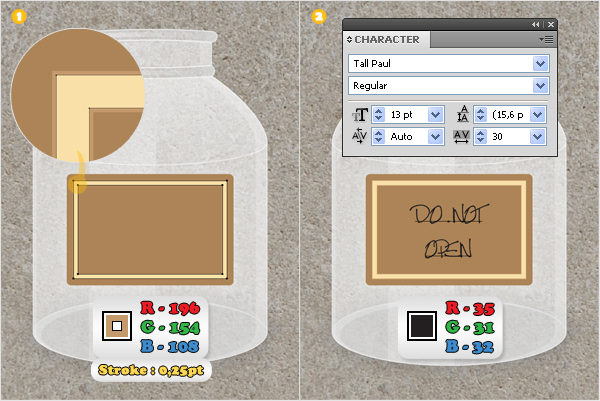
Select the expanded stroke made two steps ago. Add a 0,25pt stroke for this shape, align it to outside, and set the color to R=196, G=154, B=108. Grab the Type Tool (T), click on your artboard, and add the “Do Not Open” text. Set the color to R=35, G=31, B=32, and use the Tall Paul font with a size of 13pt.
Step 27
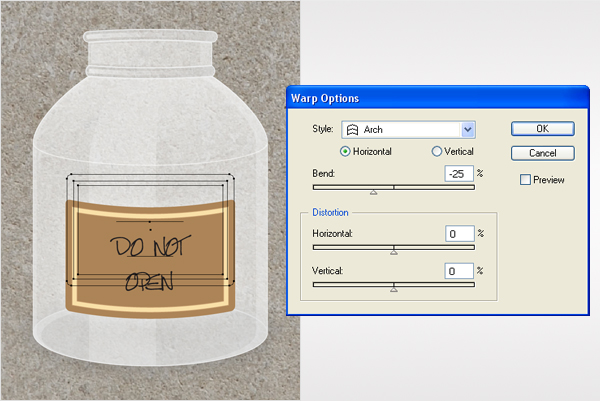
Select the text along with the other three etiquette components and group them (Command + G). Select this new group and go to Effect > Warp > Arch. Enter the data shown below then click OK. Now, your etiquette should look like the following image.
Step 28
Duplicate the large shapes that make up the overall jar. Select these copies, click on the Unite button from the Pathfinder panel, and disable the Snap to Grid. Pick the Pen Tool (P) and create a shape like the one shown in the second image. Select it along with the other, fresh shape and click on the Intersect button from the Pathfinder panel. Fill the resulting shape with R=102, G=45, B=145, and move it into the bottom of the Layers panel, right above the background image.
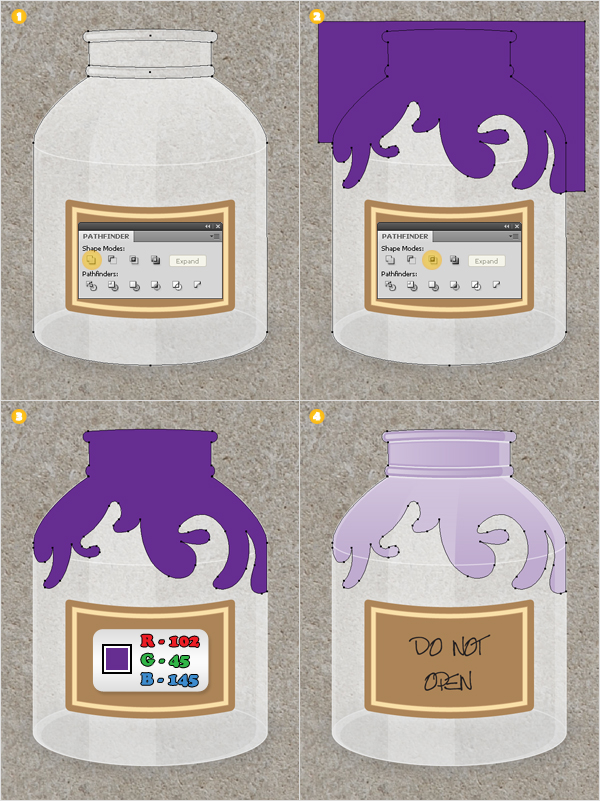
Step 29
Pick the Ellipse Tool (L), create some random shapes, and place them as shown in the following image. Fill them with R=102, G=45, B=145, and move them into the bottom of the Layers panel, right above the shape made in the previous step. Now the jar is done.
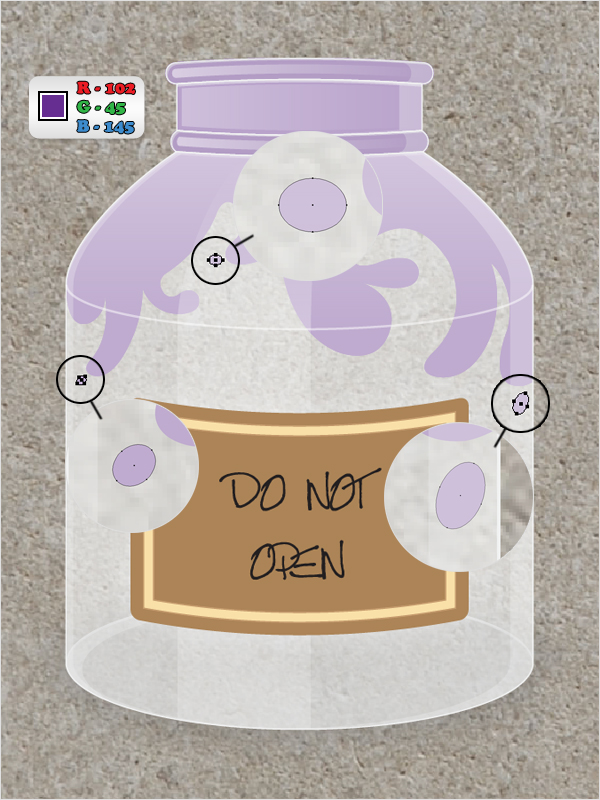
Step 30
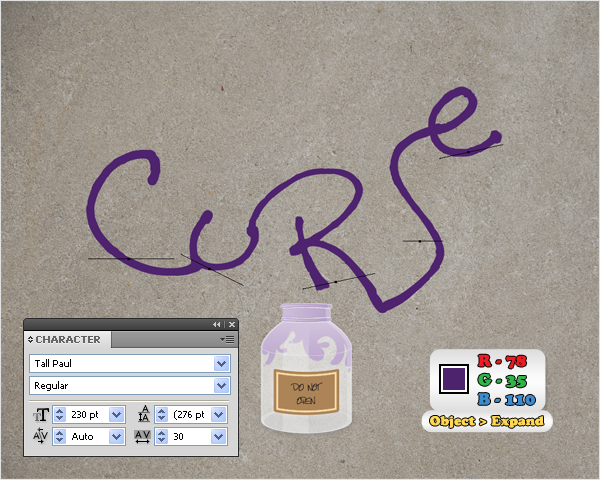
Let’s continue with the text. Grab the Type Tool (T) and add your text. Add each character separately. Again, use the Tall Paul font with a size of 230pt and set the color to R=78, G=35, B=110. As you can see I used the “CuRsE” word (“C,” “R,” “S” in uppercase and “u,” “e” in lowercase). Play with these characters, rotate them, and stick them to each other. Finally, select all these characters and go to Object > Expand.
Step 31
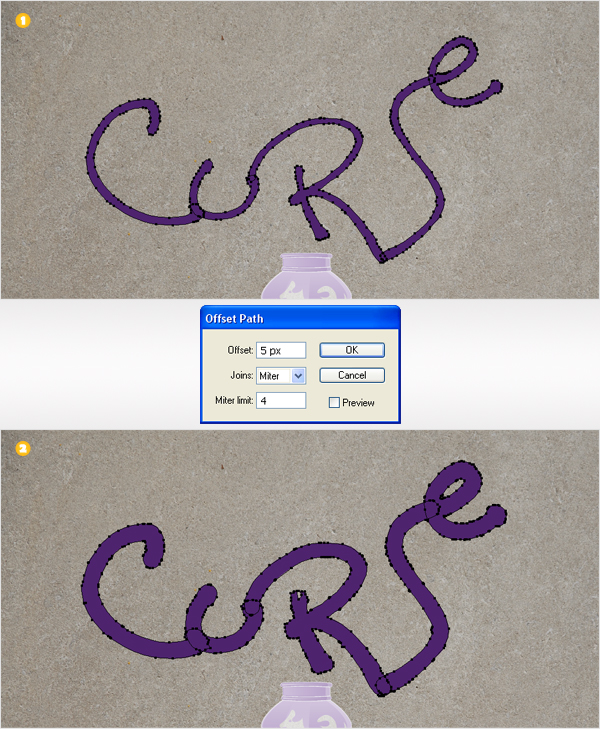
Select the shapes made in the previous step and go to Object > Path > Offset Path. Enter a 5px Offset and click OK. Delete the original shapes and keep these thicker shapes.
Step 32
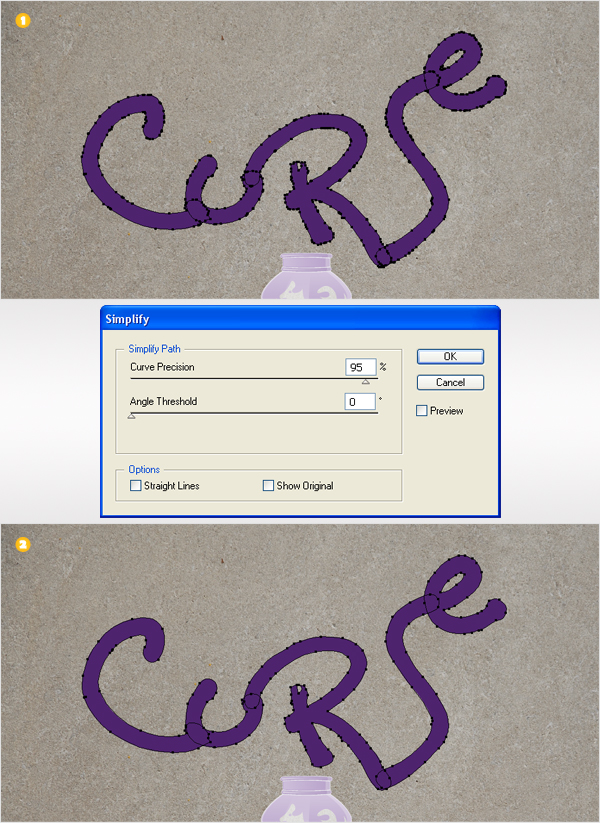
Next you need to decrease the number of anchor points for the shapes made in the previous step. Select them and go to Object > Path > Simplify. Drag the Curve Precision slider to 95% and click OK.
Step 33
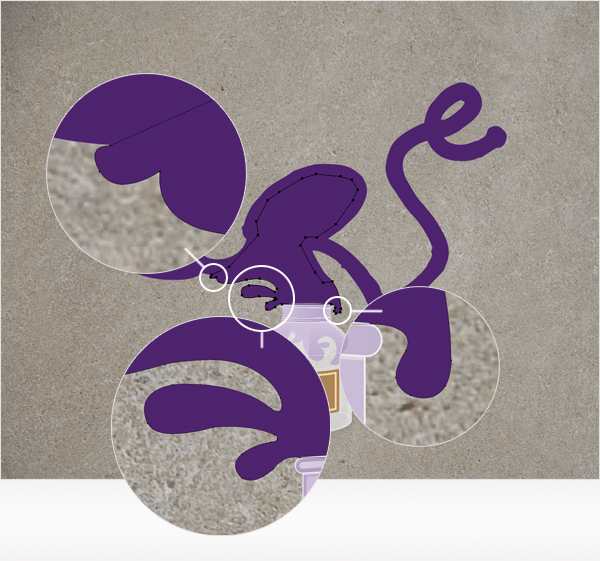
Let’s start adding the splashy effect for the text. Pick the Pen Tool (P) and draw a shape like the one shown in the following image. You can take a closer look at the zoomed areas to understand the little details of this shape.
Step 34
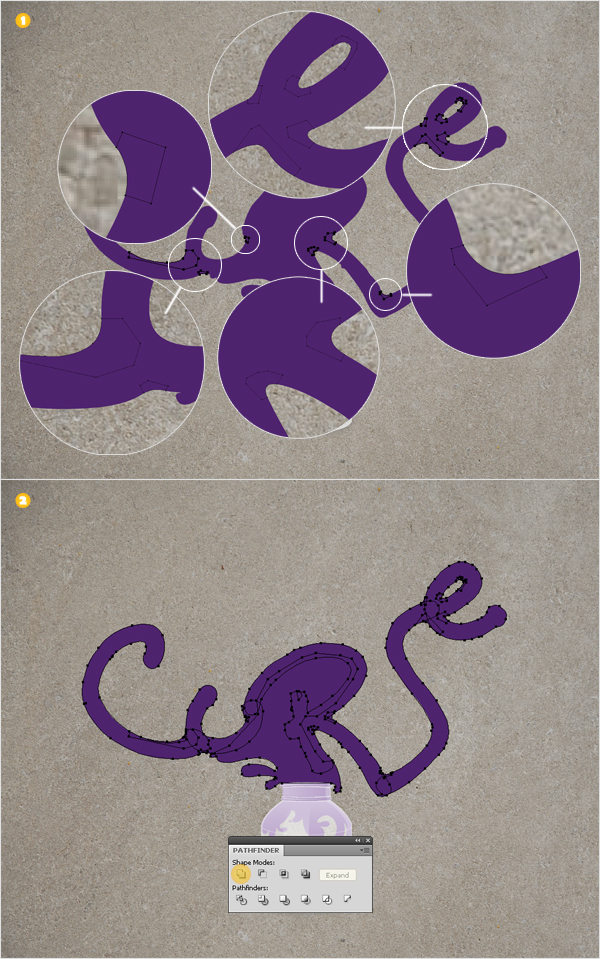
Next, you need to add some extra roundness to the overall text. Pick the Pen Tool (P) and draw some rounded shapes above the sharp areas of the text. Select all these purple shapes made in the last five steps and click on the Unite button from the Pathfinder panel.
Step 35
Pick the Pen Tool (P) and draw a shape like the white one shown in the first image. Select it along with the large purple shape and click on the Minus Front button from the Pathfinder panel.
Step 36
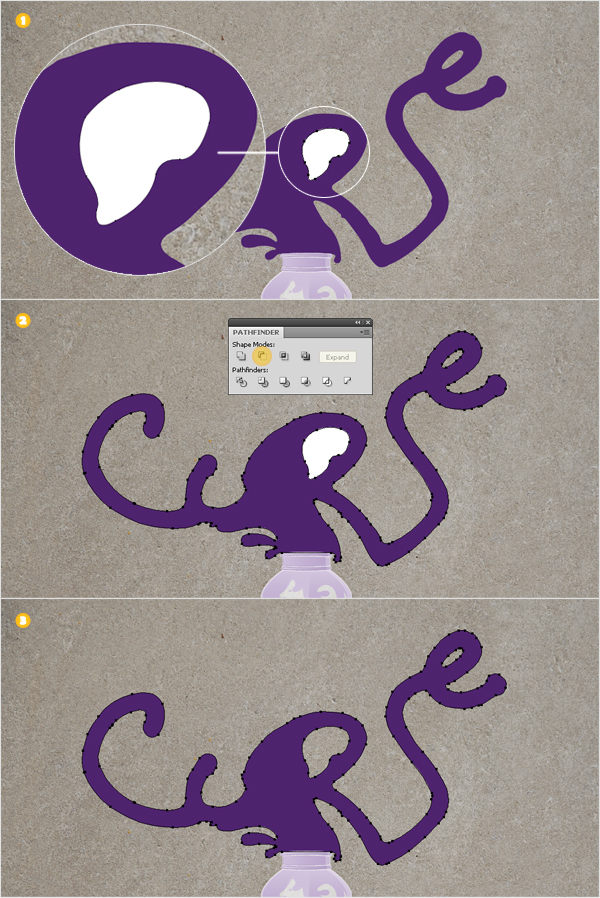
Continue with the Pen Tool (P) and create a shape like the white one shown in the first image. Again, select it along with the large, purple shape and click on the Minus Front button from the Pathfinder panel.
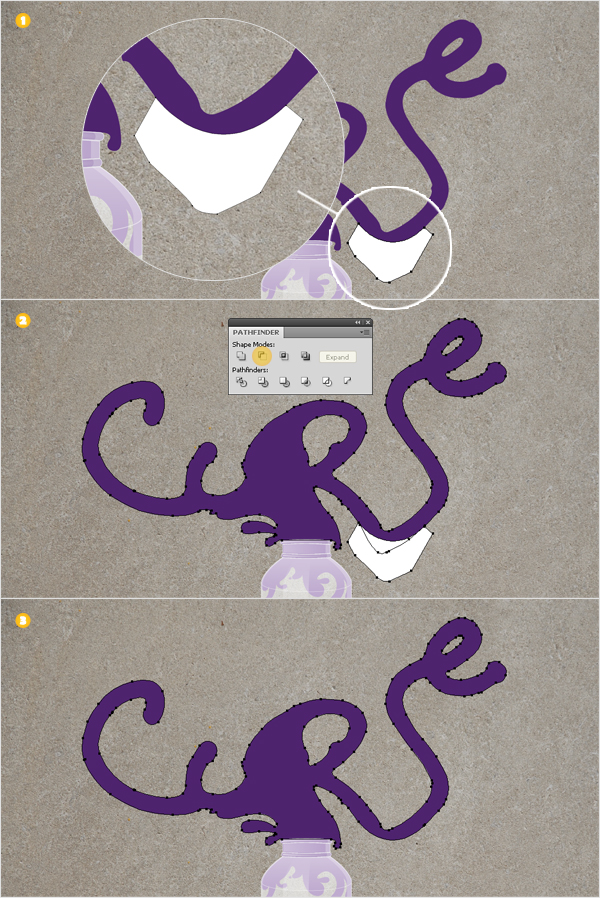
Step 37
Next, using the Pen Tool (P) and some patience, add the shapes shown in the following images. Again, take a closer look at the zoomed images to spot the little details.
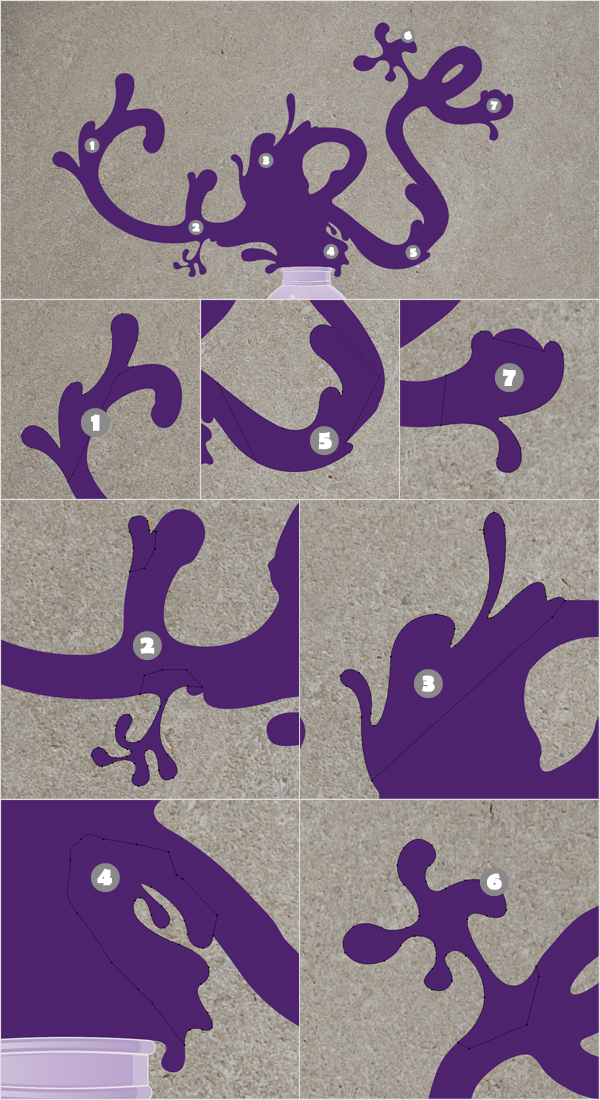
Step 38
Select the shapes created in the previous step along with the large, purple shape, and click on the Unite button from the Pathfinder panel.
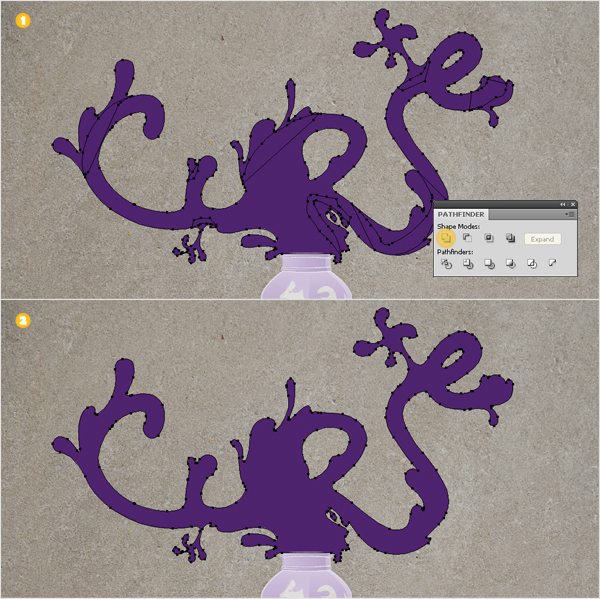
Step 39
Pick the Ellipse Tool (L) and click on your artboard. Enter 5 in the Width box and 50 in the Height box, then click OK. This will create a 5px by 50px ellipse. Fill it with R=78, G=35, B=110, and go to Effect > Warp > Arc. Enter the data shown below image #2, click OK, then go to Effect > Warp > Arc Lower.
Enter the data shown below image #3, click OK, then go to Effect > Warp > Fish. Enter the data shown below image #4, click OK, then go again to Effect > Warp > Arc. Enter the data shown below image #5, click OK, then go to Object > Expand Appearance.
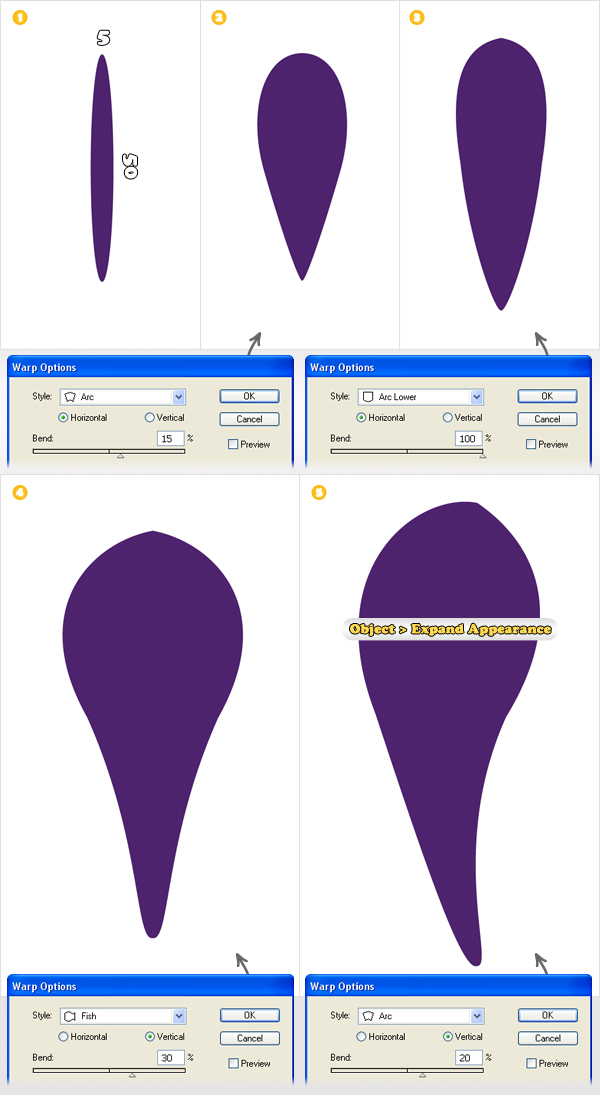
Step 40
Select the shape made in the previous step and make several copies (Command + C > Command + F). Randomly resize these copies, rotate them and place them across the text as shown in the first image. Select these fresh shapes along with the large, purple shape and go to Object > Compound Path > Make. Fill the resulting shape with the radial gradient shown in the final image.
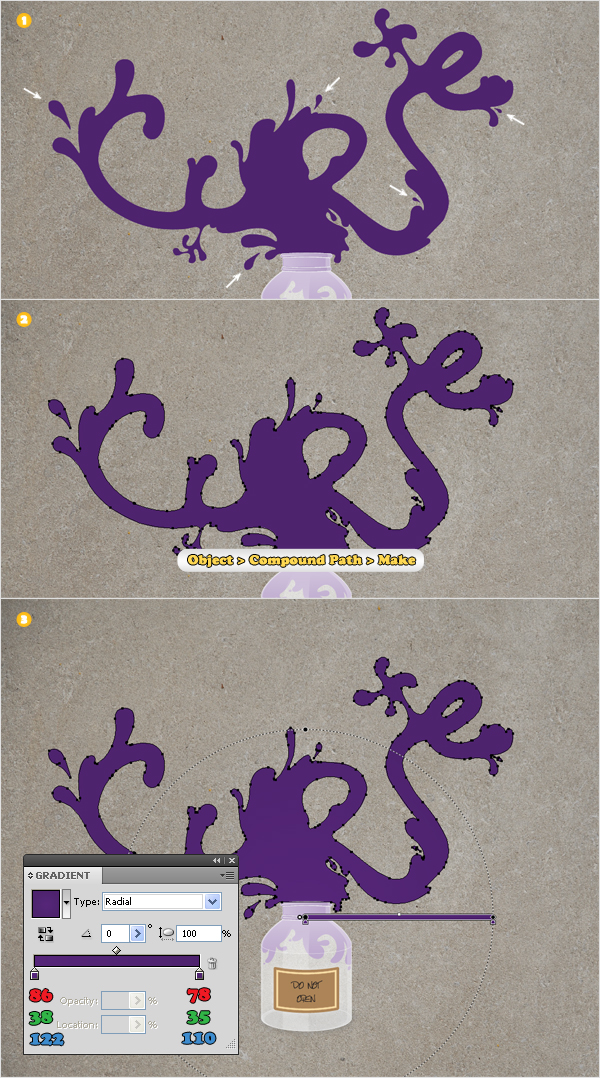
Step 41
Select the shape made in the previous step and go to Object > Path > Offset Path. Enter a -5 Offset and click OK. Duplicate the resulting shape. Select this copy, then hit the down arrow and the right arrow three times. Reselect these two, new shapes and click on the Minus Front button from the Pathfinder panel.
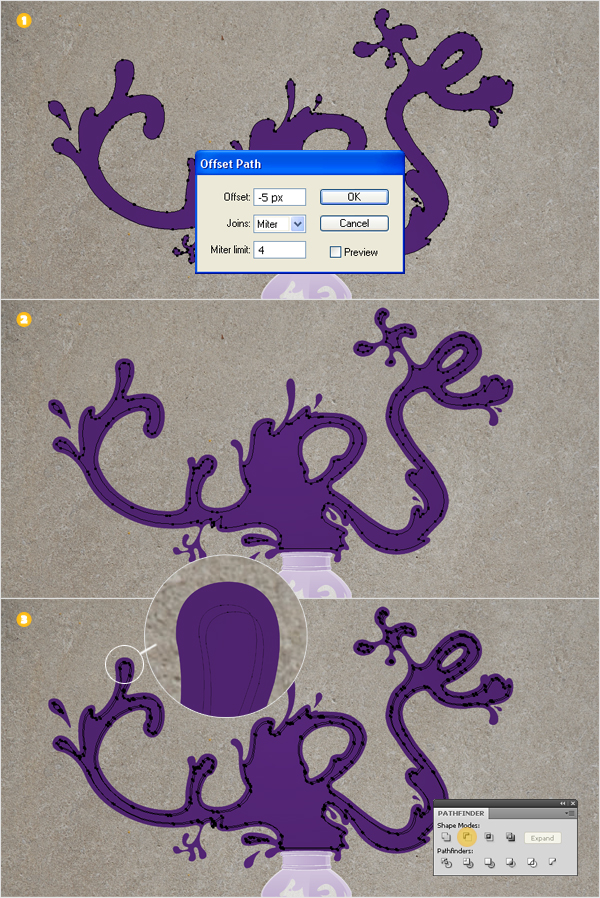
Step 42
You should have a group of thin shapes resulted from the previous step. Fill these shapes with R=240, G=239, B=238. Now, select the entire group, change its blending mode to Overlay, then go to Effect > Blur > Gaussian Blur. Enter a 3px radius and click OK.
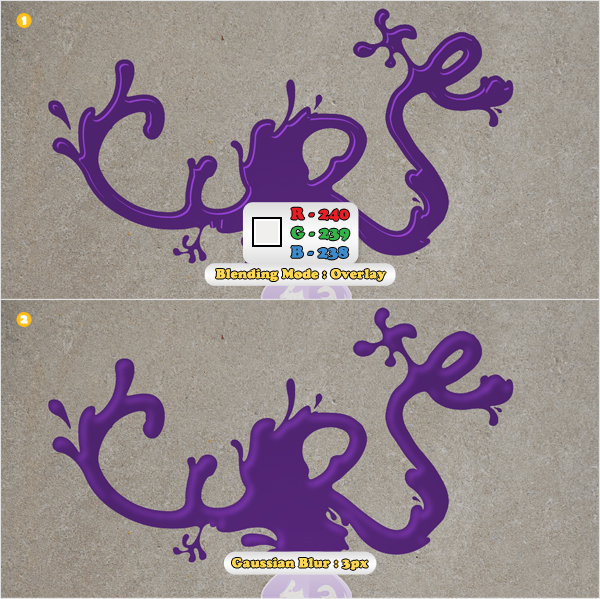
Step 43
Reselect the large, purple shape and make two copies (Command + C > Command + F). Select the top copy and hit the down arrow and the right arrow once. Reselect both copies and hit the Minus Front button from the Pathfinder panel. Fill the resulting shapes with R=102, G=45, B=145.
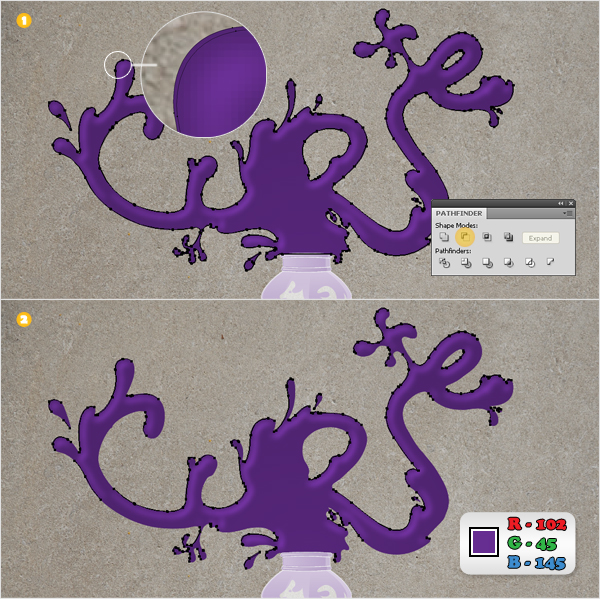
Step 44
Again, select the large, purple shape and make two copies (Command + C > Command + F). Select the top copy and hit the down arrow and the left arrow once. Reselect both copies and hit the Minus Front button from the Pathfinder panel. Fill the resulting shapes with R=54, G=24, B=76.
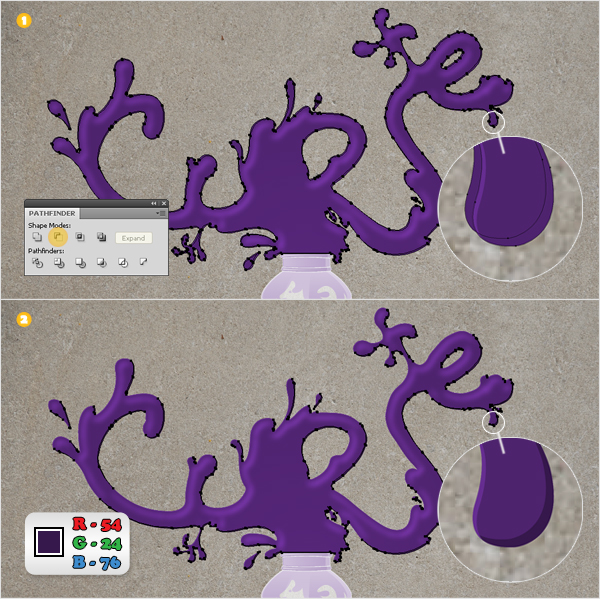
Step 45
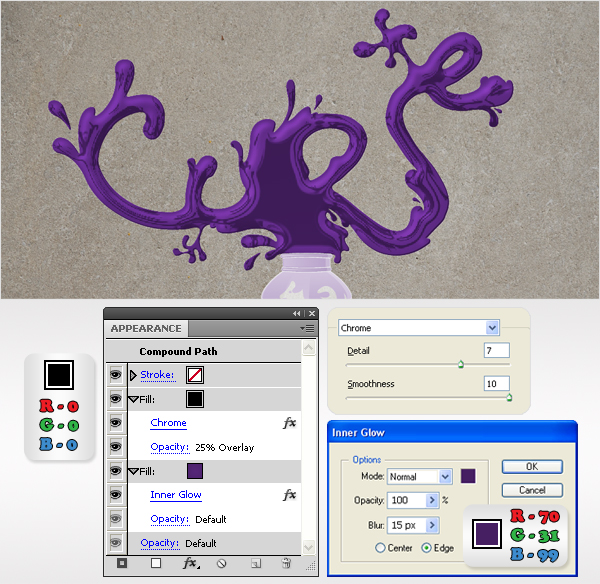
Now let’s focus on the large, purple shape. Select it, then select the fill from the Appearance panel, and go to Effect > Stylize > Inner Glow. Enter the data shown in the following image and click OK. With this shape still selected, open then fly-out menu of the Appearance panel, and click on the Add New Fill. This will add a second fill for the selected shape. Select this new fill, make it black, lower its Opacity to 25%, change the blending mode to Overlay, then go to Effect > Sketch > Chrome. Enter the data shown below and click OK.
Step 46
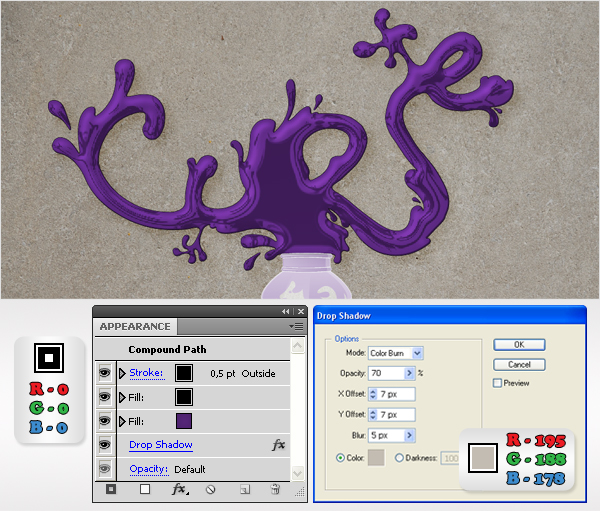
Reselect the shape edited in the previous step and add a 0.5 stroke. Make it black and align it to the outside. Next, reselect the entire path and go to Effect > Stylize > Drop Shadow. Enter the data shown below and click OK. Now your text should look like the following image.
Step 47
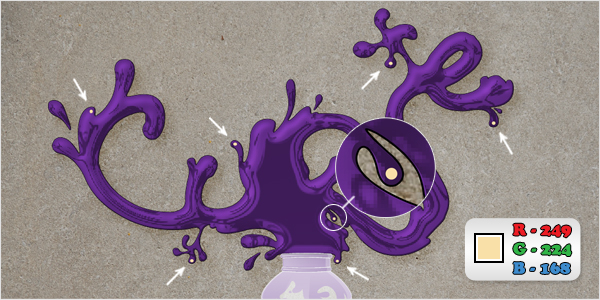
Pick the Ellipse Tool (L) and make some small circles. Fill them with R=249, G=224, B=168 and place them as shown in the following image.
Step 48
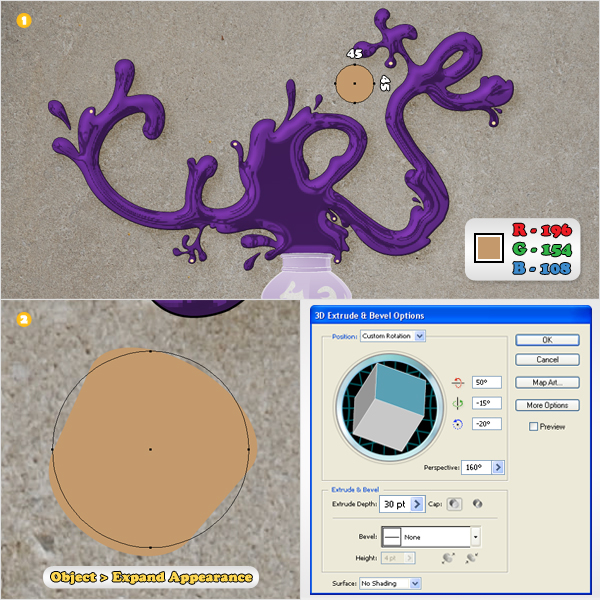
Now that we’re done with the text let’s continue with the cork. Pick the Ellipse Tool (L) and create a 45px by 45px shape. Fill it with R=196, G=154, B=108. Place it as shown in the following image and go to Effect > 3D > Extrude & Bevel. Enter the data shown in the following image, click OK, then apply Object > Expand Appearance.
Step 49
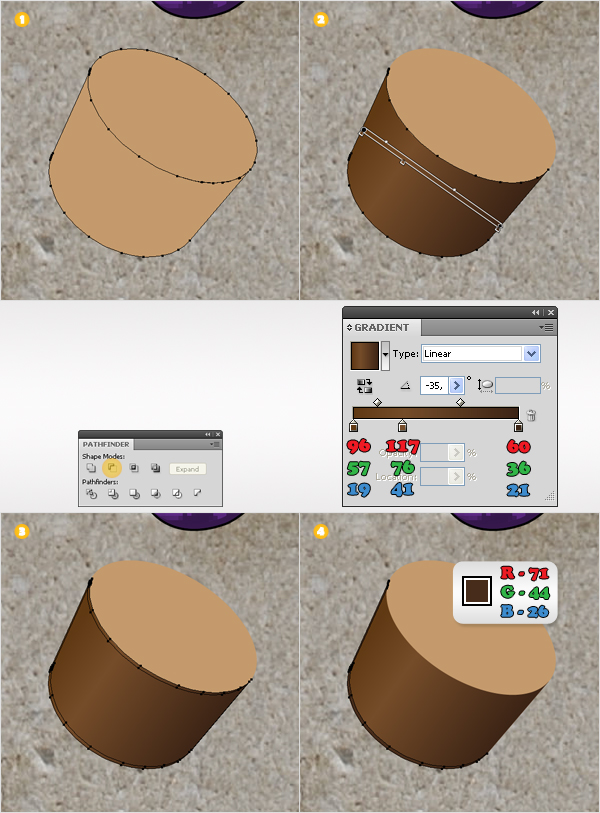
Ungroup the two shapes resulted from the previous step. Select the bottom shape and fill it with the linear gradient shown below image #2. Make two copies of this shape. Select the top copy and hit the up arrow and the right arrow once. Reselect both copies and click on the Minus Front button from the Pathfinder panel. Fill the resulting shape with R=71, G=44, B=26.
Step 50
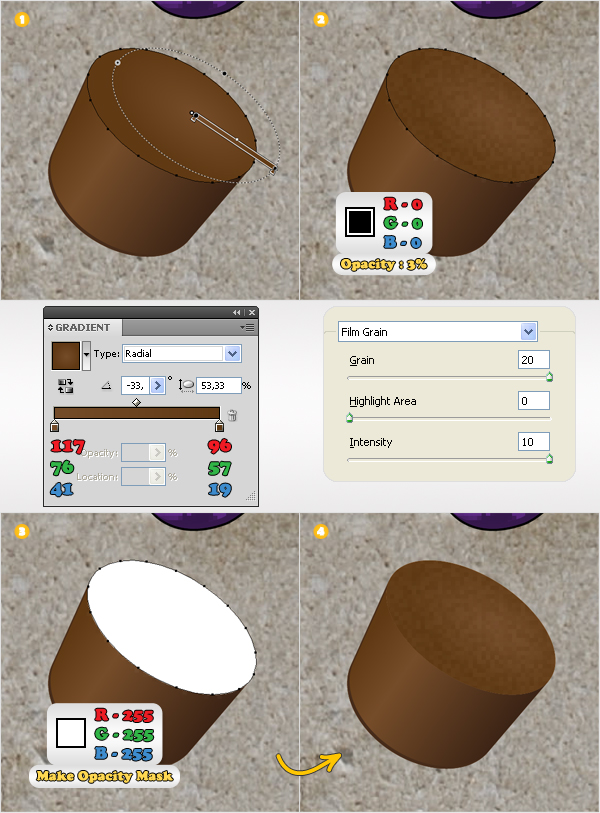
Move to the other shape. First, fill it with the radial gradient shown below and then add a second fill. Select this new fill, make it black, lower its Opacity to 3%, then go to Effect > Artistic > Film Grain. Enter the data shown below image #2 and click OK.
Make a copy of this shape (Command + C > Command + F) and fill it only with white. Select this fresh copy along with the original shape and go to the Transparency panel. Open the fly-out menu and click on Make Opacity Mask. In the end your shape should look like the final image.
Step 51
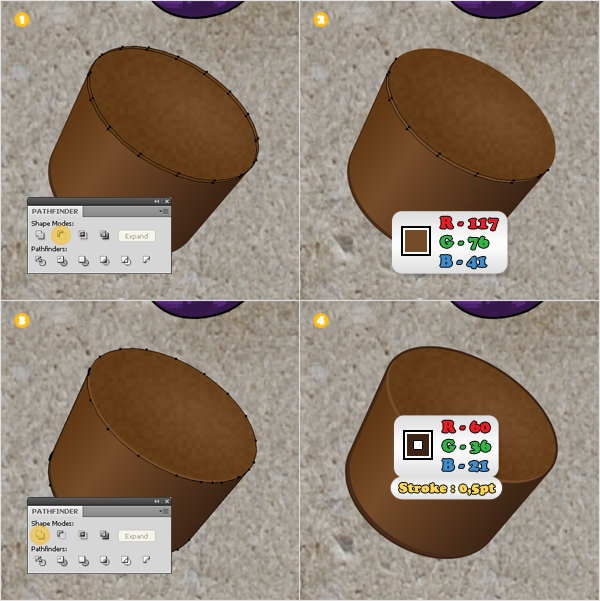
Make two copies of the shape from the previous step. Select the top copy and hit the up arrow and the right arrow once. Reselect both copies and click on the Minus Front button from the Pathfinder panel. Fill the resulting shape only with R=117, G=76, B=41.
Reselect the two large components of the cork and duplicate them. Select these two copies and click on the Unite button from the Pathfinder panel. Fill the resulting shape with none, but add a 0,5 stroke. Align it to the outside and set the color to R=60, G=36, B=21.
Step 52
Select all the shapes that make up the cork and group them (Command + G). Select the group and go to Effect > Stylize > Drop Shadow. Enter the data shown below and click OK.
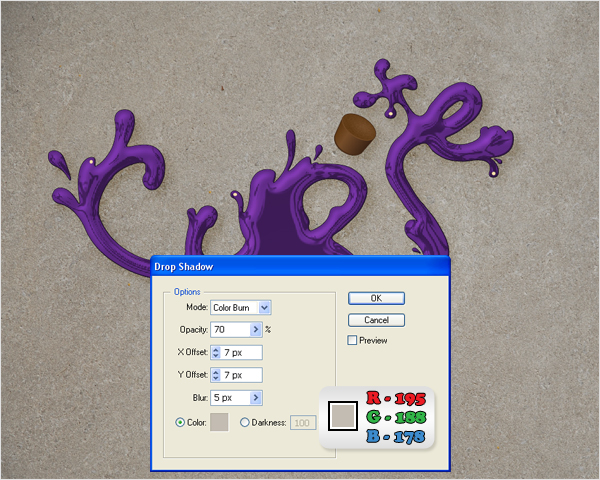
Step 53
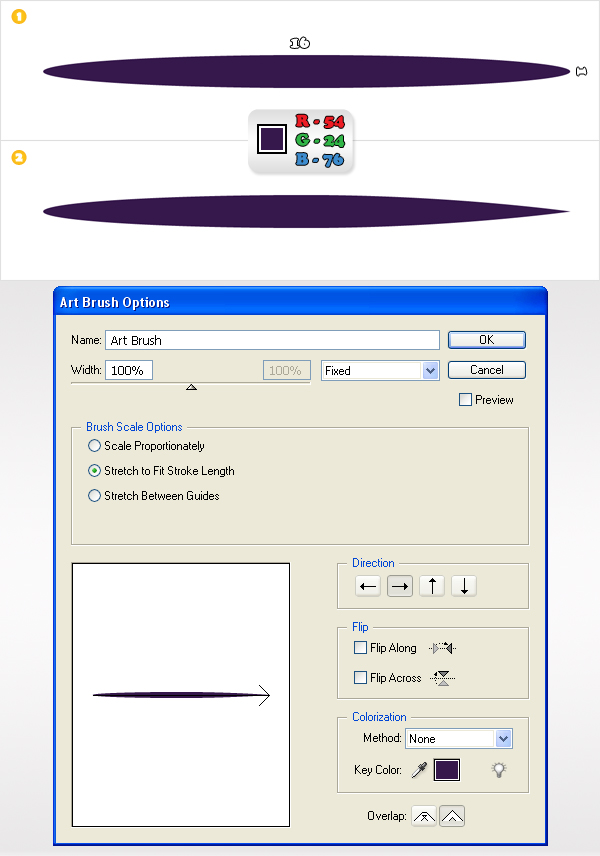
Finally, you need to create a thin art brush. Pick the Ellipse Tool (L) and create a 16px by 1px shape. Fill it with R=54, G=24, B=76, then pick the Convert Selection Tool (Shift + C) and click on the right anchor point.
Now your shape should look like the second image. Select it and go to the Brushes panel (Window > Brushes). Open the fly-out and go to New Brush. Check Art Brush, click OK, enter the data shown in the following image and click OK.
Step 54
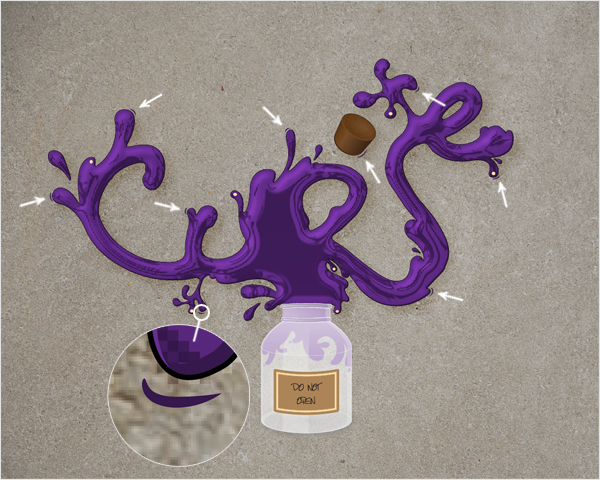
Pick the Brush Tool (B). Select the the art brush made in the previous step, add some random paths as shown in the following image and you’re done.
Conclusion
The final image is below.
