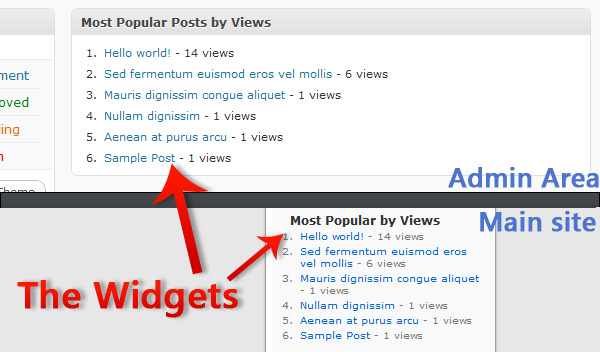
As you continue using writing for WordPress more and more, the level of difficulty and complexity of your plugins will eventually reach far beyond the simple back-end data manipulation, as demonstrated in our beginner’s article. In this installment we’ll cover in-depth: database interaction, Admin Widgets, and Sidebar Widgets. Today’s example will be a custom built “Most Popular by Views” plugin, which creates an admin area widget for us to view, and a sidebar widget for visitors to see.
Step 0. What it’s Gonna Do?
Before we open our IDE or write any code, you should always write out a list of what features your plugin will and will not have (at least in its initial phase, you can always extend later). For our plugin, “Most Popular By Views,” our primary feature is to display a list of the most popular posts (we’ll say, top 10). Secondly, we’ll also put the list in the admin area as a kind of low-tech analytics. Lastly, we’ll give the developers the option to display it anywhere by making it available as a sidebar widget, and via a simple function.
Features:
- Creates a list of the top ten most popular posts based on views
- List is displayed in Admin area as a low-tech analytics
- List is available as both a sidebar widget and function
Step 1. The Database
Before we can display the most popular posts, we need to gather data about which posts are being viewed and how often, but even before we can do that, we need somewhere to put all that data. Inside of a new plugin file, let’s create a new function (ppbv_create_table) that will check to see if our table exists. If it does not, we’ll create it. Our method of doing this is rather simple; we’ll use $wpdb->get_results to run a SQL statement that checks for a table named “wp_popular_by_views.” If it doesn’t find the table, get_results will return null. If that’s the case, we’ll use $wpdb->query to write in the new table. We run this function every time the plugin is activated.
<?php
/**
 * Plugin Name: Popular Posts by Views
 * Plugin URI: http://net.tutsplus.com
 * Description: Create a widget to show your most popular articles based on views.
 * Version: 1.0
 * Author: Jonathan Wolfe
 * Author URI: http://fire-studios.com
 * License: GPL2
 * .
 * This plugin and its accompanying tutorial are written for Nettuts+ at http://net.tutsplus.com
 * .
 */

global $wpdb; // call global so we can get the database prefix
$ppbv_tablename = $wpdb->prefix.'popular_by_views'; // combine the prefix with our tablename

function ppbv_create_table(){
    global $wpdb, $ppbv_tablename; // call global so we can use them within the function
    $ppbv_table = $wpdb->get_results("SHOW TABLES LIKE '{$ppbv_tablename}'" , ARRAY_N); // returns null if no results
    if(is_null($ppbv_table)){ // if we don't have a table
        $create_table_sql = "CREATE TABLE {$ppbv_tablename} (
            id BIGINT(50) NOT NULL AUTO_INCREMENT,
            post_id VARCHAR(255) NOT NULL,
            views BIGINT(50) NOT NULL,
            PRIMARY KEY (id),
            UNIQUE (id)
        );"; // be careful with SQL syntax, it can be VERY finiky
        $wpdb->query($create_table_sql); // run the SQL statement on the database
    }
}
register_activation_hook(__FILE__,'ppbv_create_table'); // run the function 'ppbv_create_table' at plugin activation
?>
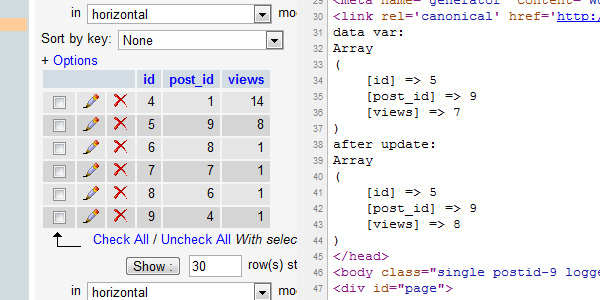
Step 2. Catching the Data
The next thing we need to do, now that we have a table to store our data, is catch our data. We’ll create a new function (ppbv_page_viewed) that we’ll attach to the wp_head hook so that it’ll run on every page load. Inside this function, we’re going to do one of two things, after we check to see if the current page is already in the database: increase its views by one or, if it’s not in the database, add it to the database. To figure out if the current page is already in the database, we’re going to be using the $post object to get the “post_ID.” This step is actually really simple, because we aren’t collecting any complicated data; the comments in the code provide a detailed step by step in this process.
function ppbv_page_viewed(){
    if(is_single() && !is_page()){ // only run on posts and not pages
        global $wpdb, $post, $ppbv_tablename; // call global for use in funciton
        $wpdb->flush(); // clense the DB interface
        $data = $wpdb->get_row("SELECT * FROM {$ppbv_tablename} WHERE post_id='{$post->ID}'", ARRAY_A); // get the data row that has the matching post ID
        if(!is_null($data)){ // if we have a matching data row
            $new_views = $data['views'] + 1; // increase the views by 1
            $wpdb->query("UPDATE {$ppbv_tablename} SET views='{$new_views}' WHERE post_id='{$post->ID}';"); // update the data row with the new views
            $wpdb->flush(); // clense the DB interface
        }
        else { // if we don't have a matching data row (nobody's viewed the post yet)
            $wpdb->query("INSERT INTO {$ppbv_tablename} (post_id, views) VALUES ('{$post->ID}','1');"); // add a new data row into the DB with the post ID and 1 view
            $wpdb->flush(); // clense the DB interface
        }
    }
}
add_action('wp_head','ppbv_page_viewed'); // attach ppbv_page_viewed to the wp_head hook
Step 3. Creating the Admin Widget
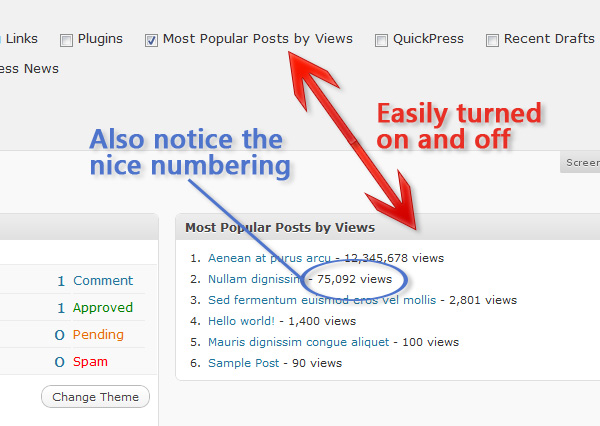
Next up, we’re going to use this data we just added to our database to create an ordered list inside of an Admin Area Dashboard Widget. This process involves two functions: the first (ppbv_admin_widget) to generate everything inside the widget, and second, (ppbv_add_admin_widget) to create the widget itself. Let’s start with the content function, pppbv_admin_widget. Firstly, since we’re making an ordered list, let’s echo out the opening tags for that. Then we’ll globalize the $wpdb and $ppbv_tablename vars so we can access the database and retrieve the ten most viewed post’s IDs. Then we’ll run the returned array through a foreach statement, and use each individual ID to build a list-item and create a link to that page while also printing out its views (formatted with number_format to make it easier to read).
function ppbv_admin_widget(){
    echo "<ol id='popular_by_views_admin_list'>"; // create an unordered list
        global $wpdb, $ppbv_tablename; // call global for use in function
        $popular = $wpdb->get_results("SELECT * FROM {$ppbv_tablename} ORDER BY views DESC LIMIT 0,10",ARRAY_N); // Order our table by largest to smallest views then get the first 10 (i.e. the top 10 most viewed)
        foreach($popular as $post){ // loop through the returned array of popular posts
            $ID = $post[1]; // store the data in a variable to save a few characters and keep the code cleaner
            $views = number_format($post[2]); // number_format adds the commas in the right spots for numbers (ex: 12543 to 12,543)
            $post_url = get_permalink($ID); // get the URL of the current post in the loop
            $title = get_the_title($ID); // get the title of the current post in the loop
            echo "<li><a href='{$post_url}'>{$title}</a> - {$views} views</li>"; // echo out the information in a list-item
        } // end the loop
    echo "</ol>"; // close out the unordered list
}
Now that we’re generating content, let’s create the widget. Inside the creation function, ppbv_add_admin_widget, we’re going to call another function native to WordPress: wp_add_dashboard_widget. All we need to do is give wp_add_dashboard_widget the following parameters: [id of the container], [title in the container], [content function] (ours fills as such: ‘popular_by_views’, ‘Most Popular Posts by Views’, ‘ppbv_admin_widget’). The last thing we need to do is attach our creation function to the wp_dashboard_setup hook.
function ppbv_add_admin_widget(){
    wp_add_dashboard_widget('popular_by_views', 'Most Popular Posts by Views', 'ppbv_admin_widget'); // creates an admin area widget || wp_add_dashboard_widget([id of div],[title in div],[function to run inside of div])
}
add_action('wp_dashboard_setup','ppbv_add_admin_widget'); // attach ppbv_add_admin_widget to wp_dashboard_setup
And now we have a working dashboard widget for administraitors to see.
Step 4. Creating the Sidebar Widget
Creating a sidebar widget is fairly painless; unfortunately, certain parts aren’t documented well (like how to make them uniform), but we’ll cover that. Let’s start by writing a new function (ppbv_display_widget) and, inside of it, we’ll carbon copy our content function from the admin widget (I suggest moving the global calls to the top, outside the <ol> echo, of the function for clarity later on). Then the next step is to register our widget in WordPress via wp_register_sidebar_widget (parameters are: [id of the container],[title on the widget page],[content function] || ‘popular_by_views’, ‘Most Popular Posts by Views’, ‘ppbv_display_widget’).
function ppbv_display_widget() {
    global $wpdb, $ppbv_tablename; // call global for use in function

    echo "<div id='popular_by_views'>"; // create a container
        echo "<h2>Most Popular by Views</h2>"; // write the title
        echo "<ol id='popular_by_views_list'>"; // create an ordered list
            $popular = $wpdb->get_results("SELECT * FROM {$ppbv_tablename} ORDER BY views DESC LIMIT 0,10",ARRAY_N);
            foreach($popular as $post){ // loop through the returned array of popular posts
                $ID = $post[1]; // store the data in a variable to save a few characters and keep the code cleaner
                $views = number_format($post[2]); // number_format adds the commas in the right spots for numbers (ex: 12543 to 12,543)
                $post_url = get_permalink($ID); // get the URL of the current post in the loop
                $title = get_the_title($ID); // get the title of the current post in the loop
                echo "<li><a href='{$post_url}'>{$title}</a> - {$views} views</li>"; // echo out the information in a list-item
            } // end the loop
        echo "</ol>"; // close the ordered list
    echo "</div>"; // close the container
}
wp_register_sidebar_widget('popular_by_views', 'Most Popular Posts by Views', 'ppbv_display_widget'); // add the widget to the select menu || wp_register_sidebar_widget([id of the option],[title of the option],[function to run from the widget]))
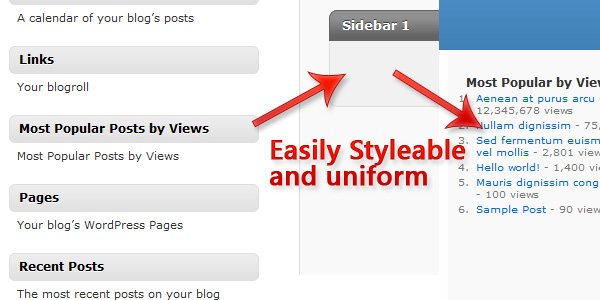
This is actually the bare-minimum you need to do for a sidebar widget, but what 90% of all dynamic sidebars have certain settings applied about how widgets are styled, so let’s conform our widget to those settings. The first thing we need to do is add in a parameter to our ppbv_display_widget function, $args. By adding this parameter inside the function, using the extract function on it, we gain access to several variables which will allow our plugin to be styled the same as the rest of the widgets in the sidebar.
“We don’t need to provide any input for $args, WordPress will do that for us.”
Thanks to $args and extract, we now have access to the following variables that we can echo to style our widget:
- $before_widget
- $after_widget
- $before_title
- $after_title
function ppbv_display_widget($args){
    global $wpdb, $ppbv_tablename; // call global for use in function
    extract($args); // gives us the default settings of widgets

    echo $before_widget; // echos the container for the widget || obtained from $args
        echo $before_title."Most Popular by Views".$after_title; // echos the title of the widget || $before_title/$after_title obtained from $args
        echo "<ol id='popular_by_views_list'>"; // create an ordered list
            $popular = $wpdb->get_results("SELECT * FROM {$ppbv_tablename} ORDER BY views DESC LIMIT 0,10",ARRAY_N); // Order our table by largest to smallest views then get the first 10 (i.e. the top 10 most viewed)
            foreach($popular as $post){ // loop through the returned array of popular posts
                $ID = $post[1]; // store the data in a variable to save a few characters and keep the code cleaner
                $views = number_format($post[2]); // number_format adds the commas in the right spots for numbers (ex: 12543 to 12,543)
                $post_url = get_permalink($ID); // get the URL of the current post in the loop
                $title = get_the_title($ID); // get the title of the current post in the loop
                echo "<li><a href='{$post_url}'>{$title}</a> - {$views} views</li>"; // echo out the information in a list-item
            } // end the loop
        echo "</ol>"; // close the ordered list
    echo $after_widget; // close the container || obtained from $args
}
Step 5. The Non-widget Function
Not everybody who uses this plugin is going to want to use the widget, so it’s imperative that we provide them with another method of displaying our list. Thankfully, that’s as simple as cloning our ppbv_display_widget function and removing the widget parts, replacing them with standard hardcoded HTML.
function ppbv_display() {
    global $wpdb, $ppbv_tablename; // call global for use in function

    echo "<div id='popular_by_views'>"; // create a container
        echo "<h2>Most Popular by Views</h2>"; // write the title
        echo "<ol id='popular_by_views_list'>"; // create an ordered list
            $popular = $wpdb->get_results("SELECT * FROM {$ppbv_tablename} ORDER BY views DESC LIMIT 0,10",ARRAY_N);
            foreach($popular as $post){ // loop through the returned array of popular posts
                $ID = $post[1]; // store the data in a variable to save a few characters and keep the code cleaner
                $views = number_format($post[2]); // number_format adds the commas in the right spots for numbers (ex: 12543 to 12,543)
                $post_url = get_permalink($ID); // get the URL of the current post in the loop
                $title = get_the_title($ID); // get the title of the current post in the loop
                echo "<li><a href='{$post_url}'>{$title}</a> - {$views} views</li>"; // echo out the information in a list-item
            } // end the loop
        echo "</ol>"; // close the ordered list
    echo "</div>"; // close the container
}
Conclusion
That’s it guys, you’ve successfully made your very own “Most Popular by Views” WordPress plugin. Not too hard, was it?
View Final Source Code with Commenting?
<?php
/**
 * Plugin Name: Popular Posts by Views
 * Plugin URI: http://net.tutsplus.com
 * Description: Create a widget to show your most popular articles bassed on views.
 * Version: 1.0
 * Author: Jonathan Wolfe
 * Author URI: http://fire-studios.com
 * License: GPL2
 * .
 * This plugin and it's accompanying tutorial are written for NETTUTS at http://net.tutsplus.com
 * .
 */

global $wpdb; // call global so we can get the database prefix
$ppbv_tablename = $wpdb->prefix.'popular_by_views'; // combine the prefix with our tablename

function ppbv_create_table(){
    global $wpdb, $ppbv_tablename; // call global so we can use them within the function
    $ppbv_table = $wpdb->get_results("SHOW TABLES LIKE '{$ppbv_tablename}'" , ARRAY_N); // returns null if no results
    if(is_null($ppbv_table)){ // if we don't have a table
        $create_table_sql = "CREATE TABLE {$ppbv_tablename} (
            id BIGINT(50) NOT NULL AUTO_INCREMENT,
            post_id VARCHAR(255) NOT NULL,
            views BIGINT(50) NOT NULL,
            PRIMARY KEY (id),
            UNIQUE (id)
        );"; // be careful with SQL syntax, it can be VERY finiky
        $wpdb->query($create_table_sql); // run the SQL statement on the database
        $wpdb->flush(); // clense the DB interface
    }
}
register_activation_hook(__FILE__,'ppbv_create_table'); // run the function 'ppbv_create_table' at plugin activation

function ppbv_page_viewed(){
    if(is_single() && !is_page()){ // only run on posts and not pages
        global $wpdb, $post, $ppbv_tablename; // call global for use in funciton
        $wpdb->flush(); // clense the DB interface
        $data = $wpdb->get_row("SELECT * FROM {$ppbv_tablename} WHERE post_id='{$post->ID}'", ARRAY_A); // get the data row that has the matching post ID
        if(!is_null($data)){ // if we have a matching data row
            $new_views = $data['views'] + 1; // increase the views by 1
            $wpdb->query("UPDATE {$ppbv_tablename} SET views='{$new_views}' WHERE post_id='{$post->ID}';"); // update the data row with the new views
            $wpdb->flush(); // clense the DB interface
        }
        else { // if we don't have a matching data row (nobody's viewed the post yet)
            $wpdb->query("INSERT INTO {$ppbv_tablename} (post_id, views) VALUES ('{$post->ID}','1');"); // add a new data row into the DB with the post ID and 1 view
            $wpdb->flush(); // clense the DB interface
        }
    }
}
add_action('wp_head','ppbv_page_viewed'); // attach ppbv_page_viewed to the wp_head hook

function ppbv_admin_widget(){
    echo "<ol id='popular_by_views_admin_list'>"; // create an unordered list
        global $wpdb, $ppbv_tablename; // call global for use in function
        $popular = $wpdb->get_results("SELECT * FROM {$ppbv_tablename} ORDER BY views DESC LIMIT 0,10",ARRAY_N); // Order our table by largest to smallest views then get the first 10 (i.e. the top 10 most viewed)
        foreach($popular as $post){ // loop through the returned array of popular posts
            $ID = $post[1]; // store the data in a variable to save a few characters and keep the code cleaner
            $views = number_format($post[2]); // number_format adds the commas in the right spots for numbers (ex: 12543 to 12,543)
            $post_url = get_permalink($ID); // get the URL of the current post in the loop
            $title = get_the_title($ID); // get the title of the current post in the loop
            echo "<li><a href='{$post_url}'>{$title}</a> - {$views} views</li>"; // echo out the information in a list-item
        } // end the loop
    echo "</ol>"; // close out the unordered list
}
function ppbv_add_admin_widget(){
    wp_add_dashboard_widget('popular_by_views', 'Most Popular Posts by Views', 'ppbv_admin_widget'); // creates an admin area widget || wp_add_dashboard_widget([id of div],[title in div],[function to run inside of div])
}
add_action('wp_dashboard_setup','ppbv_add_admin_widget'); // attach ppbv_add_admin_widget to wp_dashboard_setup

function ppbv_display_widget($args){
    global $wpdb, $ppbv_tablename; // call global for use in function
    extract($args); // gives us the default settings of widgets

    echo $before_widget; // echos the container for the widget || obtained from $args
        echo $before_title."Most Popular by Views".$after_title; // echos the title of the widget || $before_title/$after_title obtained from $args
        echo "<ol id='popular_by_views_list'>"; // create an ordered list
            $popular = $wpdb->get_results("SELECT * FROM {$ppbv_tablename} ORDER BY views DESC LIMIT 0,10",ARRAY_N); // Order our table by largest to smallest views then get the first 10 (i.e. the top 10 most viewed)
            foreach($popular as $post){ // loop through the returned array of popular posts
                $ID = $post[1]; // store the data in a variable to save a few characters and keep the code cleaner
                $views = number_format($post[2]); // number_format adds the commas in the right spots for numbers (ex: 12543 to 12,543)
                $post_url = get_permalink($ID); // get the URL of the current post in the loop
                $title = get_the_title($ID); // get the title of the current post in the loop
                echo "<li><a href='{$post_url}'>{$title}</a> - {$views} views</li>"; // echo out the information in a list-item
            } // end the loop
        echo "</ol>"; // close the ordered list
    echo $after_widget; // close the container || obtained from $args
}
wp_register_sidebar_widget('popular_by_views', 'Most Popular Posts by Views', 'ppbv_display_widget'); // add the widget to the select menu || wp_register_sidebar_widget([id of the option],[title of the option],[function to run from the widget]))

function ppbv_display() {
    global $wpdb, $ppbv_tablename; // call global for use in function

    echo "<div id='popular_by_views'>"; // create a container
        echo "<h2>Most Popular by Views</h2>"; // write the title
        echo "<ol id='popular_by_views_list'>"; // create an ordered list
            $popular = $wpdb->get_results("SELECT * FROM {$ppbv_tablename} ORDER BY views DESC LIMIT 0,10",ARRAY_N);
            foreach($popular as $post){ // loop through the returned array of popular posts
                $ID = $post[1]; // store the data in a variable to save a few characters and keep the code cleaner
                $views = number_format($post[2]); // number_format adds the commas in the right spots for numbers (ex: 12543 to 12,543)
                $post_url = get_permalink($ID); // get the URL of the current post in the loop
                $title = get_the_title($ID); // get the title of the current post in the loop
                echo "<li><a href='{$post_url}'>{$title}</a> - {$views} views</li>"; // echo out the information in a list-item
            } // end the loop
        echo "</ol>"; // close the ordered list
    echo "</div>"; // close the container
}
?>