Workshop #86: Calm Before the Storm by Tully Sumner

At Audiotuts+ we irregularly put up a reader track for workshopping and critique (find out how to submit a track). This is how it works: you upload your song, and every week or so we’ll publish one here and step away from the podium. The floor is yours to talk about the track and how the artist can fix problems in and improve upon the mix and the song.

This track has been submitted for your friendly, constructive criticism. They have put their track (and their heart and soul) in your hands to learn and get useful feedback.

  • Do you enjoy the song or track itself? Does it have potential?
  • Can the arrangement be improved?
  • How did you find the mix? What would you do differently?
  • What do you enjoy about the rhythm track? What can be done to improve it?
  • Is the choice of instruments relevant and effective for the style/song?
  • Are the lyrics (if any) effective? Does the style, arrangement and genre of the song suit them?
  • Can you suggest any specific techniques that might improve the track?
  • Do you have any other constructive feedback?

Future and Past by Jarin Bressler

Artist’s website: myspace.com/tullysummoner

Description of the track:

Folk/Alt country break-up song. Minimal instrumentation tried to keep it spacious and warm. Recorded in a home studio in 2004.

Download audio file (10CalmBeforeStorm.mp3)

Terms of Use: Users can stream the track for the purposes of giving feedback but cannot download or redistribute it.

Have a listen to the track and offer your constructive criticism for this Workshop in the comments section.


Submit Your Tracks for Workshopping

Need constructive criticism on your own tracks? Submit them using this form.


Quality Instrument Cable: Why It Matters, and How To Make Your Own

The notion that good quality cable is an important part of sound reproduction has been widely accepted among hi-fi enthusiasts for a long time, but musicians have been a little slower to catch on. In this article, I’d like to explain how quality cable can make a difference to your sound, clear up some common misconceptions, and show you step-by-step how to make your own high quality guitar lead for a fraction of store prices.

Continue reading “Quality Instrument Cable: Why It Matters, and How To Make Your Own”

Freebie: 8 High Resolution Screen Print Ready Textures


A designer can never have too many textures on hand to add dimension, depth, or just to distress their artwork. Today, our friends at CX City were gracious enough to donate 8 high resolution screen print ready textures that you can use in your work. CX City is an apparel and art project based in southern California and they have packaged up some really nice textures contained within a PSD file that you can download and apply to your apparel designs.


8 High Resolution Screen Print Ready Textures Included

This pack includes 8 high-resolution textures contained within a PSD file. Each texture is 17 x 14 inches, at 300 dpi, and has been halftoned and extracted from its background, making it super easy to distress your apparel designs. You can view a low resolution example of each texture below.

sample
sample
sample
sample
sample
sample
sample
sample

The Making of Lost – Part 2


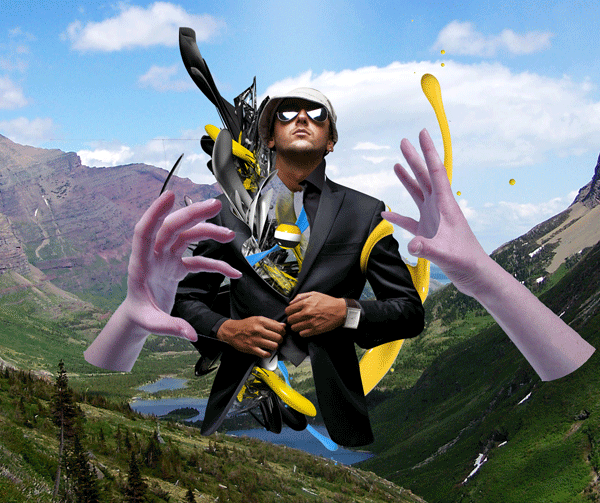
In this second tutorial of this two part series, we will add a background and enhance the image with Photoshop effects. Keep in mind that a key to succeed in following this tutorial series is to experiment. I will be teaching the basic techniques but in order to create a strong composition and attractive shapes, you will need to alter the settings, and experiment with other effects. Patience and determination are mandatory skills for any artist. So let’s finish this image!

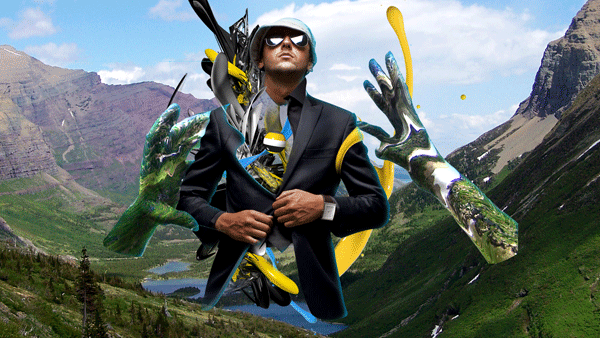
Let’s take a look at the image we’ll be creating for this two part series (above): Part 1 on Cgtuts+ and Part 2 will be covered here on Psdtuts+ in today’s final tutorial.


Step 1

Expand the canvas horizontally, place the stock mountain image by Sara Moses in the background.

s1

Step 2

Take the stock of the paint splash; adjust the Hue/Saturation to make it yellow and wrap it around the person.

s2

Step 3

Repeat the previous step to achieve the following.

s3

Step 4

If the background is removed at this point, a nice piece can be formed already.

s4

Step 5

Take the stocks of the hands (hand 1 and hand 2 from Duck Dodger) and place them as shown. Merge the two layers of the hands and duplicate that layer two times.

s5

Step 6

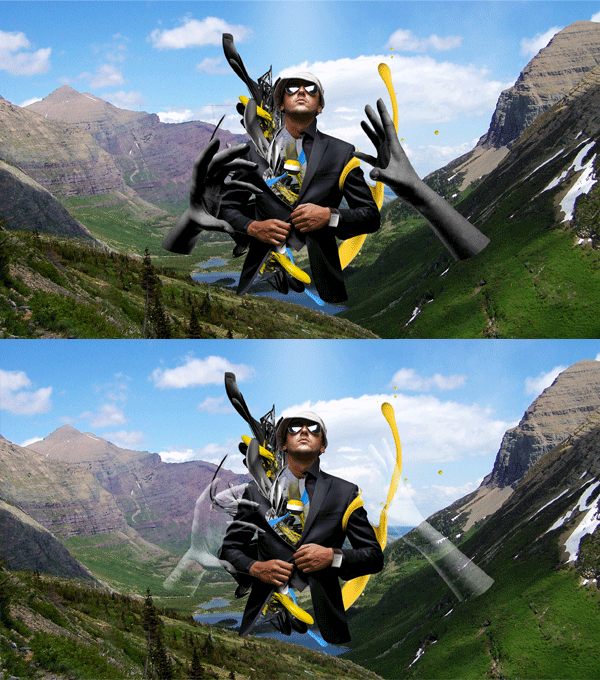
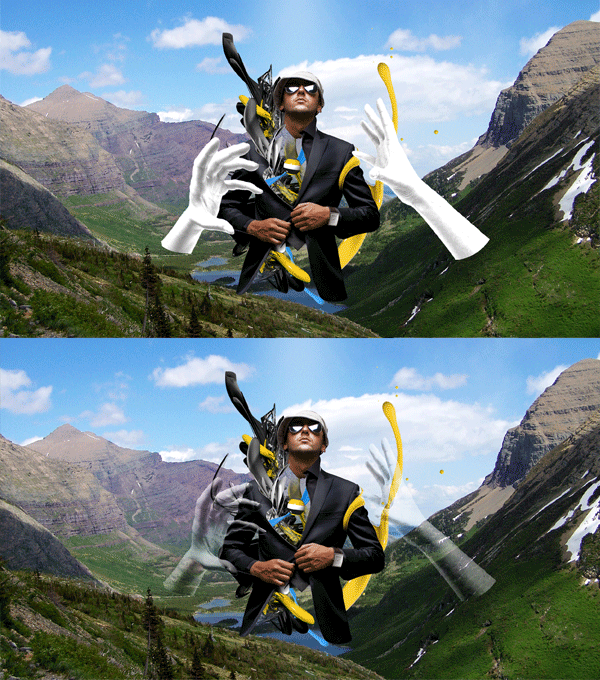
Desaturate the first layer; using levels, brighten the image . Then set the layer mode to Multiply.

s6

Step 7

Desaturate the image second layer; using Levels, darken shadows and brighten the highlights. Then set the layer mode to Screen.

s7

Step 8

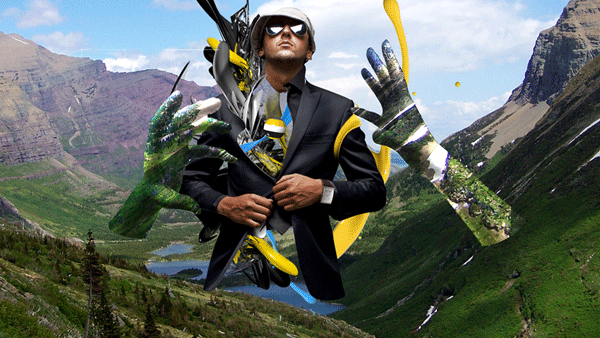
Duplicate the “background” layer, place it right above the unaltered “hands” layer and use a layer clipping mask between the two layers. Move the background duplication so that mostly green is shown on the hands.

s8

Step 9

Using the Liquify Filter, liquify the background duplication that it adheres to the hands’ contour.

s9

Step 10

Create a new layer and place it above the layer of the base stock (the suit). Select the “suit” layer (Command-click) and fill it with cyan.

s10

Step 11

Selection > Modify > Feather 10 px. Slightly nudge the selection to the left, then down, then press delete.

s11

Step 12

Repeat steps 10 and 11 for the hands.

s12

Step 13

Create a new layer on the very top, set the layer mode to Overlay and loosely paint some parts using a large brush.

S13

Step 14

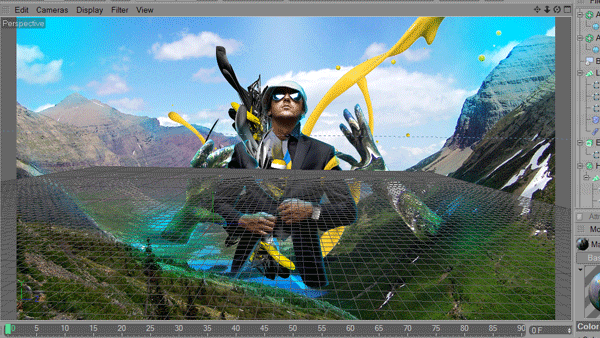
Export the image as a JPG. In C4D, create a background, apply the image to a new material and apply the material to the background. Make sure the proportion/size of the render is the same as the image exported.

S14

Step 15

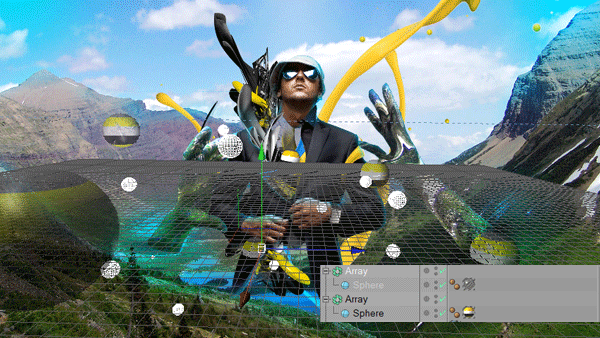
Using the spheres created in Part 1 of this tutorial, duplicate them by creating an array and altering its settings to best show the image and strengthen the focal.

s15

Step 16

Render the image. Go back to Photoshop; using the alpha channel, make the spheres into a separate layer and place it in the original file.

s16

Final Image

Slightly adjust the levels of the spheres to achieve the results for this tutorial.

s17

Alternative Final Image

If the background image is removed, this image can be formed; it has a totally different atmosphere and theme.

s18

Conclusion

This is the essence of how I created my piece “lost.” Most of the techniques used are explained in this tutorial. The only method to achieve better results is time. Due to the abstract nature of this piece, a lot of experimentation must be done. The tutorial explains only the techniques used, using these techniques, you can create a result perhaps better than my original piece with determination and time.


Design a Macbook Pro Illustration in Photoshop


Illustrating an electronic device such as a laptop may seem like a difficult task but it’s actually not as hard as you might think. In this tutorial, I will demonstrate how to create a MacBook Pro in Photoshop. Let’s get started!


Step 1

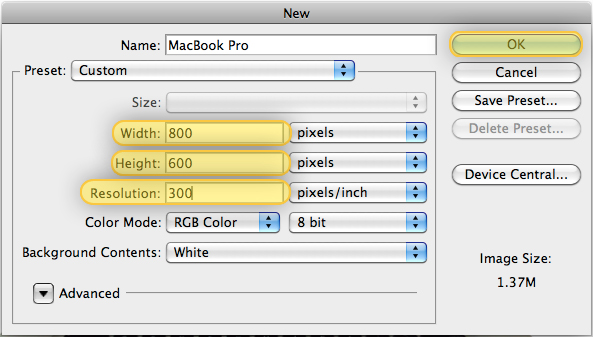
First, go to File > New. Then change the Properties as is shown below:


Step 2

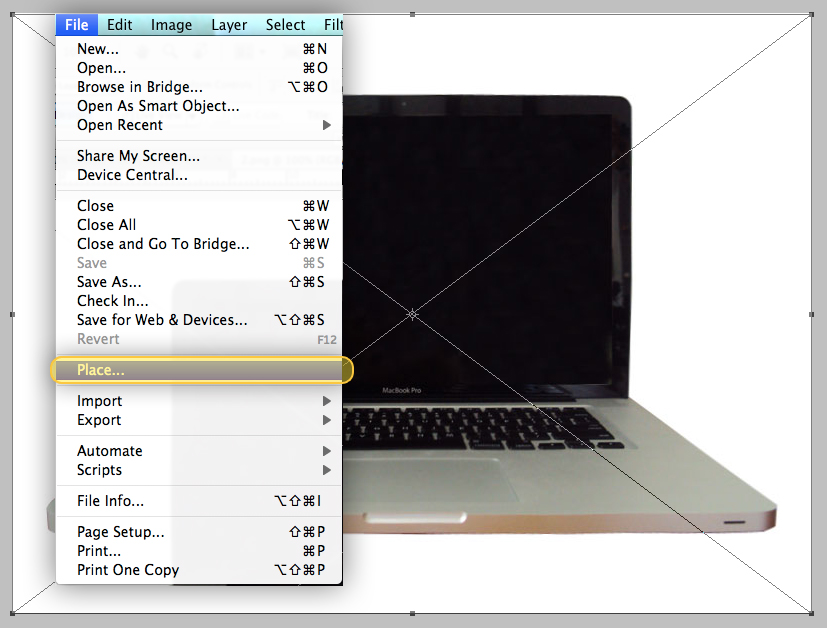
Now you will need to find a photo to use a reference. To do this, just head over to Google and run an image search. Once you’ve found a photo, place it into your document by going to File > Place, then center it as shown below.


Step 3

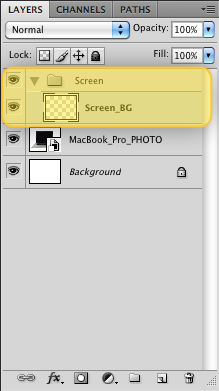
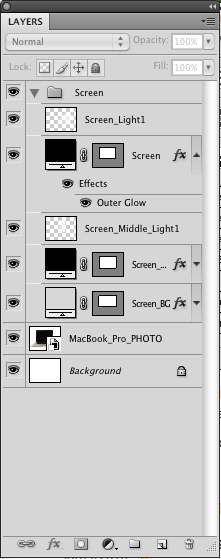
Make a new Folder, name it "Screen". Then, make a new Layer and name it "Screen_BG." Make sure you insert the "Screen_BG" layer to the "Screen" Folder.


Step 4

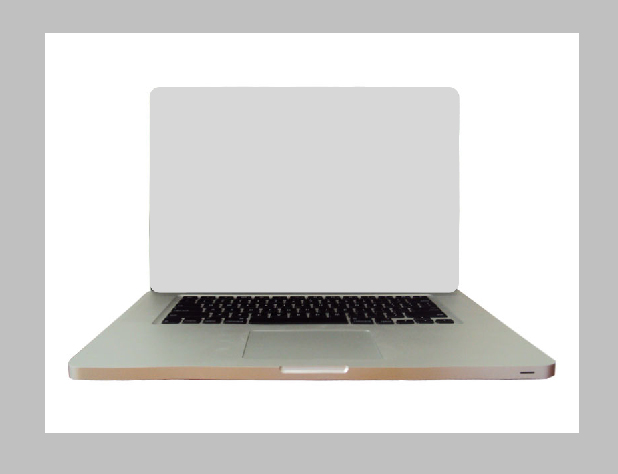
In the "Screen_BG" layer draw a Rounded Rectangle (Shift + U) on the MacBook’s Screen with a Radius of 15px as shown below.


Step 5

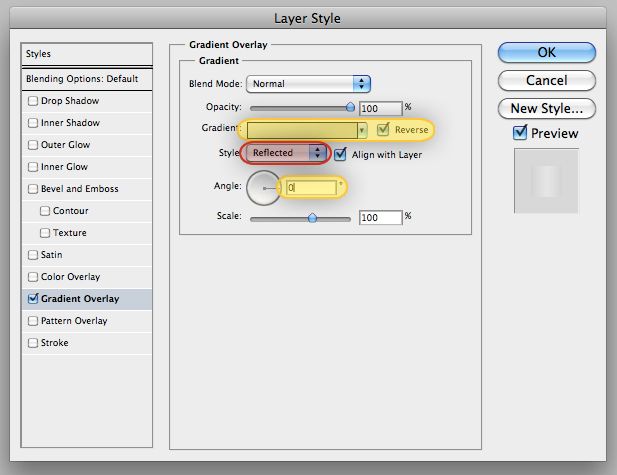
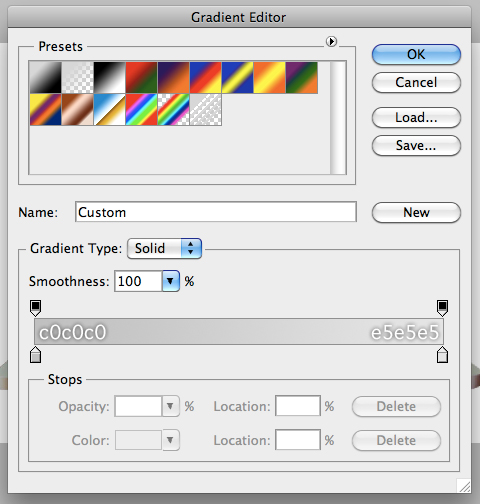
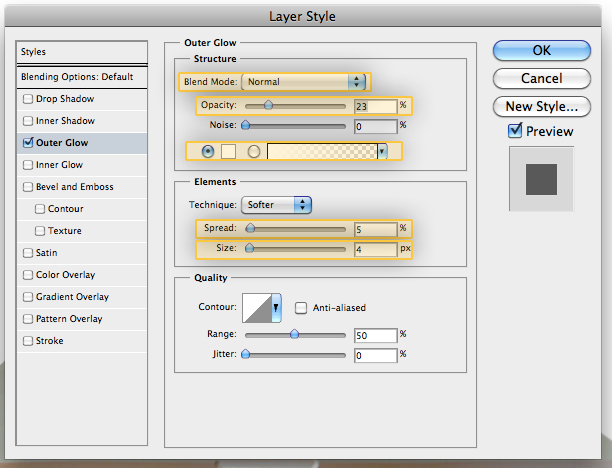
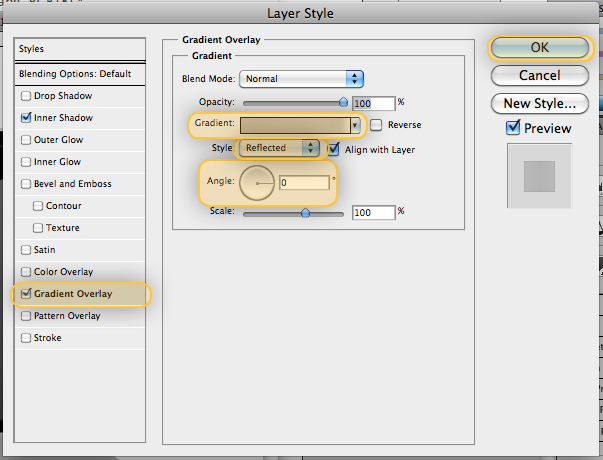
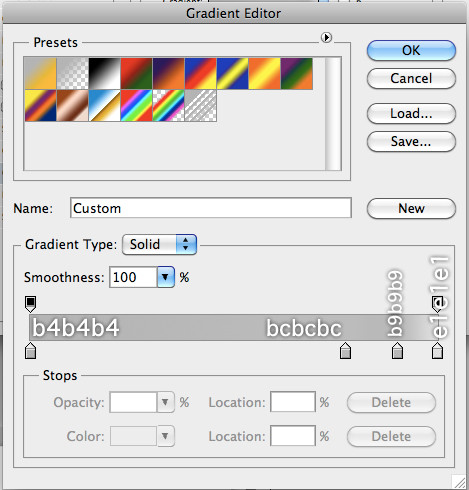
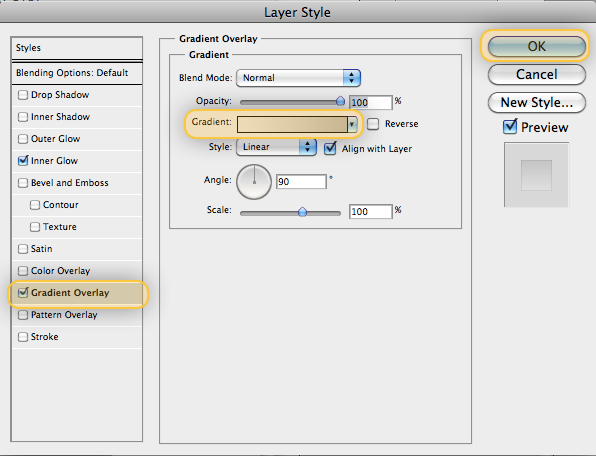
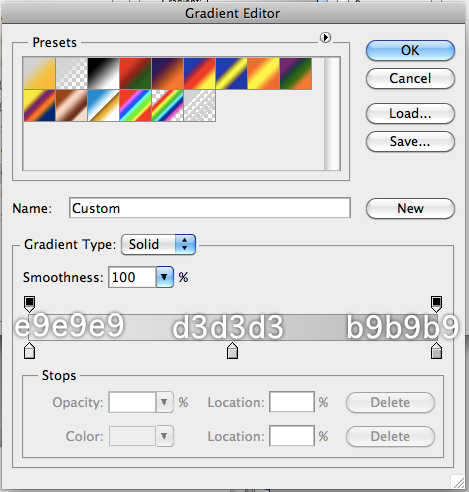
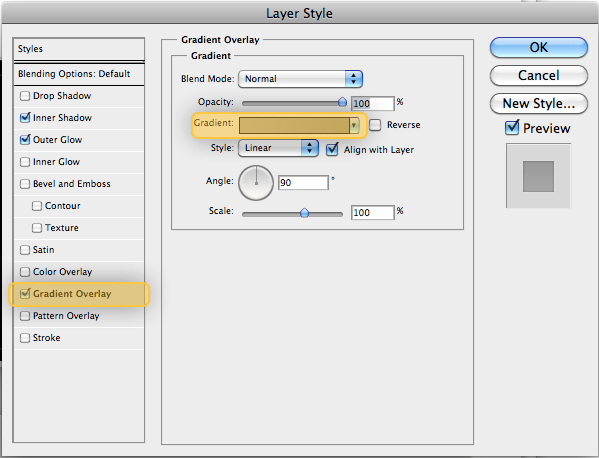
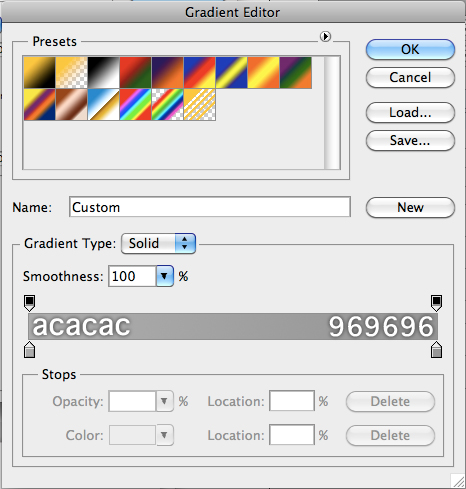
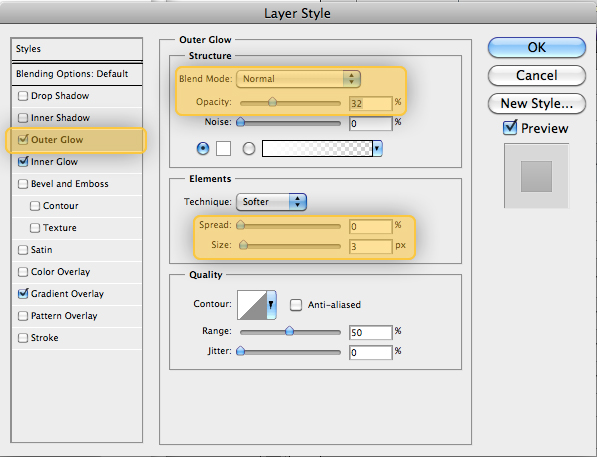
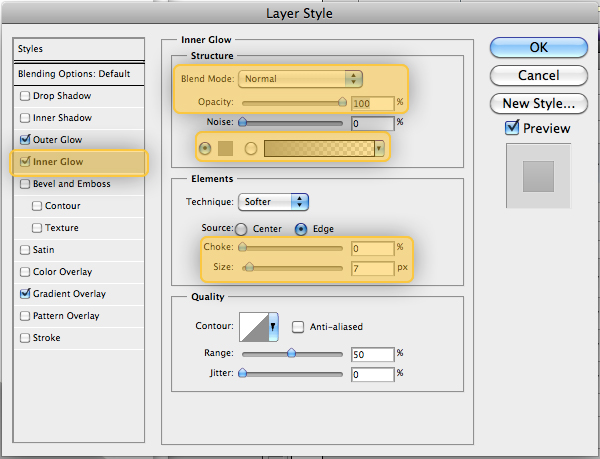
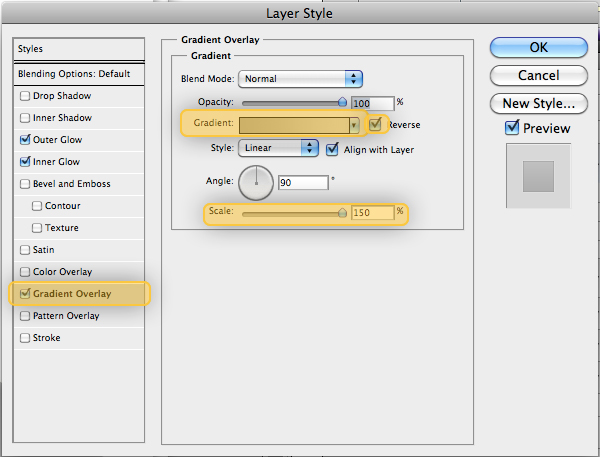
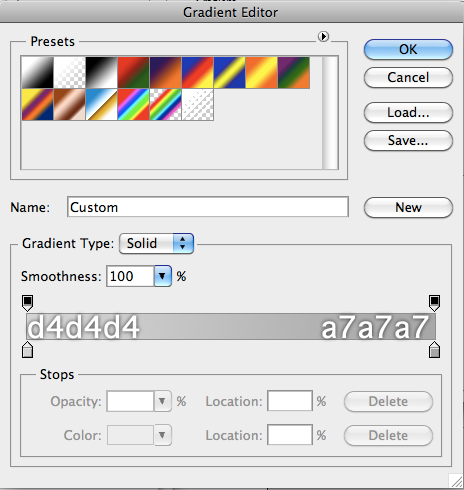
Now apply the following Layer Styles to our "Screen_BG" layer.


Step 6

Draw a Rounded Rectangle (Shift + U) over the edge of the MacBook’s screen with a Radius of 15px and choose a black color. Name this layer "Screen_Middle".


Step 7

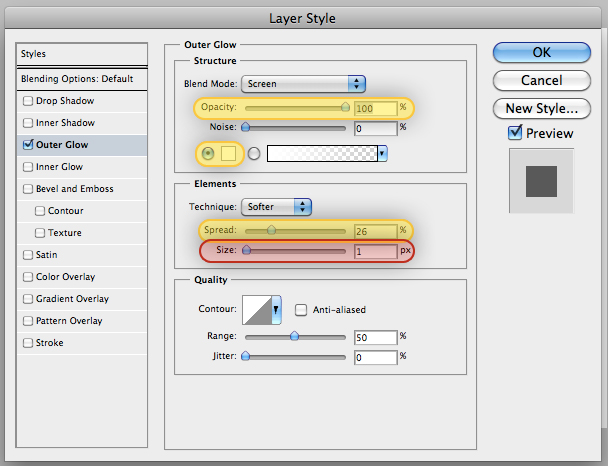
Apply the following layer styles to Screen_Middle.


Step 8

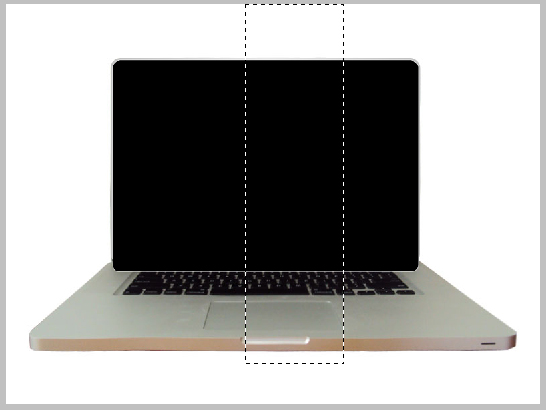
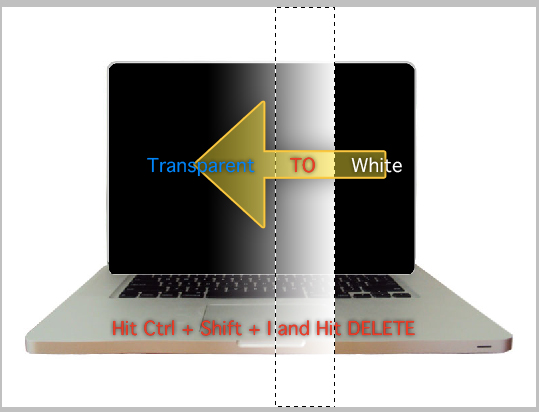
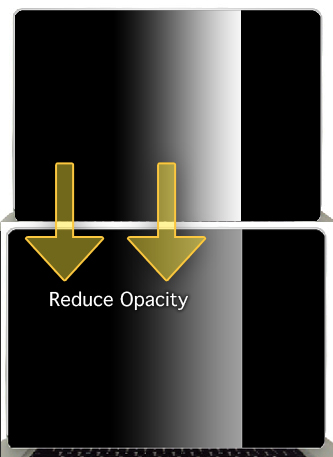
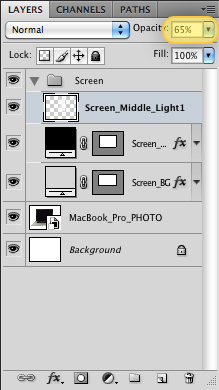
Create a new layer and name it "Screen_Middle_Light1" and drag it to our "Screen" Folder. With the layer selected use the Rectangle Marquee Tool (Shift + M) and draw a rectangle as shown below. After that, fill this selection with a transparent to white gradient using the Gradient Tool (Shift + G). Then, Cmd + Click the "Screen_BG" layer’s thumbnail and then Cmd + Shift + I and hit delete. Finally, reduce the "Screen_Middle_Light1" layer’s opacity to 65%.


Step 9

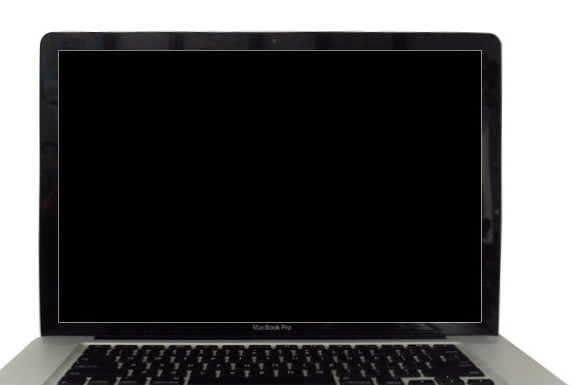
Now we have to draw the MacBook Pro’s screen. First, draw a Rectangle using the Rectangle Tool (Shift + U). Make sure the rectangle is black, and draw it above the MacBook Pro’s Screen. Name this layer "Screen" and drag it to our "Screen" Folder. Then, apply the layer styles as shown below.


Step 10

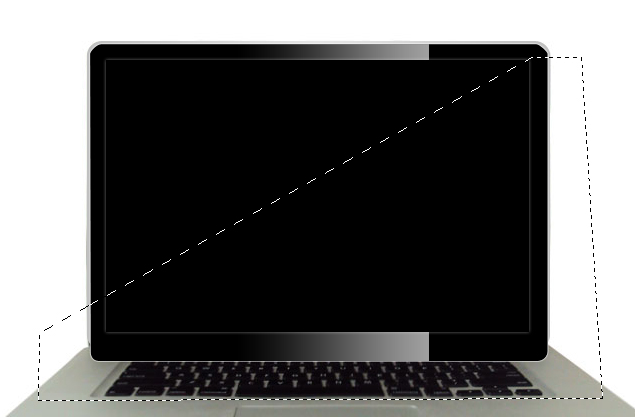
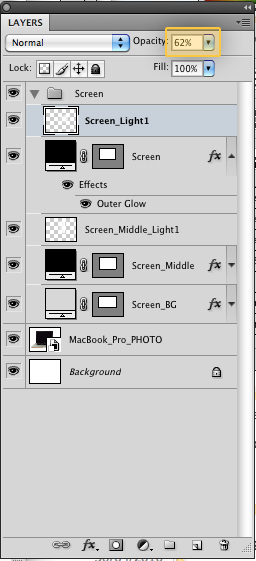
Now let’s add a reflection to the MacBook’s screen. Create a new layer and name it "Screen_Light1", use the Polygonal Lasso Tool (Shift + L) and draw the following shape.


Step 11

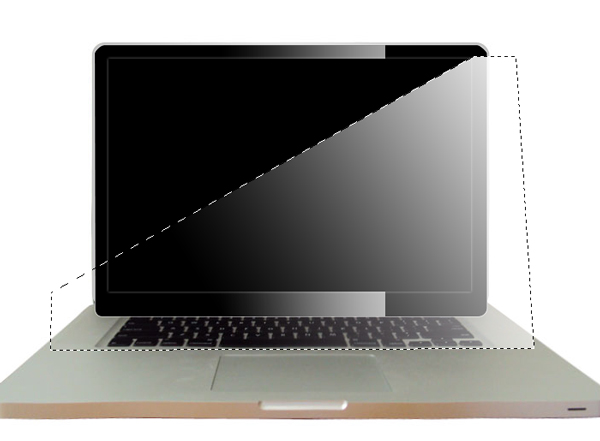
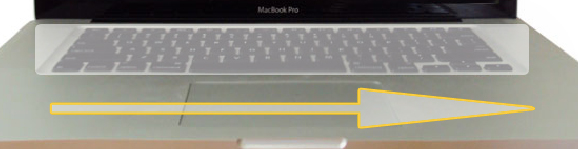
With the "Screen_Light1" layer selected, use the Gradient Tool (Shift + G) to apply a white to transparent gradient, make sure you select the Linear Option a shown in the following images, when you are done deselect the selection using Cmd + D.


Step 12

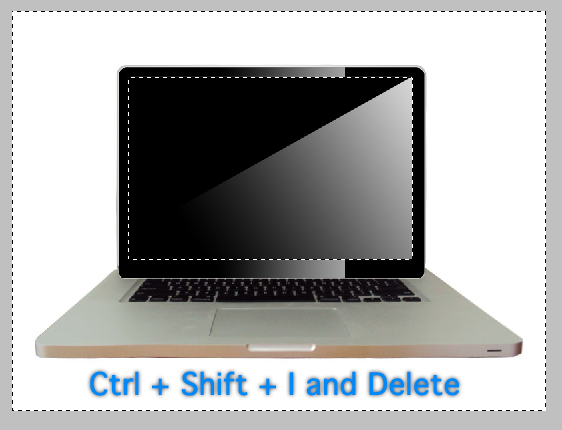
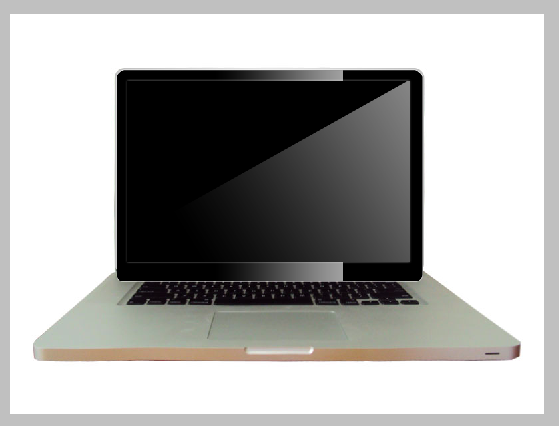
Cmd + Click the "Screen" layer’s thumbnail and then Cmd + Shift + I and then hit delete (Make sure to be in the "Screen_Light1" layer). After that, reduce the opacity to 62%.

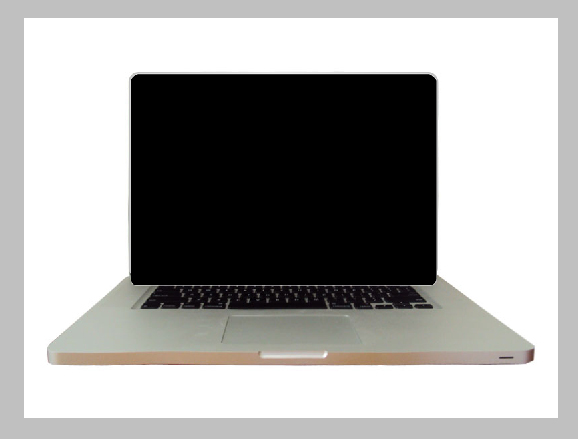
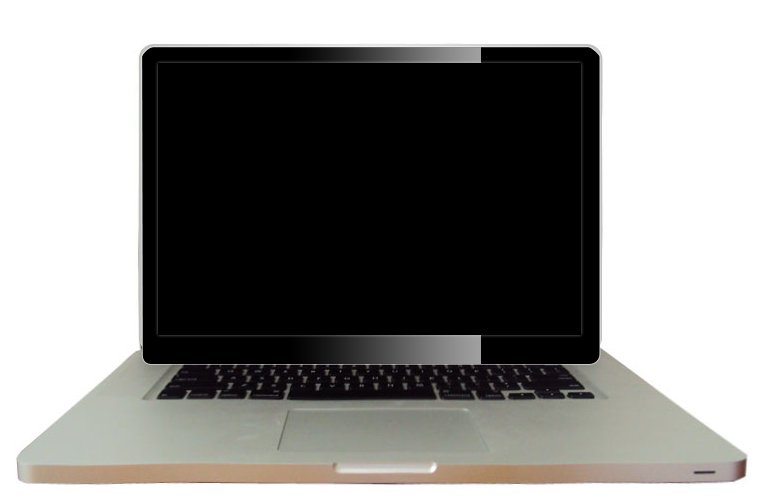
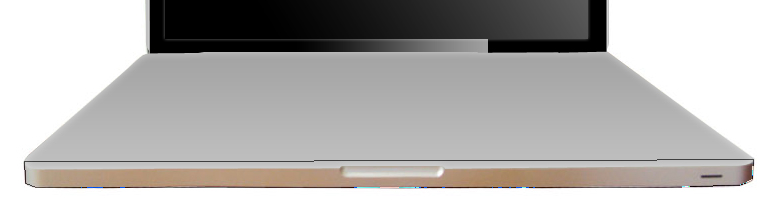
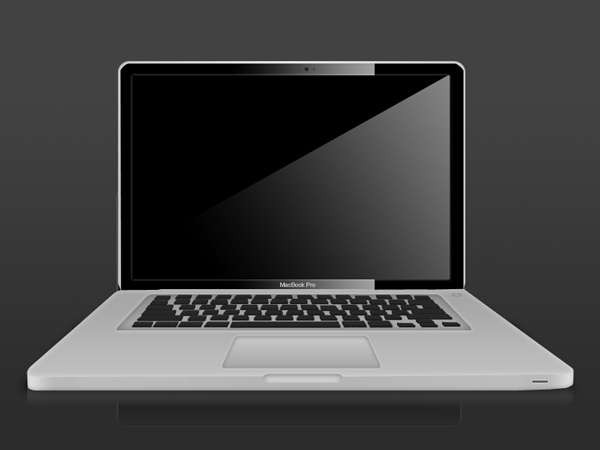
At this point your illustration should look similar to the image below.


Step 13

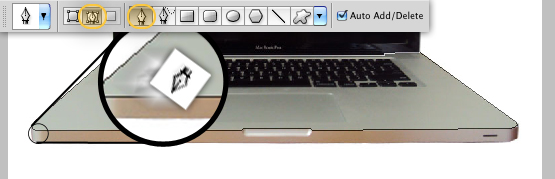
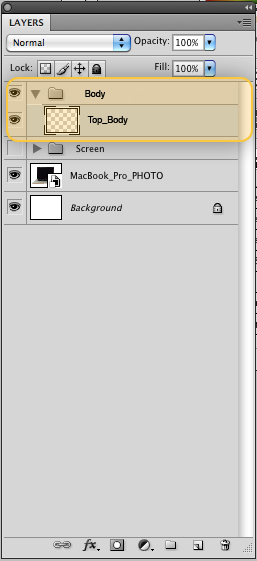
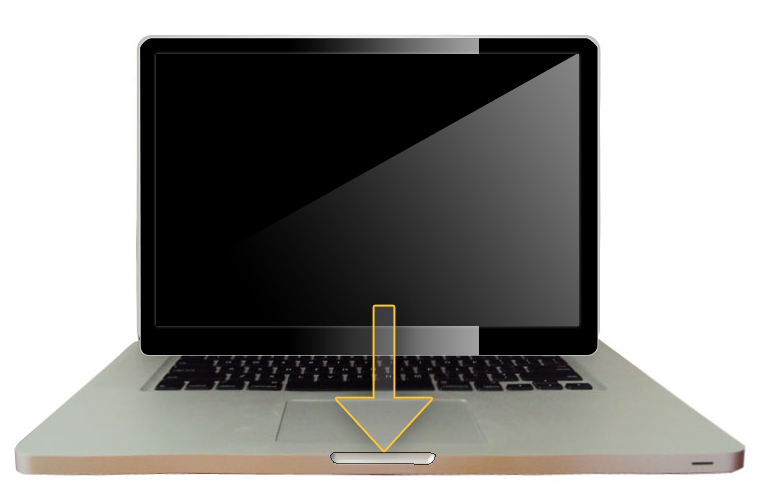
Our screen is ready! Now we have to create everything else. First, make a new Folder and call it: "Body". Then, make a new layer and use the Pen Tool (Shift + P) to trace the laptop’s body, make sure to have the "Paths" option selected as in the following image. Drag this layer into the "Body" Folder and call it "Top_Body".


Step 14

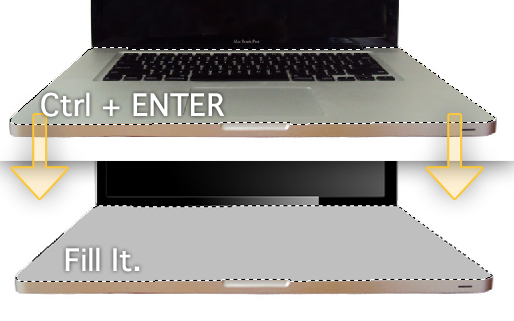
With the "Top_Body" layer selected hit Cmd + Enter to make a selection. Then fill this selection with a gray color.


Step 15

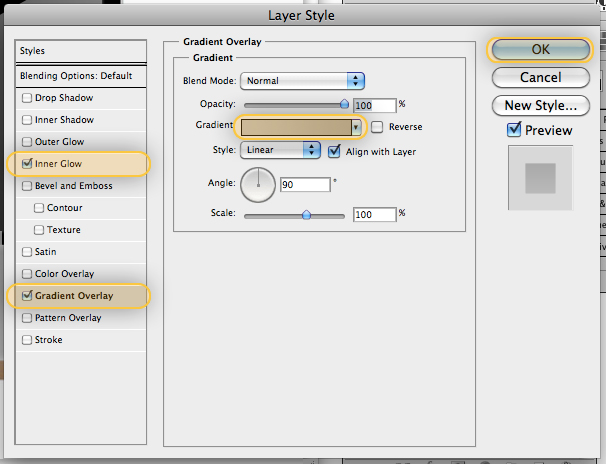
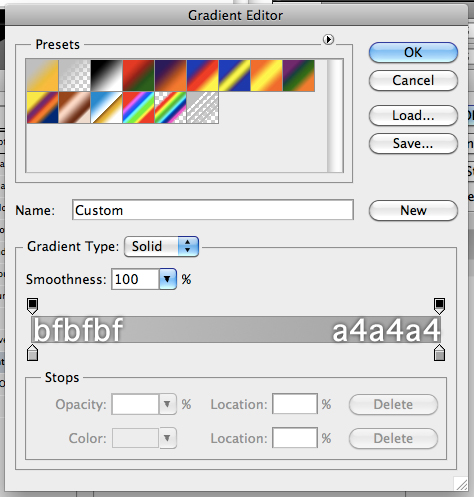
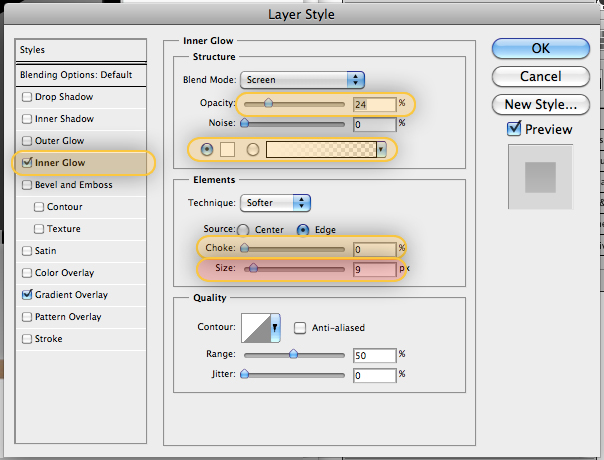
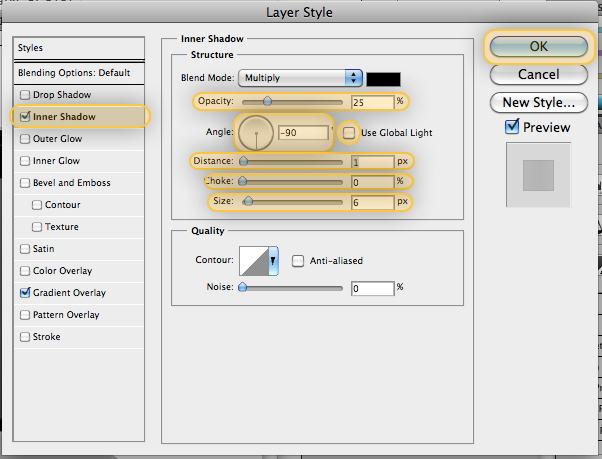
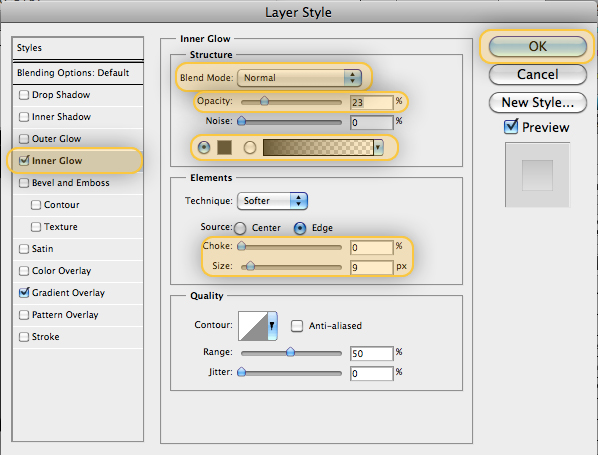
Apply the following layer styles.


Step 16

Now lets create the outer body, this is very similar to Step 14. Create a new layer and name it "Outer_Body" and insert it in the "Body" Folder. With the layer selected use the Pen Tool (Shift+P) and trace the outer part. When you’re done fill it with a different gray tone.


Step 17

Apply the following layer styles to the "Outer_Body" layer.


Step 18

Now, we will create the laptop’s opening. To do this, make a new layer in the same Folder and call it "Opening_Body". Repeat steps 14 and 16.


Step 19

Apply the following layer styles to the "Opening_Body" layer.


Step 20

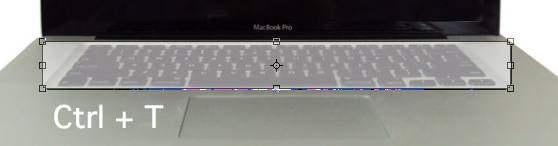
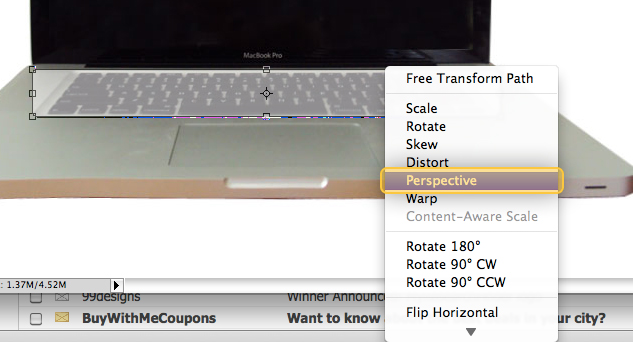
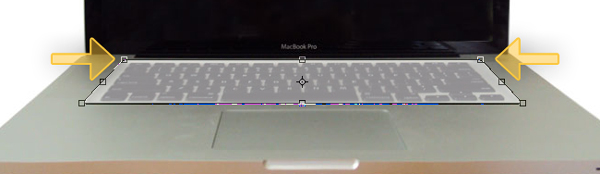
Now, we have to draw the sunken area where the keyboard goes. Select the Rounded Rectangle Tool (Shift + U) with a radius of 5px and a color that you can distinguish from the body’s gray. Then, draw a rectangle, select Cmd + T to bring up the Transform Tools, right-click the rectangle and then choose Perspective and play with it until it looks similar to the shape below. Name this layer "Keyboard_Sunken".


Step 21

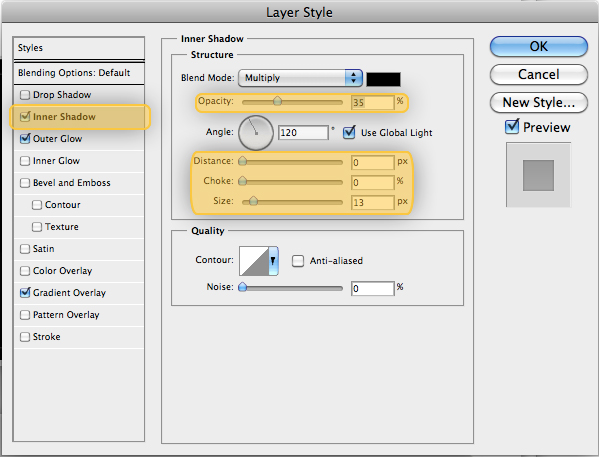
Apply the following layer styles.


Step 22

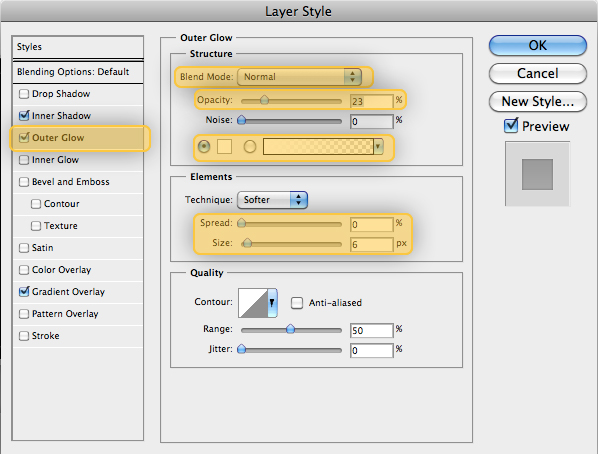
Now let’s create the TrackPad. We have to make a Rounded Rectangle (Shift+U) with a Radius of 5px, and do the same steps to transform it as we did on Step 20 and of course apply some layer styles. Name this layer "TrackPad" and drag it inside the "Body" Folder.


Step 23 (Optional)

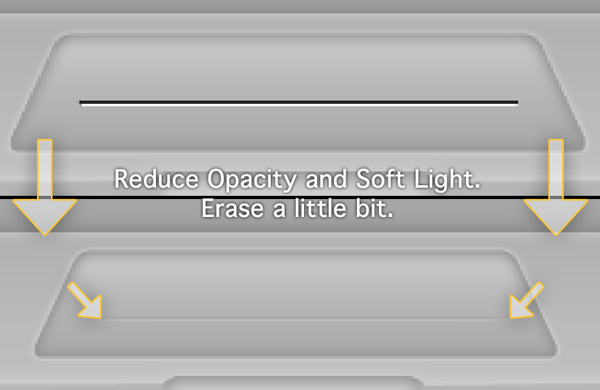
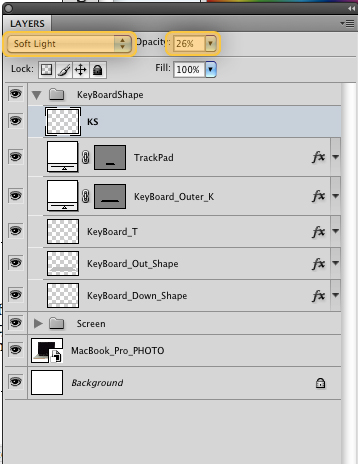
In case you are building a different kind of laptop you can add a separation on the TrackPad. This step is optional because the new MacBook Pro doesn’t have this line. Anyway, select the Line Tool (Shift + U) and make one black line and one white line, give them a weight of 1px. You will realize that it makes two different separate layers, so you have to merge them. Select the two layers and the press Cmd + E. Then, change the name of the merged layer to "TrackPad_Line" and change the Blending Mode to Soft Light and reduce the Opacity to 26%. Also, erase a little bit the edges using the Eraser Tool (Shift + E).


Step 24

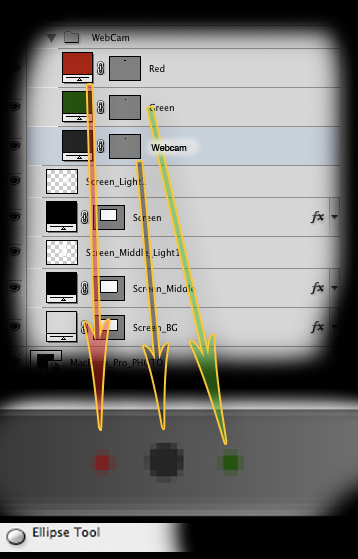
Before we start work on the Keyboard, we need to add lots of small details, such as the webcam, the power button, etc. So, go to the "Screen" Folder and make a new Folder, Name this Folder "WebCam". Make a new layer and call it "Webcam". Take the Ellipse Tool (Shift + U) and draw a circle as shown.


Step 25

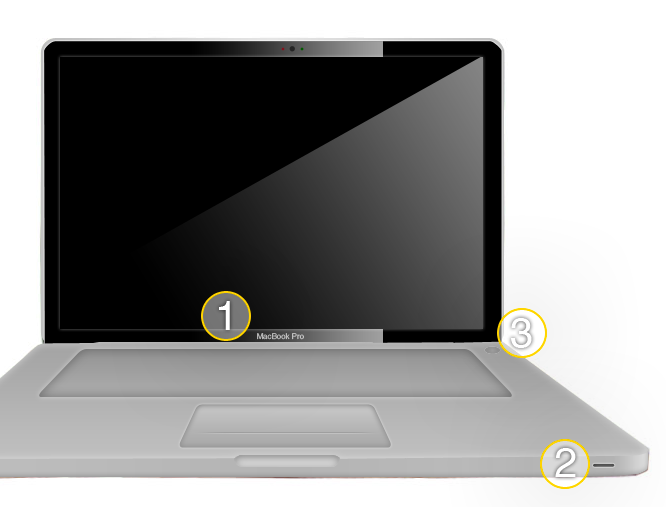
Also add the MacBook Pro text (use Helvetica or Myriad Pro), the Infrared sensor, and the power button.


Step 26

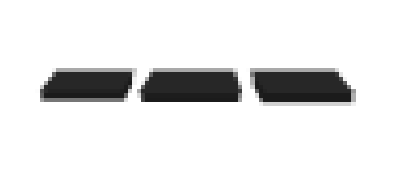
Finally, we will start work on the Keyboard. Make a new Folder and name it "Keyboard". Grab the Pen Tool (Shift + P) and trace as we did it in the Step 14. Make sure to make the keys in three positions.


Step 27

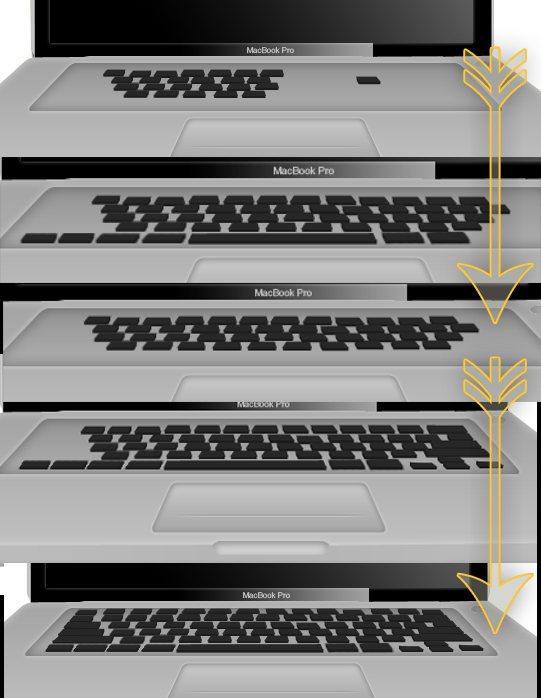
Now duplicate these layers (Hold Alt and Click and Drag) and complete the KeyBoard, remember to drag these layers on a folder named "KeyBoard". You should also make a new shape for the Space Bar, Delete Button, etc.


Step 28

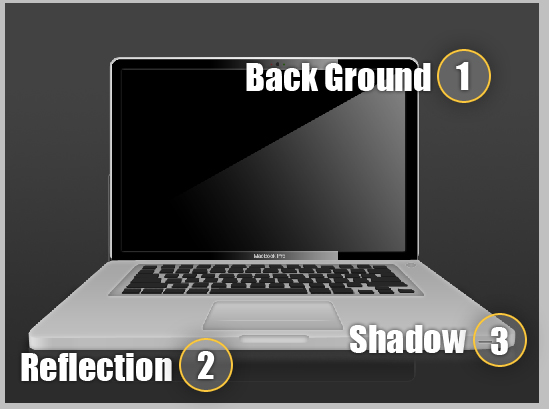
To finish things off, use the gradient tool to add a background as shown below. You may also choose to add a reflection. To do this, duplicate all your layers, flip them vertically, place as shown below and lower their opacity. In addition, you can add a shadow as well using a blurred black rectangle as shown.


Conclusion

Take a look at the final image. I hope you learned something new!

Video Email System

Are you looking to work with an established online entrepreneur with 12 years of experience?

I guarantee if you are the winning bid you will gain as much from me as I will be gaining from you in terms of this project. I’m easy to work with, know what I want, and always leave stellar feedback.

For this project, I need a Video Email system.

Members will be able to log into their accounts,
shoot a video with a webcam or upload from their system,
and then email out to contacts, lists, etc form an online address book directory.
System should allow further videos previous stored in systemslibrary to be appended to initial email.

Email will be framed by a template that has been chosen from a template library.
Templates will have fields to accomodate name, and various contact info.

Recipients receive an email with a screen shot of template, and video, in their email, that when clicked will open up a page where video starts autoplay within a template.

Send receives a return receipt with appropriate info.

You will be building the main core of a system that will have many more parts that will be added to it.

All code shall be unencrypted, written tight, and should be modular. All admin features will be admin control panel driven.

Pad Manager/software Submiss.

PLEASE READ THIS ENTIRE POST. Thank you:

INTRODUCTION
I need someone to simply complete our company info in Pad Manager then upload needed files to our server. You can download the Pad Manager program free from this site and read info here: http://submitmysoft.com/?page=pad

OVERVIEW
I am planning to engage this company to submit our web driven software to some 600-1,000 download sites/shareware sites. You are not doing any of the submissions just completing the Pad Manager info. However, if you have any expertise or connections on such submissions please let me know.

DETAILS
From what I can learn it looks like our server should have Pad Manager file. Our site is www.tabodex.com where anyone can signup for our free contact management web driven software. Anyone considering bidding should signup to understand how it works and download Pad Manager if you are not familiar with it.

We will give you the contact info needed for Pad Manager and FTP details.

This should be a quick and easy job. I will fund your account immediately on bid award. I am one of the top buyers on SL but I do expect communication thru IM (Win Live) or Gtalk. Too low of bid rejected. Too high of bid rejected.

Thank you very much and I appreciate your bid.

Digital Products (partner Req)

PEOPLE WITH DIGITAL PRODUCTS TO GET A RECURRING INCOME!
Hi i have a website which receives over 90,000 unique visitors a month,
On the website i sell website scripts, eBooks, software ect.
Currently i’m making around £5/600 a week from customers i have a way of expanding this im looking for people who have content, scripts, eBooks, software and basically anything web based or related to join me, ill give you access to add and upload your digital products you set all the prices of your product, the buyer has many option’s to pay via Google Checkout, PayPal, Money bookers, Bank Transfer, Money order and Cheque.

What i get is more products on my site which obviously means more revenue you set the price you want to sell your products for and i tke 50% which my 50% includes all fees charged by processing the payment so you get 50% off all sale’s for your products with no fee’s what so ever.

The funds are added to your account as soon as any of your products have been purchased.
At which time you can request payout whether you have £1 or £1,000 in your account and i can pay you via Money Bookers, PayPal or Google checkout, depending how much you have to withdraw and the payment method you choose if i don’t have the full amount in that account at that time ill transfer what ever is available and transfer the remaining balance once its been transferred to my bank account.
If you can accept payout by more than one way even better.

I only want people who have digital products and at least 30 as I want to expand as much as i can.
This is win, win situation at no cost to you, i do all advertising and you take in all the revenue you make. If you have some really amazing products i may target ads to them individually.

If your interested let me know what you have to offer and ill get you vender account setup on my site so you can start adding products and making money.

Each time one of your products are sold your emailed instantly.

THIS IS NOT A CON!

The more great products you have the more money we can make! 😀
NO ILLEGAL SOFTWARE PLEASE!
Thanks Danny.

Pc Program

Hi,

I’m looking to have a PC program that does the following:

I’d like the program to have a 7 days trial and be protected with a key so I’d need a key generator for people that purchase the paid version. If the key can be auto-generated via the web using paypal IPN or something similar, than this would be a plus. A manual key generator would be needed though also so I can generate keys for copies I want to give away to people.

On right-click it presents a new menu called “links” and then, when you put your mouse cursor over this “link” menu, you’re presented with a sub menu that list categories, then each category presents a sub menu again containing values. Each value, when clicked would insert the data specified for that value wherever the right click originated from, like a text field.

The categories / values would be configured using a simple interface when they open this pc program. It would be good if the data could be protected by a password, so when someone reboots their computer and tries to use this program / right click menu, they’re prompted for a password so that unauthorized users access the PC couldn’t access the data in the program unless they have the password.

====
Example use to illustrate an example of how this program would be used by a user to help clarify this project for you.

Bob installs the program on his PC and opens it. He’s presented with an interface that asks him to enter this Key to activate the full version or continue using the 7 days trial.

Then, there’s an interface where he can create different categories.

Once categories are created, he can create sub-categories.

He decides to create a category called “favorite music” for now.

Inside the category “favorite music” he creates sub-categories:
Reggae
Classical
POP

Insides these sub-categories he creates some values, for example under Reggae he creates:
Bob Marley

For the value Bob Marley, he specifies some data for it:
My favorite raggae artist is Bob Marley

Now that he has this configured, he can go anywhere that text can be entered, for example in his browser and right-click in text fields / areas or opening Word or Notepad and right-click there. Basically anywhere that text can usually be typed-in/ entered.

When he right-clicks in one of those areas, for example in a text area on the web, he sees the menu “links” then puts his mouse over it and is presented with the categories, he puts his mouse over “favorite music” and he’s presented with sub-categories “Raggae” he puts his mouse over than and is presented with values. If he clicks on “Bob Marley”, then the data “My favorite raggae artist is Bob Marley” get inserted in the text area automatically for him without him having to type it.

So basically it creates a way to easily insert data wherever using the right-click menu.

For now I want a PC version that works in as many Windows versions as possible, at the very least it should work in XP – Vista – Windows 7

If have the ability to make it work on MACs too, that would be a big plus.. but I understand it could be a separate project so perhaps I would release that later but please let me know if you have that ability and feel free to provide a separate quote for that also so I know what to expect in the future.

The programmer bidding on this should be available for future modifications / improvements of the program and hopefully available for more projects like this 🙂

Please provide examples of past work too.

URGENT: I NEED PROFESSIONAL BLOG/ARTICLE WRITER by gumhart8

I need someone ASAP! I am looking for a professional writer who can make marvelous, original and creative *130-150 word Blogs ($0.50/blog) *300-400 word Articles ($1.00/article) I need 30 blogs in 2 days, so I need someone immediately… (Budget: $30-250, Jobs: Article Submission, Articles, Blog, Data Entry, Forum Posting)