Car customizing website by nasukau

This website would allow users to customize cars from the years 1930 to 1959 both Ford and Chevy. The user should be able to click on the year and make of the car. This should then bring up a 3D view of a shell of the factory vehicle.The user should be able to rotate the vehicle 360degrees… (Budget: $250-750, Jobs: 3D Rendering, AutoCAD, Concept Design, Flash, Virtual Worlds)


PowerPoint Presentation Optimise by rgmorris

Need to tidy up and professionlize an 85 slide PowerPoint presentation that will be presented to a large industry conference. Looking for expert PowerPoint skills to modify the theme, look and feel of a presentation that is already made with many embedded photos and there is therefore very visual… (Budget: $30-250, Jobs: Format & Layout, Powerpoint)


Combined job: retail auction site and fixed price web store by Izeldor

We are looking for IT assistance for build-out of a web auction platform, similar in function to bidz.com specifically, with countdown timer and auto-reset (if any bids occur in the last 30 seconds). We also would like to intergrate a fixed price store platform (seperate URL)… (Budget: min $5000, Jobs: Amazon Web Services, HTML5, PHP, Website Design, XML)


Reliable English Writers Needed For Articles and UAW by mperdue

TAKE THIS TEST TO BE CONSIDERED and take it right a way, the first 10 passable grades will be awarded the project right away and will start right away. I will award this project with in the next 4 hours regardless how many pass the test… (Budget: $30-250, Jobs: Article Rewriting, Articles, Blog, Editing, Reviews)


Digital Illustration – Creative Session Wrap


It’s a wrap. This session has covered a mix of digital illustration articles on theory and in depth case studies. We’ve looked at various artist’s work and their workflows. We’ve taken a close look at the topic of style development, finding your market, and promoting your work. This session posted across numerous Tuts+ sites: Psdtuts+, Vectortuts+, and Cgtuts+. We’ll continue to expand each session as we cover new topics and integrate your feedback. Let us know what you think of this session’s material.

Continue reading “Digital Illustration – Creative Session Wrap”

How to Create a Rock Girl with "Beautiful Strokes" in Adobe Illustrator CS5 – Vector Premium Tutorial


We have another great Vector Premium tutorial available exclusively for Premium members today. If you want to learn how to use the new stroke settings in Illustrator CS5 to make a Rock Girl and Guitar with funky line art and bold colors, then we have an awesome tutorial for you.

Continue reading “How to Create a Rock Girl with "Beautiful Strokes" in Adobe Illustrator CS5 – Vector Premium Tutorial”

Getting the Most From Group and Return Channels

Using group channels and send/return configurations is pretty much an essential part of constructing your mix. Saying that I get a lot of students that are either slightly puzzled about the exact routing technique or when they should be using send/returns instead of inserts.

To the more experienced user the group channel is something that is second nature but perhaps they are missing out on a few creative techniques that utilise them. In this tutorial I’ll start of with a brief examination of group channels for the beginner and go on to suggest some slightly more advanced uses for them.

I have used various DAWs here but the techniques used can be applied in any application.


Step 1: The Vanilla Flavoured Group or Return Channel

If you are a new comer to the world of music production the use of group channels maybe news to you. Basically put a group is an independent channel we use to feed several audio streams to. Not only does this give us convenient control over a group of sounds in our mix but it also means we can apply processing to more than one element at once.

A good example of group mixing is treating all our drum sounds in a dedicated drum group. This allows us to apply compression and eq with one chain of processors, adding cohesion and impact to the overall sound. We can also change the level of the whole drum part whilst retaining the relative levels of each individual part.
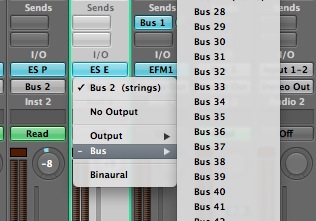
Selecting a group channel in Logic Pro.

Another way of using these independent channels is as an effects return. Modern DAWs treat group and return channels as the same thing, the only real difference often lies in the way they are routed. Return channels are used to house effects plug-ins and signal is send to these specialised channels using a send control on of the mix channels. This allows to set up ‘global’ effects units that can be re used by any instrument in our mix.

Send/return configurations like this are perfect for delay or reverb effects, or any effect combination that produces an elongated ‘tail’.

You may find that different DAWs call group channels different things. They may be called ‘busses’, ‘auxiliaries’, or hopefully just ‘groups’. Whatever the manufacturer calls them it’s highly likely they all do the same thing. Always double check your manual to learn how your specific application handles different channel types.
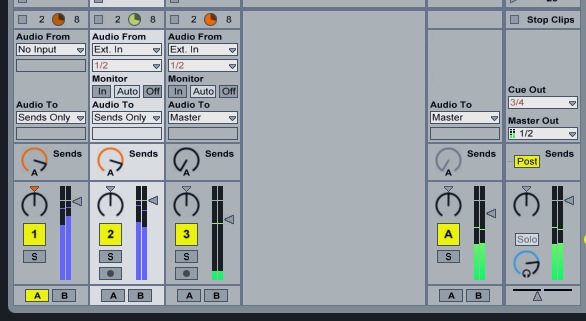
A standard group channel in Ableton Live.


Step 2: The Parallel Buss/Group

So you’ve got the hang of creating simple group channels and you have already started using basic send and return set ups, let’s take a look at how you can step things up a notch and start to use groups in more interesting and creative ways.

First up I want to look at something called parallel bussing. As the name suggests this involves running a group in parallel to another. Essentially the same audio is fed through both busses and their levels can be changed independently of each other.

This routing is usually achieved by using the main outputs of each channel to select one group and the auxiliary sends to select another, here is a screenshot of parallel bussing occurring in Logic Pro 9…
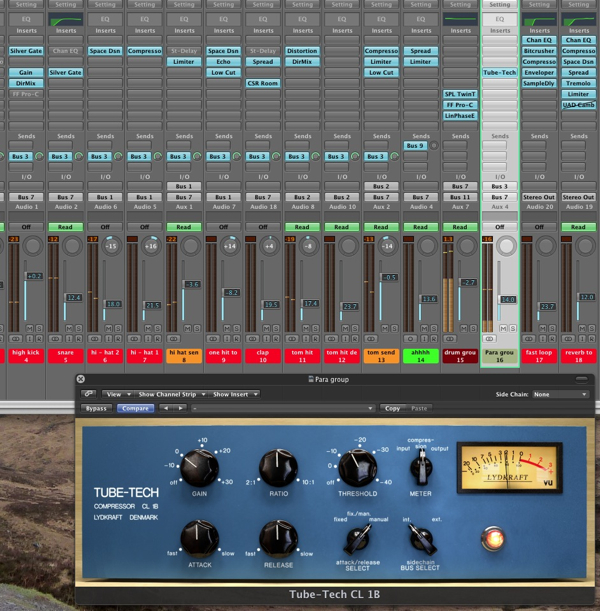
A parallel compression buss in Logic Pro.

This configuration allows us to use one buss as a dry, untreated version of our group and the other a more effected or extreme take on events. The most common use for this set up is parallel compression and using this technique we can offset our dry audio against a more heavily compressed group. This is great for adding punch and density to groups of sounds but it’s by no means the only use for parallel bussing.

With a little creative thinking we can start to use parallel processing in conjunction with a number of effects. Experiment here by adding large amounts of distortion or maybe a phaser to your parallel group. The beauty of this technique is that you have really fine control over the amount of effected signal being introduced. You can also add further processing to the effected sound, such as low or high pass filters. This is a luxury that we lose when using traditional wet/dry effects mixes.

You can get more info on parallel compression, with audio examples here.


Step 3: Sub / Sub Groups

Another technique you may want to think about is using multiple sub groups. This can greatly increase the control you have over levels of cretin instruments and also create a more cohesive mix due to processing similar sounds in groups.

To give you an example of what I mean, let’s say your drum part is made up of ten different tracks. These ten tracks may represent carious different sounds that make up you rhythm track and would probably include things like a kick drum, some snares, high hats and various percussion.

One option is to send these to one group channel and treat the drum part as one, alternatively you may want to go one step further and create sub mixes for each type of sound in the drum part. I find this very useful for treating several high hat parts that may be programmed to sound like one pattern. These can be grouped, treated and then sent to the main drum group. This gives you quick access to their level and total control over their sound.
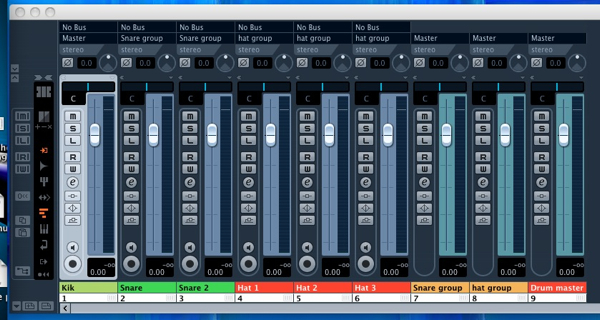
Sub groups and groups in Cubase 5.5.

Also try this when working with vocals, backing vocals and lead parts can be sent to sub groups and then to a main vocal group. I have even used the technique when mixing large numbers of synth or guitar parts. It’s all about control and cohesion, give it a go it may work for you.


Step 4: Dynamic Effect Returns

Although send/return set ups do differ from a straight forward group routing some DAWs use the same process to achieve both results. Logic Pro for example uses the same buss list for both and the only difference is how you feed them. i.e. either with an auxiliary send or channel output.

Other DAWs on the other hand have dedicated channel types for both returns and groups. Cubase 5 uses this system and in many ways it keep things a little more organised and in the long run is probably clearer for the beginner. Whichever system your DAW uses you should find it a pretty straight forward process creating a send/return routing.

If you have already experimented with reverbs and delays on your return channels and want to do something a little different you could try creating what I like to call a dynamic effects return. This involves placing a side chain capable compressor plug-in directly after your chosen return effect. The side chain for the compressor is then fed by any mix element you choose.

The result is an effect that breathes with an individual part of your mix. This can be extremely useful when dealing with top lines or vocal parts, as they can be clearly heard above another effected part. You can also feed the compressor with the part being effected, this results in the effects being drastically lowered when the core of the part is playing.

If this is a little hard to grasp you can hear audio examples and read more about the technique here.
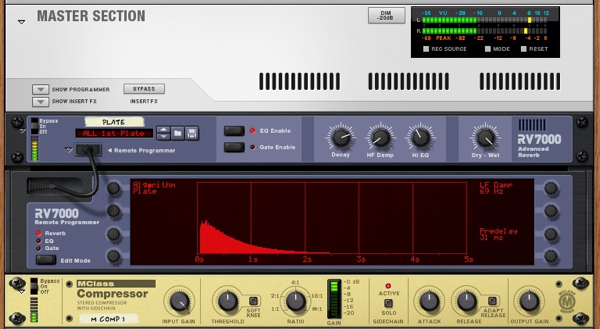
A dynamic effects return in Record.


Step 5: Monitor and Headphone Mixes

One last way you can use your groups is to create alternative mixes to send to separate musicians in your session. This is as simple as creating a group and using sends to build a mix with new levels. The outputs of this new group can be sent to a separate output of your sound card or dedicated headphone out.

This technique can be great for sending bass players a louder drum mix, or lowering lead guitar parts for vocalists. Once you have mastered the technique multiple custom mixes can be sent to every member of a band, assuming you have enough outputs and pairs of headphones!


Digital Illustration – Creative Session Wrap


It’s a wrap. This session has covered a mix of digital illustration articles on theory and in depth case studies. We’ve looked at various artist’s work and their workflows. We’ve taken a close look at the topic of style development, finding your market, and promoting your work. This session posted across numerous Tuts+ sites: Psdtuts+, Vectortuts+, and Cgtuts+. We’ll continue to expand each session as we cover new topics and integrate your feedback. Let us know what you think of this session’s material.


Digital Illustration – CS Content

  • Basic Principles of Digital Matte Painting

    Digital Matte Painting is a huge creative field that can add wonder and excitement to static film shots. Learn about digital matte painting principles, like set extension, camera mapping, as well as professional tips that matte painters employ.

    Visit Article

  • Software Assisted Illustration in the Form of Information Visualization

    Thinking about illustration inevitably calls to mind images of pencils and sketchpads and an analog, old-school creative process. There’s a certain charm to hand-drawn images, an intimate bridge between artist and page. But the digital age has brought its own magnetism to the illustrative process, liberating artists to do more than they ever could before and offering an entirely new platform for self-expression.

    Visit Article

  • Developing a Diverse Range of Illustration Styles

    Making a living as an illustrator is a dream for many young artists – but it takes more than dreaming to impress potential clients. A successful illustrator needs flare, persistence and a strong portfolio. Over the years I’ve experimented with various mediums and techniques to establish a broad range of styles. In this article I’d like to share my thoughts and experiences with using multiple illustration styles, as opposed to fixating on just one.

    Visit Article

  • From A Childs View: 30+ Creative Children’s Book Covers

    This inspirational post is all about showing you a great selection of different ways the digital medium is put to use in the modern day world to create illustrations for children’s book covers: from toddlers’ short novels and picture books, to books about color for the youth, to older kids who have a keen interest in art and design – and of course everything in between.

    Visit Article

  • Eighteen Artists Share Their Opinions on Artistic Style – Part I

    Talk to some artists or take a look at an online conversation about artwork and there’s a mighty good chance you’ll hear or read a mention of artistic style at some point. But for as often as it’s mentioned, style seems under-appreciated and misunderstood. So what exactly is behind a style? How does an artist develop a style and what does style mean to an artist? To find out, I spoke with eighteen highly-talented artists and I’ve conveniently assembled their responses for your edification and entertainment.

    Visit Article

  • Eighteen Artists Share Their Opinions on Artistic Style – Part II

    Talk to some artists or take a look at an online conversation about artwork and there’s a mighty good chance you’ll hear or read a mention of artistic style at some point. So what exactly is behind a style? How does an artist develop a style and what does style mean to an artist? To find out, I spoke with eighteen highly-talented artists and I’ve conveniently assembled their responses for your edification and entertainment. This is the second part of a two-part series. What’s that? Missed the first part? Well check it out!

    Visit Article

  • Scratching Your Niche Market

    As opposed to discussing just the specific techniques used to target a precise niche market, I would like to start off with a few overarching thoughts. I will cover some basic, yet very useful principles to keep in mind for the bigger picture (Get it? ‘Bigger picture,’ like your career – hehe), and then supply a case study of how I have used them in my work.

    Visit Article

  • Incorporating Surrealism Concepts into Your Digital Artwork

    Have you ever wanted to incorporate Surreal concepts into your artwork, but weren’t sure how to approach it? In this article, I share my personal pipeline for fusing Surrealist notions with my imagination to create fresh work. Learn to unleash your mind, capture your dreams, and fuse wild ideas into well crafted digital works of art through experimentation, planning, and execution.

    Visit Article

  • Realistic Vector Motorcycle Portraits

    Every semester, in my Illustrator classes, my students always want to know how I create the Motorcycle Portraits I am known for. I often give them a brief explanation, but I have never really sat down and described the process in detail…until now. My approach to getting a realistic look in my work is a bit tedious, but I think you will agree that the end results are well worth it. Enjoy!

    Visit Article

  • ‘Faux’ Magazine Cover Design

    With digital tools (such as, a combination of Poser and Photoshop) one can create faux cover designs much like the surface effects of traditional painting techniques. Furthermore the speed, turn around, and cost benefits in work flow these tools provide might just put a much cherished form of illustration back at the magazine editors doorstep. Let’s review a case study on creating a “Faux Fantasy and Adventure Magazine” cover, with an authentic look and worn vintage feel from yesteryear.

    Visit Article

  • The Making of Lost – Part 1

    In this tutorial series, I will be covering the basic process of how I created my piece “lost.” The first part of this two part series covers the basics of creating 3D abstract pieces and how to incorporate them with photo manipulation; the second part will focus on the creation of effects in Photoshop and how to enhance and strengthen the final image.

    Visit Article

  • The Making of Lost – Part 2

    In this second tutorial of this two part series, we will add a background and enhance the image with Photoshop effects. Keep in mind that a key to succeed in following this tutorial series is to experiment. I will be teaching the basic techniques but in order to create a strong composition and attractive shapes, you will need to alter the settings, and experiment with other effects. Patience and determination are mandatory skills for any artist. So let’s finish this image!

    Visit Article

  • Selfless Self-Promotion: How to Promote Yourself Without Talking About Yourself

    Promoting yourself doesn’t have to mean talking about yourself. There are so many other ways to get your name out there and market your brand. This is something that is too often overlooked by creative professionals. Let’s look a few simple ways to promote yourself without talking about yourself.

    Visit Article


Your Thoughts on this Digital Illustration Session

We’d love to here your feedback and suggestions on how to improve Creative Sessions. We’re actively working to improve this project, by consistently adding more high quality material, and new intensive two week sessions releasing each month. We look forward to your comments.


Coming Soon, Interface Design – Creative Session

Our next session will be on interface design. In the next session we’ll cover a wide spectrum of interface design topics. We’ll dive deeper into the theory of user-centered design, creating mobile interfaces, GUI design, and more. We’ll also follow some interface designers through their working process. We have a great session lined up on interface design coming soon. Expect to see this next session post around the middle of July.

Badge

Create Black and White Floral Typography in Photoshop – Psd Premium Tutorial


Today, we have another Psd Premium tutorial exclusively available to Premium members. If you want to take your typography skills to the next level, then we have an awesome tutorial for you. Learn more after the jump!


This Premium Tutorial is Filled with Creative Tips

I am sure that you will agree that there is something mysterious about black and white photography. A while back I took some photos of some dry flowers and decided that I wanted to integrate them into an illustration. Today, I will use those photos to create some beautiful black and white floral typography. Let’s get started!


Professional and Detailed Instructions Inside

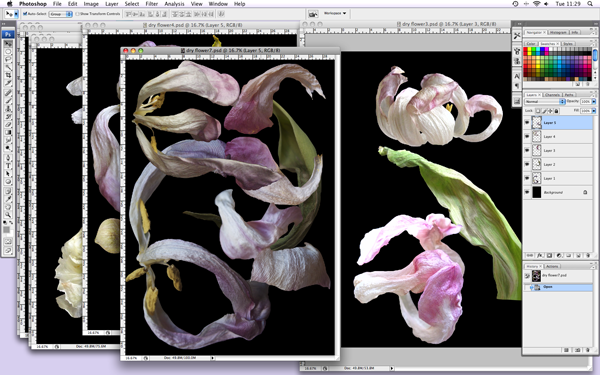
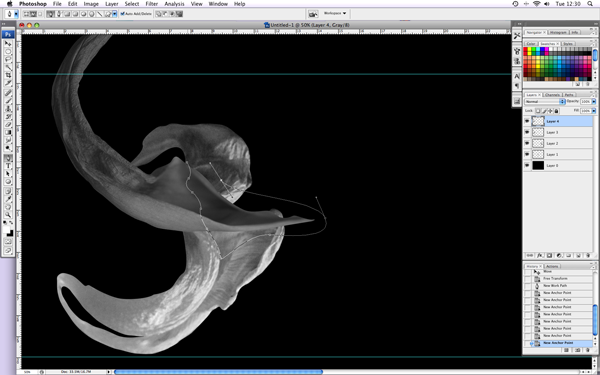
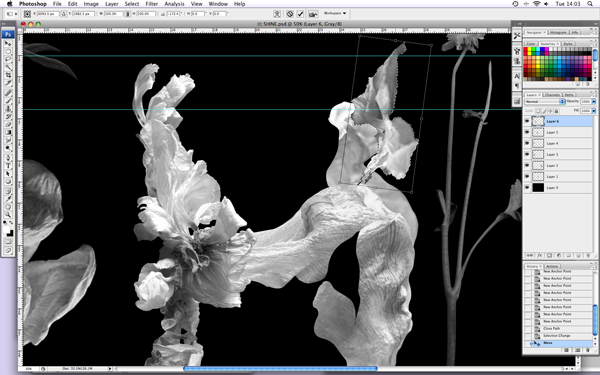
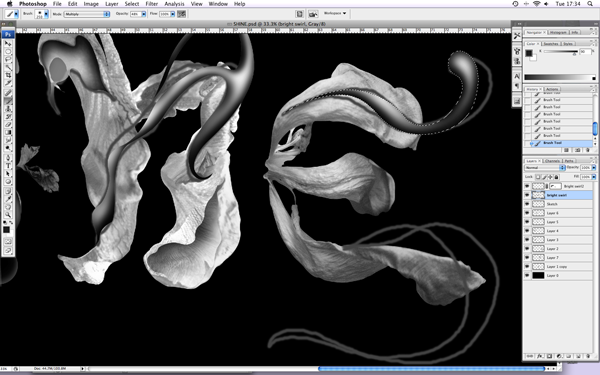
Premium members can Log in and Download! Otherwise, Join Now! Below are some sample images from this tutorial.


Psd Premium Membership

As you know, we run a premium membership system here that costs $9 a month (or $22 for 3 months!) which gives members access to the Source files for tutorials as well as periodic extra tutorials, like this one! You’ll also get access to Net Premium and Vector Premium, too. If you’re a Premium member, you can log in and download the tutorial. If you’re not a member, you can of course join today!