I have more than 10 adult sites for now and I am looking for a designer to make new logo for all of them.

Freelance Projects, Design and Programming Tutorials
I have more than 10 adult sites for now and I am looking for a designer to make new logo for all of them.
I will pay 15 dollars to the freelancer that can make me a small utility and provide me the vbs2008 project including the source code. I would like to customize it myself. Only serious bidders please. This project wont last longer then an hour.
Sincerely,
Lee
Talented front end web developer with strong mark-up, Javascript , AJAX and JQuery ,CSS , twitter, facebook and scripting skills to help to continue developing our websites and task.We want pieces of codes and customization, such as Sliders, Tabs, Positioning objects and Twitter and Facebook API… (Budget: $250-750, Jobs: AJAX, jQuery / Prototype, Twitter)
The project is an social app, similar to several "conversation starters" apps. First is Android, then iPhone/iPad. We have rough js coded for json and we have completed artwork as psd and png… (Budget: $750-1500, Jobs: Android, iPad, iPhone)
This tutorial is the first of three which discuss how to give some Artificial Intelligence (AI) to games and apps you create. In this first tutorial we are going to learn about path finding.
Let’s take a look at the final result we will be working towards:
Click a point, then another point and the AI will figure out a shortest possible path to get between them. You can use the drop-down list to select the AI algorithm to use.
This tutorial will be the first of three which will discuss giving Artificial Intelligence (AI) to games and apps you create. You might think that this sounds just too hard, but it is actually pretty simple! I will explain two key aspects of the AI in games and then create a cool game using what we learn. I hope you enjoy following this short series!
In games, one of the most important aspects is to make it very efficient, to do what it has to do using minimal resources. There’s a whole science just for that.
In this tutorial we are going to cover a key aspect in game development: pathfinding. We will discuss the 2 best methods, how they work, how we make them work in AS3, then last but not least, when to use them. Let’s start..
Suppose you are in the middle of a forest with 50 different potential routes in front of you, you have almost no energy and need to find the best way out, how would you do it?
One option would be to follow each of the 50 routes; a trial and error method. You will certainly get out but that would take too much time. This isn’t a new problem and many people have come up with ideas of how to solve it. One of them was Edsger W. Dijkstra who developed an algorithm to get the shortest path given a graph, a source and a target.
Before we can start solving the problem, we must create those elements, the graph which contains all the information, the nodes which are the waypoint of the graph, and the edges that connect the nodes. Think of it as the graph being a map: the nodes are the cities and the edges the highways that connect them.
Before we start coding, let’s first set up our workspace. Create a new folder and name it “PathFinding”. Inside it create another folder and name it “Graph”. Then in the PathFinding folder create a new Flash (AS3) FLA file and call it “PathFinding”.
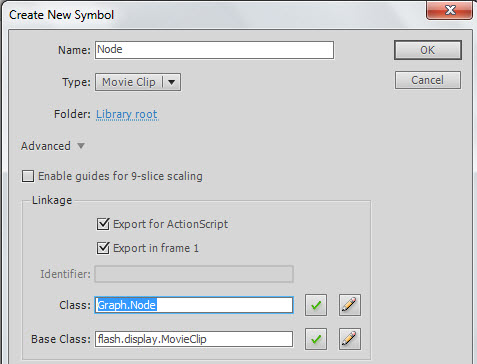
In the “PathFinding.fla” file, go to Insert > New Symbol and create a new MovieClip called Node. Select “export for actionscript” and as the class write “Graph.Node”
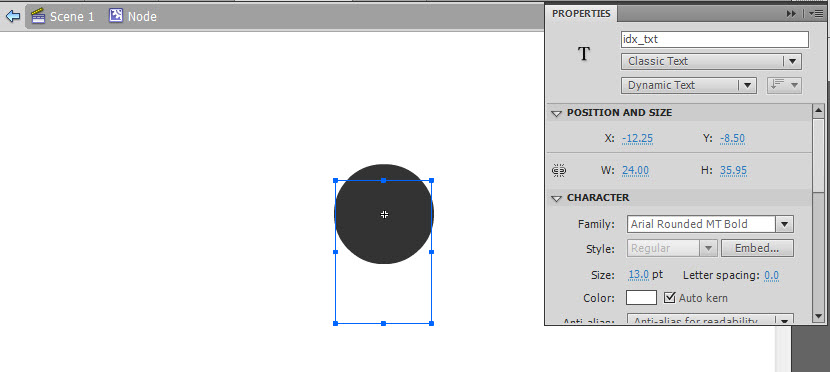
Inside the Node Movieclip, create a new Circle with a radius of 25 and place it in the center. Then add a new text box, make it Dynamic and give it an instance name of “idx_txt” and position it at the center of the stage.
Each node is composed of 2 main elements; an index in order to identify it, and its position on the graph. With this in mind create a new class inside the Graph folder/package and name it “Node”. Make it extend the sprite class, then just add two variables: one int for the index, and a Vector3D for the position. Also, add their corresponding set and get methods:
package Graph
{
	import flash.display.Sprite;
	import flash.geom.Vector3D;

	public class Node extends Sprite
	{
		private var pos:Vector3D;
		private var index:int;
		public function Node(idx:int,n_Pos:Vector3D)
		{
			index=idx;
			pos=n_Pos;
			this.x=n_Pos.x;
			this.y=n_Pos.y;
			idx_txt.text=String(idx)
		}

		public function getIndex():int
		{
			return index;
		}
		public function setPos(n_Pos:Vector3D):void
		{
			pos=n_Pos;
		}

		public function getPos():Vector3D
		{
			return pos;
		}
	}
}
The edge contains three elements: the indices of the two nodes that it connects, and its “cost” (or distance between nodes in this case). Again in the Graph package/folder create a new class and call it “Edge”; make it extend the Sprite class again.
Now add two ints for the nodes, and one Number for the cost, then add the corresponding set and get methods:
package Graph
{
	import flash.display.Sprite;
	import flash.geom.Vector3D;

	public class Edge extends Sprite
	{
		private var from:int;     //The index of the node from which this edge departs
		private var to:int;       //The index of the node from which this edge arrives
		private var cost:Number;  //The cost of crossing through this node (i.e. the distance)

		public function Edge(n_From:int,n_To:int,n_Cost:Number=1.0)
		{
			from=n_From;
			to=n_To;
			cost=n_Cost;
			this.z=1;
		}

		public function getFrom():int
		{
			return from;
		}

		public function setFrom(n_From:int):void
		{
			from=n_From;
		}

		public function getTo():int
		{
			return to;
		}

		public function setTo(n_To:int):void
		{
			to=n_To;
		}

		public function setCost(n_Cost:Number):void
		{
			cost=n_Cost;
		}

		public function getCost():Number
		{
			return cost;
		}
        /*
          Since the edge is just a line that connects the nodes,
          we will use this method to draw the edge, the style refers to how we will
          want the edge to be
        */
		public function drawEdge(fromPos:Vector3D,toPos:Vector3D,style:String="normal")
		{
			switch(style)
			{
				case "normal":
                //If it is normal, create a gray line
					this.graphics.clear();
					this.graphics.lineStyle(1, 0x999999, .3);
					this.graphics.moveTo(fromPos.x,fromPos.y);
					this.graphics.lineTo(toPos.x,toPos.y);
					break;
				case "path":
                //If it is a line from the path, create a black line
					this.graphics.clear();
					this.graphics.lineStyle(2, 0x000000,1);
					this.graphics.moveTo(fromPos.x,fromPos.y);
					this.graphics.lineTo(toPos.x,toPos.y);
					break;
				case "visited":
                //If it is a line used by the algorithm, create a red line
					this.graphics.clear();
					this.graphics.lineStyle(1, 0xFF0000,1);
					this.graphics.moveTo(fromPos.x,fromPos.y);
					this.graphics.lineTo(toPos.x,toPos.y);
					break;
			}
		}
	}
}
The Graph is a more complex element since it must store all the information. In the Graph folder, create a new class and name it “Graph”. Since it just contains data, there’s no need to extend the Sprite class.
The graph will contain a Vector with all the nodes on the graph, another Vector with the edges that each node has and a static int in order to get the next index available for a node. This way, it will be easier to access all the elements in the graph, since the node index is the key of the edges vector, meaning that if you want to get the edges of a node with index 3, you access the edges vector at position 3 and you will get the edges for that node.
Now let’s create these variables:
package Graph
{
	public class Graph
	{
		private static var nextIndex:int=0;
		private var nodes:Vector.<Node>;
		private var edges:Vector.<Array>;

		public function Graph()
		{
			nodes=new Vector.<Node>();
			edges=new Vector.<Array>();
		}
	}
}
The graph also needs methods to add and get nodes, and edges:
package Graph
{
	public class Graph
	{
		private static var nextIndex:int=0;
		private var nodes:Vector.<Node>;
		private var edges:Vector.<Array>;

		public function Graph()
		{
			nodes=new Vector.<Node>();
			edges=new Vector.<Array>();
		}
        //In order to get the node, we just ask for the index of it, and access the nodes vector with that key
		public function getNode(idx:int):Node
		{
			return nodes[idx];
		}

        //To get an edge, we ask for the two nodes that it connects,
        //then we retrieve all the edges of the from node and search if one of them
        //goes to the same node as the edge we are looking for, if it does, that's our edge.
		public function getEdge(from:int,to:int):Edge
		{
			var from_Edges:Array = edges[from] as Array;
			for(var a:int=0;a<from_Edges.length;a++)
			{
				if(from_Edges[a].getTo()==to)
				{
					return from_Edges[a];
				}
			}
			return null;
		}

        //To add a node to the graph, we first look if it already exist on it,
        //if it doesn't, then we add it to the nodes vector, and add an array to the
        //edges vector where we will store the edges of that node, finally we increase
        //the next valid index int in order to give the next available index in the graph
		public function addNode(node:Node):int
		{
			if(validIndex(node.getIndex()))
			{
				nodes.push(node);
				edges.push(new Array());
				nextIndex++;
			}
			return 0;
		}
        //To add an edge we must first look if both nodes it connects actually exist,
        //then we must see if this edge already exist on the graph, finally we add it
        //to the array of edges of the node from where it comes
		public function addEdge(edge:Edge):void
		{
			if(validIndex(edge.getTo())&&validIndex(edge.getFrom()))
			{
				if(getEdge(edge.getFrom(),edge.getTo())==null)
				{
					(edges[edge.getFrom()]as Array).push(edge);
				}
			}
		}

        //To get the edges of a node, just return the array given by the edges vector
        //at node's index position
		public function getEdges(node:int):Array
		{
			return edges[node];
		}

        //This function checks if the node index is between the range of already added nodes
        //which is form 0 to the next valid index of the graph
		public function validIndex(idx:int):Boolean
		{
			return (idx>=0&&idx<=nextIndex)
		}

        //Just returns the amount of nodes already added to the graph
		public function numNodes():int
		{
			return nodes.length;
		}

        //This is to redraw all the edges on the graph to get them to the normal style
		public function redraw():void
		{
			for each(var a_edges:Array in edges)
			{
				for each(var edge:Edge in a_edges)
				{
					edge.drawEdge(getNode(edge.getFrom()).getPos(),getNode(edge.getTo()).getPos());
				}
			}
		}

        //This function return the next valid node index to be added
		public static function getNextIndex():int
		{
			return nextIndex;
		}
	}
}
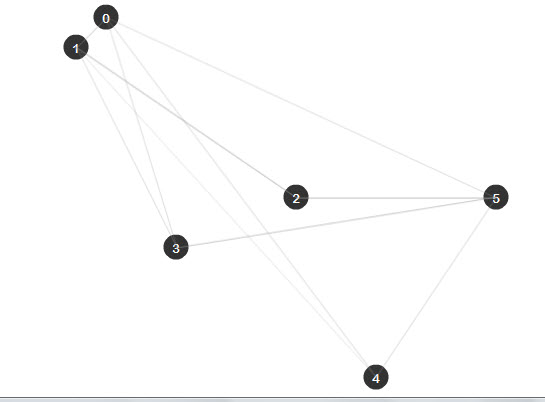
So now that we have all the elements needed, let’s go ahead and build a graph.
In the PathFinding folder, create a new class and call it “Main”, this will be our main class:
package{
	import flash.display.Sprite;

	public class Main extends Sprite
	{
		public function Main()
		{

		}
	}
}
Now we need to import the classes we just created since they are in the Graph folder. Then create two variables: one for the graph and another that is an array of the position of the nodes we want to add. After that just add those nodes and their edges:
package{
	import flash.display.Sprite;
	import Graph.*;
	import flash.geom.Vector3D;

	public class Main extends Sprite
	{
		var graph:Graph = new Graph();
        //This array contains the position of the different nodes in the graph (x,y)
		var nodes:Array =new Array(
		 [110,20],
		 [80,50],
		 [300,200],
		 [180,250],
		 [380,380],
		 [500,200]
		 );
         //This array contains the edges that connects the different nodes (from,to)
		var edges:Array = new Array(
		[0,1],[0,5],[0,3],
		[1,2],[1,0],[1,4],
		[2,1],[2,5],
		[3,1],[3,5],
		[4,0],[4,5],
		[5,2],[5,3]
		);
		public function Main()
		{
		  //A loop in order to create all the nodes
			for(var a:int=0;a<nodes.length;a++)
			{
				var node:Node = new Node(Graph.Graph.getNextIndex(), new Vector3D(nodes[a][0],nodes[a][1]));
				graph.addNode(node);
				addChild(node);
			}
          //Another loop to create all the edges between nodes
			for(var b:int=0;b<edges.length;b++)
			{
				var from:int = edges[b][0];
				var to:int = edges[b][1];

				var edge:Edge = new Edge(from,to,Vector3D.distance(graph.getNode(from).getPos(),graph.getNode(to).getPos()));
				graph.addEdge(edge);
                //Since the drawEdge method requires the position vectors, we get the nodes
                //from the graph with their index and then get their position with getPos()
				edge.drawEdge(graph.getNode(from).getPos(),graph.getNode(to).getPos());
				addChild(edge);
			}
		}
	}
}
As I told you before there are many methods to obtain a path between two nodes, like the DFS(Deep First Search), or BFS(Broad First Search), but sometimes you don’t just want to get a path that connect the nodes, you also want to get the “best” path, which most of the time will mean the one that takes less time or the closest, depending on what you want.
During this tutorial I will just refer to it as the one that costs less to follow. (In our case, remember “cost” means distance. In a game, you may wish to find the least dangerous path, or the one that uses least fuel, or the least visible…)
There are algorithms that work depending on the cost, the most important ones being the Dijkstra Algorithm and the A* (A-Star) Algorithm. Lets talk first about the Dijkstra Algorithm
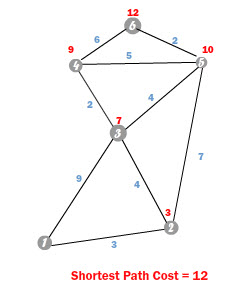
This algorithm was created by Edsger Dijkstra in 1959. It advances depending on the cost that each edge represents, the edges with lower cost will always be chosen first so when you reach the target, you will be sure that the path is the lowest costing path available.
Because this algorithm works with costs, we must have a place where we will be storing the cost of moving to each node from the source (the starting node); call this a cost vector.
For example if the source is the node 0, when we access the cost vector at position 3, this will return the lowest cost until now of moving from 0 to 3. We will also need a way of storing the shortest path: I’ll explain the Shortest Path Tree in the next step.
The basic steps of the algorithm are the following:
An animation will make more sense. Here we are trying to get from 1 to 6:
This algorithm is composed of different vectors that will store all the information needed, for example the costs of the nodes, or the best path until now. I will explain this better:
Note: AS3 doesn’t contain many data structures including the Indexed Priority Queue, so I coded one to use in this tutorial. To get it just download the source files and import the utils folder to the PathFinding folder. The class is utils.IndexPriorityQ.
Before we start coding, in the PathFinding folder, create a new Folder and call it “Algorithms”.
In this new folder, create a new AS3 class named “Dijkstra”:
package Algorithms  {

	public class Dijkstra {

		public function Dijkstra() {

		}

	}

}
Now let’s code the Algorithm. It will need three basic things: the graph itself, the source node and the target node; but we must also create the vectors we just talked about (Cost,SPT,SF). Remember to import the Graph classes:
package Algorithms  {

	import Graph.Edge;
	import Graph.Graph;
	import utils.IndexedPriorityQ;

	public class Dijkstra {

		private var graph:Graph					//The graph where the search will be made
		private var SPT:Vector.<Edge>;			//The Shortest path tree containing edges
		private var cost2Node:Vector.<Number>;	//The Cost vector containing numbers
		private var SF:Vector.<Edge>;			//The Search Frontier containing edges
		private var source:int;                 //Where will the search start
		private var target:int;                 //Where will the search end

		public function Dijkstra(g:Graph) {

		}

	}

}
Once we have set up the class, we can start coding the algorithm which will be in the “Search” function. I will explain the code with comments, so If you still have some questions return to Steps 12 and 13 to remind yourself how this algorithm works:
private function search():void
{
	//This will be the indexed priority Queue that will sort the nodes
	var pq:IndexedPriorityQ = new IndexedPriorityQ(cost2Node)
	//To start the algorithm we first add the source to the pq
	pq.insert(source);
	//With this we make sure that we will continue the search until there are no more nodes on the pq
	while(!pq.isEmpty())
	{

		/* 1.- Take the closest node not yet analyzed */

		//We get the Next Closest Node (NCN) which is the first element of the pq
		var NCN:int = pq.pop();

		/* 2.-Add its best edge to the Shortest Path Tree (Its best edge is stored on the SF) */

		SPT[NCN]=SF[NCN];

		//This will color the actual edge red in order to see which edges the algorithm has analyzed
		if(SPT[NCN])
		{
			SPT[NCN].drawEdge(
				graph.getNode(SPT[NCN].getFrom()).getPos(),
				graph.getNode(SPT[NCN].getTo()).getPos(),
				"visited"
			);
		}

		/* 3.- If it is the target node, finish the search */

		if(NCN==target)return;

		/* 4.- Retrieve all the edges of this node */

		var edges:Array=graph.getEdges(NCN);

		//With this loop we will analyze each of the edges of the array
		for each(var edge:Edge in edges)
		{
			/* 5.- For each edge calculate the cost of moving from the source node to the arrival Node */

			//The total cost is calculated by: Cost of the node + Cost of the edge
			var nCost:Number = cost2Node[NCN]+edge.getCost();

			//If the arrival node has no edge on the SF, then add its cost to the
			//Cost vector, the arrival node to the pq, and add the edge to the SF
			if(SF[edge.getTo()]==null)
			{
				cost2Node[edge.getTo()]=nCost;
				pq.insert(edge.getTo());
				SF[edge.getTo()]=edge;
			}

			/* 6.- If the cost of this edge is less than the cost of the arrival node until now, then update the node cost with the new one */

			else if((nCost<cost2Node[edge.getTo()])&&(SPT[edge.getTo()]==null))
			{
				cost2Node[edge.getTo()]= nCost;
				//Since the cost of the node has changed, we need to reorder again the pq to reflect the changes
				pq.reorderUp();
				//Because this edge is better, we update the SF with this edge
				SF[edge.getTo()]=edge;
			}
		}
	}
}
When the function finishes searching we will have the path all messes up on the SPT, so it is up to us to retrieve it. Since the SPT has the best edge to get to a node, we can work backwards to obtain the best path. Take as a reference the following image which comes from the previous animation:
If we access the SPT at the target node, which in this case is 6, it will return the best edge to get there. That would be the 6 – 5 edge. Now if we repeat this process with the new node that comes with the edge, the 5 we would obtain the best edge to get to that node, which is the 5 – 2 edge. Repeating this process once again with the node 2, will give us the edge 2 – 1, so we finally get to the beginning, now joining al those edges we get the best path: 6 > 5 > 2 >1.
As you see we have to work backwards starting on the target and moving to the source to get the best path.
Create a new function that will return an Array with the nodes of the path, call it “getPath”:
public function getPath():Array
{
	var path:Array = new Array();
	if(target<0) return path;
	var nd:int = target;
	path.push(nd);
	while((nd!=source)&&(SPT[nd]!=null))
	{
		SPT[nd].drawEdge(
			graph.getNode(SPT[nd].getFrom()).getPos(),
			graph.getNode(SPT[nd].getTo()).getPos(),
			"path"
			);
		nd = SPT[nd].getFrom();
		path.push(nd);
	}
	path=path.reverse();
	return path;
}
We have finished almost everything, we just now have to fill the constructor and call the search function, so the class will look like this:
package Algorithms{

	import Graph.Edge;
	import Graph.Graph;
	import utils.IndexedPriorityQ;

	public class Dijkstra {

		private var graph:Graph
		private var SPT:Vector.<Edge>
		private var cost2Node:Vector.<Number>
		private var SF:Vector.<Edge>
		private var source:int;
		private var target:int;

		public function Dijkstra(n_graph:Graph,src:int,tar=int) {
			graph=n_graph;
			source=src;
			target=tar;
			SPT= new Vector.<Edge>(graph.numNodes());
			cost2Node = new Vector.<Number>(graph.numNodes());
			SF = new Vector.<Edge>(graph.numNodes());
			search();
		}
		private function search():void
		{
			var pq:IndexedPriorityQ = new IndexedPriorityQ(cost2Node)
			pq.insert(source);
			while(!pq.isEmpty())
			{

				var NCN:int = pq.pop();

				SPT[NCN]=SF[NCN];

				if(SPT[NCN])
				{
					SPT[NCN].drawEdge(
						graph.getNode(SPT[NCN].getFrom()).getPos(),
						graph.getNode(SPT[NCN].getTo()).getPos(),
						"visited"
					);
				}

				if(NCN==target)return;

				var edges:Array=graph.getEdges(NCN);

				for each(var edge:Edge in edges)
				{
					var nCost:Number = cost2Node[NCN]+edge.getCost();

					if(SF[edge.getTo()]==null)
					{
						cost2Node[edge.getTo()]=nCost;
						pq.insert(edge.getTo());
						SF[edge.getTo()]=edge;
					}

					else if((nCost<cost2Node[edge.getTo()])&&(SPT[edge.getTo()]==null))
					{
						cost2Node[edge.getTo()]= nCost;
						pq.reorderUp();
						SF[edge.getTo()]=edge;
					}
				}
			}
		}

		public function getPath():Array
		{
			var path:Array = new Array();
			if((target<0)||(SPT[target]==null)) return path;
			var nd:int=target;
			path.push(nd);
			while((nd!=source)&&(SPT[nd]!=null))
			{
				SPT[nd].drawEdge(
					graph.getNode(SPT[nd].getFrom()).getPos(),
					graph.getNode(SPT[nd].getTo()).getPos(),
					"path"
				);
				nd = SPT[nd].getFrom()
				path.push(nd);
			}
			path = path.reverse();

			return path;
		}
	}
}
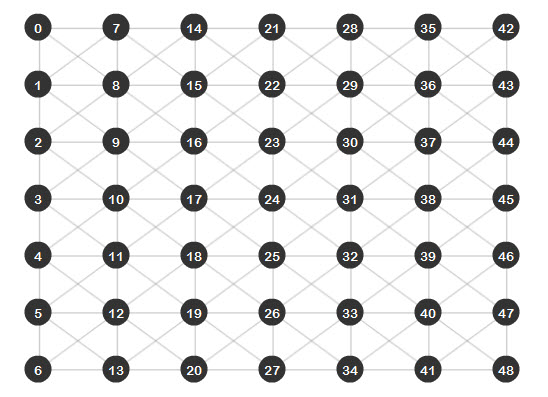
In order to see a better result of the algorithm, I wrote a class that helps with the creating of graphs. It’s called Grapher and can be found inside the utils folder that comes with the source files. This class creates a grid of nodes from where we can observe how the algorithm is moving through the graph.
With this class, open again the “Main.as” file and modify it. We will now have the following code:
package{
	import flash.display.Sprite;
	import Graph.*;
	import utils.Grapher;

	public class Main extends Sprite
	{
		var graph:Graph = new Graph();

		public function Main()
		{
			//The parameters of the Grapher class are the width and height of the stage
			//the number of columns and rows, and then the graph for storing the data
			//After this we just add  the grapher to the stage and we are done.
			//This will create a grid of nodes of 7*7
			var grapher:Grapher = new Grapher(550,400,7,7,graph);
			addChild(grapher);
		}
	}
}
Save and run the file and you will obtain this result:
Now let’s go ahead and perform a search with the new algorithm we have just done. Import the Dijkstra class, create an instance of it and call the getPath function:
package{
	import flash.display.Sprite;
	import Graph.*;
	import utils.Grapher;
	import Algorithms.Dijkstra;

	public class Main extends Sprite
	{
		var graph:Graph = new Graph();

		public function Main()
		{
			var grapher:Grapher = new Grapher(550,400,7,7,graph);
			addChild(grapher);

			//We create a new Dijkstra search that will look a path from node 24 to node 35
			var dijkstra:Dijkstra = new Dijkstra(graph,24,35);
			dijkstra.getPath();
		}
	}
}
Save and run the file. You will see the edges that the algorithm analyzed as red lines, the best path found (from node 24 to node 35) appearing as a black line:
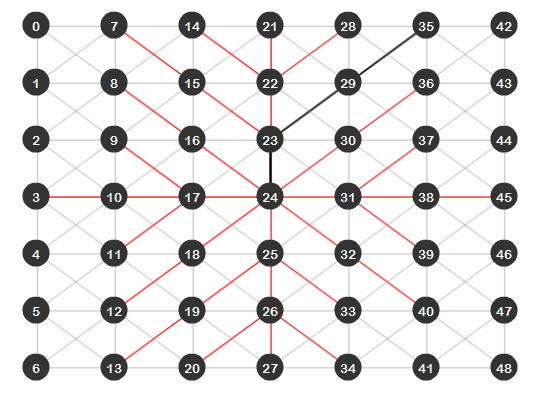
As we can see, the Dijkstra algorithm does find the shortest path between two nodes, but as the last image shows, there are a lot of red lines. This means that all those edges were analyzed, which isn’t a big deal because we have a small graph, but imagine a bigger graph; that would be just too many edges to analyze. If we could just find a way to reduce this and make the algorithm even more efficient… well I present you the A* (A-Star) algorithm.
The A* algorithm is a modified version of Dijkstra. It takes into consideration a modified way of getting the cost of each node with an heuristic approach. This means that we provide a little “help” for the algorithm and tell him where to go, working as a compass and moving the algorithm directly to the target.
Instead of calculating the cost of a node by summing the edge cost to the stored node cost, it is now calculated by summing the stored node cost and an Heuristic cost, which is an estimation of how close to the target the node we are analyzing is. This new cost is called the F cost
The F cost is calculated using the following formula: F = G + H, where G is the cost of the node and H is the heuristic cost of that node to the target. In this tutorial the H cost will be calculated using the Euclidean distance between the node and the target, which is the straight line distance between the two nodes.
What this does is that at the end, the nodes with a lower F cost will be the first ones tested and because the F cost will depend mostly on the H cost, at the end the algorithm will always prioritize the nodes closest to the target.
In the Algorithms folder, create a new class named “Astar”. The variables inside the class will be almost the same as the Dijkstra class, but here we will have another vector to store the F cost of each node:
package Algorithms{
	import Graph.Edge;
	import Graph.Graph;
	import flash.geom.Vector3D;
	import utils.IndexedPriorityQ;

	public class Astar {
		private var graph:Graph
		private var SPT:Vector.<Edge>
		private var G_Cost:Vector.<Number>	//This vector will store the G cost of each node
		private var F_Cost:Vector.<Number>	//This vector will store the F cost of each node
		private var SF:Vector.<Edge>
		private var source:int;
		private var target:int;

		public function Astar(n_graph:Graph,src:int,tar:int)
		{
			graph=n_graph;
			source=src;
			target=tar;
			SPT= new Vector.<Edge>(graph.numNodes());
			G_Cost = new Vector.<Number>(graph.numNodes());
			F_Cost = new Vector.<Number>(graph.numNodes());
			SF = new Vector.<Edge>(graph.numNodes());
			search();
		}
	}
}
The only difference between the Dijkstra algorithm search function and this one will be that the nodes will be sorted (in the Indexed Priority Queue) depending on the F cost vector and that the F cost vector will be given by the calculated H cost and the stored G cost:
		private function search():void
		{
			//The pq is now sorted depending on the F cost vector
			var pq:IndexedPriorityQ = new IndexedPriorityQ(F_Cost)
			pq.insert(source);
			while(!pq.isEmpty())
			{
				var NCN:int = pq.pop();
				SPT[NCN]=SF[NCN];
				if(SPT[NCN])
				{
				SPT[NCN].drawEdge(
					graph.getNode(SPT[NCN].getFrom()).getPos(),
					graph.getNode(SPT[NCN].getTo()).getPos(),
					"visited"
				);
				}
				if(NCN==target)return;
				var edges:Array=graph.getEdges(NCN);
				for each(var edge:Edge in edges)
				{
					//The H cost is obtained by the distance between the target node, and the arrival node of the edge being analyzed
					var Hcost:Number = Vector3D.distance(
						graph.getNode(edge.getTo()).getPos(),
						graph.getNode(target).getPos())
					var Gcost:Number = G_Cost[NCN] + edge.getCost();
					var to:int=edge.getTo();
					if(SF[edge.getTo()]==null)
					{
						F_Cost[edge.getTo()]=Gcost+Hcost;
						G_Cost[edge.getTo()]=Gcost;
						pq.insert(edge.getTo());
						SF[edge.getTo()]=edge;
					}
					else if((Gcost<G_Cost[edge.getTo()])&&(SPT[edge.getTo()]==null))
					{
						F_Cost[edge.getTo()]=Gcost+Hcost;
						G_Cost[edge.getTo()]=Gcost;
						pq.reorderUp();
						SF[edge.getTo()]=edge;
					}
				}
			}
		}
These are the only changes needed, since the getPath function is the same for both classes. At the end the class will be this one:
package Algorithms  {
	import Graph.Edge;
	import Graph.Graph;
	import flash.geom.Vector3D;
	import utils.IndexedPriorityQ;

	public class Astar {
		private var graph:Graph
		private var SPT:Vector.<Edge>
		private var G_Cost:Vector.<Number>	//This vector will store the G cost of each node
		private var F_Cost:Vector.<Number>	//This vector will store the F cost of each node
		private var SF:Vector.<Edge>
		private var source:int;
		private var target:int;

		public function Astar(n_graph:Graph,src:int,tar:int)
		{
			graph=n_graph;
			source=src;
			target=tar;
			SPT= new Vector.<Edge>(graph.numNodes());
			G_Cost = new Vector.<Number>(graph.numNodes());
			F_Cost = new Vector.<Number>(graph.numNodes());
			SF = new Vector.<Edge>(graph.numNodes());
			search();
		}
		private function search():void
		{
			//The pq is now sorted depending on the F cost vector
			var pq:IndexedPriorityQ = new IndexedPriorityQ(F_Cost)
			pq.insert(source);
			while(!pq.isEmpty())
			{
				var NCN:int = pq.pop();
				SPT[NCN]=SF[NCN];
				if(SPT[NCN])
				{
				SPT[NCN].drawEdge(
					graph.getNode(SPT[NCN].getFrom()).getPos(),
					graph.getNode(SPT[NCN].getTo()).getPos(),
					"visited"
				);
				}
				if(NCN==target)return;
				var edges:Array=graph.getEdges(NCN);
				for each(var edge:Edge in edges)
				{
					//The H cost is obtained by the distance between the target node, and the arrival node of the edge being analyzed
					var Hcost:Number = Vector3D.distance(
						graph.getNode(edge.getTo()).getPos(),
						graph.getNode(target).getPos())
					var Gcost:Number = G_Cost[NCN] + edge.getCost();
					var to:int=edge.getTo();
					if(SF[edge.getTo()]==null)
					{
						F_Cost[edge.getTo()]=Gcost+Hcost;
						G_Cost[edge.getTo()]=Gcost;
						pq.insert(edge.getTo());
						SF[edge.getTo()]=edge;
					}
					else if((Gcost<G_Cost[edge.getTo()])&&(SPT[edge.getTo()]==null))
					{
						F_Cost[edge.getTo()]=Gcost+Hcost;
						G_Cost[edge.getTo()]=Gcost;
						pq.reorderUp();
						SF[edge.getTo()]=edge;
					}
				}
			}
		}
		public function getPath():Array
		{
			var path:Array = new Array();
			if(target<0) return path;
			var nd:int = target;
			path.push(nd);
			while((nd!=source)&&(SPT[nd]!=null))
			{
				SPT[nd].drawEdge(
					graph.getNode(SPT[nd].getFrom()).getPos(),
					graph.getNode(SPT[nd].getTo()).getPos(),
					"path"
					);
				nd = SPT[nd].getFrom();
				path.push(nd);
			}
			path=path.reverse();
			return path;
		}
	}
}
Once again open the “Main.as” file and import the Astar class, then erase the Dijkstra search we created, replacing it with an A* search:
package{
import flash.display.Sprite;
import Graph.*;
import utils.Grapher;
import Algorithms.Dijkstra;
import Algorithms.Astar;
public class Main extends Sprite
{
var graph:Graph = new Graph();
public function Main()
{
var grapher:Grapher = new Grapher(550,400,7,7,graph);
addChild(grapher);
//We create a new Astar search that will look a path from node 24 to node 35
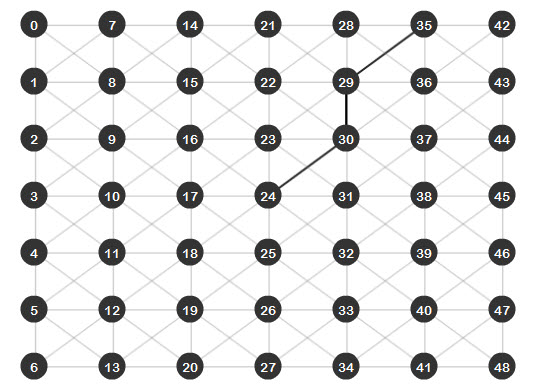
var astar:Astar = new Astar(graph,24,35);
astar.getPath();
}
}
}
Save and run the file. As you can see, the result is very impressive, there are no red lines meaning that the search went directly from the source to the target without analyzing extra edges:
Well, even though the A* algorithm is faster and better in getting a direct path from the source to the target, there will be some cases where Dijkstra will be the best option.
For example, imagine an RTS game, where you’ve instructed your villager to go and find some resources; with the A* algorithm you would have to do a search for every resource on the map and then analyze which one is closer. With a Dijkstra search, since it expands the same amount to all directions, the first resource it finds will be the best one to gather and you will have performed just one search versus the many searches of the A*.
Basically, you will want to use the Dijkstra algorithm when you are doing a general search and the A* algorithm when you are looking for a specific item.
That’s it for this tutorial, I hope you liked it and will use it for your projects. Keep track of the next tutorial of this AI series and let me know what you think about it.
Thanks for reading! -Eduardo
In the second part of this extremely detailed 2 day tutorial series, we’ll be finishing the modeling of the Bugatti Veyron 16.4 in Maya. These tutorials not only cover the basic workflows involved in creating a photo-realistic car from scratch, but also show you some of the more common mistakes that artists are prone to make when modelling extremely high-end photo-realistic cars. This tutorial series is invaluable for any artist interested in adding some outstanding car models to their portfolio. Can’t wait to get started? Become a Premium member, or learn more after the jump!
Follow freelance CG artist, Madhan, as he walks us through the modelling workflows he uses to create stunning, photorealistic car models such as the Bugatti Veyron shown below. Covering Maya’s powerful modelling toolset, this truly is a must-have tutorial for any artists interested in either vehicle or product design.

The Tuts+ network runs a membership service called Premium. For $9 per month, you gain access to exclusive high quality screencast tutorials, downloadable content packs, and freebies at CGtuts+, Psdtuts+, Vectortuts+, Audiotuts+, Nettuts+ and Aetuts+! For less than the price of a movie, you’ll learn from some of the best minds in the business all month long!!. Become a Premium member today!
Don’t miss more CG Premium tutorials and content packs, published weekly – subscribe to Cgtuts+ by RSS.
What happens however when you find your career advancement has stalled – or gone backwards?
Sometimes your career can go backwards through no fault of your own. Your company has a major restructure (or two or three) and suddenly you find your role is not what it used to be. Somewhere along the line, though your position title reads the same, your responsibilities have been significantly downgraded. Though your workload may have actually increased, you find yourself filling your day with a variety of mundane tasks.
Suddenly it dawns on you that you cannot remember the last time you learned something new in your current position. It’s official – you’re stuck in a rut.
So what are your career options?
It may be worth taking a moment to examine the steps you took in your career up to this point. Are there some instances where you could have made a better decision? Did you see any warning signs along the way? This exercise is not to wallow in the past. This is about helping you to be more in tune with your wants and needs to allow you to make better decisions in the future.
In some economic climates, with redundancies taking place, the truth is you may need to sit tight in your current role. Staying put however, does not mean you have to be idle. Keep your eye out for internal opportunities. Keep your CV polished and up to date at all times, so you can be ready to pounce without delay on a good opportunity.
Be patient and continue to do your best work. Remember to keep your eye firmly fixed on where you want to go.
You open your inbox for the first time in the day and there are 98 new messages; they’re from mom and dad, clients, that friend from high school who just found you on Facebook, a few stray spam messages and so on. Even if you spend an average of just 1 minute per message that’ll add up to more than an hour and a half. You just don’t have that much time to spare right now. So what do you do?
What’s your routine for checking email?
Increasing your productivity in the kitchen is something we can all use, especially if we have a family to feed. A boost in productivity will especially be helpful to working mothers who cook for their families, due to the scarcity of time that they have allotted to preparing dinner each night. Even stay-at-home Dads or freelancing folk can be well served learning the art of fast cooking. What steps can be taken to achieve an increase in kitchen productivity?
The addition of an island or free-standing working surface to your kitchen will do wonders for your productivity. Years ago, being an avid woodworker, I built an island for my wife, at her request. This was, by far, the biggest and most important addition to our kitchen. Fortunately, I was able to build it to her specifications. The proper height is especially important and it will typically be the exact same height as your kitchen countertops. If the height is too low, it could add to back problems due to the chef bending over to work on the surface. If it is too high, it will be very uncomfortable to use the work surface. There are many advantages to utilizing an island in your kitchen. The main advantage is that you now have a much larger surface to prepare your meals. Rather than using approximately a two foot deep countertop as a work surface, your work surface could potentially double or greater. It is important to locate your island in a central location in your kitchen. As a result, it makes it very easy to get at your refrigerator, pantry, or your pots and pans. The island I built also has a built-in cabinet where my wife keeps many of her large pots and pans. This also puts the cookware in close proximity to her when she needs them. Another pleasant advantage to using an island in your kitchen is that you can now face the center of your kitchen rather than facing a wall when using your countertops. This can lend itself to having a conversation with your children or your spouse while preparing your meal. Do not underestimate the importance of an island in your kitchen. Ask someone who has one and they will tell you that they cannot live without it.
Well, this isn’t fast cooking, per se, but still a kitchen accelerator. Purchasing a slow cooker or Crock-Pot can result in a tremendous productivity boost in your kitchen. Why, you might say? You can be cooking your nightly meal while you are busy taking your kids to their soccer game. All you have to do is load up the slow cooker and your meal can be cooking itself throughout the day. Not only does it make your life a whole lot easier, it will fill your house with a wonderful aroma. Just peruse the internet and you will find recipes, books, and sites that are devoted to slow cooking. Some favorites that my wife makes are pulled pork, chili, and basically any type of stew. Believe me, it is worth the investment.
The most popular free-standing mixer that is out there is made by KitchenAid. We picked one of their mixers up years ago and the advantages of this kitchen tool are numerous – and the time saved is tremendous. They may not be cheap, but the advantages are numerous. If you bake bread or make pizza for your family, a free-standing mixer is invaluable. If you purchase an attachment called a dough hook, you can use it to knead the dough while you are busy working on the rest of your meal. This mixer can also be used to whip potatoes, mix up meatloaf, or combine ingredients for cakes, pies, or any other type of dessert. Even though this type of mixer is expensive, they will last for years.
These days, kitchen gadgets that can be purchased are numerous. One special gadget that my wife utilizes is called a microplane. It is a tool that is approximately one foot long which includes a metal blade surface, about one inch wide, and a plastic handle. It is similar to the size of your typical hand file. The microplane is used to shred cheese, puree garlic, and to shred lemon or lime zest. The uses are endless and it has become an essential gadget in my wife’s kitchen arsenal.
A bread knife – especially if you cook or buy any type of bread – is an essential kitchen gadget. A bread knife is a special type of knife that has serrated edges which make it very easy to cut into a loaf of fresh bread. A bread board, which is a wooden surface with holes, allows you to cut the bread and the crumbs, will fall into a metal plan beneath it. The two pieces are separate which makes for easy cleaning.
Two other gadgets that are well used in our kitchen are the lemon and lime reamer. All you have to do is slice the lemon or lime in half and by simply pressing each side of the reamer together the juice can be easily directed to the food you are preparing.
There are numerous ways to increase your kitchen productivity; I have only scratched the surface. I didn’t even get into the clean-up! With the right setup, methods and the tools in place, you can make working in your kitchen not only more productive…but a lot more enjoyable.
Imagine you have a scheduled appointment or phone call in 10 minutes (let’s assume that you’re fully prepped for the appointment – or it’s not the type of thing that requires advanced work). 10 minutes is not enough time to tackle a major project, but still enough time to accomplish some small task. The question is: what will that task be?
When I have a window of spare time, I typically pull up Google Reader and scan through a couple of posts. It’s productive, because I’d want to read those posts at some point later. However, sometimes I’ll keep longer posts marked as unread if I don’t want to get sucked in to a “think” piece.
What about you? Will you click over to Facebook or Twitter and see what your friends are up to? Open a desk drawer and give it a quick refresh? Or start that big project and return to it later?
Last week, I gave seven advanced tips on reading RSS feeds. The post got some nice comments and fueled further discussion, and fellow WorkAwesome contributor Georgiana Cohen followed up with some Google Reader tips.
While I personally love my RSS reader, there are no doubts about the fact that RSS usage has seen a decline since it was invented. The main reason behind that: the birth of a variety of content aggregators and social media tools in the last 2-3 years.
I’ve found more and more people moving towards things like Twitter lists, alerts and aggregators like Alltop for consuming content. The good ol’ feed reader may be not be that relevant anymore.
Do you still use a feed reader as the primary tool to consume content? If not, what do you use?
Having office space to share can definitely be a great thing. But even if you and your office mate are the best of friends, it still has its challenges. Think of any other time in your life where you shared space with another person – whether it was your parents, a total stranger at summer camp or your freshman year at college. This is the same type of situation; you have to adjust to another person’s quirks, habits, and styles. Yet unlike a shared living space scenario, moving out may not be so easy. For this reason alone, it’s crucial to communicate and keep a high level of mutual respect in order to maintain harmonious office co-habitation.
You may not be thrilled at the idea of having to share your office space with another person but there are a few ways to not only make it more bearable, but even improve productivity on both sides:
Even if you’re co-habitating in the smallest closet-sized office in your department, try to claim a little corner of the room to call your own. This still gives you some personal space that you can arrange or decorate any way you’d like, and get your own work done without fighting for desk space or computer access.
One of the best things about sharing an office is that you have a live-in proofreader, spell checker, project teammate, or general sounding board who can give you feedback on ideas. I’ve shared an office for over two years, and this is definitely one of the perks. We constantly read our works in progress to each other to gauge how something sounds or if it should be worded differently. If you work in the same department with your office mate, try to collaborate on projects when possible. It will lighten the workload for both of you…and as the old saying goes: two heads are better than one.
This goes back to the first rule of office-sharing—communicate! If they listen to music as they work and you prefer quiet, ask them if they would mind keeping the volume down or using headphones. They may be oblivious to some of their personal habits that are absolutely maddening to you. Speak up! It could be an easy fix if you bring it to their attention. Politely, of course.
You might find that your work habits are rubbing off on each other. Maybe you’re the driven, “get it done now” type who thinks nothing of working overtime, while they’re a bit more laid back. But a few months from now, you might discover that you’re starting to ease up a bit on your intense focus and feeling a bit less stressed in the process, while they’re buckling down and improving their own performance. Along the same lines, many folks struggle with staying organized. If your office mate is one of them and their desk shows it, offer to help them get their files and work area in order. Not everyone is naturally tidy; rather than criticize or complain about their casual housekeeping methods, offer to help them.
Everyone gets the occasional personal call at work, not matter how much we try to avoid it. It can be awkward if you’re the person listening to the call rather than the one on the phone. If this is a one-time happening, give your co-worker some privacy if they don’t decide to take the call someplace else. Take a walk to the copy room or stop by to talk to another co-worker about a project. But if it looks like it might become a habit, ask your office mate if they would mind leaving the room for personal calls – especially if they’re for something you would really rather not overhear.
Office sharing is very different than sharing the wall of a cubicle. The shared office has no visible barrier between you and your office mate whatsoever. Like it or not, you’ll be up close and personal with each others’ lives and it can put a serious cramp in your productivity. Giving the above tips a try should help you cope – or even excel – in this type of environment.
Enthusiasm in the workplace is in a constant territorial battle with realism. New ideas emerge from your group, and they will either get welcomed by the energy of enthusiasm or cut down by the criticism of an overly-cautious environment. Every new idea, good or bad, has a risk and a cost involved. The ultimate challenge in any organization is to separate the viable ideas from the unworthy ones.
Where enthusiasm wins, you may find a daily brainstorm of overambitious ideas, all of which get encouraged, approved and pursued. The aftermath of enthusiasm’s victory is an ever-growing list of large, ambitious projects, and a staff stretched so thin that even the best ideas don’t get the attention they deserve. If you speak up and suggest that the group “picks their battles,” your realistic thinking might look like the product of a poor, negative attitude.
Where realism wins, the best ideas get cut down alongside the bad ones. People become obsessed with managing expectations, limiting the scope of projects, and running a “tight ship.” There’s no room in over-realism for risk; the status quo prevails. Practicality dictates that the ship “stays the course.”
Perhaps the best thing to do is fuel the fire, achieve “double-agent” status, and make sure there’s a constant, healthy battle between the two. You may not want either side to win.
Have you encountered over-enthusiasm? Have you been to a place that is all too cautious and realistic?
Friday Photo Critique is our weekly community project, where we publish a photograph submitted by one of our wonderful readers, then ask you all to offer constructive feedback on the image. It’s a great way to learn more about photography, express your viewpoint, and have your own image critiqued!
Without further ado, here is this week’s candidate for Friday Photo Critique!

Photographer: Chris Day
Please let us know what you think in the comments – how would you have approached the scene or taken the photo differently? A massive thank you to everyone who commented last week.
The most constructive and helpful comments will be featured on the site. Interested in submitting your own photo? You can do so here!
The MySQL 5 series introduced quite a few changes. Triggers and stored procedures were two of the big ticket items. One of the lesser known additions, at least from the amount of writing on the subject, is the introduction of views. While after a quick look at MySQL views, you might not see the obvious advantages, they’re there if you dig into them just a bit.
“A View is nothing more than a pseudo table doing the work of a defined query.”
In short, the easiest way to look at a view is that it is just a stored query which mimics a table. It’s nothing more than a pseudo table doing the work of a defined query. It doesn’t add any functionality, such as changing variables, nor does it fire other queries when something else happens. Views just sit there, fat dumb and happy doing what you defined them to do.
On first blush, this doesn’t sound like that big of a deal, but if you dig past the surface, you can start seeing some of the power of the lowly view. I am not going to say that views will change your life, but I will tell you that they will make the job of database interaction a little easier to work with. They will make your job a little easier when you make major version changes in your interaction layer. They will also make some difficult tasks such as dynamic reporting a little more efficient and a little easier to work with. I’ll take a little easier any day of the week.
With anything there are tradeoffs.
“Views may and probably will decrease your performance.”
As I have written in the past, I am a believer in making tradeoffs, as long as you understand what is on the table. More than likely someone will skim past this paragraph and make a comment that you should never use a view because of the performance hit. I disagree. You should use every tool in your toolbox, but when they make sense. You don’t use a hammer to put a screw into a wall, just as you wouldn’t use a view when you really need a heap / memory table. The flip side is the development usability for your applications. When it makes sense to save time, effort, and energy over the performance hit that you might take, take that choice. Development isn’t all about the performance of your applications, as there are other considerations such as support, time to market, and overall value of your time.
The tools that I am working with in this tutorial are pretty standard. I am using phpMyAdmin for the database interaction for explanation purposes. I will also be using very rudimentary table structures, strictly for ease of explanation. I don’t expect that these table structures would ever be used in a production environment, as I am merely using them for illustration.
One further note. There is no right or wrong way to name a view. However, I do name my views with the syntax of view_*primary_table*_*what_the_view_is_used_for* unless I am working for backwards compatibility changes. So, if I was creating a view for statistical reporting purposes on my salesforce table, my view name would be: view_salesforce_statistical_report. That can be rather long and you only have 64 characters to work with, so keep that in mind. It works for me, and my style, it might not work for you.
“I am not going to say that views will change your life, but I will tell you that they will make the job of database interaction a little easier to work with. They will make your job a little easier when you make major version changes in your interaction layer. They will also make some difficult tasks such as dynamic reporting a little more efficient and a little easier to work with.”
As I stated, a view is just a query. There are some slight configurations that we need to make when creating a view, so let’s discuss that first. In phpMyAdmin, in the “browse” table page, you will see a link called “Create View”.

If you click on that link you should see something that looks like this:

This, my friends, is where the magic happens. There isn’t much to explain on the page, but let’s take a quick look at the definitions that we need to understand to create a view.
First, there is “Create View” followed by “OR REPLACE”. If you click the OR REPLACE it will do exactly as you think, which is overwrite an existing view. Column names is the name of the columns in your table. Each is seperated by a comma, so it might look like first_name, second_name, etc. AS is the query.
There are two more items to explain, but the concepts are not hard. ALGORITHM has the selections of undefined, merge, and temp table. If you select “Merge” when there is a one to one relationship it will combine the incoming query with the view. Temp table is less efficient, but when you are not using a one to one relationship, such as a aggregation function like SUM() or you are using certain keywords like GROUP BY or HAVING or UNION, you have to use the temp table algorithm. That said, you can do like I do, and leave the algorithm as “undefined” and MySQL will select the best algorithm to use.
Finally, we have CASCADED CHECK OPTION and LOCAL CHECK options. The check options tell MySQL to validate the view definition if there is a condition on the query, like WHERE. If the WHERE clause excludes data, it will prevent updates or insertion of those rows where it should be excluded. The LOCAL CHECK deals with just the view you are defining, where CASCADED CHECK is for views that you have defined from other views. It will cascade the check for those as well.
That’s a view in a nutshell. Let’s take a look at some use cases to see them in action and where they may help your development efforts.
I have had it happen more times than I would care to mention when I design a single use table which I never think will need to be normalized further inevitably does. Let’s take the example that showed before with a few more records.

Obviously, my normalization skills leave something to be desired in this example. What I probably should have done when I first created this table, was have a seperate table for addresses, and then just call an address_id in my sales force table. The problem is, once I move to a database change, I have to run back through my logical interaction layer and make numerous query changes. Instead of doing that much work, why not let a view come to the rescue.
First, let’s make the change to my table structure. I copy my table structure and data to my new table, addresses and make the table sane such as adding address_id and removing the unneeded structure:


Then I just need to delete the offending columns and add my address_id back to my sales table.

This is a pretty common change that you make on a semi-regular basis, although rather simplistic in nature. You figure out that you can normalize something because of a new feature. In this case, we can reuse our addresses for customers, or for other employees, or for whatever we might store addresses. This work isn’t that difficult, but depending on your query reuse, finding all of the places that you call our old sales_force table might be a much larger change in scope. In comes a view.
Instead of going back through our code right now, and instead wait for a normal release cycle, we can create a view to keep our old functionality intact. I changed the name of our sales_force table to sales_force_normalized:

Now we can create our view to maintain backwards compatibility:

And we have our backwards compatibility with just the extra work of creating one query that sits in MySQL:

Even when I enter a new sales person, my view will reflect the change:

And, presto:

About two minutes of work to maintain our backwards compatibility to our previous data structure. There are drawbacks to this method, in that you can not define an index against your view which is important when you are cascading views. In addition, you will still need to change your queries for INSERT, DELETE and UPDATE, but this will save you some work. Your performance could drop a bit, but as a stop gap, there is no easier way to make a change to your data structure to ease your code base into that change. Your queries in your logic layer will be untouched because as far as they know, they are looking at the original table.
Now that we have our proof of concept under our belts, let’s look at another use. I created another table to capture the sales data from my salesforce table and filled it with some random information. It looks like this:

It’s an extremely simplified table to capture the sales of the salesforce for illustration. There are always things that we want to extract for measurement on a table like this. I probably want to know the total sales. I probably would want to know the total sales by person. I also might want to know the rank of the sales performance. I could write queries in my database logic to perform each of these when I need them, or I could simply write a view to grab the data as needed. Since this is a tutorial about views, I guess the choice is pretty simple at this point which tactic to take.
Let’s start by evaluating the total sales, along with some other pertinent information:

Which gives us a view of:

I also included the query time on this one, as looking at 200 records, this is lightening fast, but performance will vary. Notice that I am not using the CHECK functions because I am not discriminating the information in a WHERE clause. Now that we have this information neatly packaged, it’s just a matter of building our reporting mechanism in our logic.
Getting this information isn’t that hard. Let’s take this just a step further and use a GROUP BY function and a join function against the salesforce. Again, I am using simplified queries to illustrate. In this case, we want to get the same information that we had from total sales, but this time broken down by our individual sales person.

Which gives us a view of:

Again, very simple in the end to get these values out of your database. Let’s take a look at one more example, which will combine the two views. I want to compare the totals against the individual, and so we will create a view of two views:

Which gives us a view of:

One other benefit of views is they do provide a further level of security to your applications. You are not exposing your table structure to your application. Instead, you’re exposing something that doesn’t really exist, except as a pseudo table. I wouldn’t call a view a best practice and use them primarily for writing secure applications, but I would look at it as an added benefit.
I use views in a limited fashion. Where I use views are as demonstrated above, particularly in the reporting mechanisms in my applications. Writing a query to perform the heavy lifting for me is much easier than writing the logic around more difficult queries. I do take a bit of a hit on my performance from time to time, which I tend to overcome by optimizing the original data structure. I’ve yet to have one be a show stopper in terms of performance, but the day is young. Thanks so much for reading.