I have few sites, On which I need SEO experts for. I dont need big words. I need proper SEO white hat strategies. And how can you make my sites listed in google and yahoo first page. I need longterm expert to handle the SEO of these sites… (Budget: $750-1500, Jobs: Advertising, Bulk Marketing, Internet Marketing, SEM / Adwords, SEO)
Access Database – Player List
Logo Needed – See Attachemnts And Instructions
We need a logo created. Please see all of the attachments and use as a guide to create the following:
1. Rover Awards (name on Logo) Rover up top and Awards to be at bottom at designers artistic discretion (several version requested)
2. “Rover should be arched with the “v” in the middle and the arms in the prototype award will replace the “v’ and serve as that letter in the word.
3. The round disc in the hands of the prototype will be clear glass like in the Stevie Award Close Up pic but will be round not triangle.
4. The general idea is the basic concept used in the2010 Stevie Logo jpgs attached but it will be the “v” replaced
5. The award in the logo should be fairly simplistic with the actual award base not included like in the Stevie Main Logo bmp attached.
6. Need several font options and mock ups. Logo should be gold like the Stevie Main Logo with a secondary color with a few options. No bleeds or blended colors please.
7. We need to own the logo, need all .ai files, vector files low res and high res files and all .eps files. we also need logo with only the gold and clear otherwise for print purposes on other backgrounds and backdrops.
If you are not clear on anything, send a PM to clarify.
You must put “ROVER” in your PM or it will not be read. I will not accept canned replies at all.
Keywords Tracking With Php
I need a simple PHP script that should be placed at the top of every web page of any website and generate a unique number (integer) for every search query that comes from the Internet (using the referrer).
The script should be able to manage diferent websites from a single instalation.
Example: If the user types in Google: “Roman Empire”, the script creates a record with all information available. After that another user types in Google “History of the Roman Empire”, since the search is new in the database, it generates another record, a third user types “Roman Empire” and since this search already exists and both are from Google then only the “count” field is incremented.
Sweepstake Program
we are established a company to provide the customers a turnkey operation for internet cafe ,we interested in :
1. Software To Run Cafe
2. Software For Sweepstakes Games To Be Installed On
Each Computer. (Sweepstakes Software May Be Online & Web Based)
3. Sweepstakes management software
4 Upgradable hardware configurations with multiple
computer component
5 POS validates and awards sweepstakes prize
6. Examples Of Games Used For Sweekstakes
Facebook Posting (using Python)
Css Menu
Accessing “Right To Left” Languages Within After Effects
Right to left languages are widely used in After Effects, but traditionally these languages are not treated like text in After Effects. We have to instead covert them to vector graphics which limit many possibilities that are only possible with text layers. In this Quick Tip we will learn to enable languages and manipulate “RTL” text right within After Effects. This tutorial is for After Effects CS4 and the preview video for this tutorial is just to show the capabilities of RTL languages in After Effects. I will not be discussing how to achieve this effect.
Tutorial
Download Tutorial .flv
File size 254MB
Core Art Skills: Part 1, Welcome to the Course
Vectortuts+ is excited to bring you a new five part series on core art skills. In this series, Ben Mounsey will be sharing in-depth knowledge and analysis of the skills required to become a better illustrator. Ben will be outlining four main skills; using sketchbooks, life drawing, working in traditional 3D and using traditional media techniques for your digital work, culminating in a professional tutorial that will knock your socks off! This series is great for all skill levels and you’ll be surprised how a solid understanding of traditional methods can greatly improve your digital workflow. Let’s get started!
Continue reading “Core Art Skills: Part 1, Welcome to the Course”
Open Mic: Tell Us About the First Time You Played in Public
Do you remember the first time you played or sang in public? Tell us about your first performance.
Each Tuesday we open our mic to readers and lurkers alike to come out of the woodwork and tell us your thoughts and opinion, your experiences and mistakes, what you love and what you hate. We want to hear from you, and here’s your chance.
How did you feel before your first performance, and how did it go? What type of performance was it? Did it inspire you or discourage you? How long was it until you performed publicly again? Which instrument did you play? Do you have a story to tell?
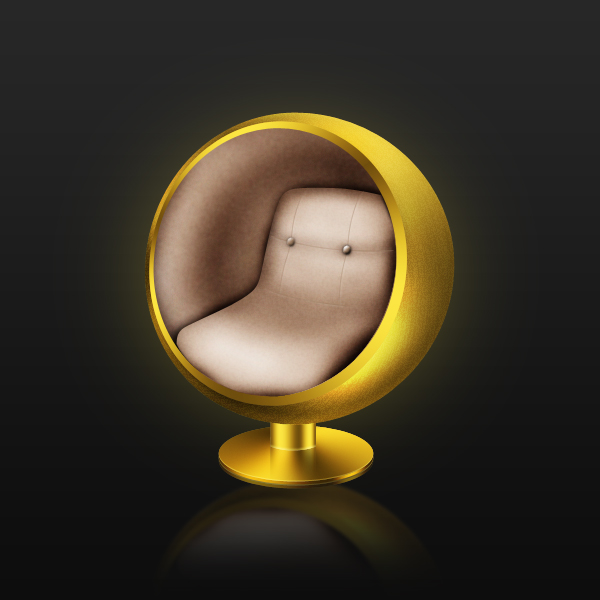
Create a Iconic Retro-Modern Ball Chair in Photoshop
The ball chair, popularized by Finnish interior designer Eero Aarnio was the cornerstone of any mid-century or 1960’s living area. Today, we will learn how to create this iconic piece of furniture from scratch in Photoshop. Let’s get started!
Step 1
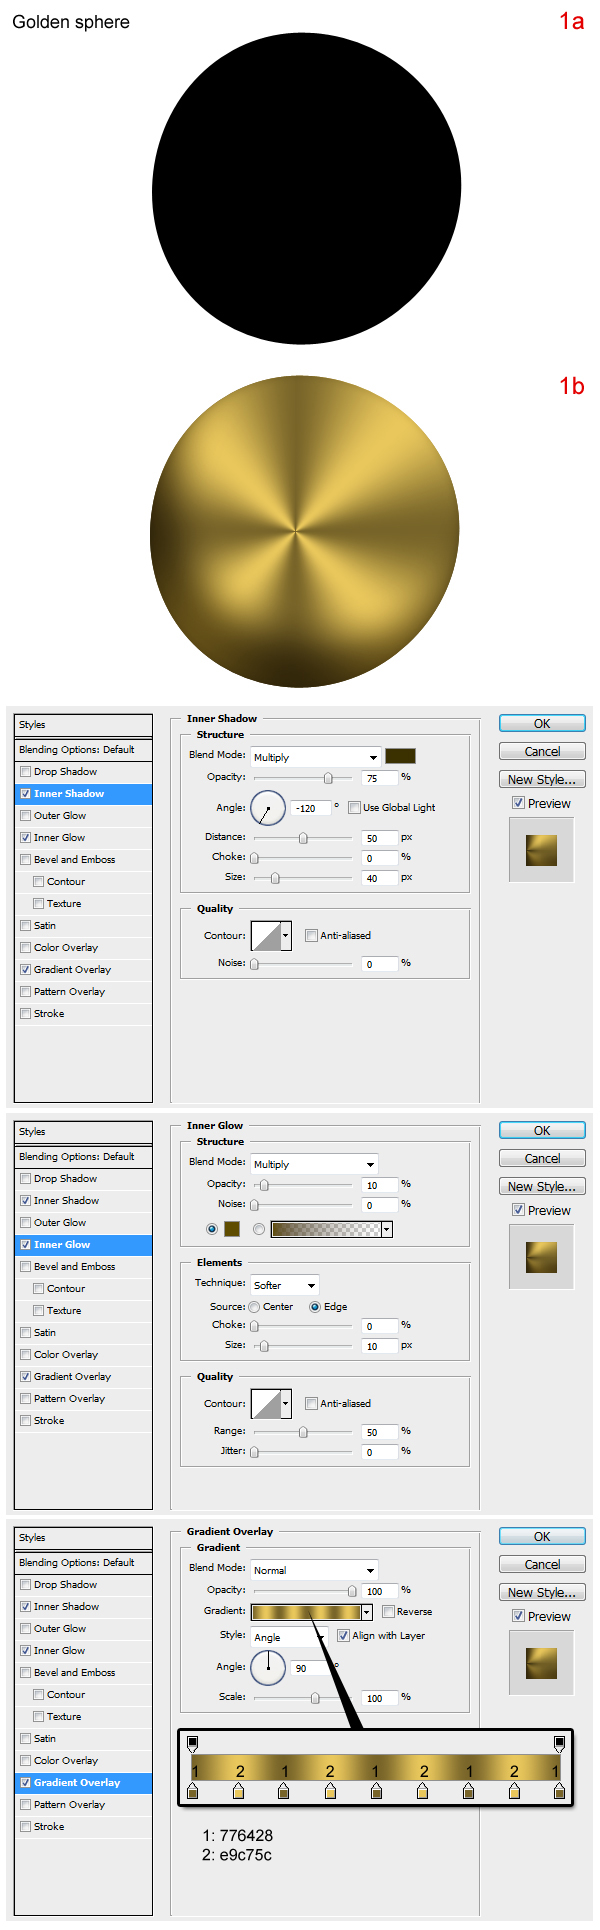
In new document, create a new layer; name it “golden sphere”. Use the Elliptical Marquee Tool to draw a circle and it fill with any color (1a). Then apply the layer styles as shown in figure (1b).

Step 2
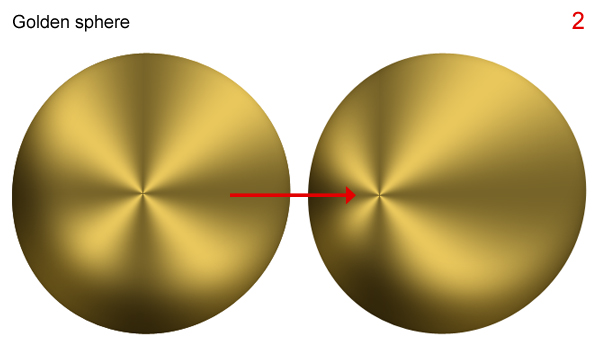
Place the center of the gradient as shown.

Step 3
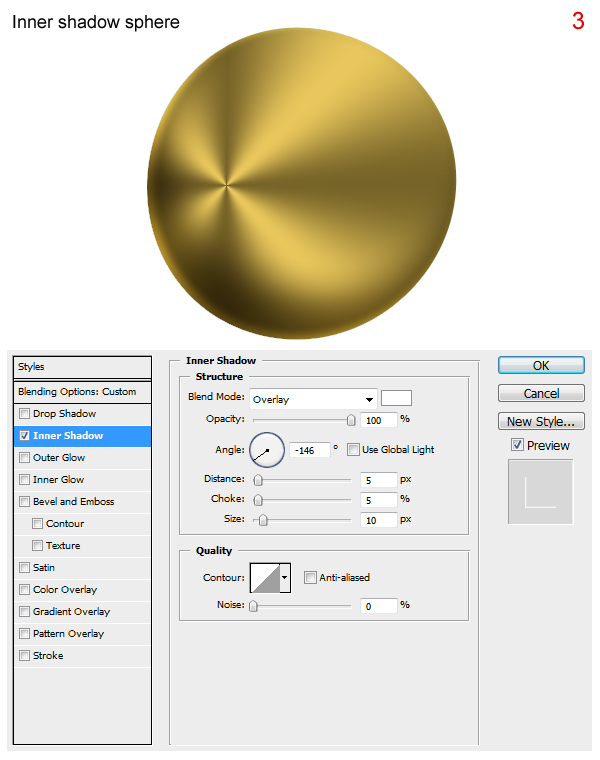
Press Cmd/Ctrl + J to duplicate “golden sphere”. Rename the new layer “Inner shadow sphere”, reduce Fill to 0% and apply style below.

Step 4
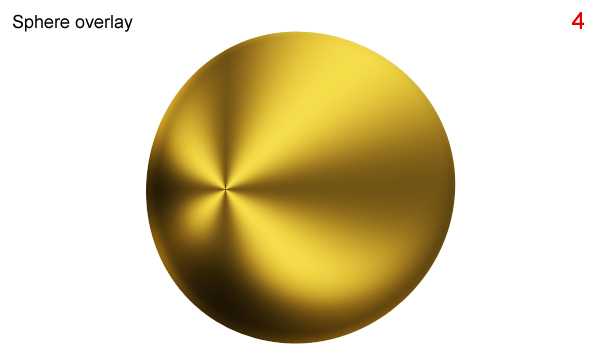
Press Cmd/Ctrl + J to duplicate “golden sphere”, create a new layer above the duplicated layer. Select both new layers and press Cmd/Ctrl + E to merge them. Rename new layer “sphere overlay” and change its Blending Mode to Overlay.

Step 5
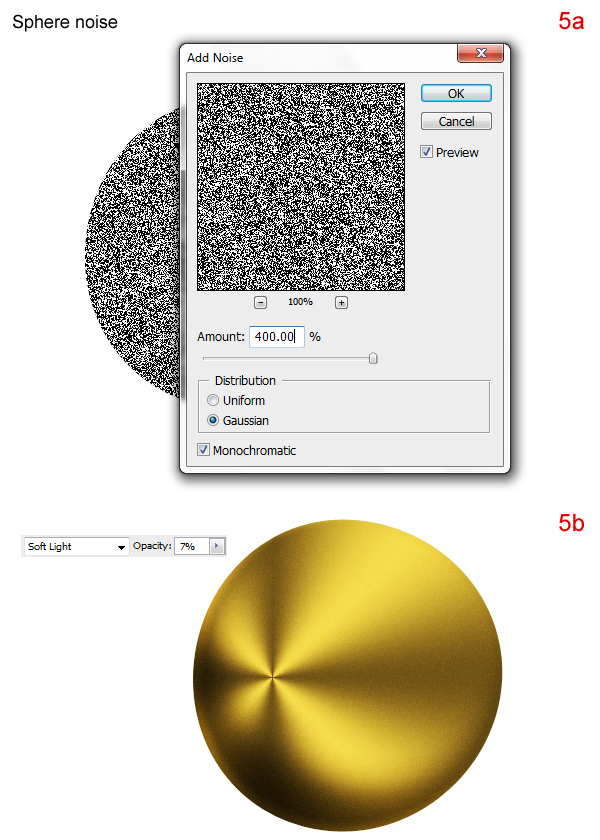
Press D to reset the foreground and background colors to black and white. Create a new layer on top, call it “sphere noise” and draw a circle with black. While holding Cmd/Ctrl click on “sphere noise” to obtain its selection. Go to menu Filter > Noise > Add Noise and set as shown in figure (5a). Then change its Blending Mode to Soft Light and reduce Opacity to about 7% (5b).

Step 6
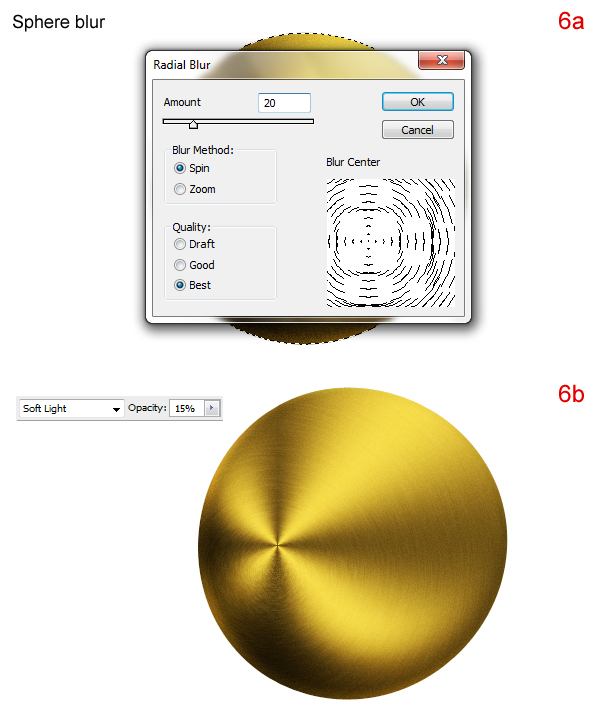
Press Cmd/Ctrl + J to duplicate “noise sphere,” rename new layer “sphere blur.” While holding Cmd/Ctrl click on “sphere blur” to obtain its selection. Go to menu Filter > Blur > Radial Blur and set as in figure (6a). Then reduce its Opacity to about 15% (6b).

Step 7
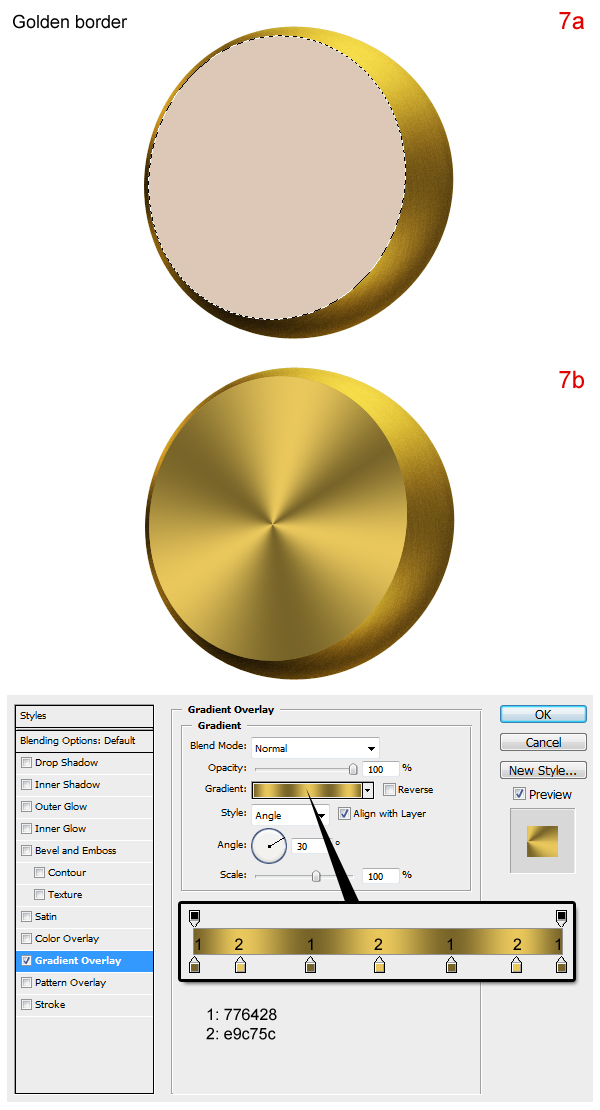
Create new layer on top, call it “golden border” and draw as show in figure (7a). Then, apply the layer styles as shown in figure (7b).

Step 8
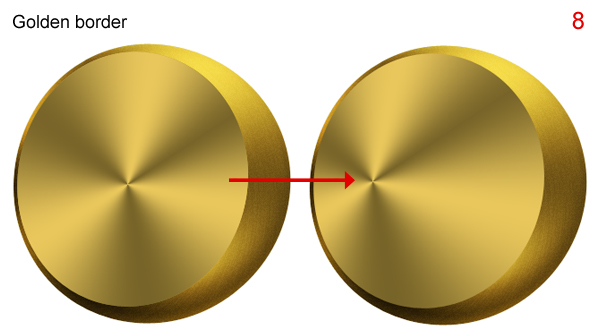
Place the center of the gradient as show.

Step 9
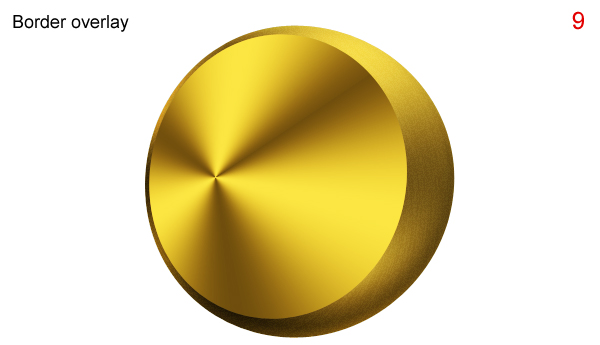
Press Cmd/Ctrl + J to duplicate “golden border,” create a new layer on top of “golden border 2”. Select both new layers and press Cmd/Ctrl + E to merge them. Rename the new layer “border overlay” and change its Blending Mode to Overlay.

Step 10
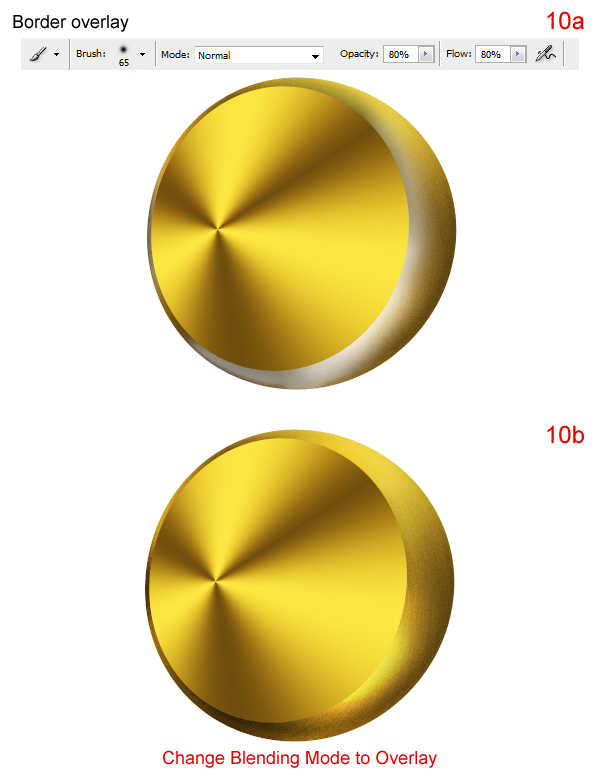
Create a new layer between “sphere blur” and “golden border,” call it “light”. Use the Brush Tool as shown in (10a) to draw like a highlight as shown in figure (10a). Then change its Blending Mode to Overlay (10b).

Step 11
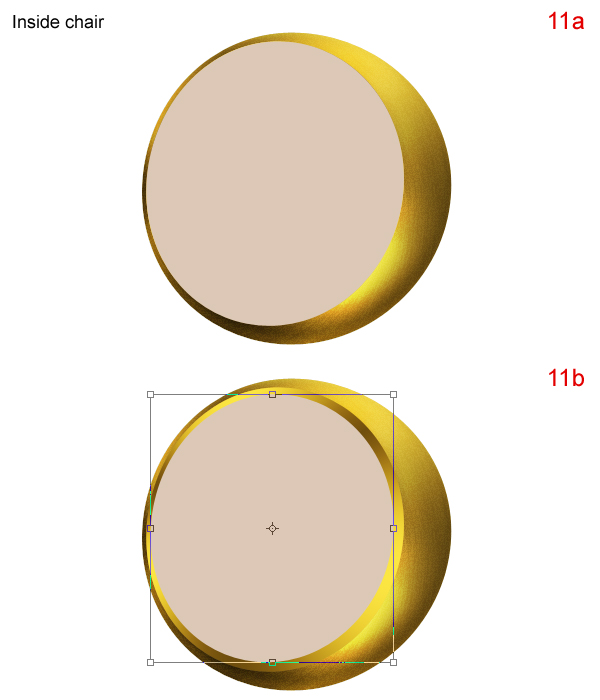
Press Cmd/Ctrl + J to duplicate “golden border,” rename it “inside chair” and send it toward the top (above “border overlay”). Remove its later styles, fill color as show in figure (11a). Press Cmd/Ctrl + T to transfom it as shown in (11b).

Step 12
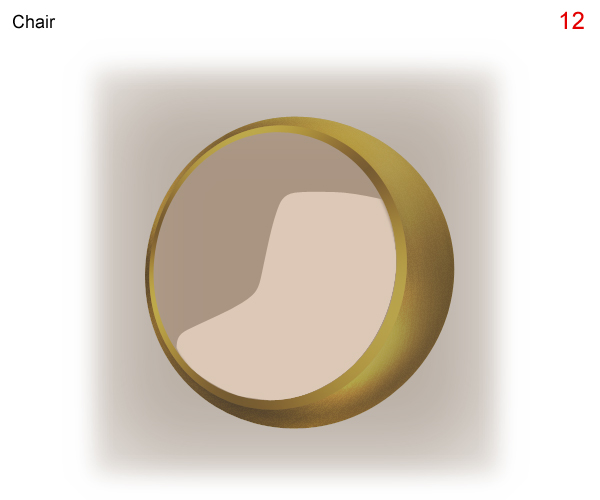
Create a new layer on top, call it “mattress”. Draw a shape as shown below and fill it with the same color as “inside chair.”

Step 13
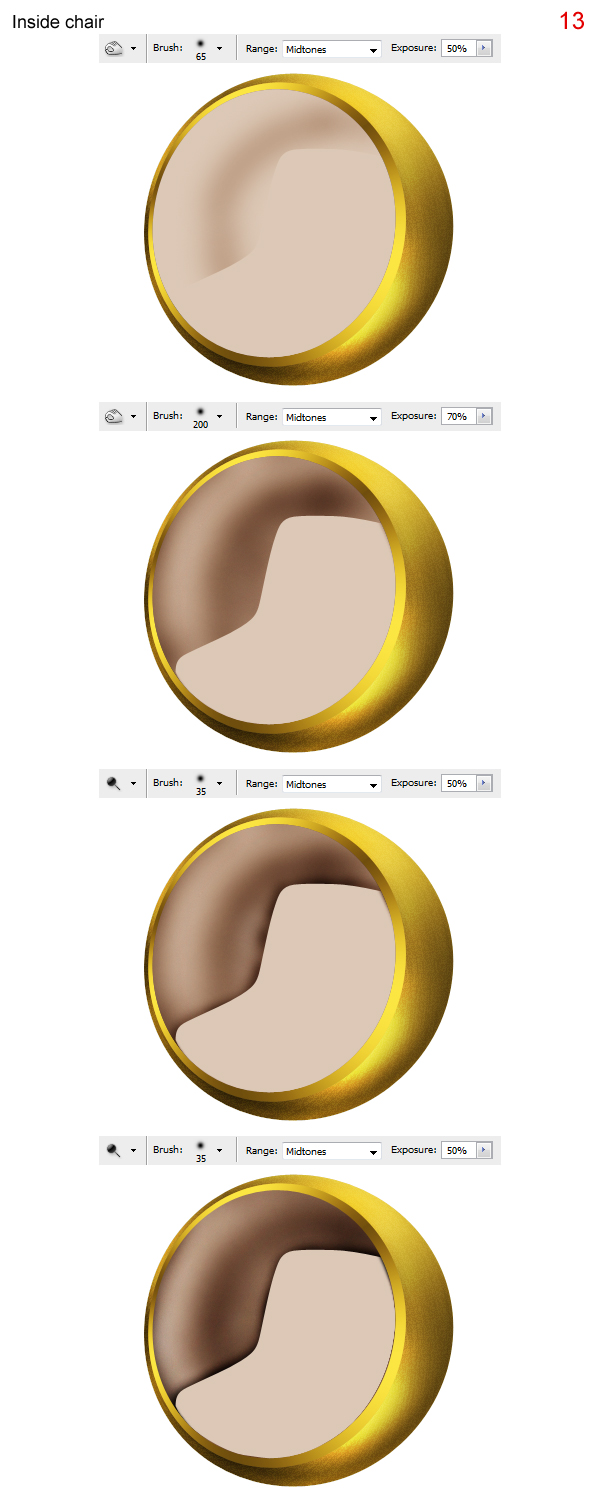
Use the Burn and Dodge tool on the “inside chair” layer to paint in some shading as shown below.

Step 14
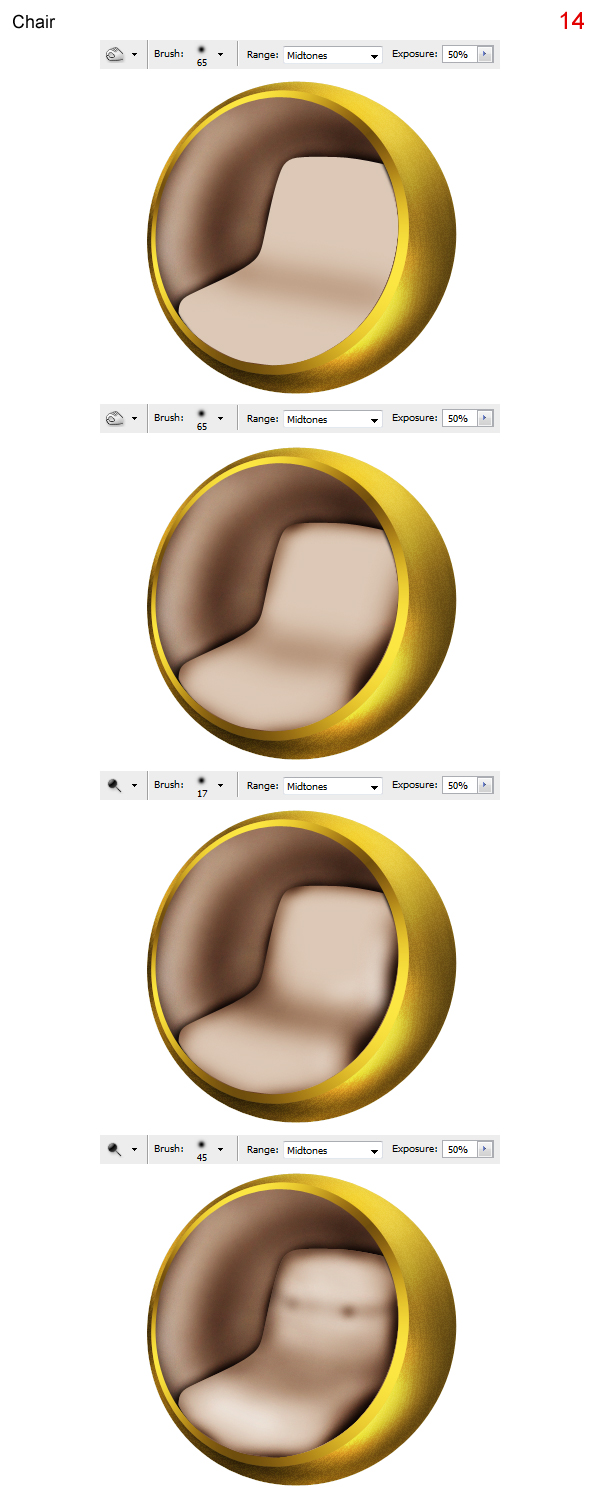
Now select the “chair” layer and use the Burn and Dodge Tool to paint some shading as shown below.

Step 15
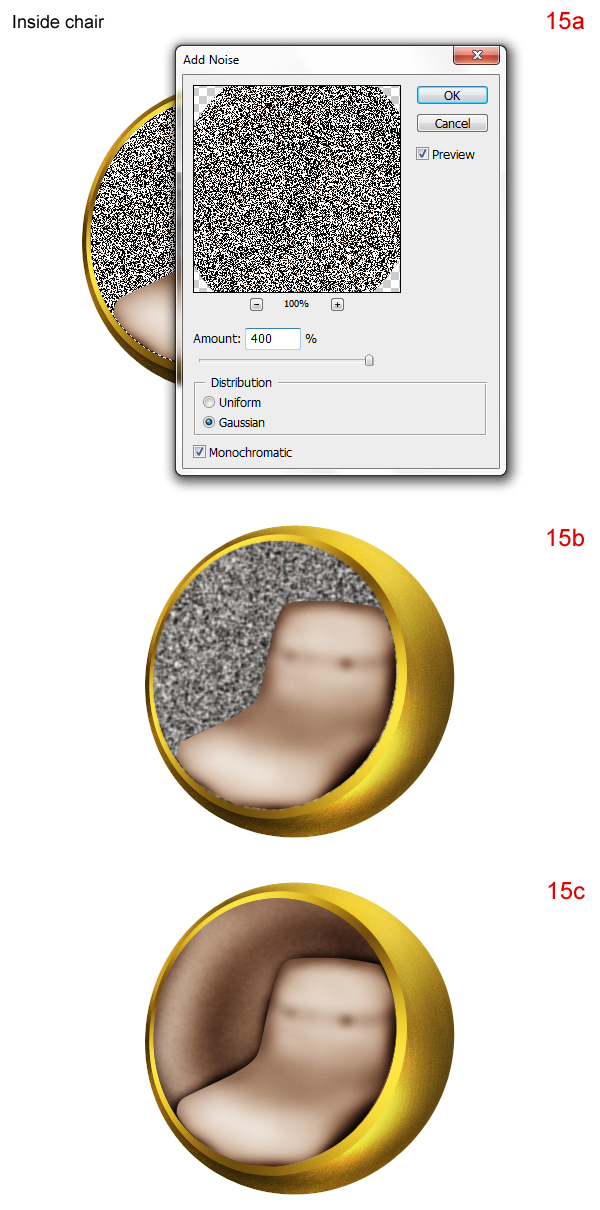
Press Cmd/Ctrl + J to duplicate “inside chair,” rename the new layer “inside chair noise.” Go to menu Filter > Noise > Add Noise and use the settings as shown in figure (15a). Go to menu Filter > Blur > More Blur, press Cmd/Ctrl + F about 2 – 3 times (15b). Then change its Blending Mode to Soft Light and reduce Opacity to 15% (15c).

Step 16
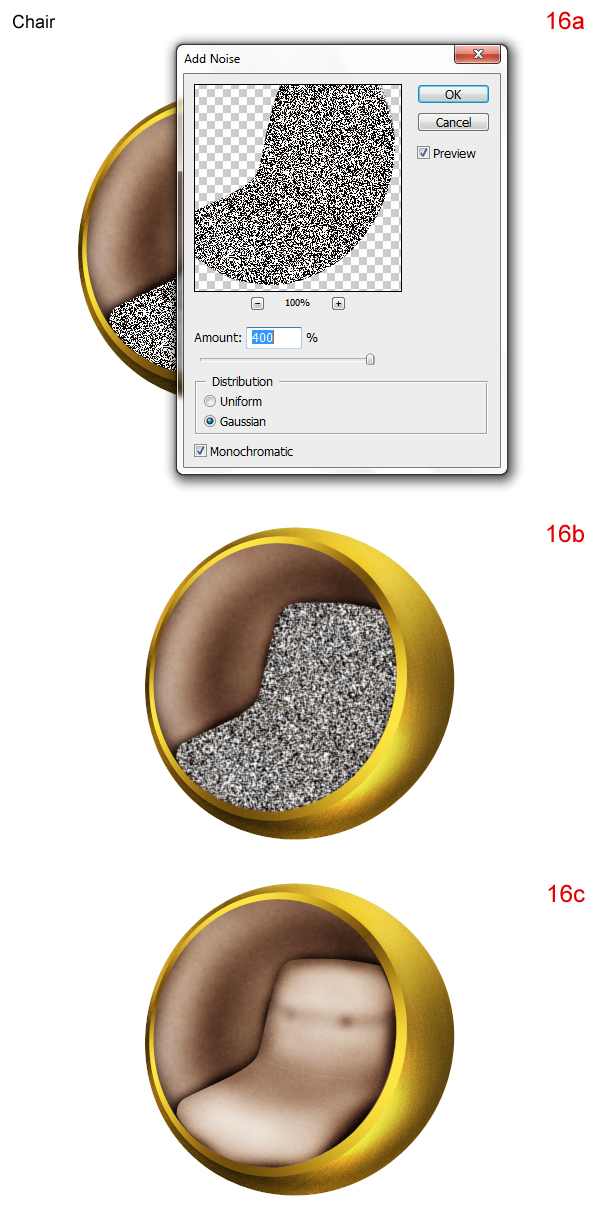
Press Cmd/Ctrl + J to duplicate “chair,” rename the new layer “chair noise.” Go to menu Filter > Noise > Add Noise and use the settings as shown in figure (16a). Go to menu Filter > Blur > Blur, press Cmd/Ctrl + F about 1 – 2 times (16b). Then change its Blending Mode to Soft Light and reduce Opacity to 10% (16c).

Step 17
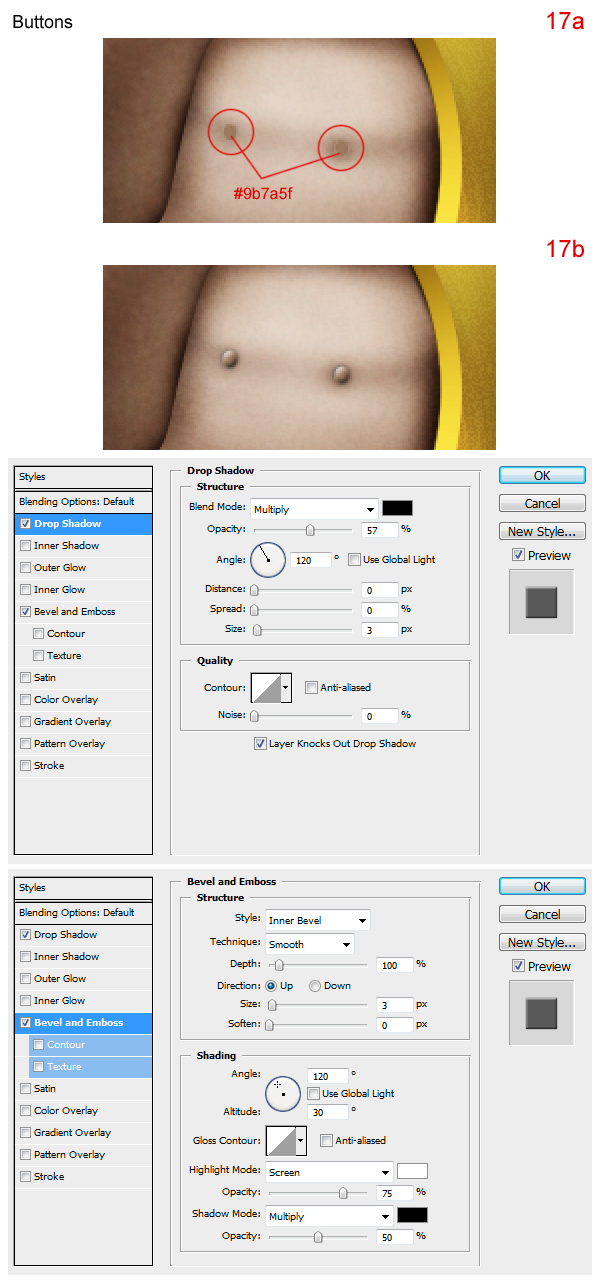
Create a new layer on top, call it “buttons”. Draw as shown in figure (17a). Then apply the layer styles as shown in figure (17b).

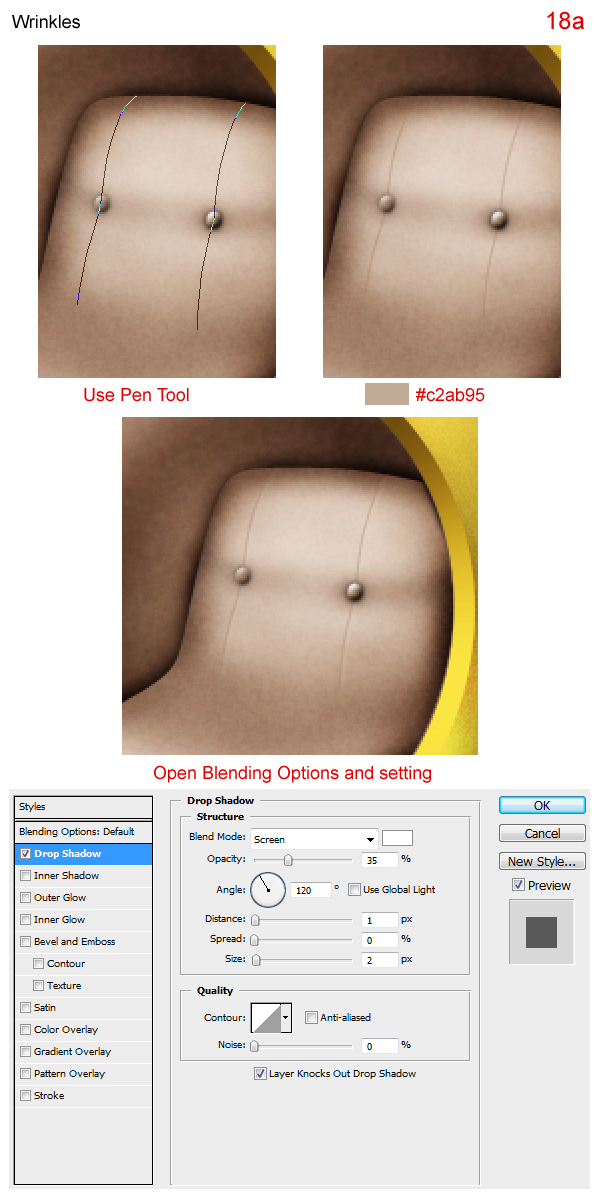
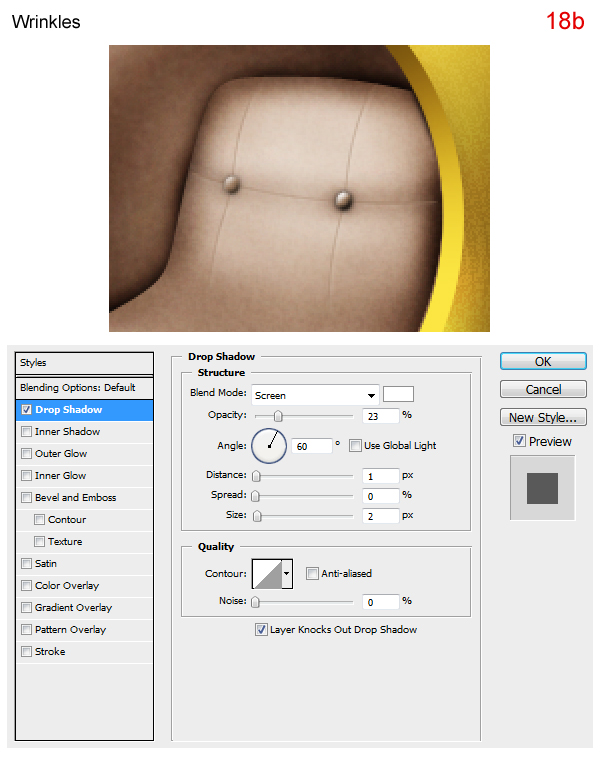
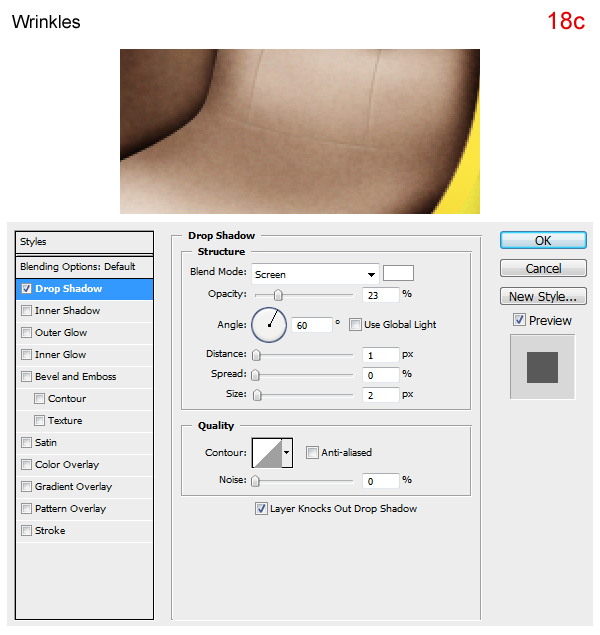
Step 18
Draw some seams as shown below.


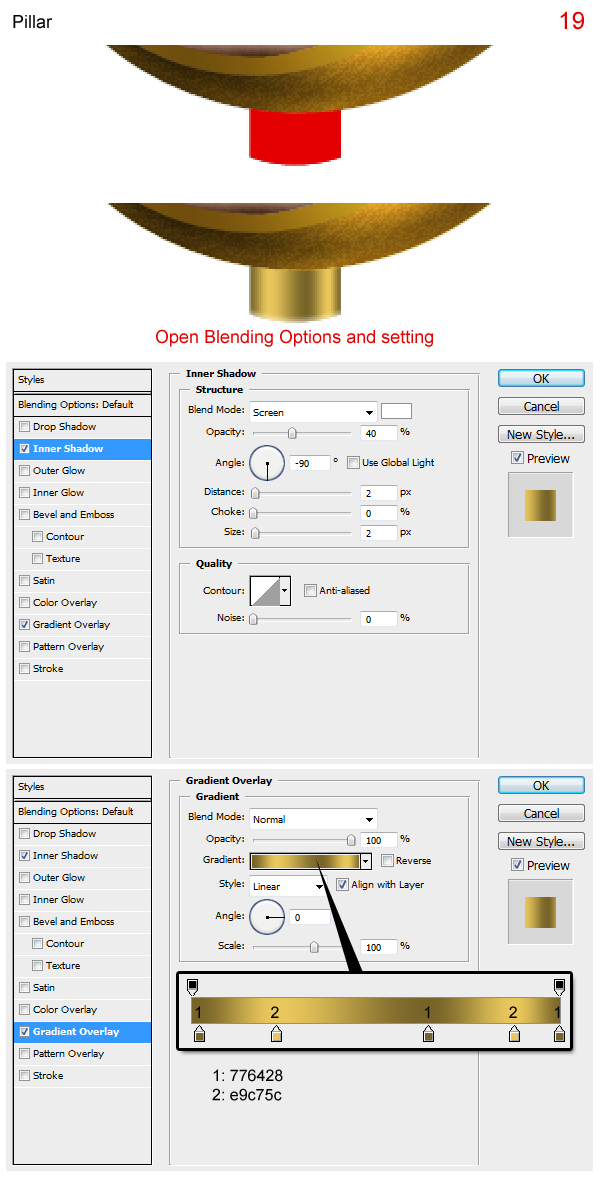
Step 19
Create a new layer under “golden sphere,” call it “pillar.”

Step 20
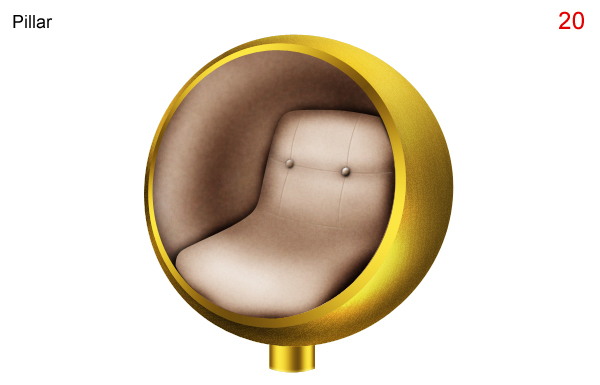
Press Cmd/Ctrl + J to duplicate “pillar.” Create a new layer above “pillar copy”. Select the two new layers and press Cmd/Ctrl + E to merge these layers into one new layer, rename it “pillar overlay” and its change Blending Mode to Overlay.

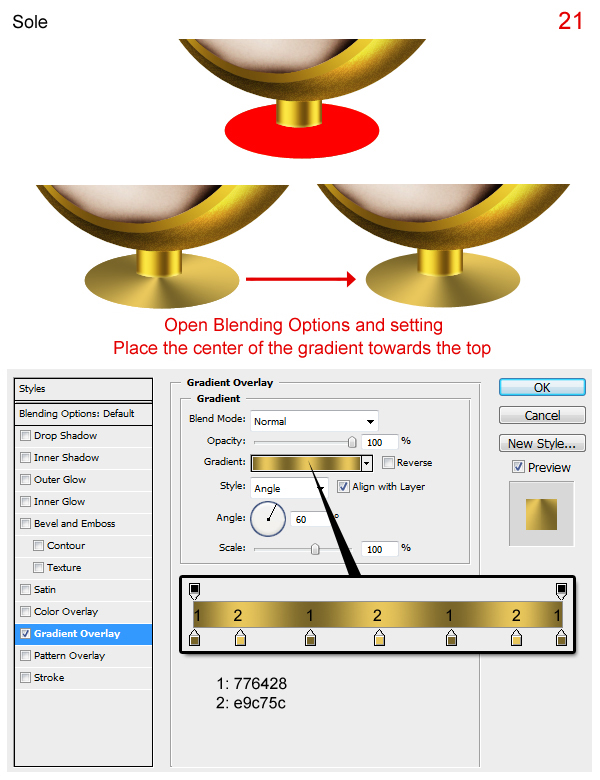
Step 21
Create a new layer under “pillar,” call it “sole.”

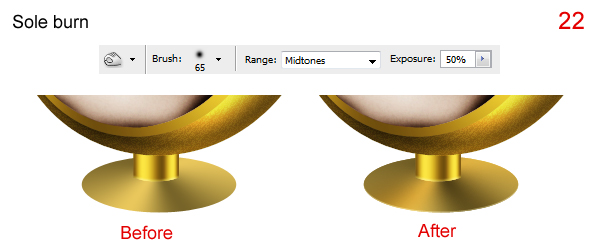
Step 22
Press Cmd/Ctrl + J to duplicate “sole.” Create a new layer above “sole copy.” Select the two new layers and press Cmd/Ctrl + E to merge these layers into one new layer, rename it “sole burn” then use Burn Tool as shown in figure (22) to add some shadowing.

Step 23
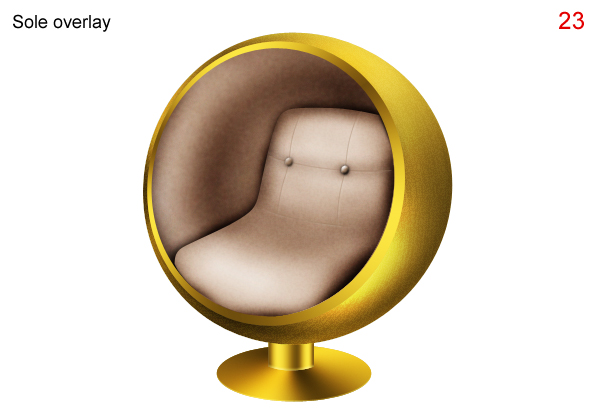
Press Cmd/Ctrl + J to duplicate “sole burn,” rename the new layer “sole overlay” and change its Blending Mode to Overlay.

Step 24
Press Cmd/Ctrl + J to duplicate “sole,” rename new layer “sole 2.” In Layers panel, send “sole 2” behind “sole”. Then press the down arrow key 2 times to move it as show in figure (24).

Step 25
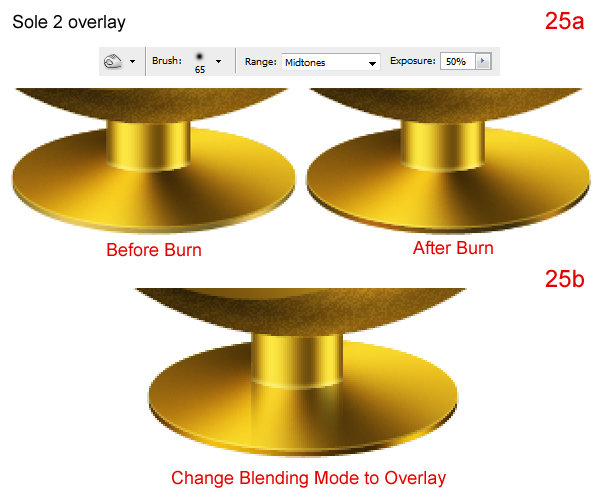
Press Cmd/Ctrl + J to duplicate “sole 2.” Create new layer above “sole 2 copy.” Select the two new layers and press Cmd/Ctrl + E to merge these layers into one new layer, rename it “sole 2 over” and use Burn Tool as shown in figure (25a) to add some shadows (25a). Then change its Blending Mode to Overlay (25b).

Step 26
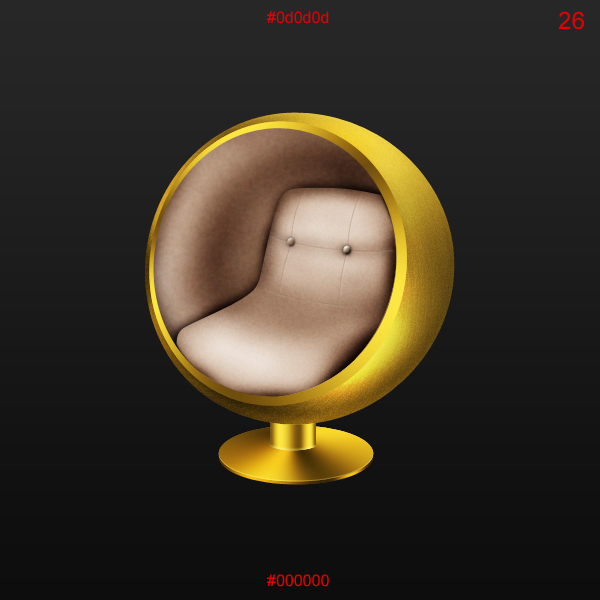
Fill the background with a linear gradient as shown.

Step 27
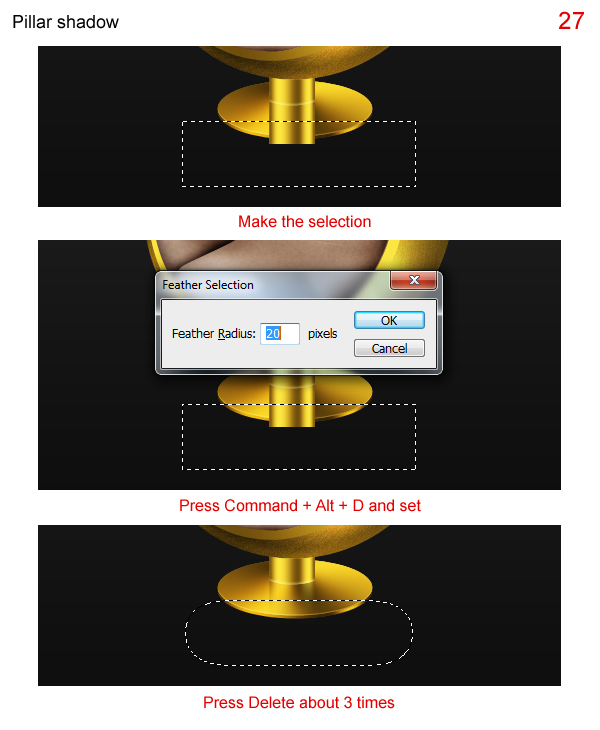
Select “pillar” and “pillar overlay,” right click on these layers and choose Duplicate Layers. Press Cmd/Ctrl + E to merge them into one new layer, rename it “pillar shadow.” Then send it behind “pillar” and perform the steps below.

Final Image
That’s it! We’re finished!

Need 10 articles (5 orig & 5 rewrites) on July 9 by annielie
I need a total of 10 articles to be completed/turned in on July 9, 2010. There are 5 topics. For each topic, you need to search and write one quality and unique article. Then, from that original article, you have to rewrite it according to paragraph… (Budget: $30-250, Jobs: Article Rewriting, Articles)