Stardust Particle Engine provides two major approaches to freely manipulate particle motion, namely gravitational fields and deflectors. Gravitational fields are vector fields that affect a particle’s acceleration, and deflectors manipulate both a particle’s position and velocity.
The first part of this tutorial covers the basics of particle motion and gravitational fields. Also, it demonstrates how to create your own custom gravitational fields. The second part focuses on deflectors and how to create custom deflectors.
Prior knowledge of the basic usage of Stardust is required to continue reading this tutorial. If you’re not familiar with Stardust, you can check out my previous tutorial on the subject, Shoot out Stars with Stardust Particle Engine, before going on.
Final Result Preview
Let’s take a look at the final result we will be working towards. This is an example of a custom vortex gravitational field.
Particle Motion Basics
It’s time for some quick flashback on high school physics. Remember basic kinematics? It’s all about displacement, which is just a fancier way to say “position,” and its relation to time. For the scope of this tutorial, we only need a rather simple grasp of the topic.
Displacement
Displacement means the current position of an object. In this tutorial the “objects” we are mainly dealing with are particles in 2D space. In 2D space, the displacement of an object is represented by a 2D vector.
Velocity
An object’s velocity denotes how fast an object’s position changes and the direction of the change. The velocity of an object in 2D space is also represented by a 2D vector. The vector’s x- and y-components represent the direction of the change of position, and the vector’s absolute value denotes the object’s speed, i.e. how fast the object’s moving.
Acceleration
Acceleration is to velocity as velocity is to displacement. The acceleration of an object denotes how fast an object’s velocity changes and the direction of the change. Just like the velocity of an object in 2D space, an object’s acceleration is represented by a 2D vector.
Vector Fields
Another thing worth mentioning is the concept of vector fields. You can basically view a vector field as a function that takes a vector as its input and outputs another vector. Gravitational fields are a kind of vector fields that take position vectors as inputs and output acceleration vectors. For example, in physics simulation, usually a uniform gravity pointing downward is applied to all objects; in this case, the gravitational field representing the gravity is a vector field that outputs a constant vector (pointing down), no matter what the input position vectors are.
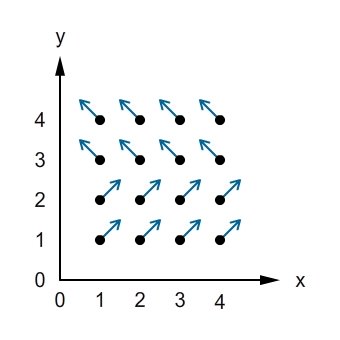
This is a visualized graph of a vector field. The output vector of a given input vector (1, 2) is (0.5, 0.5), while the output of an input (4, 3) is (-0.5, 0.5).
The Field class in Stardust represents a 2D vector field, and its 3D counterpart, the Field3D class represents a 3D vector field. In this tutorial, we’ll only focus on 2D vector fields.
The Field.getMotionData() method takes a Particle2D object, containing a particle’s 2D position and velocity information, as parameter. This method returns a MotionData2D object, a 2D vector “value object” that is consisted of x- and y-components. Combined with the Gravity action, a Field object can be used as a gravitational field, whose output is used to manipulate particle velocity.
That’s all for our high school physics recap. Now it’s time for some real Stardust stuff.
The Gravity Action
As previously mentioned, the Gravity action class makes use of Field objects as gravitational fields to manipulate particle velocity. Here’s how you create a uniform vector field, a vector field that returns a constant vector no matter what input is given, and wrap it into a Gravity action.
//create a uniform vector field pointing downward (remember positive y-coordinate means "down" in Flash)
var field:Field = new UniformField(0, 1);

//create a gravity action
var gravity:Gravity = new Gravity();

//add the field to the gravity action
gravity.addField(field);
This Gravity action is now ready to be used in the same way as any other ordinary Stardust actions.
//add the gravity action to an emitter
emitter.addAction(gravity);
Example: Windy Rain
We are going to create a windy rain effect using the Gravity action.
Step 1: Basic Raining Effect
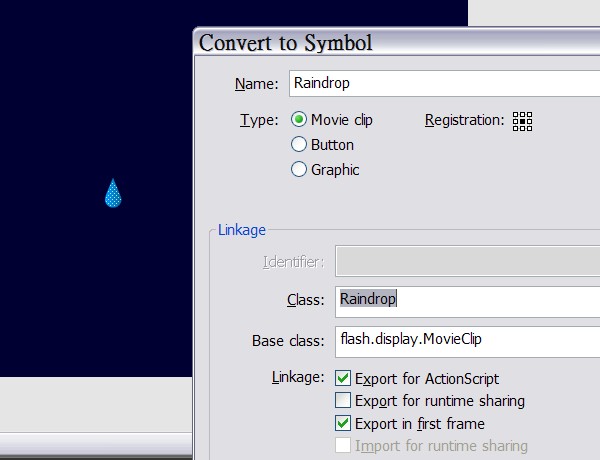
Create a new Flash document, choose a dark color for background, draw a raindrop on the stage, and convert the raindrop to a movie clip symbol, exported for ActionScript with a class name “Raindrop”. Delete the raindrop instance on the stage afterward.
Now we’re going to create an AS file for the document class, and an AS file for the rain emitter. I won’t explain the code here, since I’ve already covered the basic usage of Stardust in my previous tutorial. If you’re not familiar with Stardust or you need some refreshment, I strongly recommend that you read my previous tutorial before moving on.
This is the document class.
package {
	import flash.display.*;
	import flash.events.*;
	import idv.cjcat.stardust.common.emitters.*;
	import idv.cjcat.stardust.common.renderers.*;
	import idv.cjcat.stardust.twoD.renderers.*;

	public class WindyRain extends Sprite {

		private var emitter:Emitter;
		private var renderer:Renderer;

		public function WindyRain() {
			emitter = new RainEmitter();
			renderer = new DisplayObjectRenderer(this);
			renderer.addEmitter(emitter);

			addEventListener(Event.ENTER_FRAME, mainLoop);
		}

		private function mainLoop(e:Event):void {
			emitter.step();
		}
	}
}
And this is the emitter class used in the document class.
package {
	import idv.cjcat.stardust.common.clocks.*;
	import idv.cjcat.stardust.common.initializers.*;
	import idv.cjcat.stardust.common.math.*;
	import idv.cjcat.stardust.twoD.actions.*;
	import idv.cjcat.stardust.twoD.emitters.*;
	import idv.cjcat.stardust.twoD.initializers.*;
	import idv.cjcat.stardust.twoD.zones.*;

	public class RainEmitter extends Emitter2D {

		public function RainEmitter() {
			super(new SteadyClock(1));

			//initializers
			addInitializer(new DisplayObjectClass(Raindrop));
			addInitializer(new Position(new RectZone(-300, -40, 940, 20)));
			addInitializer(new Velocity(new RectZone( -0.5, 2, 1, 3)));
			addInitializer(new Mass(new UniformRandom(2, 1)));
			addInitializer(new Scale(new UniformRandom(1, 0.2)));

			//actions
			addAction(new Move());
			addAction(new Oriented(1, 180));
			addAction(new DeathZone(new RectZone( -300, -40, 960, 480), true));
		}
	}
}
This is what our current progress looks like.
Step 2: Make it Windy
Now we’re going to make the rain effect windy by adding a uniform gravitational field that “pulls” the raindrops to the right. Add the following code in the constructor of the RainEmitter class.
//create a uniformfield that always returns (0.5, 0)
var field:Field = new UniformField(0.5, 0);

//take particle mass into account
field.massless = false;

//create a gravity action and add the field to it
var gravity:Gravity = new Gravity();
gravity.addField(field);

//add the gravity action to the emitter
addAction(gravity);
Note that we set the Field.massless property to false, which is true by default. When set to true, this property causes fields to act like ordinary gravitational fields, affecting all objects equally regardless of their mass. However, when the property is set to false, particle mass is taken into account: particles with larger mass are less affected by the field, whereas particles with smaller mass are affected more. That is why we used the Mass initializer in our previous emitter code, to add some randomness into the rain effect.
Test the movie again, and this is what our outcome looks like. Raindrops are now affected by a gravitational field and are all “pulled” to the right.
Example: Turbulence
Now we’re going to swap the UniformField object with a BitmapField object, returning vector fields based on a bitmap’s color channels, to create a turbulence effect. If you’ve worked with ActionScript for a while, you might be expecting to use the BitmapData.perlinNoise() method when thinking of turbulence, and that’s exactly what we’re going to do.
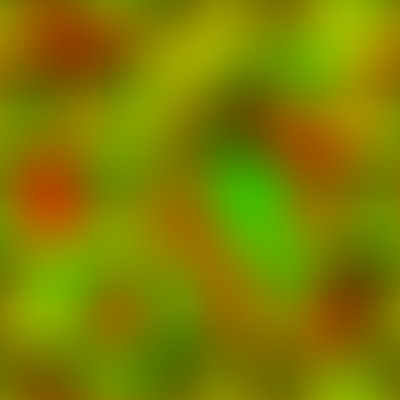
Here’s what a sample Perlin noise bitmap looks like. Perlin noise is an excellent algorithm to generate noise for simulating turbulence, water wave, cloud, etc. You can find more information about Perlin noise here.
Bitmap Fields
You might be wondering, if we’re going to use the BitmapData.perlinNoise() method to generate a perlin noise bitmap, how are we going to use this bitmap as a vector field? Well, this is what the BitmapField class is for. It takes a bitmap and converts it to a vector field.
Let’s say we have a bitmap field whose X channel is set to red and Y channel is green. This means when the field takes an input vector, say, (2, 3), it looks up to the bitmap’s pixel at (2, 3) and the output vector’s X component is determined from the pixel’s red channel, and the Y component is determined from the green channel. When the components of an input vector are not integers, they are rounded first.
A color channel’s value ranges from 0 to 255, 127 being the average. A value less than 127 is regarded as negative by the bitmap field, while a value larger than 127 is taken positive. Zero is the most negative number and 255 is the most positive one. For example, if we have a pixel with a color 0xFF0000 in hexadecimal representation, meaning a red channel with value 255 and green channel with 0, then the bitmap field’s output for this pixel would be a vector with X component of a most positive possible number and Y component of a most negative possible number, where this most positive/negative possible number, or maximum number, is specific to the bitmap field. To be more precise, here’s the formula of the pixel-to-vector conversion.
Step 1: Basic Flying Arrows
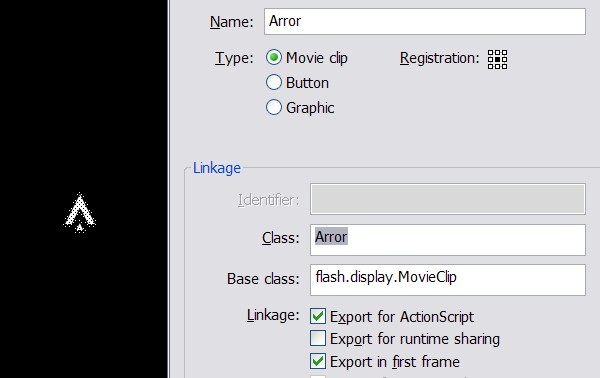
Create a new Flash document. Draw an arrow on the stage, convert it to a symbol named “Arrow” and export it for ActionScript.
Create an AS file for the document class. This is almost the same as the previous example.
package {
	import flash.display.*;
	import flash.events.*;
	import idv.cjcat.stardust.common.emitters.*;
	import idv.cjcat.stardust.common.renderers.*;
	import idv.cjcat.stardust.twoD.renderers.*;

	public class Turbulence extends Sprite {

		private var emitter:Emitter;
		private var renderer:Renderer;

		public function Turbulence() {
			emitter = new ArrowEmitter();
			renderer = new DisplayObjectRenderer(this);
			renderer.addEmitter(emitter);

			addEventListener(Event.ENTER_FRAME, mainLoop);
		}

		private function mainLoop(e:Event):void {
			emitter.step();
		}
	}
}
Create another AS file for our emitter class.
package {
	import idv.cjcat.stardust.common.actions.*;
	import idv.cjcat.stardust.common.clocks.*;
	import idv.cjcat.stardust.common.initializers.*;
	import idv.cjcat.stardust.common.math.*;
	import idv.cjcat.stardust.twoD.actions.*;
	import idv.cjcat.stardust.twoD.emitters.*;
	import idv.cjcat.stardust.twoD.initializers.*;
	import idv.cjcat.stardust.twoD.zones.*;

	public class ArrowEmitter extends Emitter2D {

		public function ArrowEmitter() {
			super(new SteadyClock(1));

			//initializers
			addInitializer(new DisplayObjectClass(Arrow));
			addInitializer(new Life(new UniformRandom(50, 10)));
			addInitializer(new Position(new SinglePoint(320, 200)));
			addInitializer(new Velocity(new LazySectorZone(3, 2)));
			addInitializer(new Mass(new UniformRandom(2, 1)));
			addInitializer(new Scale(new UniformRandom(1, 0.2)));

			//actions
			addAction(new Age());
			addAction(new DeathLife());
			addAction(new Move());
			addAction(new Oriented());
			addAction(new ScaleCurve(10, 10));
		}
	}
}
The current progress looks like this.
Step 2: Make it Turbulent
Add the following code that creates a 640-by-480 Perlin noise bitmap data in the emitter constructor. For detailed explanations on each parameter of the BitmapData.perlinNoise() method, you can refer to this documentation. To make it simple, the following code creates a Perlin noise bitmap with “octaves” roughly of the size 50X50, and the noise consists of red and green color channels.
//create a Perlin noise bitmap data
var noise:BitmapData = new BitmapData(640, 400);
noise.perlinNoise(50, 50, 1, 0, true, true, 1 | 2);
Next, create a BitmapField object and assign the bitmap data to it through the update() method. Then the rest of the code concerning the Gravity action is exactly the same as the previous example.
//create a uniformfield that always returns (0.5, 0)
var field:BitmapField = new BitmapField();
field.channelX = 1; //set X channel to red
field.channelY = 2; //set Y channel to green
field.max = 1; //set the max vector component absolute value
field.update(noise); //update the field with the noise bitmap

//take particle mass into account
field.massless = false;

//create a gravity action and add the field to it
var gravity:Gravity = new Gravity();
gravity.addField(field);

//add the gravity action to the emitter
addAction(gravity);
Now test the movie again, and you shall see our flying arrows are now experiencing turbulence.
Custom Fields
We’ve used the UniformField and BitmapField provided by Stardust, and now we’re going to create our own custom fields by extending the Field class and overriding the getMotionData2D() method.
The getMotionData2D takes a Particle2D parameter as input, which contains the position vector information of the particle, and that’s the input to the field. The method returns a MotionData2D object, representing the output of the field. That’s all you need to know to create a custom field. Let’s create a custom vortex field.
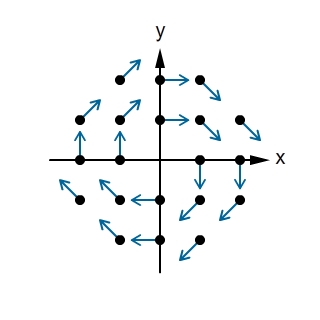
Below is the visualized graph of our vortex field. It’s pretty self-explanatory why it’s called a vortex field.
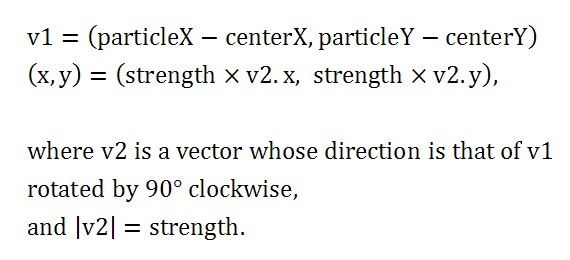
Here’s the formula for our vortex field.
And the vortex field class is as simple as the code below. We’ve made use of the Vec2D class to do all the dirty work of rotating a vector by 90 degree clockwise and setting the vector’s absolute value. Then, we dump the vector’s x- and y-components into a MotionData2D object, which is of the object type to be returned.
package {
	import idv.cjcat.stardust.twoD.fields.*;
	import idv.cjcat.stardust.twoD.geom.*;
	import idv.cjcat.stardust.twoD.particles.*;

	public class VortexField extends Field {

		public var centerX:Number;
		public var centerY:Number;
		public var strength:Number;

		public function VortexField(centerX:Number = 0, centerY:Number = 0, strength:Number = 1) {
			this.centerX = centerX;
			this.centerY = centerY;
			this.strength = strength;
		}

		override protected function calculateMotionData2D(particle:Particle2D):MotionData2D {
			var dx:Number = particle.x - centerX;
			var dy:Number = particle.y - centerY;
			var vec:Vec2D = new Vec2D(dx, dy);
			vec.length = strength;
			vec.rotateThis(90);

			return new MotionData2D(vec.x, vec.y);
		}
	}
}
Now that we have our custom field, let’s test it out in the following example.
Example: Vortex
This example serves as a test drive for our vortex vector field. It’s as simple as swapping a field with a new one. Change the following code from the previous example from this
//create a uniformfield that always returns (0.5, 0)
var field:BitmapField = new BitmapField();
field.channelX = 1; //set X channel to red
field.channelY = 2; //set Y channel to green
field.max = 1; //set the max vecotr length
field.update(noise); //update the field with the noise bitmap
to this
//create a vortex field centered at (320, 200) with strength 1
var field:VortexField = new VortexField();
field.centerX = 320;
field.centerY = 200;
field.strength = 1;
And we’re done. You may test the movie and see the vortex effect. Sweet!
Conclusion
You have seen how to use the Gravity action and Field class to affect particle velocity. And you’ve learned how to create your own custom vector fields to be used as gravitational fields. The next part of this tutorial will show you how to make use of deflectors to manipulate both particle position and velocity at once.
Thank you very much for reading!