Hi, i’m looking to license iphone or ipad games & apps.. reply imm… (Budget: $30-250, Jobs: iPhone, Mobile Phone)

Freelance Projects, Design and Programming Tutorials
Hi, i’m looking to license iphone or ipad games & apps.. reply imm… (Budget: $30-250, Jobs: iPhone, Mobile Phone)
I am looking for a company that specializes in Search Engine Optimization to partner with. My company has been doing web development for over five years and the organization that currently provides our SEO services is inadequate… (Budget: $750-1500, Jobs: Internet Marketing, Link Building, SEO)
Hello Here is my website : http://bit.ly/9EXJV9 So I need improvements to be done : Here are the principal improvements : #1 : Lighten the Flash module ( decrease RAM utilisation, still… (Budget: $250-750, Jobs: AJAX, Flash, Javascript, MySQL, PHP)
Responsible freelancer needed to develop a counter strike website. Project Include: 1. SMS payments section 2. Multilingual website (3 languages), may be WP-based 3. Multilingual forum (3 languages), may be PHP BB based 4… (Budget: $30-250, Jobs: MySQL, PHP)
Timeline: 2-3 day completion Type of Logo: 3D Price: $75 Details: I’ll send you details through private message here on freelancer (Budget: $30-250, Jobs: Graphic Design, Logo Design)
temp control assignment specification:
a) if the temp goes below the minimum value, the heater is to be switched on untill the temp is greater than th minimum value by 2 degrees c.
b)if the temp goes above the maximum value, the motor (simulating a fan) is to be switched on at maximum speed (clockwise) untill the temp is less than the maximum value by 2 degrees c.
c) no action is to be taken if the temp is within the temp band.
i have listed in the aide of imags the full assignment brief and all of the specifications that need to be met.
THIS MUST BE COMPLETED IN C
I need to be able to create affiliate links and an affiliate network with my products.
I sell website templates and I want to be able to generate the affiliate link to who’s interested and being able to manage who’s selling and how much commission I have to pay them.
I need a VERY, VERY simple system/program that is able to calculate affiliates, sub affiliates and sub sub affiliates commission and links (it would be able to generate and detect sub links that were generated from affiliates and to calculate how much in dollars or other currency is the commission that I have to pay for both of affiliate and sub affiliate) and must be able to give me a report of what is going on with my network.
Must be VERY, VEry simple to use and must be error free.
Must be able to use in MAC and or PC.
It would be good if I could export the MLM to excel all affiliate and commissions information.
Show me what you have. If you have already a script you can make work, please include a link so I may check it out.
Show me results of your ideas, show me only your portfolio related with this type of projects.
Please read before bid this project:
a)Only programmers who place bids – cost and deadlines will be considered and I will not respond to copy and paste bids.
b)Make sure you understand, know if you can make and complete this project.
c)Tell me everything I should know, all the advices, all the steps etc, about what is going to happen with this project.
d)I need a 100% quality work and expert.
e)In order to have a professional job completed, after the project is done you need to give me 3 months of warranty and bugs fixing period and you will do it ASAP provide technical support and in order to be able to detect any problem or bug on the programming. This way if I have any problems dealing with the administration of the website you can help me until I understand how does it work. If you’re a real professional and efficient programmer you won’t have problems with this if you do a perfect work.
f)Need a serious and honest programmer so we don’t get any problem or trouble in the future, I will only pick a programmer that can show me a great experience on this area by the curriculum, better feedback and ranking.
g)I need to see the project wile you’re doing it, keep me updated and put the project online for me to be able to see the progresses.
h)Don’t bid if you’re not able to do my entire project.
i)For the product and its source codes you’ve done with me, you promise NOT to develop any project BASED ON THIS SOURCE CODES, unless you are invited/hired by me.
j)You promise that you will not show to public any info about the product that you’ve worked with me.
k)If you have been selected to complete this project, we’ll see wile you’re doing it if the quality of the work is according with my requests, if it’s not I will reject you asap with notice.
l)In a way of doing an excellent work and better understand the idea of this project, you can ask me all the questions that you really need to know.
m)At the end of the project you will have to give me the product finished, with the project files and a tutorial in a word file or other type of format with all the steps of how to manage it.
Thank you
I would like to modify my posterous theme. Posterous is a blogging software that uses a simple coding style that can easily be modified through its CMS. Here is their guide on their themes
http://posterous.com/theming/simple
I need to modify a few elements of my theme. 90% will stay the same, and almost all functionality will remain the same.It is mostly just graphical in nature.
I’ll post my website and design comp on the PMB
Hi All,
I need to increase traffic on my site, So can you provide details/costs of your SEO service?
What kind of results can we expect? Have you got estimates or examples say previous work that has increased traffic.
Budgets are tight so as you can imagine we don’t want to waste money.
Happy Bidding!
Thanks,
Peter
I have an internet based application that I am interested in having run on Adobe Air.
What information do you need so that I can get a bid?
Thank you
Gary
I am looking for someone to design a banner (slightly smaller in width than leaderboard size) that will feature on the home page of our website during our biggest ever sale.
The site in question is a retailer of ink/toner cartridges, the sale will offer up to 75% off, will run for 48 hours only over the course of a weekend… so there’s a few examples of text that could feature on the banner!
Any questions please don’t hesitate to ask, thanks for reading.
In Day 1 we’ll go over how to set up the shot to add a CG screen on a cell phone, GPS, or anything with a screen. It really looks cool when you do it on something portable though. We’re making a pipboy so we’ll go over how to mimick the pipboy look as far as style, color, and feel. So get ready to build build build!
File size 161MB
File size 217MB
By now you should be feeling supercharged with creativity and ready to unleash your ideas on a new project. In the fourth installment of Core Art Skills, Ben Mounsey will be showing you the benefits of getting your hands messy and developing a feel for 3D! You will learn how working in 3 dimensions can be used as an outlet for creative exploration and how it can help you better understand your two dimensional work. Let’s get started!
Continue reading “Core Art Skills: Part 4, Working in Traditional 3D”
Kicking off a new series of expanded, in-depth Basix tutorials, this is the first in a series of articles designed to guide you step-by-step through the process of setting up and using guitar amp simulation in your recordings. Beginning with the fundaments, we’ll work through some simple scenarios and work our way up to advanced tweaks and tricks. While there will be plenty of guidance and ideas you can take away and use in your own productions, the real aim is to equip you with the skills to develop your own creative solutions.
For many of us, and for reasons ranging from cost to living arrangements, it’s just not practical to record a real guitar amplifier in a real room with real microphones. Fortunately, the rapidly growing range and improving performance of digital guitar amplifier modelling technology has brought great recorded guitar tones within easy reach of the hobbyist.
Many hardware digital amps feature direct outputs with built-in speaker emulation and even, in some cases, sophisticated microphone emulation, allowing you to run your regular amp signal direct to your Digital Audio Workstation (DAW). Of the countless benefits of such a set-up, the real beauty of it is consistency: you can feed precisely the same tone into the mixing desk when playing live as you do when recording rehearsal room demos or cutting an album in the studio.
However, for those of us who aren’t quite ready to give up on the warm glow of vacuum tubes and commit to a fully digital rig, software amp simulation products like Native Instruments’ Guitar Rig, IK’s AmpliTube and Waves’ GTR provide an excellent compromise, acting as a standalone computer based amp for quiet practice sessions or jamming along with your favourite tracks in iTunes, as well as providing a means of getting great recorded guitar tones without the trouble and expense of traditional recording methods.
Though it’s true that, for many guitarists, even the best digital modelling isn’t quite ready to render the tube amp obsolete, it is nonetheless possible to achieve very impressive, professional results, and even rock royalty like Angus Young – practically synonymous with a good old fashioned Marshall half-stack – used Native Instruments’ Guitar Rig 3 to record some tracks on AC/DC’s album Black Ice.
So whether you’re a complete beginner looking to take your first steps in home recording, or you’re a seasoned pro with a few hundred million albums on your resumé, chances are that amp modelling software can provide you with the tones you want.
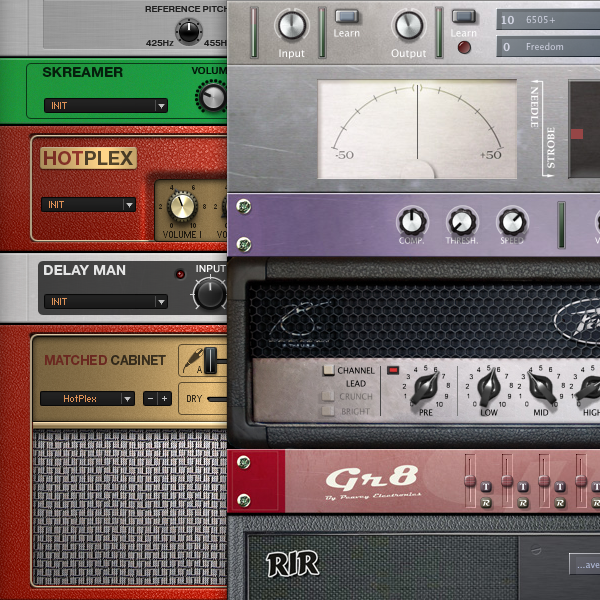
While some DAWs, like Apple’s Logic and Garageband, come with guitar amp simulation built in, most don’t and, great though these bundled plugins are, many people will find that most of the dedicated 3rd party options offer a good deal more flexibility and better sounds. The important thing is to make use of trial versions; as with “real†amps, all amp sims are not equal, and only you can decide which one will provide the kind of sounds you want. Some well known and not so well known options are:
There are also some very good free options, too:
Depending on your computer, it’s likely that all you need to get your guitar signal into your computer is a 1/4†to 1/8†adaptor. These come in various forms, typically either a simple jack adaptor or a cable with a mini-connector on one end. There are also USB connectors, usually with a small signal amplifier built in.
As with most things, the options vary from the simple and inexpensive variety to fancier, brand name affairs. My advice is to try the simplest and cheapest first and, if in doubt, ask around for advice.
If you’re going with the simple adaptor – not a dedicated guitar interface – you’ll need to convert your guitar’s signal from high to low impedance. Guitars with passive pickups produce a high impedance signal which, perhaps counter-intuitively, means it’s quite weak and needs to be driven a little harder before it can go through, say, an amplifier circuit or into your computer’s sound card.
The good news is that any powered effect pedal or rack processor, as long as it isn’t a “true bypass†circuit, will do that job for you, so you probably don’t need to buy any extra gear. Something like a noise suppressor or an EQ is ideal, since you then get the added benefit of the pedal’s effect (less noise, or pre-amplification EQ) as well as the impedance conversion.
Of course, if you want to be able to record multiple, simultaneous tracks, you’ll need some kind of multi-input audio interface. This also applies if you’re having latency issues; that is, a small delay between you playing a note and hearing the amplified signal from your computer. However I’ve found that most modern PC and Mac sound cards are sufficiently powerful to keep latency sufficiently low.
So, you’ve chosen an amp simulator and you’ve got your guitar signal into your computer. How to get the best from it?
Paradoxically, the plug and play simplicity of most modelling software means that many players expect great results far more quickly than with a “real†amplifier. Given a decent tube amp, most people will spend days and weeks constantly homing in on that elusive, perfect tone; with the vastly greater range of possibilities modelling software offers, it should be no surprise that the digital alternative requires at least the same investment.
It’s also often the case that the preset sounds in any given plugin sound impressive at first but, as soon as you try to get them to sound effective in a mix with other instruments, they begin to fall short.
For the rest of this tutorial, I’m going to be working with Guitar Rig 3, since that’s the plugin I use and am most familiar with. However, the topics we’ll cover are applicable to most, if not all, of the amp simulators currently on the market.
Unwanted noise can be a problem with any guitar recording scenario – real amps or software – and especially when higher gain settings are involved. Unfortunately, while the hiss and hum of a real half-stack has a certain portentous charm, the hiss and crackle of digital modelling software is rather less appealing.
If noise is a problem for you, try the following steps:
At this point, you might be wondering why I haven’t mentioned noise suppressors; don’t worry, I’m coming around to that in a moment! The above steps are important because they will all help to keep unwanted noise from getting into your signal in the first place. The benefit of that is a nice, clean signal while you’re playing: a noise suppressor or gate, no matter how good it is, is only effective when the gate is closed, i.e., when you’re not playing, so it’s imperative to make sure you’re working with the best possible signal. Remember: garbage in, garbage out!
A noise suppressor or gate is the thing that’s going to give you glorious, undisrupted silence during breaks and rests in the music, but setting it correctly is of paramount importance in preserving the dynamics of your playing. Get it wrong, and it’ll be too slow to react to your playing, causing notes to cut off or fail to sound altogether.
So what’s the difference between a noise suppressor and a noise gate? Not much, really, at least in terms of their main function. Typically, a noise suppressor is a simpler tool which is designed to filter out hiss and hum and is usually set with a single threshold control. Noise gates, in contrast, tend to be more sophisticated, typically featuring controls for threshold, attack, release and, occasionally, hold.

It’s worth noting that, in a recording scenario, you may need to use different noise gate settings for different parts of the song, especially where there are dramatic differences in the dynamics of your playing.
For example, for a heavy rock or metal track, the rhythm guitar parts are likely to be performed with quite an abrupt, heavy staccato and lots of distortion, in which case the gate will need to respond quite aggressively in order to preserve a “tight†sound. When you come to the solo, or maybe a more fluid, rolling chorus part, that aggressive noise gate setting will probably be too harsh, cutting off decaying notes and blocking softer pick attack.
The input section of Guitar Rig, and most of its competitors, has noise reduction built in, and this can usually be turned on or off and its threshold adjusted manually or via the “Learn†function, through which the software will try to determine the appropriate setting as you play. For anything more than very slightly overdriven tones, though, this probably isn’t going to be sufficient, so you’ll need to add a gate or suppressor to the signal chain.
In the SideKick panel of Guitar Rig (F2, to show and hide), there are two options: Noise Gate and Noise Reduction.
Noise Reduction is my favourite for general use, since it’s so easy to use and is generally very good at filtering out the hiss without affecting the attack and decay of my playing. The key thing to do, though, is to click the maximise button on the right side of the module to open the “expert†parameters. This reveals a pair of fairly intuitively named controls: Release and De-Hiss. The former determines how quickly the noise filter will engage when the input signal stops (i.e, when you stop playing), and the latter will help to filter out high frequency hiss (although this can be detrimental to your overall tone, so proceed carefully).
Noise Gate, on the other hand, is more akin to the rack and stomp-box noise reduction units you might already be familiar with, and is better suited to specific applications, like that heavy rock rhythm track I mentioned earlier.
It’s easy to miss, but at the very top right of the Guitar Rig window, next to the bypass switch and CPU meter, is a Hi Q control. Other modellers have similar functions, often in the overall program settings, and usually a choice between 32 and 64 bit processing.

Engaging Hi Q mode, or otherwise increasing the software’s processing rate, produces a much higher quality sound. The drawback is that this places a greater strain on your computer’s CPU and, depending on how powerful your computer is, may introduce unmanageable latency.
Most modern computers should be able to cope with this, but bear in mind that as you introduce your host DAW, various plugins and perhaps multiple instances of plugins, the load on the CPU increases, so watch out for the CPU meter tipping into the red. If necessary, save the high quality mode for the final mixdown.
Most of the preset tones in amplifier modelling software are designed to show the product off to its best advantage as a standalone device. Typically, that means lots of gain, lots of bass, and jaw dropping delays and modulation. All great fun, but perhaps not well suited to real world applications in a full band mix.
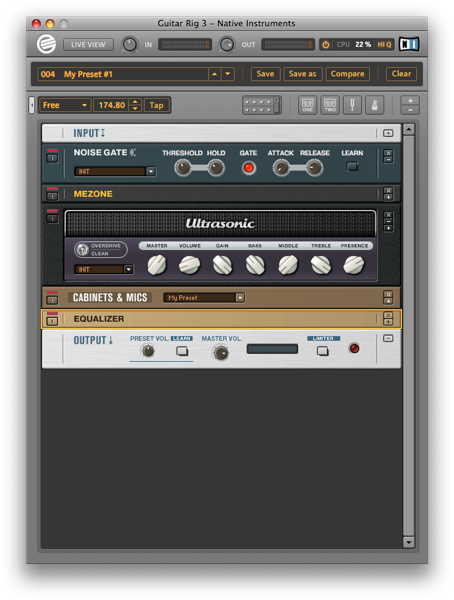
The only way to get tones that work well in your mixes and with your music is to build signal chains from the ground up. Of course, the presets are a good way to get an idea of which amp and effect models are going to get you into the ballpark and, since all of the amp simulator manufacturers use quite well established amps as the basis for their models, very often your existing real-world knowledge of amps is going to stand you in good stead.
Nonetheless, the dizzying array of options can be daunting, so how do you get to grips with learning to coax the sounds you want from your software? My advice is to try to mimic some of your favourite guitar tones. If you’re a big fan of, say, Jimmy Page, you probably already have a pretty good idea of what kind of equipment he used and what his tone should sound like. Using that knowledge as a starting point, you can turn the learning process into a fun afternoon of tone-matching, trying different amp and speaker models, different overdrive boxes, and so on. In the process, you should start to get a good idea of how the different elements affect the sound and, just as importantly, how closely the software matches the amps and effects it seeks to emulate.
Another important thing to consider is that feel is as important as sound. Ever plug into an amp that you just love? Part of that will of course be the tonal properties of the amp’s sound, but it will also be how the amp responds to your playing style and, in turn, how that makes you play. This matters with software amps, too: even if the tone sounds right, you might find that, somehow, you’re not feeling an interaction between your playing and the amp.
We’re dealing with an issue that’s hard to quantify here but, later in this series of tutorials, I’ll take you through some of the factors that can help get the right feel, as well as the right sound.
So, that’s a very general introduction to using software amp simulation. In the next part, we’ll work through some detailed examples of the processes involved in getting specific sounds and fine tuning them to perfection, before moving on to more advanced configurations, including 3rd party cabinet simulations and blending multiple amps for fuller tones.
In today’s tutorial, we will create an LCD TV from scratch using simple shapes and layer styles. We will also learn how to create a seamless pattern to create the speakers and also how to create some nice indicator lights. Let’s get started!
Start by creating a new file, size 2600×1700 px. In Photoshop, it’s easier to start with a big size to help us focus on the details. Using a rounded rectangle with 5 px radius, create a shape and use the following layer styles.

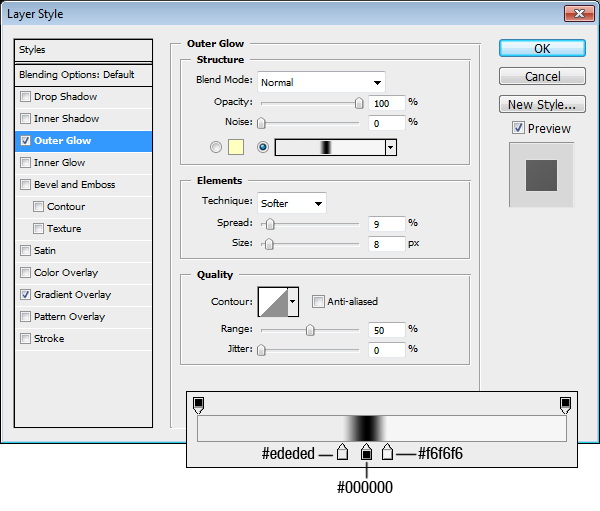
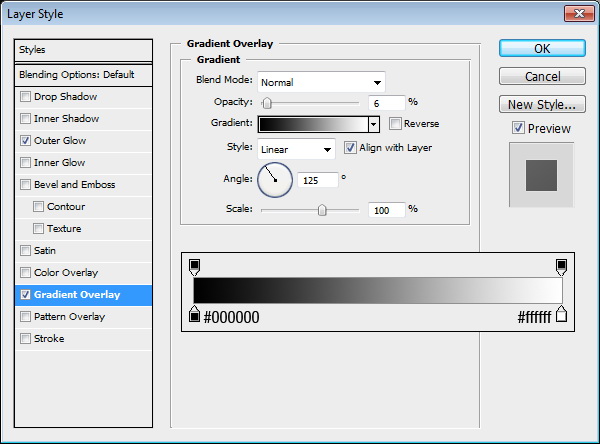
Create a smaller rounded rectangle inside previous shape to create the screen. Add the following layer styles.

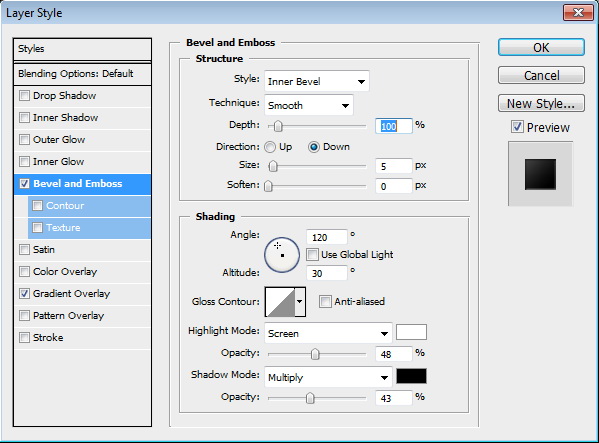
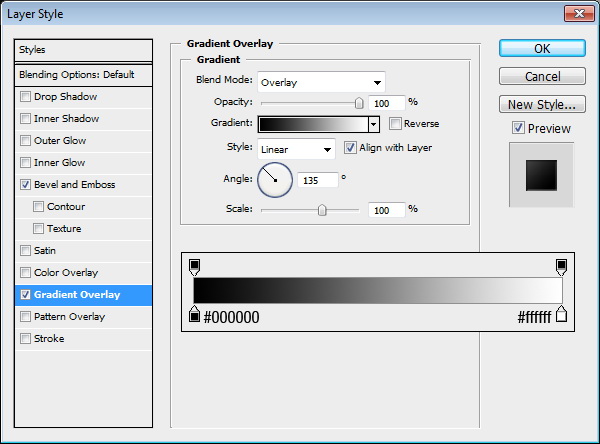

Using the rounded rectangle tool, create another shape behind the screen. Click with pen tool to add new anchor points as indicated below. Select new point with direct selection tool and move it down. Add layer styles as shown below.


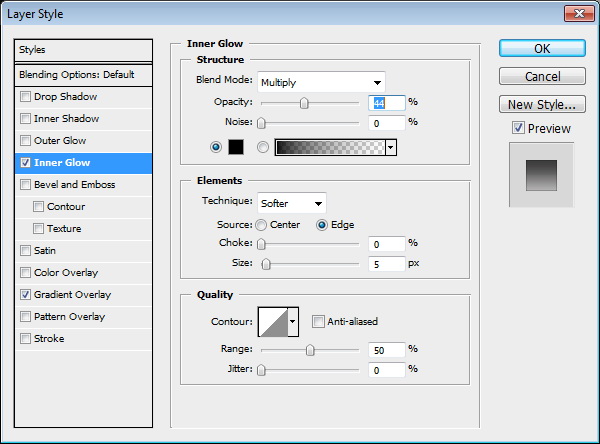
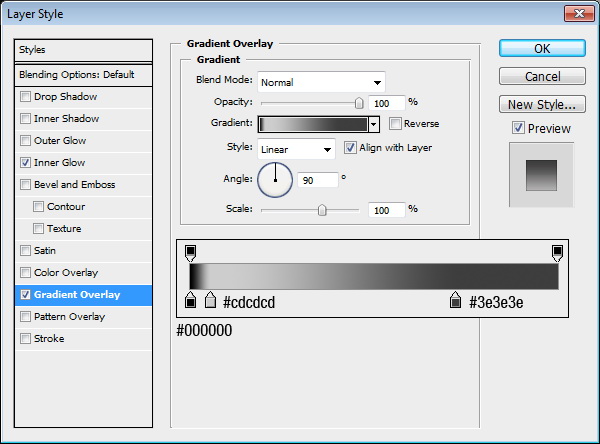

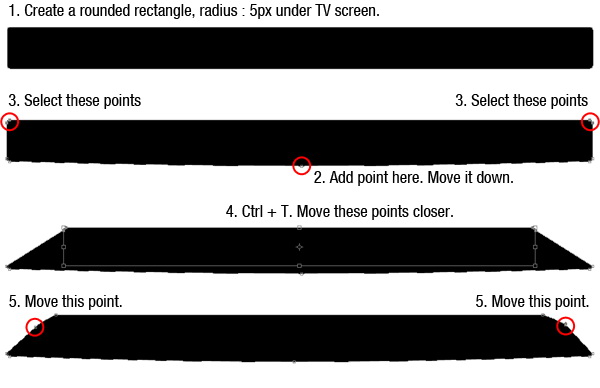
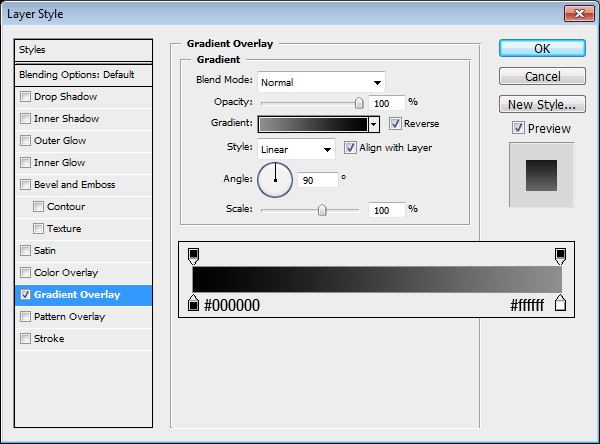
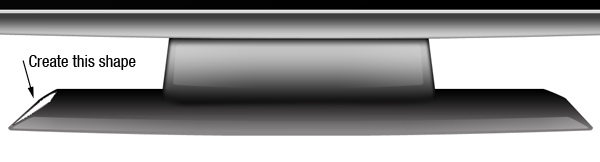
Create another rounded rectangle. This time under the TV. Add a point in the middle of lower side and move it down. Select points in the top corner, press Cmd/Ctrl + T and move them closer. Finally, move the points as indicated below. Add layer styles.
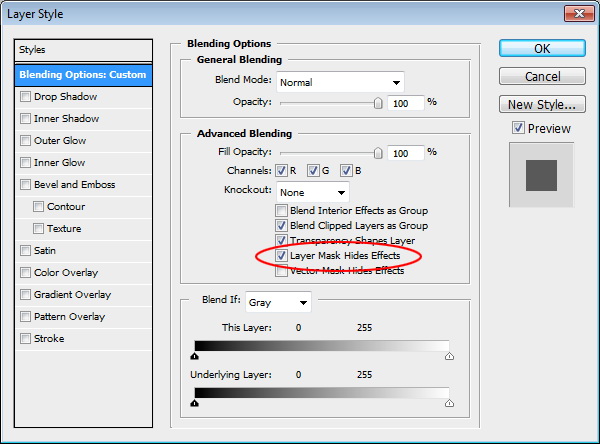
Draw a rounded rectangle connecting the base and the screen. Hit Cmd/Ctrl + T, right click and choose Perspective. Change its size, see picture below for reference. Double click layer to open Layer Style options. Activate Layer Mask Hides Effects and add the following layer styles.
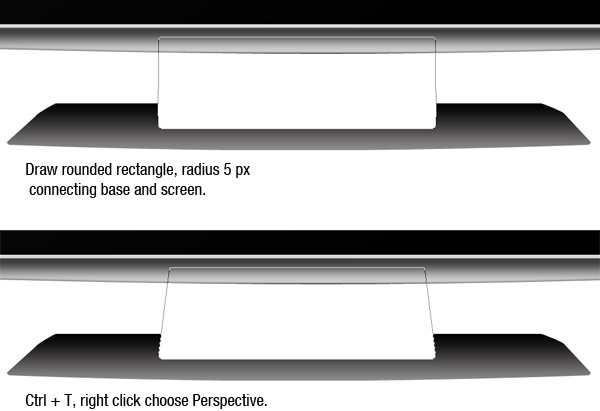
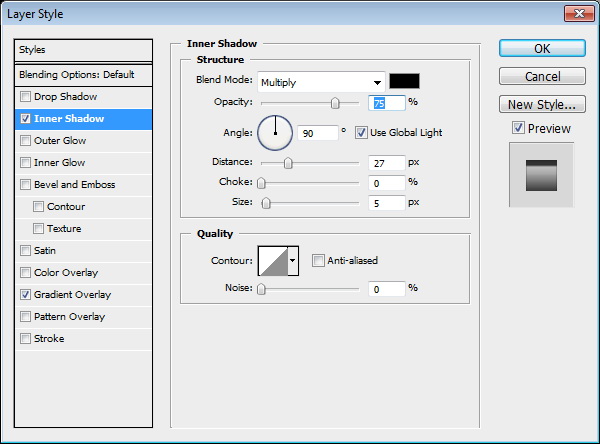
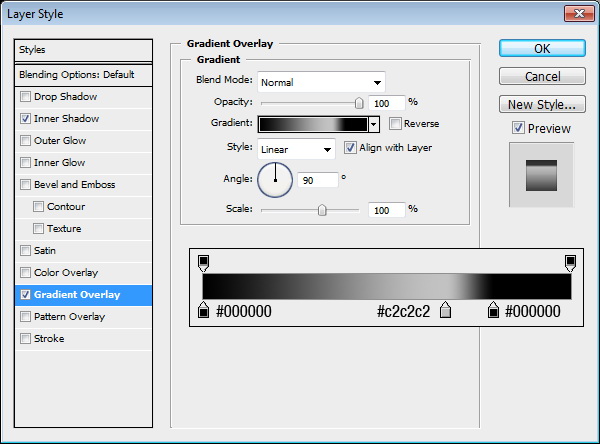
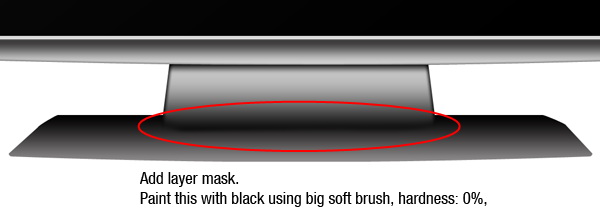
Add layer mask. Paint lower part of the shape with black until it blends into the base.
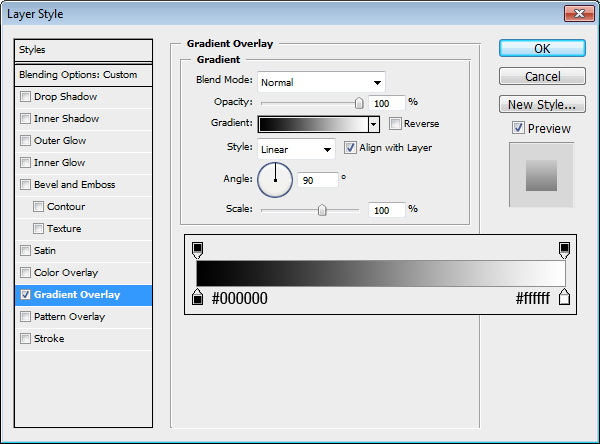
Now, we can start creating reflections. Create a shape as shown below. Add the following layer styles. Use a black to white gradient with blending mode set to Screen. Change layer’s blend mode to Screen to remove the black and leave only the lighter pixels.

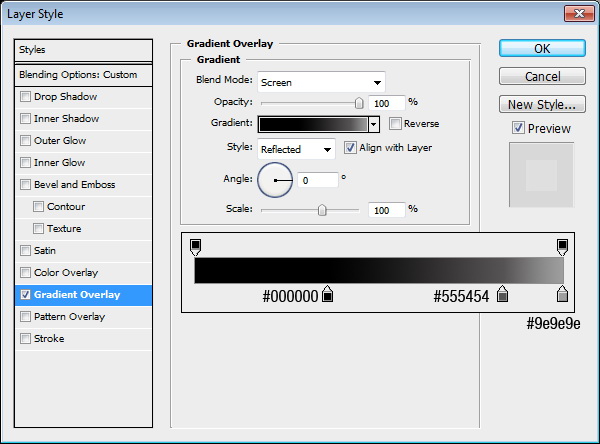

Draw another shape as shown below. Add Gradient Overlay with blending mode set to Screen. Change layer’s blending mode to Screen.
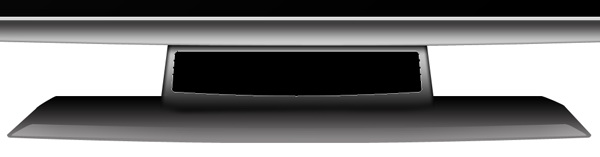
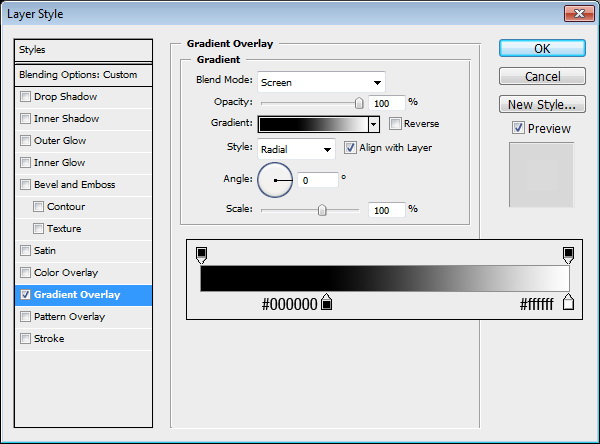
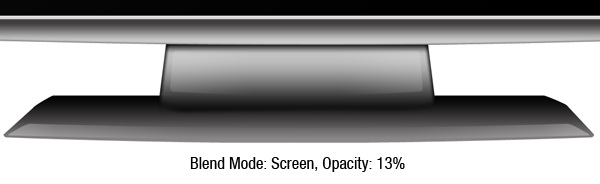
Create another shape for reflection. Add the following layer styles.
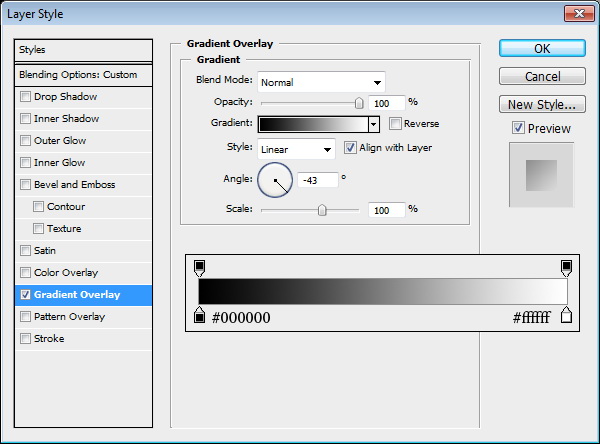
Repeat previous step to create another reflection on the other side. Add the following layer styles but this time use the opposite direction for the angle.

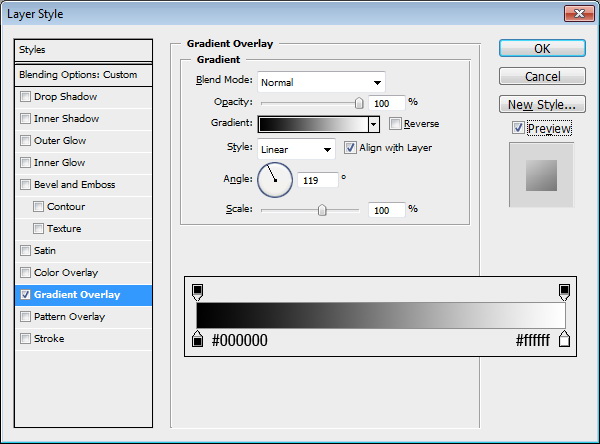
Create a shape as shown below. Add the following layer styles. Change blending mode to Screen.
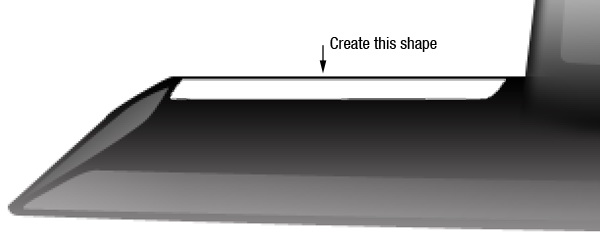
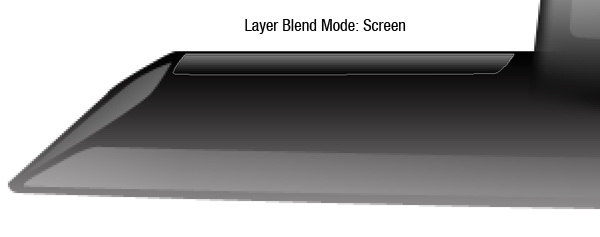
Duplicate the reflection and place on the other side.
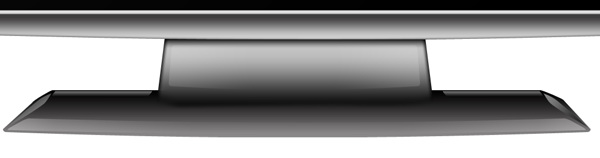
Create a shape under the base. This is the part that touches the floor. Add the following layer styles.
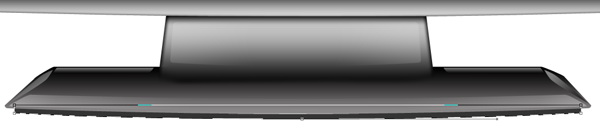
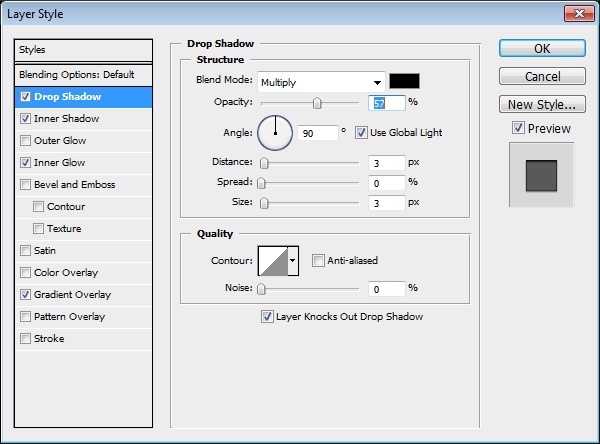
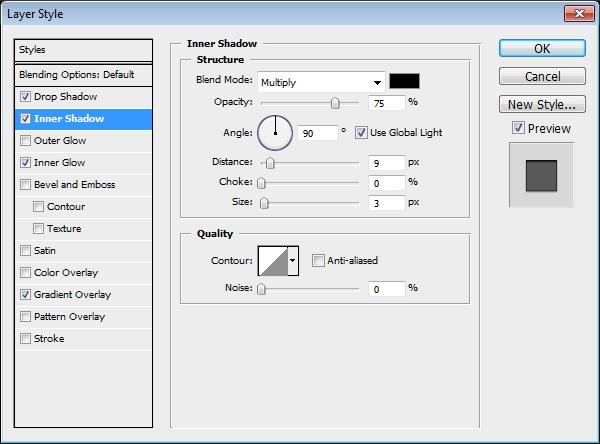
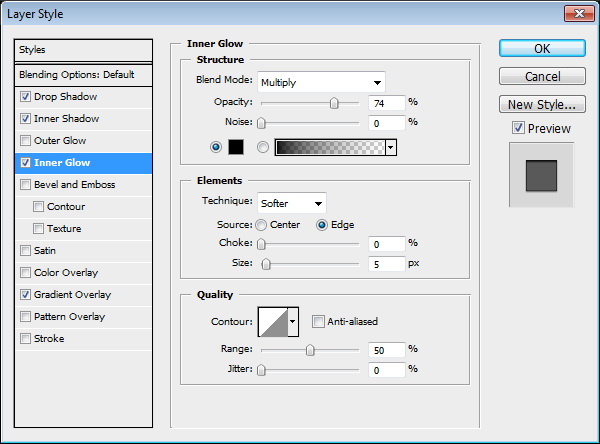
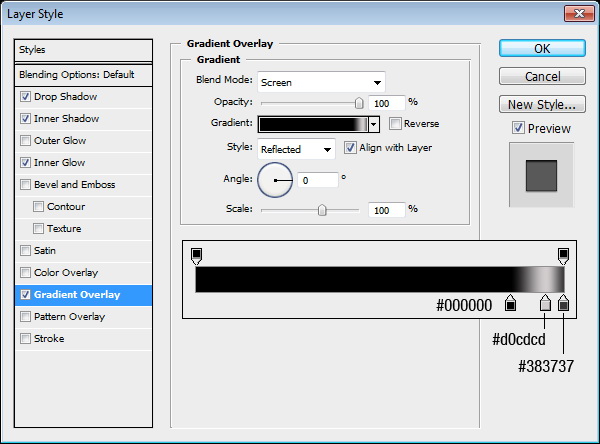

Let’s add a shadow on the floor. Create a new layer underneath the TV, create a rectangular selection. Add Gaussian Blur to soften it and change its opacity to 5%.



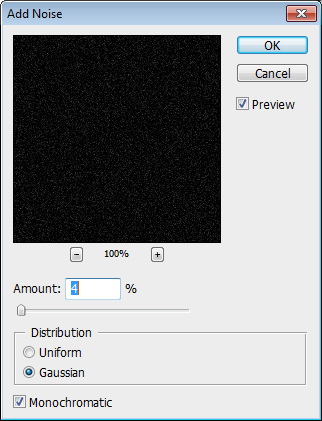
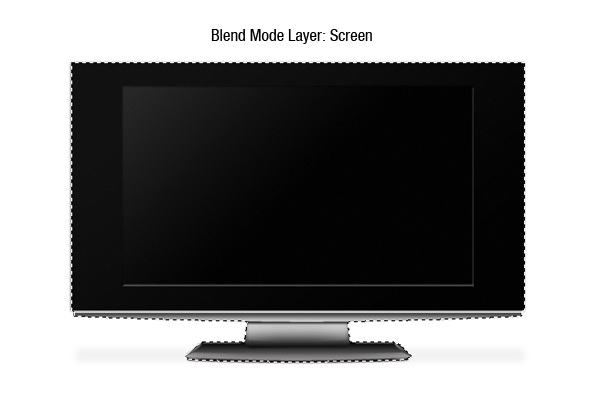
This TV is too clean and it looks unrealistic. We need to add some textures. Hold Cmd/Ctrl + Shift then click the TV and base layer’s to create a selection based on its shape. Create a new layer on top of all the other layers and fill it with black. Click Filter > Noise > Add Noise. Change layer’s blend mode to Screen.

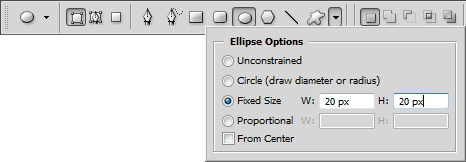
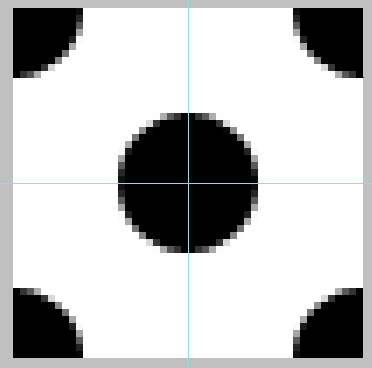
To create speakers, we need to create its pattern first. Create a new file 50 x 50 px. Activate ellipse tool. From the option bar set to Fixed Size 20 x 20 px. This setting will automatically create a 20×20 px circle shape.
Hit Cmd/Ctrl + R to activate Ruler. Drag ruler to the center of the image to create a vertical and horizontal guide in the center. Draw a circle in the middle.
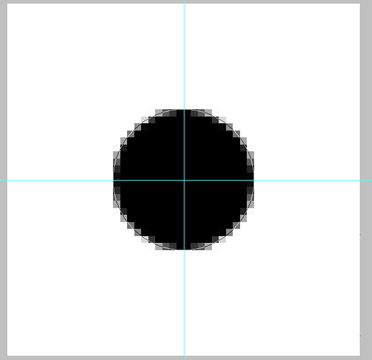
Draw another circle and place it in the middle of each corner.
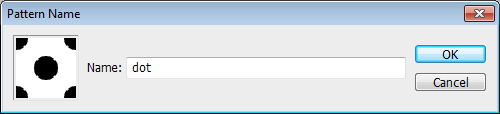
Click Edit > Define Pattern to save it as a pattern.
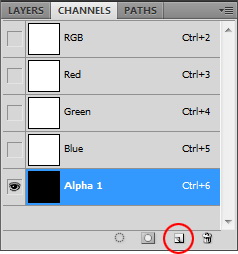
Create new file, size 3000 x 3000 px. Open Channels panel and create a new channel.
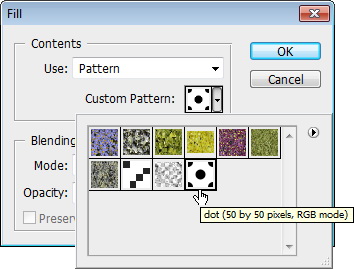
Click Edit > Fill. Use pattern we created earlier.
Cmd/Ctrl-click channel to load it as a selection. Create new layer, fill it with black. Select all and copy (Cmd/Ctrl + C).

Return to your TV file. Create a rectangular selection on the right side of the screen.

Click Edit > Paste Into. The pattern will automatically be placed inside the selection. Hit Cmd/Ctrl + T and resize it. Add the following layer styles.

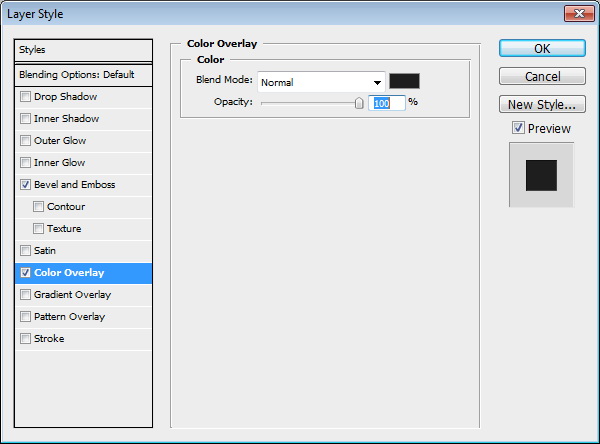
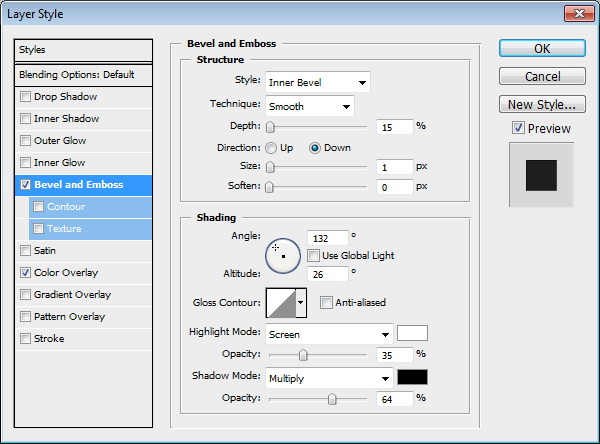

Create a rounded rectangle covering the speaker. Change its fill to 0% and add these layer styles.
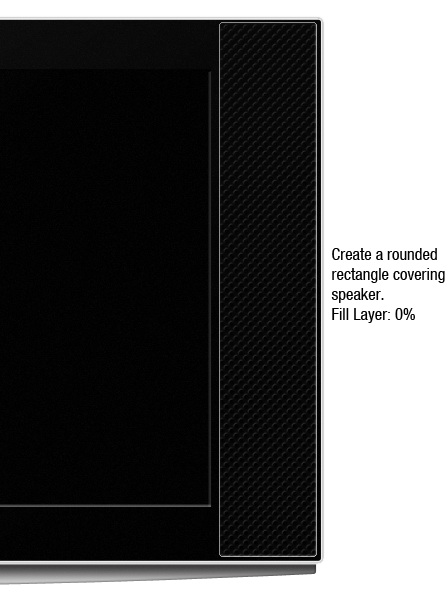
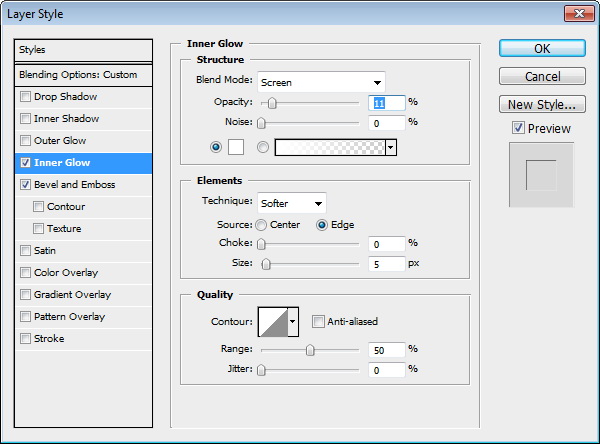
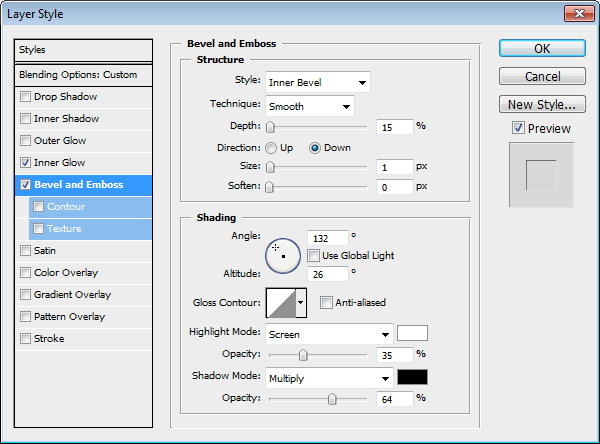
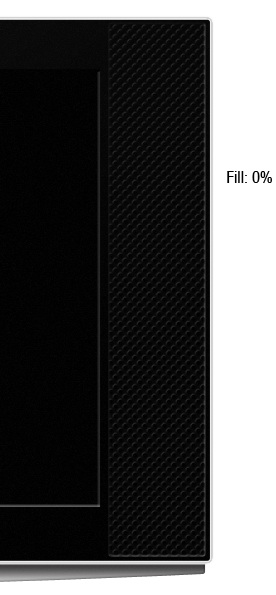
Duplicate the speaker and place on the other side.

Add the TV’s brand and apply the following layer styles to give it a metallic look.

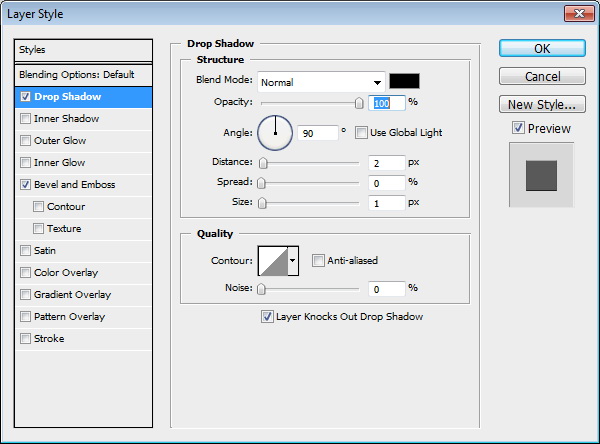
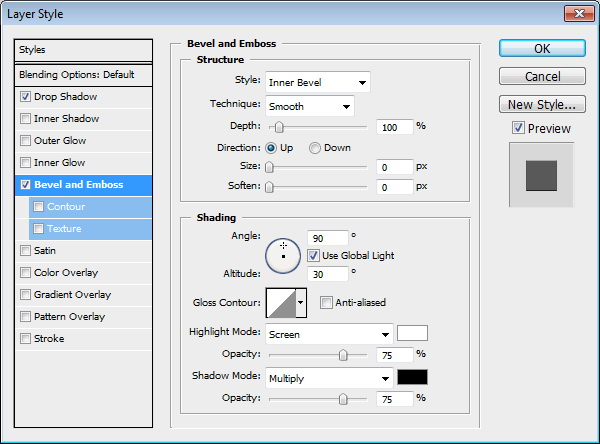
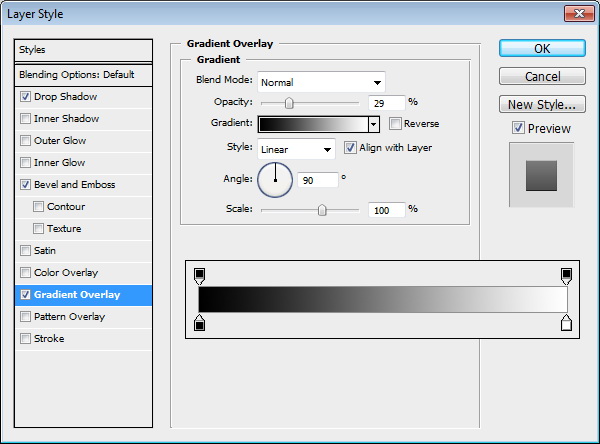
Create a small rounded rectangle shape. Make sure its Opacity is set to 100% with its Fill set to 0%. Apply the following layer styles.
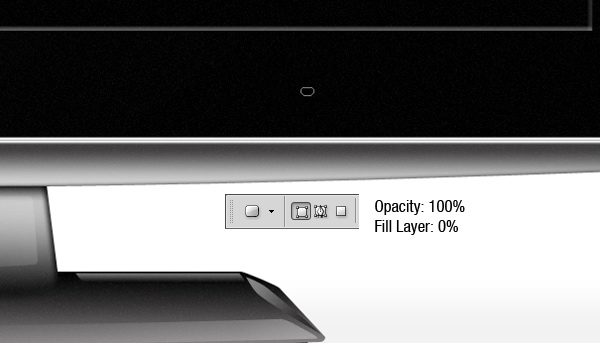
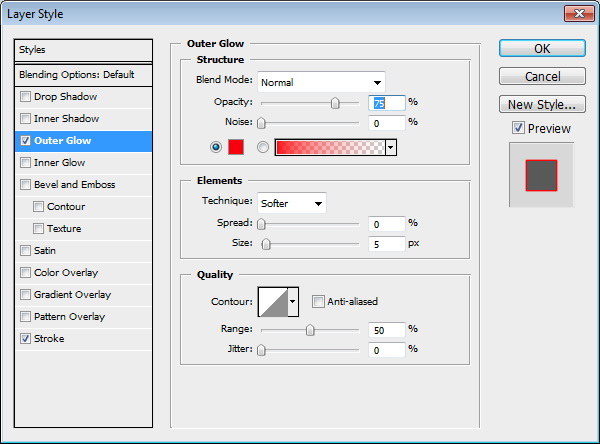
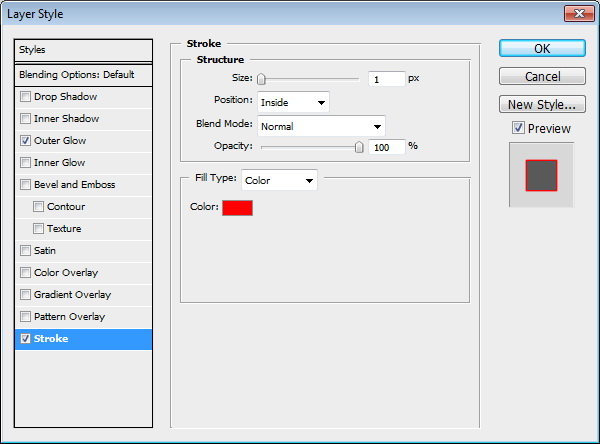
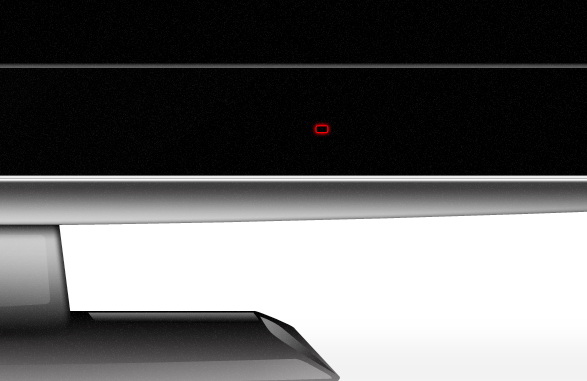
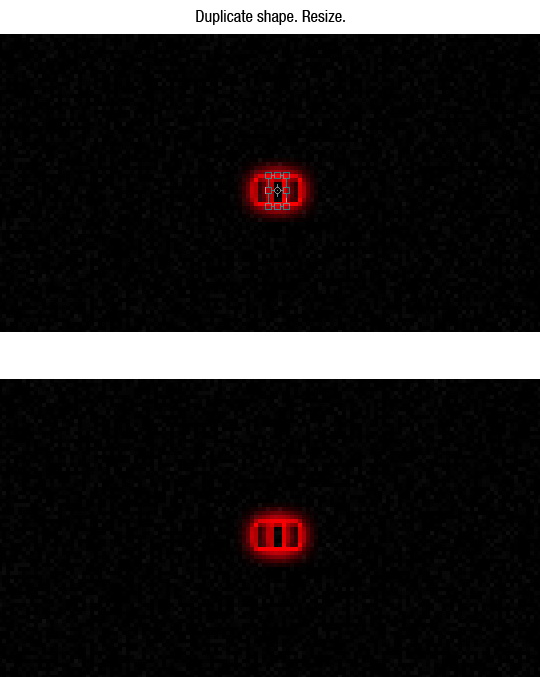
Duplicate the shape and resize it as shown.
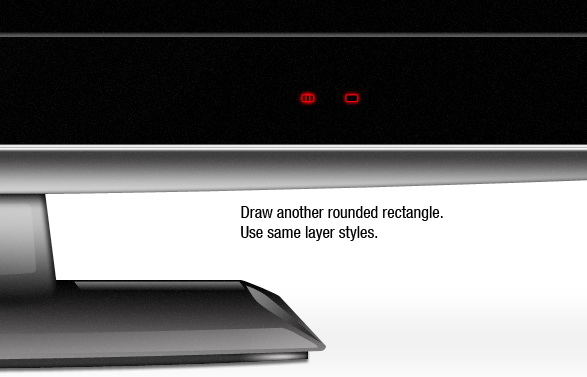
Create another rounded rectangle. Use the same layer styles.
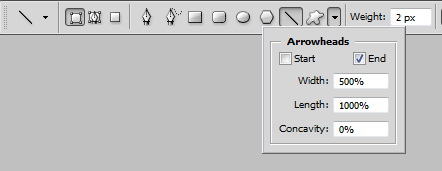
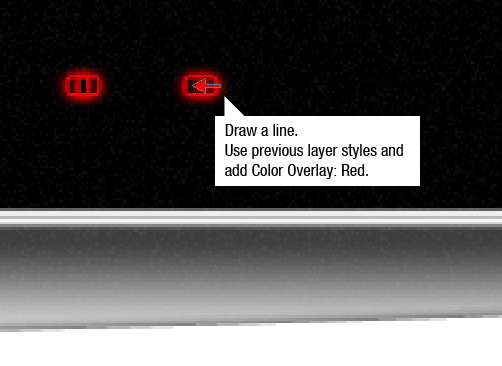
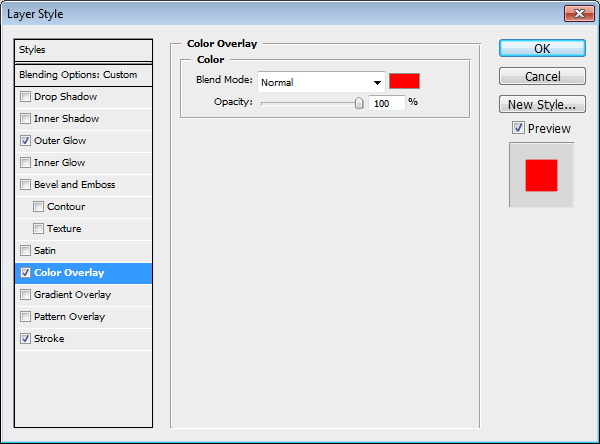
Activate the line tool. From the option bar, set Arrowheads to End. Use previous layer’s styles and add Color Overlay.
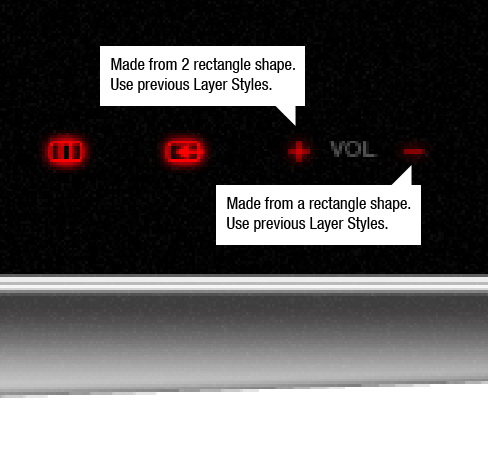
Create plus and minus sign using rectangle tool for volume indicator.
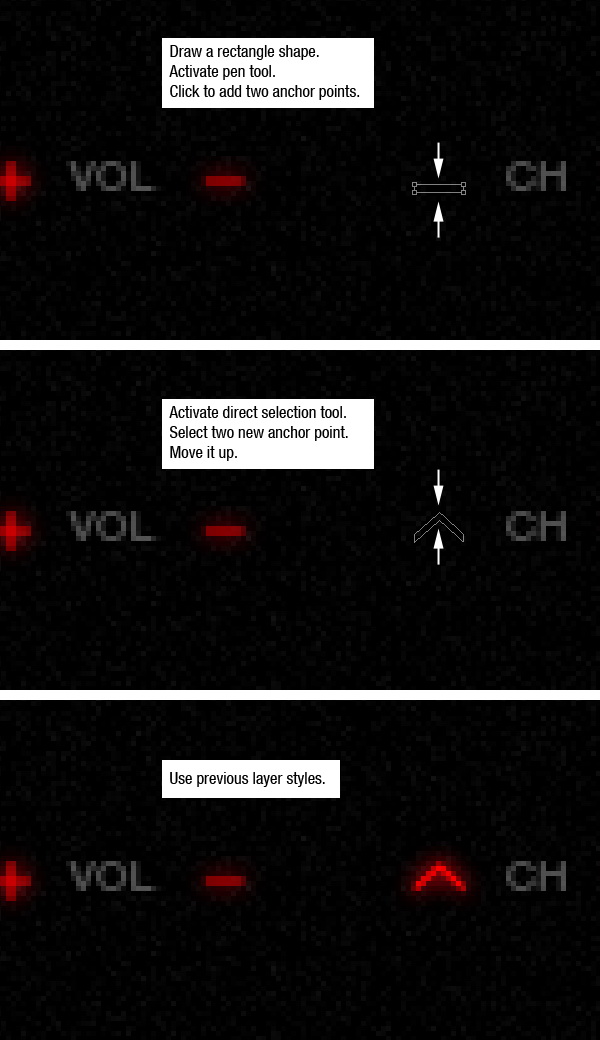
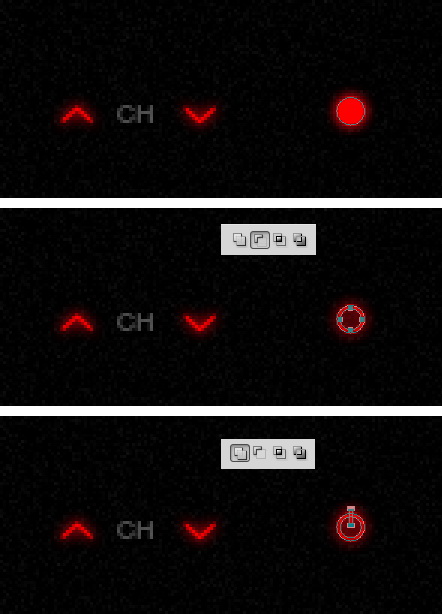
Let’s add an up and down indicator for channel. Draw a rectangle shape. Click its middle with pen tool to add new anchor points. Select and move them up. Use previous layer styles, Outer Glow, Color Overlay, and Stroke. To create a down indicator you just need to duplicate the shape and flip it vertical.
To create the power indicator we need to combine a few shapes. Start by creating a circle shape. Duplicate circle path and resize it, from option bar select Subtract. Create a rectangular path and select Add.
Activate the Background layer. Create a radial gradient from light gray to darker gray.

Duplicate layer and resize it. This is going to be the floor
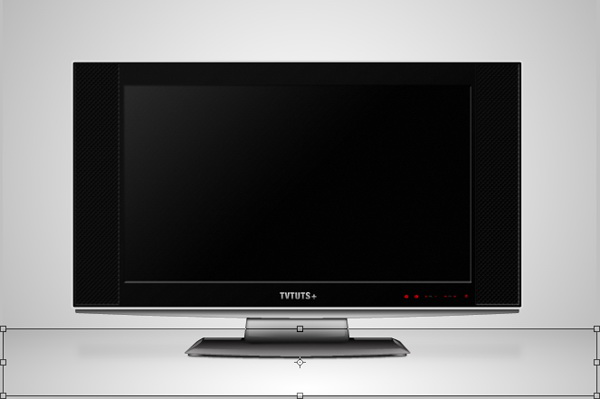

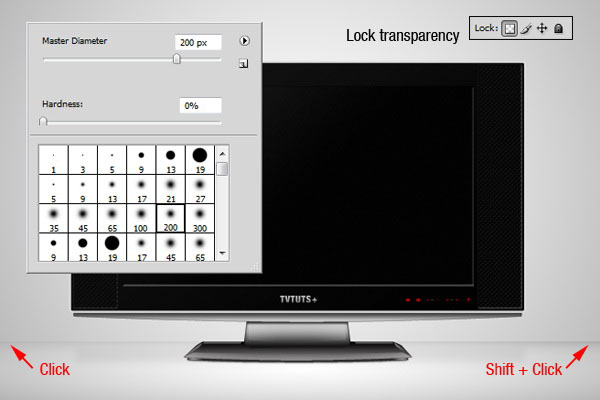
We still need to distinguish the floor from its background. Click Lock Transparency icon in Layers panel. Paint upper part of the floor. First, click on one side then Shift-click on the other side to paint a straight line.
That’s it! We’re done. You can view the final image below.
