MovieClip Reconstruction with the SharedObject Class

During this tutorial, we will learn how to implement the SharedObject class. We’ll store all the essential data of a MovieClip locally, then reload it next time the application is opened!

We found this awesome author thanks to FlashGameLicense.com, the place to buy and sell Flash games.

Thanks to manicho for the hard disk icon.


Final Result Preview

Let’s take a look at the final result we will be working towards:

Doodle an image in the box with your mouse, and hit the Save button. Refresh this page in your browser, and click Load. You’ll see your doodle reappear, having been loaded from your hard drive; the background animation will even be on the same frame as it was before!


Step 1: Setting Up Our Document Class

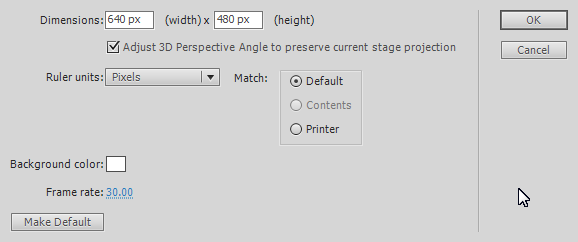
Let’s begin by creating a new .fla. Save it and open up the properties panel in Flash. I am using Flash CS5, but this tutorial should work with every Flash CS version. In the properties panel, push the Edit button and make sure that your settings are identical to the image below:

Step 2: Document Class Setup

Now that we’ve setup our .fla, let’s begin our Document Class. To begin, open up your favorite ActionScript code editor and save an .as file called “Main.as” in the same directory as your .fla. Next go into the “Publish” panel of Flash. Set the “Class” textfield to “Main”. Now open Main.as and copy and paste the following code to create our Main document class.

package {

	import flash.display.Bitmap;
	import flash.display.BitmapData;
	import flash.display.Graphics;
	import flash.display.Shape;
	import flash.display.Sprite;
	import fl.controls.ComboBox
	import flash.events.Event;
	import flash.events.MouseEvent;
	import flash.geom.Matrix;
	import flash.geom.Rectangle;
	import flash.net.SharedObject;

	public class Main extends Sprite {

		public function Main():void  {

		}

	}

}

Step 3: Our Main Object

Now we are going to create our main MovieClip. It will contain 3 frames. Each one with a colored shape. Draw a red rectangle, turn it into a MovieClip with F8 and set the name of the MovieClip to “myObject”. Make sure that the registration point is the top left corner. Then create two new empty frames inside the MovieClip. Fill one up with a green triangle and the other with a blue circle.

The final result should look a bit like this:


Step 4: Using a ComboBox

Now we are going to use a ComboBox, which is basically a Drop-down list. Make sure that the instance of myObject on the stage is also labeled myObject. Then open: Window > Components and drag the “ComboBox” item onto the library. If you aren’t using the Flash IDE, you need to Right Click > Export to SWC the ComboBox in the library.

Now we can create the “myComboBox” variable, placed above the constructor function.

private var myComboBox:ComboBox = new ComboBox()

Next add the following code to your Main() constructor:

//Stops the myObject MovieClip on the first frame
myObject.gotoAndStop(1)

//Adds the following Objects to the ComboBox
and gives them each unique labels
myComboBox.addItem({label:"Rectangle"})
myComboBox.addItem({label:"Circle"})
myComboBox.addItem({label:"Triangle"})
//Adds the ComboBox
addChild(myComboBox)
//Moves it to the correct coordinates
myComboBox.move(280,150)

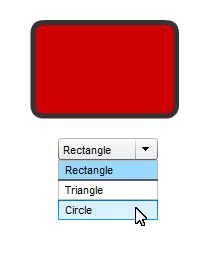
Here is a snapshot of what your application should look like when run:

Step 5: Changing myObject Frames

We want our MovieClip to change frames when we select a different item!

Let’s begin by adding an EventListener to our constructor – the Event.CHANGE event listener – which checks to see when the selected object in the ComboBox changes. This is exactly when the user chooses a new ComboBox item.

myComboBox.addEventListener(Event.CHANGE,changeObjectFrame)

Next we shall create the changeObjectFrame() function. This function checks to see what the current label on the ComboBox is, which is the name of the object the user has selected. It will then go to the correct frame of myObject to display the selected object type.

private function changeObjectFrame(e:Event):void
{
	//myComboBox.selectedLabel is the name of
	the current object selected that we defined
	earlier...

	if (myComboBox.selectedLabel == "Rectangle") {
		myObject.gotoAndStop(1)
	}
	if (myComboBox.selectedLabel == "Triangle") {
		myObject.gotoAndStop(2)
	}
	if (myComboBox.selectedLabel == "Circle") {
		myObject.gotoAndStop(3)
	}
}

You can now go ahead and compile the application. You should be able to switch to a different object by selecting it from the drop-down menu.


Step 6: Adding Animation

Next, let’s add some animation to our program. Go into the myObject MovieClip on the first frame. Select all of the red rectangle and push F8 to turn it into a MovieClip. Make sure that the registration point is at the top left corner. Do this with every shape inside the myObject MovieClip

Next we will have to give each MovieClip an animation. Go into the rectangle shape MovieClip and Right Click > Create Shape Tween on the red shape filling.
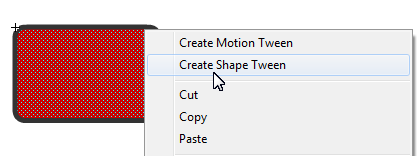
Then select the 60th frame of the MovieClip on the timeline and push F6 to create a new keyframe. Do this with the 30th frame as well. Now you can just go to the 30th frame and change the color of the shape fill. I have chosen to change the color to a golden orange. Now if you play the animation, the color should change from Red > Orange > Red.
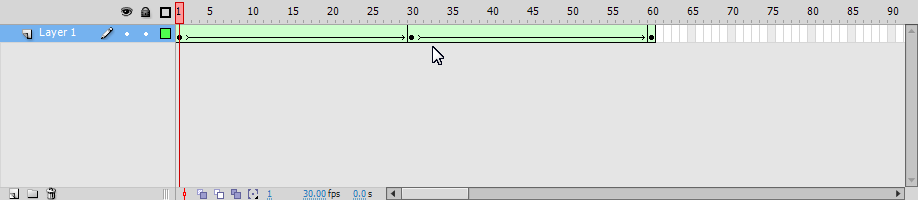
Go ahead and do this for each shape in the myObject MovieClip. Now you can go ahead and compile the application; each selected shape will change colors.

The current application should act like this:


Step 7: Doodle Canvas

Now, let’s allow the user to draw a little custom doodle on the MovieClip. This is similar to my last tutorial in which we allowed the user to draw a custom design on the player. However, we will take it one step further in this tutorial by allowing the user to SAVE his message. But let’s save that for later!

Let’s get started by setting up an instance of the Shape class. Add this code above your constructor:

private var myCanvas:Shape = new Shape()

Next we are going to add the myCanvas variable to the stage… Add this code to the bottom of our constructor.

addChild(myCanvas))

Step 8: Doodles

We’ll do this very quickly. If you want more explanation on how to use the Shape class for drawing, please check my other tutorial.

Start by creating a mouseIsDown variable…

//Checks to see if the mouse is down
private var mouseIsDown:Boolean = false

Now go ahead and add the following event listeners:

stage.addEventListener(MouseEvent.MOUSE_MOVE, drawDoodle)
stage.addEventListener(MouseEvent.MOUSE_DOWN, mouseDown)
stage.addEventListener(MouseEvent.MOUSE_UP, mouseUp)

And here are the 3 functions which are attached to the EventListeners:

private function mouseUp(e:MouseEvent):void
{
	mouseIsDown = false
}

private function mouseDown(e:MouseEvent):void
{
	mouseIsDown = true

	//Moves mouse pointer to mouse
	myCanvas.graphics.moveTo(myCanvas.mouseX, myCanvas.mouseY);
}

private function drawDoodle(e:MouseEvent):void
{
	//If the mouse is clicked
	if (mouseIsDown) {
		//Makes drawing settings right
		myCanvas.graphics.lineStyle(5, 0, 1)
		//Draws the doodle line
		myCanvas.graphics.lineTo(myCanvas.mouseX, myCanvas.mouseY);  

	}
}

Now you can test out the program and it should be drawing fine. However, we still haven’t limited the drawing space of our canvas, so drawings outside of the myObject boundaries still show. In the next step, we will solve all of this!


Step 9: Masking

In my previous tutorial, the process of masking was very easy because each masked object remained the same throughout all of the application. This time, we need to have a mask that adjusts to each MovieClip.

Let’s go ahead and Right Click > Copy our myObject on the stage. Now we need to Right Click > Paste in Place the object so it is exactly where our myObject was. Now change the instance name to “myObjectAsMask.” Switch to the Main Class and add the following lines to the constructor:

//This should all be self-explanatory!
myCanvas.mask = myObjectAsMask
myObjectAsMask.gotoAndStop(1)

So far, the mask should only work for the first object. We need to adjust the changeObjectFrame function to change our mask to meet the new shape of myObject. Add the highlighted code to the changeObjectFrame function:

private function changeObjectFrame(e:Event):void
{
	if (myComboBox.selectedLabel == "Rectangle") {
		myObject.gotoAndStop(1)
	}
	if (myComboBox.selectedLabel == "Triangle") {
		myObject.gotoAndStop(2)
	}
	if (myComboBox.selectedLabel == "Circle") {
		myObject.gotoAndStop(3)
	}

	//Clears doodle
	myCanvas.graphics.clear()
	//Syncs myObject and myObjectAsMask frames
	myObjectAsMask.gotoAndStop(myObject.currentFrame)
}

Step 10: The Save Button

Next up: we’ll add a save button to our application. Later on this will save all our myObject’s data into a SharedObject. Create a new Button and design it however you want. I have included my own button but showing you how to draw one is not important.

Drag an instance of the button onto the stage and give it the instance name of “saveStuff”. Then add the following event listener to the constructor:

saveStuff.addEventListener(MouseEvent.CLICK, saveObjectData)

Next, add this empty function that we will use to add our code that saves the object.

private function saveObjectData(e:MouseEvent):void
{

}

Step 11: Creating and Accessing a New SharedObject

To start using the SharedObject class, we will need to create a new instance of the SharedObject class. If you haven’t ever used the SharedObject class before, then this would be a good time to check out this tutorial on Working with SharedObjects to get a basic idea of how they work. Use this code to create a SharedObject:

private var mySaveData:SharedObject = SharedObject.getLocal("saveData")

Go inside the saveObjectData function and add the following code to begin our save operation:

// Creates a new array inside the program
var myDataArrayInProgram:Array = new Array()

// Adds some random data to our Array
myDataArrayInProgram.push("WhateverDataYouWant")

// Creates a variable inside the SharedObject
// and sets it's value to the value of our local
// array
mySaveData.data.myDataArray = myDataArrayInProgram

// "Flushes" the data away to be saved in the
// computer (although the name suggests otherwise,
// this actually stores the data!)
mySaveData.flush()

If you want to check to see if this code is effective, just add this snippet of code to the bottom of your function:

trace(mySaveData.data.myDataArray)

Step 12: Saving our Main MovieClip Data

So far, all is good. We’ve managed to create a SharedObject and have successfully stored a few bytes of data in it. The next step is to start preparing our program for reconstructing our MovieClip. In this step, we will add all of the necessary data to our SharedObject for our application to reconstruct the MovieClip from scratch.

To do this, we will need to push all of our data into the myDataArrayInProgram Array so it will be attached to our SharedObject. I’ve modified the saveObjectData function to do all of this. You can view it below:

private function saveObjectData(e:MouseEvent):void
{
	var myDataArrayInProgram:Array = new Array()

	//Adds the object's X location
	myDataArrayInProgram.push(myObject.x)

	//Adds the object's Y location
	myDataArrayInProgram.push(myObject.y)

	//Adds the object's currentFrame
	//(The current object chosen)
	myDataArrayInProgram.push(myObject.currentFrame)

	//Adds the current frame of the
	//current object's animation
	myDataArrayInProgram.push(myObject.getChildAt(0).currentFrame)

	mySaveData.data.myDataArray = myDataArrayInProgram
	mySaveData.flush()
	trace(mySaveData.data.myDataArray)
}

IMPORTANT: getChildAt() accesses the children of the object based on their index. When there is only one object in a MovieClip, you can be sure that getChildAt(0) will get you to it!

MORE IMPORTANTLY: Don’t worry if you get the following error:

1119: Access of possibly undefined property currentFrame through a reference with static type flash.display:DisplayObject.

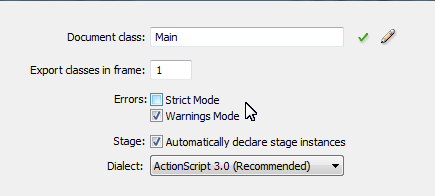
If so, you probably have Strict Mode enabled in your flash settings. The problem is that getChildAt() returns a DisplayObject, and to flash, that could be a Bitmap, Sprite, MovieClip, etc. The issue with DisplayObject.currentFrame is that only the MovieClip Class has the currentFrame property, because no other class has any animation.

To solve this, go to: File > Publish Settings > Actionscript Settings and uncheck “Errors: Strict Mode”
Editor: Alternatively, you could cast the object returned by getChildAt() as a MovieClip, like so:

myDataArrayInProgram.push((myObject.getChildAt(0) as MovieClip).currentFrame)

This tells Flash, “treat this object as a MovieClip“.


Step 13: Creating a Load Button

We aren’t at the stage yet where we can use our save data, but it is still good to create the UI option to load the SharedObject ahead of time. Just like the save button, you can design this button to be however you want; I’m not going to walk you through drawing it.

Create a new button and drag an instance onto the stage. Then set the instance name to “loadStuff”.

And now just add the following Event Listener:

loadStuff.addEventListener(MouseEvent.CLICK, loadObjectData)

And create the loadObjectData function like so:

private function loadObjectData(e:MouseEvent):void
{

}

Step 14: Clear Everything Button

Now let’s add a new button to our UI. This button will delete everything in our SharedObject and also wipe out the current doodle on myCanvas.

Just like the other buttons, I will choose my own graphic; you can choose your own or use mine.

This time you can set the instance name of the button to “clearStuff”.

Now add this Event Listener:

clearStuff.addEventListener(MouseEvent.CLICK, clearObjectData)

And create the clearObjectData function like so:

private function clearObjectData(e:MouseEvent):void
{
	//Clear SharedObject
	mySaveData.clear()
	//Clears myCanvas graphics
	myCanvas.graphics.clear()
}

Step 15: BitmapData Snapshots

Now you are beginning to ask: “Why can’t I save the user’s doodle like any other property?” Unfortunately, Flash doesn’t allow you to directly save MovieClips, Bitmaps, or even Shapes inside of a SharedObject, but you can do this by saving the pixel by pixel value OF the image.

You must be asking: “But the doodle isn’t a bitmap, it’s a user drawn vector image contained in shape?!” That’s right, but we can convert it to Bitmap based data by taking a snapshot of it with the BitmapData class!

Go ahead and create the following variable above the constructor of our Main application:

private var bitmapDataSnapshot:BitmapData

This variable will be the “camera” that takes a snapshot of the doodle.

Now add the following highlighted lines to the saveObjectData function in the location shown below:

private function saveObjectData(e:MouseEvent):void
{
	var myDataArrayInProgram:Array = new Array()
	myDataArrayInProgram.push(myObject.x)
	myDataArrayInProgram.push(myObject.currentFrame)
	myDataArrayInProgram.push(myObject.getChildAt(0).currentFrame)

	//Creates a new instance of the BitmapData class,
	//makes it the size of the stage, enables transparency,
	//and sets the fill to a transparent white
	bitmapDataSnapshot = new BitmapData(640, 480,true,0)

	//Tells the camera to take a snapshot
	//of myCanvas, skips the next 3 parameters,
	//and tells the snapshot area to only include
	//the stuff covered by the myObject MovieClip
	bitmapDataSnapshot.draw(myCanvas, null, null, null, new Rectangle(250, 30, 150, 100))

	mySaveData.data.myDataArray = myDataArrayInProgram
	mySaveData.flush()
	trace(mySaveData.data.myDataArray)
}

Step 16: Saving BitmapData in a SharedObject

Let’s wrap up the saving process of our program. Now that we have created a BitmapData instance with all of our myCanvas data, we need to store it inside a ByteArray to be sent into our SharedObject. To do this, we can use a very handy function inside of the BitmapData Class. It’s name is getPixels().

getPixels() returns a ByteArray of all of the pixel data of a BitmapData. Unlike the BitmapData Class, ByteArrays can be stored inside SharedObjects so they are the right tool for saving our Doodle.

All you need to do is add this line of code in your saveObjectData function right after you finish doing your BitmapData work:

//Pushes the value of the returned
//ByteArray of the getPixels() function
//into myDataArrayInProgram

//getPixels() requires a Rectangle that
//shows what part of the object's  pixels
//we actually want!

//NOTE: The current rectangle is only
//an approximation of where the doodle
//should show!
mySaveData.data.myDataArray.push(bitmapDataSnapshot.getPixels(new Rectangle(250, 30, 150, 100)))

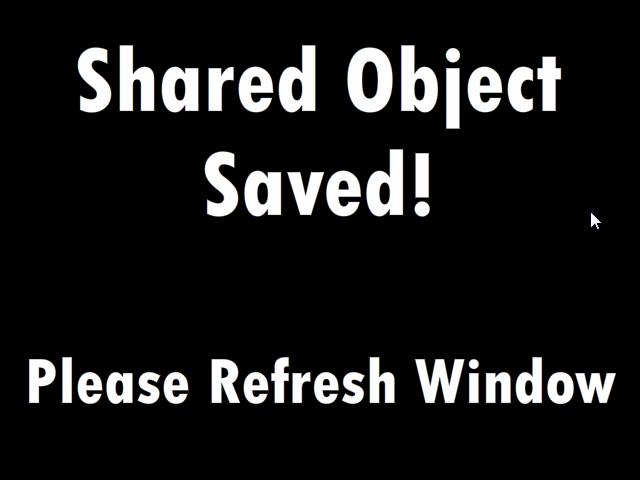
On to the last step. Once the data is saved, we need to have the user refresh the page, to prove that their doodle has been saved to their hard drive, and not just stored in temporary memory. Draw a black box around the stage and add some text to it that asks the player to refresh. Then select the whole object and push F8. Make sure to check the “Export For Actionscript” box and set the “Class” to “refreshScreen”. You can now delete the object on the stage…

Below is the refreshScreen that I have drawn:
Now add this code to the bottom of your saveObjectData function:

addChild(new refreshScreen())

Your finished saveObjectData function should look like this:

private function saveObjectData(e:MouseEvent):void
{
	var myDataArrayInProgram:Array = new Array()
	myDataArrayInProgram.push(myObject.x)
	myDataArrayInProgram.push(myObject.currentFrame)
	myDataArrayInProgram.push(myObject.getChildAt(0).currentFrame)
	bitmapDataSnapshot = new BitmapData(640, 480,true,0)
	bitmapDataSnapshot.draw(myCanvas, null, null, null, new Rectangle(250, 30, 150, 100))
	myDataArrayInProgram.push(bitmapDataSnapshot.getPixels(new Rectangle(250, 30, 150, 100)))

	mySaveData.data.myDataArray = myDataArrayInProgram
	mySaveData.flush()
	trace(mySaveData.data.myDataArray)

	addChild(new refreshScreen())
}

Step 17: Reconstructing Our Doodle

It’s time to reconstruct our entire Doodle from the ByteArray that we saved earlier!

You must be thinking: “What the heck do I do with a ByteArray, its just a bunch of garbled mumbo-jumbo!” And you are right, it is! Thankfully, Adobe has also given us a great function called setPixels() which you gives the same Rectangle and ByteArray, to recreate the same BitmapData you had!

Before we reconstruct our entire MovieClip, we should go ahead and run a test to see if we can reconstruct the BitmapData itself. Modify your loadObjectData function so it looks like this:

private function loadObjectData(e:MouseEvent):void
{
	//Creates a BitmapData and makes
	//it the size of the stage, and
	//applys all of the old settings
	var loadBitmapData:BitmapData = new BitmapData(640, 480, true, 1)

	//Sets the pixels of loadBitmap
	//using our old rectangle, and
	//by accessing our SaveData ByteArray
	//(4th item in myDataArray (myDataArray[3]))
	loadBitmapData.setPixels(new Rectangle(250, 30, 150, 100), mySaveData.data.myDataArray[3])

	//Creates a new Bitmap and tells it to
	//load its image from loadBitmapData
	var display:Bitmap = new Bitmap(loadBitmapData)

	//Moves the object mask
	//playhead to the right frame
	myObjectAsMask.gotoAndStop(mySaveData.data.myDataArray[2])

	//Masks the image with the mask
	display.mask = myObjectAsMask

	//Adds the Bitmap to the stage
	addChild(display)

}

Step 18: Fully Reconstructing myObject

Now it’s time to put this all together! First, right-click on myObject (in library) > Properties. Now check the “Export For Actionscript” box and set the “Class” to “myObjectType”. Compare your properties to the ones in the image:
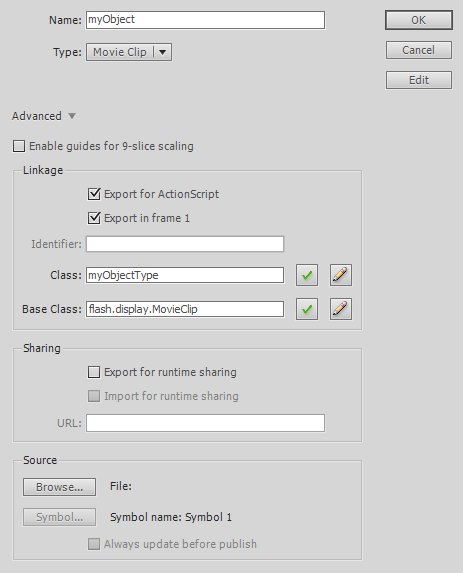
If it’s all the same, then we are ready to go! Add this above our constructor:

private var myNewObject:myObjectType;

And add all of this to the top of loadObjectData().

//Creates a new instance of myObjectType (myObject)
myNewObject = new myObjectType()

//Sets the X to the old position
myNewObject.x = mySaveData.data.myDataArray[0]
//Sets the Y to the old postion
myNewObject.y = mySaveData.data.myDataArray[1]
//Selects the old object
myNewObject.gotoAndStop(mySaveData.data.myDataArray[2])
//Moves the playhead to the right animation frame
myNewObject.getChildAt(0).gotoAndStop(mySaveData.data.myDataArray[3])
//Adds the object to the stage
addChild(myNewObject)

//Removes comboBox event listener
myComboBox.removeEventListener(Event.CHANGE, changeObjectFrame)

//Removes the "doStuff" event listeners for buttons
saveStuff.removeEventListener(MouseEvent.CLICK, saveObjectData)
loadStuff.removeEventListener(MouseEvent.CLICK, loadObjectData)
clearStuff.removeEventListener(MouseEvent.CLICK,clearObjectData)

//Removes drawing event listeners
stage.removeEventListener(MouseEvent.MOUSE_MOVE, drawDoodle)
stage.removeEventListener(MouseEvent.MOUSE_DOWN, mouseDown)
stage.removeEventListener(MouseEvent.MOUSE_UP, mouseUp)

//Removes unneeded UI
removeChild(myObject)
removeChild(saveStuff)
removeChild(loadStuff)
removeChild(clearStuff)
removeChild(myComboBox)
removeChild(myCanvas)

Test the app out, it should work perfectly.

Congratulations! You’ve officially reconstructed a MovieClip using the SharedObject class!


Step 19: Adding a Play Animation Button

If the application above works, it should present a paused image of where you saved myObject. To get the animation to play again, let’s create a “Play” button. Here is the one that I’ve chosen:

Drag it just underneath myObject on the stage and set its instance name to “playAnimation”.

Now add this to the bottom of our constructor:

//Hides button
playAnimation.visible = false

//Adds buttons Event Listener
playAnimation.addEventListener(MouseEvent.CLICK, playObjectAnimation)

Then put this at the bottom of loadObjectData().

//Shows button
playAnimation.visible = true

Lastly, add this function to your program:

private function playObjectAnimation(e:MouseEvent):void {
	myNewObject.play()
}

Step 20: Final Source

Here is our Final Application Source Code. If there is any difference between your code and this, go back and see where you took a different path.

package {

	import flash.display.Bitmap;
	import flash.display.BitmapData;
	import flash.display.Graphics;
	import flash.display.Shape;
	import flash.display.Sprite;
	import fl.controls.ComboBox
	import flash.events.Event;
	import flash.events.MouseEvent;
	import flash.geom.Matrix;
	import flash.geom.Rectangle;
	import flash.net.SharedObject;

	public class Main extends Sprite {

		private var myComboBox:ComboBox = new ComboBox()
		private var myCanvas:Shape = new Shape()
		private var mouseIsDown:Boolean = false
		private var mySaveData:SharedObject = SharedObject.getLocal("saveData")
		private var bitmapDataSnapshot:BitmapData
		private var myNewObject:myObjectType 

		public function Main():void  {
			myObject.gotoAndStop(1)

			myComboBox.addItem( { label:"Rectangle" } )
			myComboBox.addItem({label:"Triangle"})
			myComboBox.addItem({label:"Circle"})
			addChild(myComboBox)
			myComboBox.move(280, 150)

			myComboBox.addEventListener(Event.CHANGE, changeObjectFrame)

			addChild(myCanvas)

			stage.addEventListener(MouseEvent.MOUSE_MOVE, drawDoodle)
			stage.addEventListener(MouseEvent.MOUSE_DOWN, mouseDown)
			stage.addEventListener(MouseEvent.MOUSE_UP, mouseUp)

			myCanvas.mask = myObjectAsMask
			myObjectAsMask.gotoAndStop(1)

			saveStuff.addEventListener(MouseEvent.CLICK, saveObjectData)
			loadStuff.addEventListener(MouseEvent.CLICK, loadObjectData)
			clearStuff.addEventListener(MouseEvent.CLICK, clearObjectData)

			playAnimation.visible = false
			playAnimation.addEventListener(MouseEvent.CLICK, playObjectAnimation)
		}

		private function clearObjectData(e:MouseEvent):void
		{
			mySaveData.clear()
			myCanvas.graphics.clear()
		}

		private function loadObjectData(e:MouseEvent):void
		{
			myNewObject = new myObjectType()
			myNewObject.x = mySaveData.data.myDataArray[0]
			myNewObject.y = mySaveData.data.myDataArray[1]
			myNewObject.gotoAndStop(mySaveData.data.myDataArray[2])
			myNewObject.getChildAt(0).gotoAndStop(mySaveData.data.myDataArray[3])
			addChild(myNewObject)

			myComboBox.removeEventListener(Event.CHANGE, changeObjectFrame)

			saveStuff.removeEventListener(MouseEvent.CLICK, saveObjectData)
			loadStuff.removeEventListener(MouseEvent.CLICK, loadObjectData)
			clearStuff.removeEventListener(MouseEvent.CLICK,clearObjectData)

			stage.removeEventListener(MouseEvent.MOUSE_MOVE, drawDoodle)
			stage.removeEventListener(MouseEvent.MOUSE_DOWN, mouseDown)
			stage.removeEventListener(MouseEvent.MOUSE_UP, mouseUp)

			removeChild(myObject)
			removeChild(saveStuff)
			removeChild(loadStuff)
			removeChild(clearStuff)
			removeChild(myComboBox)
			removeChild(myCanvas)

			var loadBitmapData:BitmapData = new BitmapData(640, 480, true, 1)
			loadBitmapData.setPixels(new Rectangle(250, 30, 150, 100), mySaveData.data.myDataArray[4])
			var display:Bitmap = new Bitmap(loadBitmapData)
			myObjectAsMask.gotoAndStop(mySaveData.data.myDataArray[2])
			display.mask = myObjectAsMask
			addChild(display)

			playAnimation.visible = true

		}

		private function playObjectAnimation(e:MouseEvent):void
		{
			myNewObject.getChildAt(0).play()
			playAnimation.visible = false
		}

		private function saveObjectData(e:MouseEvent):void
		{
			var myDataArrayInProgram:Array = new Array()
			myDataArrayInProgram.push(myObject.x)
			myDataArrayInProgram.push(myObject.y)
			myDataArrayInProgram.push(myObject.currentFrame)
			myDataArrayInProgram.push(myObject.getChildAt(0).currentFrame)
			bitmapDataSnapshot = new BitmapData(640, 480,true,0)
			bitmapDataSnapshot.draw(myCanvas, null, null, null, new Rectangle(250, 30, 150, 100))
			myDataArrayInProgram.push(bitmapDataSnapshot.getPixels(new Rectangle(250, 30, 150, 100)))

			mySaveData.data.myDataArray = myDataArrayInProgram
			mySaveData.flush()
			trace(mySaveData.data.myDataArray)
		}

		private function mouseUp(e:MouseEvent):void
		{
			mouseIsDown = false
		}

		private function mouseDown(e:MouseEvent):void
		{
			mouseIsDown = true
			myCanvas.graphics.moveTo(myCanvas.mouseX, myCanvas.mouseY);
		}

		private function drawDoodle(e:MouseEvent):void
		{
			if (mouseIsDown) {
				myCanvas.graphics.lineStyle(5, 0, 1)
				myCanvas.graphics.lineTo(myCanvas.mouseX, myCanvas.mouseY);  

			}
		}

		private function changeObjectFrame(e:Event):void
		{
			if (myComboBox.selectedLabel == "Rectangle") {
				myObject.gotoAndStop(1)
			}
			if (myComboBox.selectedLabel == "Triangle") {
				myObject.gotoAndStop(2)
			}
			if (myComboBox.selectedLabel == "Circle") {
				myObject.gotoAndStop(3)
			}

			myCanvas.graphics.clear()
			myObjectAsMask.gotoAndStop(myObject.currentFrame)
		}

	}

}

Conclusion

As you can see, with a little bit of tweaking, it is absolutely possible to save all MovieClip data into SharedObjects for loading later on. This means that if you are writing a game, you can easily create save states instead of having small checkpoints…

Good luck on using this method of saving data on your games and applications, to help make your programs better than ever!

Thanks for reading!

Model and Render a KEF Speaker using Modo – Day 1

In this 2 part tutorial, Justin Mitrache walks us through how to model and render a KEF speaker in Luxology Modo 401. Based on existing reference pictures, we begin by modelling the object itself, after which we set up standard studio lighting, assign textures and modify the shaders, before finally rendering out the final shot. Let’s start!

For this tutorial it is recommended that you have basic knowledge of Modo. I also utilise 9b Studios PAD Pack during the texturing stages.

Original design of the speaker by KEF.


Video 1

Download

Note: click the ‘Monitor’ icon to view tutorial in full-screen HD.


Video 2

Download

Note: click the ‘Monitor’ icon to view tutorial in full-screen HD.


Video 3

Download

Note: click the ‘Monitor’ icon to view tutorial in full-screen HD.


Video 4

Download

Note: click the ‘Monitor’ icon to view tutorial in full-screen HD.


Don’t miss more CG tutorials and guides, published daily – subscribe to Cgtuts+ by RSS.

The Art of Self-Assertion

If you ask, you shall receive. It sounds simplistic, but it works in all kinds of ways.

If you’d like to make a sale, ask your customer if they’re ready to buy.

If you’d like to work on a new project, ask if you can get involved.

If you want a raise, ask for one.

Asking for what you want is often the quickest way to get it. Self-assertion allows you to take control, be proactive and grow as a person. Instead of seeing a world of limits, you see a world of opportunities. Instead of living small, you live large.

Being assertive is a critical skill, but many people are hesitant to try. If this is something you struggle with, read on for some helpful tips.

Excuses Won’t Get You Anywhere

There are so many excuses that keep us from being assertive. Speaking up can be scary, especially if you are shy. You really don’t want to bother anyone. And you may assume you will just get no for an answer anyway. You would rather not even try. Or you may be so bogged down by the day-to-day grind that you lack the energy to even think about what you really want and how to ask for it.

For many people, it may be much more comfortable to take on the role of the martyr, working away diligently, never asking for more. As long as you keep your head down, work hard, and play nice, you will be showered with rewards from on high, right? Not exactly.

The truth is that other people are busy. They may like you a lot. They may even want to help you, but they can’t read your mind. They aren’t going to sit around brainstorming ways to help you advance your personal goals. If you want to get ahead, you have to make it happen. You have to give yourself a chance.

Be Solution-Oriented

By taking the initiative, you can make important changes in your work environment. Instead of putting up with problems, you offer solutions. You make your job work for you.

This is especially helpful for people who find their jobs to be increasingly boring or unfulfilling. You could get stuck in a rut, become resentful, and start daydreaming about finding a new career, or you could brainstorm ways to expand your current role. Is another department overwhelmed and in need of extra help? Is there a promotion opening up? Could you propose a new project?

It’s important to allow yourself to think outside the box and avoid self-imposed limits. You just might have the perfect answer.

Why It’s Worth It

Just asking for what you want can change your whole working experience. You could get an exciting project that breathes fresh life into your job. You could get a promotion or a raise. You could make new connections, strike up friendships or learn valuable skills.

The best part is that you get empowered in the process. You realize it’s not so scary, after-all. You gain more confidence. You realize that you can make a difference.

It’s Not All About Taking

People tend to confuse assertiveness with aggressiveness. But they aren’t the same thing. You don’t have to throw elbows, step on toes, or make a spectacle to get what you want.

It doesn’t have to be a gimmee-gimmee situation. It’s all in your approach. The key is to find a way to meet someone else’s needs at the same time.  Instead of pushing your own agenda, find a way to tie it to someone else’s. That way everyone benefits, and you give others a reason to say yes. With a little imagination, you can create a win-win situation and open the door to new opportunities – for yourself and others.

Get Over Your Fear of Rejection

If you are still hesitant, just start small. Find one thing that could make a real difference to you, and then ask for it. Becoming assertive is like working a muscle. The more you do it, the stronger you become.

If things don’t work out as you hoped, remember that failure is not a sign of weakness. It isn’t a sign that something is wrong with you. Failure just shows your pushing the boundaries.

Failure is not the end of the story. It is the beginning. When something is hard and you are really struggling with it, that is the point when you really begin to grow and learn. Stick with it. Have patience with yourself. Don’t give up.

Michael Jordan once said,

“I failed over and over in my life and that is why I succeed.”

Isn’t that the story of humanity right there? We are never going to be perfect, but if we have courage and determination and confidence, we can succeed.

Create a Web Banner in Microsoft Word

I’ve reviewed some of the things that can be done using Word 2007 – but it is not a web tool.  Well, it’s not necessarily a web tool.

What if you are stuck and need a simple web banner?  You can actually create web banner ads directly in Microsoft Word.  The following tutorial shows you how to do just that.

Step 1

Open up Word 2007.  You will automatically have a new blank document.  Go to the tab Page Layout, choose Size  and choose More Paper Sizes at the bottom.

Step 2

From the pop-up window Page Setup, choose Paper, Paper Size and then Custom Size.  There enter 7in by 2 in. This gives you approximately 195px by 680px. You can turn on showing pixels when shapes or boxes are inserted. Simply go to the Office button, choose Word Options and then click Advanced. There you have to scroll down until you see Display, then tick the Show Pixels for HTML features box.

Step 3

Next click on the Margin Tab and set all margins to zero.

Step 4

Then click on the Layout Tab and set the size for the header and footer to zero as well.

Step 5

Go back to the Page Layout Tab and set the Page Color to a blue.

Step 6

Now we want to add some visuals. Since the background is blue, let’s add some clouds. Go to the Insert Tab and select Shape and insert round shapes filled with white and no outline color.  Align those along the bottom of the banner.

Step 7

Let’s add an easy gradient to the background. Go back to the Page Color in the Page Layout  Tab and  select Fill Effects from the drop down.

Step 8

Choose your gradient from the pop up window. You have tons of choices here. I chose a horizontal blue to light gradient.

Step 9

Go back to the Insert Tab and insert a Simple Text Box.

Step 10

Add some text, give it a styling and make it stand out. Place it to the left, or wherever you think it would be noticed.

Step 11

Now you will notice that the text gets aligned to the top in the text box. To change the vertical alignment, right click on the text box and choose Format AutoShape.

Step 12

Now you can choose top, center or bottom alignment from the pop up window.

Step 13

I’ve added more shapes (e.g. a speech bubble – cloud shape) and added more text. You can also change the transparency of shapes and their fill color. To do so, repeat the previous step and  play with the transparency slider. It works kind of backwards in Word, meaning 0% is opaque and 100% is transparent.

Conclusion

The end result is your very own web banner. The only way to get a gif, jpg or png is to either export it as a PDF or hit the PrintScreen button on your keyboard and paste it into MS Paint. There you can crop and change it and save it as an image.

A 10 Step Introduction to Making Your First Photofilm

Many have turned to video to meet the demand for web-based media, but the increasingly popular medium of Photofilms provide a simple and highly effective way to display your work, without having to learn lots of new skills. Now being employed by various news agencies, this new multimedia format is gaining momentum in the world of online photojournalism and will be a valuable means for publishing your work. Today we’ll show you how to get started, and showcase a few brilliant examples!


Step 1

Photofilms are a means for presenting your photographic stills combined with audio in a multimedia format, suitable for web publication. In basic terms it’s a glorified slideshow, but when combined effectively with music, audio interviews from subjects and sound recordings from the setting, it’s an extremely dramatic way to portray a photographic story.

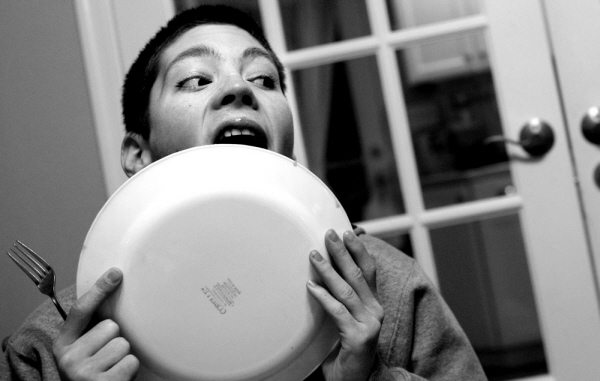
Below is an extremely well executed Photofilm by award winning photographer Maisie Crow titled ‘Hungry’.

Hungry: Living with Prader-Willi Syndrome – By Maisie Crow from liveBooks.


Step 2

As you will have seen from Maisie’s work, Photofilms are an extremely effective way to tell a story with your photos. The power of the still image really comes to light, the eye has time to explore the image as opposed to being directed by a moving image or video.

The simplicity of Maisie’s black and white shots portrays an authenticity of situation, which effectively accompanies the two voices of the subjects. The relatively short length of the film is important as well, as it would be difficult to sustain that level of quality and emotional connection with the viewer for a more extended period.

I remember coming away from viewing the film for the first time feeling highly informed about Prader-Willi symdrome and the day-to-day lives of those who live with it, yet on second reflection, there are very few facts within the film to actually educate you about the condition in a medical sense.

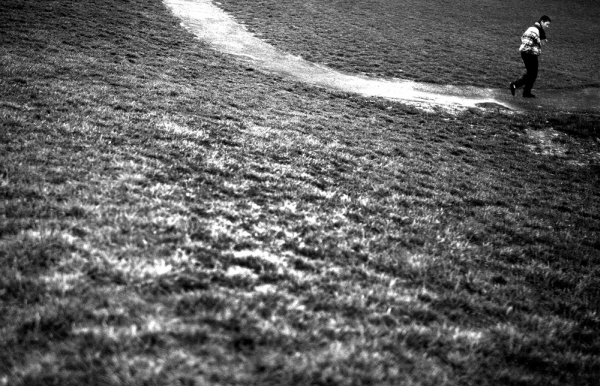
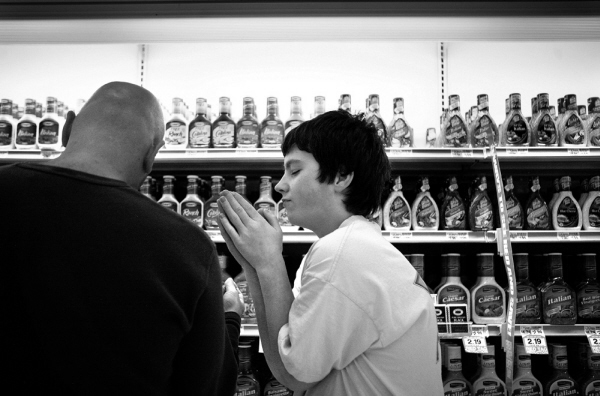
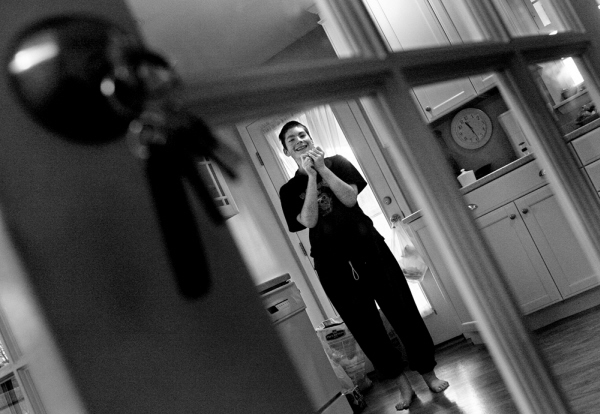
It is the depth of understanding that the film offers the viewer which is so impressive – a result of a very well crafted piece of work. Throughout the article I will include some stills from the film to demonstrate the style of images which make the piece so dramatic.


Step 3

So, you’ve seen a top quality example of a Photofilm and you want to make your own? These next few steps should equip you to start producing your very own films.

Like any photographic project, you’ll need a subject or location to shoot. It’s probably best to start with a topic that you’re familiar with or used to shooting, but you may have a particular story that you want to tell, know a group of people that you think might be interesting to capture or you may even have a collection of photos that you’ve already taken which you might be suitable.


Step 4

To create your Photofilm, it’s essential that you’re kitted out with all the right gear, but don’t worry, you only need a few pieces of kit to get started. You can use whichever camera you like, your DSLR, you’re favourite old 35mm or even your camera phone, as long as you can upload or scan the images onto your computer.

The other main piece of equipment that you’ll need is a handheld audio recording device. Something such as an Edirol R09 would be ideal, but there are some far cheaper dictaphone type products such as the Tascam DR07 which would be fine. Along with this you’ll need a good pair of closed headphones (not the in-ear ones) to listen whilst you’re recording.


Step 5

As photographers, I’m not expecting you to naturally understand the science of recording sound, but there are a few important tips to help with the recording process which should help to ensure you capture high quality audio.

Many devices have an option to record in MP3 format, please try and avoid this as it will compress your recordings, instead opt for 44.1Hz WAV for high quality audio. Think about where you’re pointing your recording device, particularly when interviewing a subject. Don’t hold it right in front of their face as this can be intimidating, instead aim to hold it at about chest height, think about the intimacy of the audio, and get up close.

Make sure your subject is comfortable and relaxed in their surroundings and if possible aim to sit side by side as opposed to facing each other directly, as this can make the situation awkward due to direct eye contact.

Be sure to think about the questions that you’re going to ask, don’t ‘umm’ and ‘ahh’ all over their answers and try to give lots of positive signs using body language such as nodding and smiling.

Remember that the person you’re interviewing may well be giving up their time for you and opening up to you as an interviewer, so ensure you respect that and leave time at the end to relax if you’ve been discussing a particularly emotional topic.


Step 6

Hopefully you’ll be far more clued up on the photographic element to your piece and it’s totally up to you what you shoot, but there are a few things to remember when shooting for a Photofilm.

Take plenty of shots, you’ll only use a small portion of the shots that you take and remember that no-one will see the shots that you don’t use! Ensure that you take a variety of shots, wide open establishing shots, lots of detail shots and everything in between.

The most important thing to remember is that you’re telling a story. There needs to be cohesion between your shots and they need to detail all that’s happening with your subject or location in order to tell the complete story.


Step 7

The only other thing you’ll need to create your Photofilm is some software to compile it. The first thing that you’ll need to do is edit your recorded audio, which can be done using free software such as Audacity.

Within Audacity you can upload all your recordings, cut them up, change the order and layer them up as you please. You’ll also need some software to combine the audio with the photos. You can download a free version of Soundslides online, which is a great tool for creating Photofilms and will present your work very nicely. The alternative if you’ve got a bit more money to spend would be Final Cut Pro or Elements.


Step 8

Now you’ve got your audio and your photos, it’s time to combine the two to create your Photofilm. It’s up to you which you organise first, but be sure to provide a solid narrative to the film, introduce the topics and subjects and don’t presume the viewer knows what it’s about before it starts.

Select your images carefully, don’t be precious about shots – you may really like particular shots, but if they don’t add to the film, then don’t be afraid to scrap them. You also need to consider the use of music, understanding the emotional portrayal of the story. Music can be a very manipulative emotional tool and needs to be used to enhance the film, but also not detract from it’s personal involvement.


Step 9

Try different orders of audio and films, different combinations, with music, without music and you’ll soon be able to gauge what does and doesn’t work. Remember though that this is all dependant on the material you’re using, just because something doesn’t work this time around it doesn’t mean it won’t work next time!

Once you’re happy with the final piece, it’s time to share it with the world, upload it to YouTube or Vimeo, show your friends and family and get some feedback.


Step 10

I’m sure you will have learned a great deal from going through the process of creating a photofilm for the first time, so now it’s time to get out there again and apply all that you’ve learnt to a different project or subject

Remember that you don’t have to be commissioned or asked to create, just get out there and capture whatever takes your interest.

Still photography will always exist because our brains are wired to ingest still images. The fact our brains are being rewired might change that equation down the evolutionary road, but for now still images continue to be powerful forms of communication and enlightenment. Mixing still imagery with moving imagery, audio, graphics, ambient sound, music and most importantly the voice of our subjects is exhilarating and has only enhanced our abilities as visual storytellers to tell our stories in new, dynamic ways that can reach broader audiences and break the space logjam that print media has always forced our work into.

Ed Kashi (recently announced as the latest member of VII Photo Agency)

I’ll leave you with another great example of a photofilm, this time created by Cathy Greenblat about people suffering with Alzheimer’s:

SEEING ALZHEIMER’S DIFFERENTLY from duckrabbit on Vimeo.

Create a Sticky Note Effect in 5 Easy Steps with CSS3 and HTML5


In this tutorial, you’ll learn how to transform an HTML list into a wall of “sticky notes” that look and work like the following…

The effect is built up gradually and works on the latest Webkit browsers (Safari, Chrome), Firefox and Opera. Other browsers simply get some yellow squares.


Step 1: The HTML and Basic Squares

Let’s start with the simplest version that works across all browsers. As we are using HTML5 for the effect, the basic HTML of our sticky notes is an unordered list with a link containing all the other elements in each list item:

<ul>
  <li>
    <a href="#">
      <h2>Title #1</h2>
      <p>Text Content #1</p>
    </a>
  </li>
  <li>
    <a href="#">
      <h2>Title #2</h2>
      <p>Text Content #2</p>
    </a>
  </li>
  […]
</ul>

Notice that each note is surrounded by a link which is always a good element to use as it automatically means that our notes become keyboard accessible. If we used the list item for the effect we’d need to set a tabindex property to get the same access.

The CSS to turn this into the yellow squares is simple:

*{
  margin:0;
  padding:0;
}
body{
  font-family:arial,sans-serif;
  font-size:100%;
  margin:3em;
  background:#666;
  color:#fff;
}
h2,p{
  font-size:100%;
  font-weight:normal;
}
ul,li{
  list-style:none;
}
ul{
  overflow:hidden;
  padding:3em;
}
ul li a{
  text-decoration:none;
  color:#000;
  background:#ffc;
  display:block;
  height:10em;
  width:10em;
  padding:1em;
}
ul li{
  margin:1em;
  float:left;
}

We reset things the browser normally gives us like margins and paddings and the list style to get rid of the bullets of the list.

We then give the UL element some padding and set its overflow property to hidden – this makes sure that when we float the list items later on they are contained in the list and the following elements in the document automatically clear the float.

We style the link as a yellow rectangle and float all of the list items to the left. The result is a series of yellow boxes for our list:

Step1: a series of yellow boxes

This works for every browser out there – including IE6. This is also where we end supporting this browser as we should not shoe-horn visual effects supported by modern technology into outdated one.


Step 2: Drop Shadows and Scribbly Font

Now it is time to add a drop shadow to the notes to make them stand out and to use a scribbly, hand-written font as the note font. For this we use the Google Fonts API and the font they provide us with, called “Reenie Beanie”. The easiest way to use this API is to play with the Google font previewer:

The Google font previewer allows you to play with the fonts API and get copy+paste CSS code

Using this, we get a simple line of HTML to include this new font into the page. This is supported by all modern browsers.

<link  href="http://fonts.googleapis.com/css?
family=Reenie+Beanie:regular"
rel="stylesheet"
type="text/css">

We then can set some padding to the headings in the sticky notes, and set the font of the paragraphs to the new font we included. Notice that Reenie Beanie needs to be big to be readable:

ul li h2{
  font-size:140%;
  font-weight:bold;
  padding-bottom:10px;
}
ul li p{
  font-family:"Reenie Beanie",arial,sans-serif;
  font-size:180%;
}

In order to give the sticky notes a shadow to make them stand out from the page, we need to apply a box-shadow. For this, we must add a line for each of the different browsers we want to support to the style of the links:

ul li a{
  text-decoration:none;
  color:#000;
  background:#ffc;
  display:block;
  height:10em;
  width:10em;
  padding:1em;
  /* Firefox */
  -moz-box-shadow:5px 5px 7px rgba(33,33,33,1);
  /* Safari+Chrome */
  -webkit-box-shadow: 5px 5px 7px rgba(33,33,33,.7);
  /* Opera */
  box-shadow: 5px 5px 7px rgba(33,33,33,.7);
}

The syntax is luckily the same for each: offset, spread and colour – in this case a dark grey with an opacity of 70%. Together with the new font our sticky notes now look like this:

Step2: adding new fonts and drop shadows

Step 3: Tilting the Notes

Disclaimer: Both the tilting of the notes and the zooming we’ll add in the next step were already explained in the past, in this article by Zurb, but lacked the support for other browsers, as they weren’t out at the time of writing. So big thanks to them for publishing this trick.

In order to tilt an element you use the transform:rotate property of CSS3, again adding the prefix for each of the browsers:

ul li a{
  -webkit-transform:rotate(-6deg);
  -o-transform:rotate(-6deg);
  -moz-transform:rotate(-6deg);
}

This tilts all the links by six degrees to the left. Now to make the sticky notes appear to be randomly tilted, we can use the nth-child property of CSS3:

ul li:nth-child(even) a{
  -o-transform:rotate(4deg);
  -webkit-transform:rotate(4deg);
  -moz-transform:rotate(4deg);
  position:relative;
  top:5px;
}
ul li:nth-child(3n) a{
  -o-transform:rotate(-3deg);
  -webkit-transform:rotate(-3deg);
  -moz-transform:rotate(-3deg);
  position:relative;
  top:-5px;
}
ul li:nth-child(5n) a{
  -o-transform:rotate(5deg);
  -webkit-transform:rotate(5deg);
  -moz-transform:rotate(5deg);
  position:relative;
  top:-10px;
}

This tilts every second link four degrees to the right, and offsets it a bit by five pixels from the top. Every third link gets tilted by three degrees to the left and pushed up five pixels. And every fifth link gets rotated five degrees to the right and offset ten pixels from the bottom. All in all this gives the impression of random sticky notes:

Step3: seemingly random sticky notes

Step 4: Zooming the Sticky Notes on Hover and Focus

To make a sticky note stand out we use a larger drop shadow and the scale transformation of CSS3. Again, we need to define these for each of the browsers:

ul li a:hover,ul li a:focus{
  -moz-box-shadow:10px 10px 7px rgba(0,0,0,.7);
  -webkit-box-shadow: 10px 10px 7px rgba(0,0,0,.7);
  box-shadow:10px 10px 7px rgba(0,0,0,.7);
  -webkit-transform: scale(1.25);
  -moz-transform: scale(1.25);
  -o-transform: scale(1.25);
  position:relative;
  z-index:5;
}

We also add a higher z-index to ensure that the enlarged sticky note covers the others. As we apply this on hover and focus,it means that moving the mouse over or tabbing to a link now makes it stand out:

Step4: Zooming the current sticky note

Step 5: Adding Smooth Transitions and Colors

The last step is to make the change from tilted to zoomed smooth and appealing rather than sudden. For this we use the CSS3 transition module in its different browser vendor implementations:

ul li a{
  text-decoration:none;
  color:#000;
  background:#ffc;
  display:block;
  height:10em;
  width:10em;
  padding:1em;
  -moz-box-shadow:5px 5px 7px rgba(33,33,33,1);
  -webkit-box-shadow: 5px 5px 7px rgba(33,33,33,.7);
  box-shadow: 5px 5px 7px rgba(33,33,33,.7);
  -moz-transition:-moz-transform .15s linear;
  -o-transition:-o-transform .15s linear;
  -webkit-transition:-webkit-transform .15s linear;
}

In essence this says: if something is to change to this element, do not just switch to that other definition but do it gradually during a quarter of a second. As another extra, let’s add some colour into the mix by making every second sticky note green and every third light blue:

ul li:nth-child(even) a{
  -o-transform:rotate(4deg);
  -webkit-transform:rotate(4deg);
  -moz-transform:rotate(4deg);
  position:relative;
  top:5px;
  background:#cfc;
}
ul li:nth-child(3n) a{
  -o-transform:rotate(-3deg);
  -webkit-transform:rotate(-3deg);
  -moz-transform:rotate(-3deg);
  position:relative;
  top:-5px;
  background:#ccf;
}

In order to see the difference to the last step, you’d need to try the last demo out in a browser.

Step 5:Coloured and smoothly zooming sticky notes

Summary and Download

There you have it – smoothly animating and tilted sticky notes without any use of images or JavaScript – supported by Firefox, Opera, Safari and Chrome and falling back to a set of yellow boxes in older browsers. By clever use of the nth-child selector and CSS transformations and transitions, we saved ourselves some scripting. Further, Google’s Web Font API made it easy to use a custom font. Using both hover and focus for the effect also means that keyboard users can observe the results as well.

Download the sticky notes example as a zip.


About the Author

Christian Heilmann is an international Developer Evangelist who works for the Yahoo Developer Network in the lovely town of London, England. He’s written two books: “Beginning JavaScript with DOM Scripting and AJAX“, and “Web Development Solutions.”

Graphic Design For Joomla Page Layout

Project: Joomla Graphic Page Layout

Description: I am developing an article site and we are looking for some custom pages with high end grahics and designs. If we can find the right graphic designer, we will have up to four designs per month.

For this project, we are looking for two layouts.

1.) Cateogry Specific Page: Smoothies. This page will be the landing page for the category of the website. So it needs to be “eye candy” and will contain several images and lots of links and buttons to other articles

2.) Individual Article Layout. This will be a simple layout for all the smoothie articles on the site. My initial thought would be to have three columns. 1st column be a picture. 2nd column ingredients and the 3rd column directions.

I already have a website and design. So you are just creating the graphic design within the existing layout. Additional details and site name will be provided to qualified designers in the PMB.

Please provide samples of prior work in PMB. Anyone who provides decent mockups will be considered. Mockups are encouraged. Questions are encouraged. Bids without portfolios, questions or mockups will be deleted.

Payment: 50% upon approval of design & 50% upon successful implementation. If you are just a graphic designer, I have a joomla programmer who can install.

Any stock images used must be sourced. If you use dreamstime or similar site, please provide image id# & name. For legal reasons, we need to maintain trace on images for copyright purposes.

Need Website Asap

I have purchased a domain torrment.com and it was purchased to create a “torrent” site that would “torment” the those who want it taken down. This would be accomplished by creating a script that had no admin-input, rather have everything automated. As we learned from Mininova, if the admins are active in the community it can bring a site down. so i need website like www.mininova.com but automated.only bid if you know what your doing and have knowledge on what i want.please send me your ideas so i can successfully select a winning bidder.

Transfer Database 2

First off, if you apply to do this you must be at least 18 years old and be okay with adult content.

Please add “I see the error on slutshome.com” at the top of your message so I know you read through everything and can complete this project

I bought a wordpress website (www.slutshome.com) transfered it from name.com to godaddy.com and imported the database but am getting an error message.

I need it to be fixed and the site to be in proper order. The site worked perfect on the other host just something went wrong in the transfer.

So, I need the error to be fixed and the site to be running how it was before. Thanks!

Rewriting – 100 Articles

I am looking for a creative writer to re-write 100 articles in “getting your ex back” niche. It would be nice to find a long term writer.

I will provide you with articles… each of them will be optimized for one keyword. It is very simple and I will explain you exactly how to do it.

The word count of rewritten articles will be around 325 ( not including the title ). The articles will be submitted to the Ezine Articles so they must be 100% original and error free… their editors are very sensitive about both of these issues.

It is a relatively easy project for a “natural” writer with a bit of creative mind. An excellent proficiency in English is an ABSOLUTE MUST to qualify for this project. PLEASE BE REALISTIC about that… I am tired of dealing with “struggling” writers and cancelling projects because of this reason.

The articles must be well written and interesting to read.

The rate is $1.00 per article. Please bid only if this rate is O.K. with you and if you can provide at least 5 quality articles per day.

The SAMPLE ARTICLE is below. If you have any questions… please ask.

Thank you.
Andre

5 Signs That Your Ex Boyfriend Still Loves You!

Sometimes, after a breakup you can still be madly in love with your ex boyfriend, and desperately want to get him back. It’s natural and understandable. Keep in mind that your ex might be feeling confused and unsure. Look out for these sure signs that your ex boyfriend still loves you if you want to get him back:

1. The first sign that your ex boyfriend still loves you is that he’ll want to remain friends. He obviously still wants you in his life one way or the other. Try not to see this as a bad sign. You can always nurture the friendship and continue to be someone important and reliable in his life.

2. Another good sign is his reaching out and regularly keeping in touch with you via phone, email or text message. It could just be a quick hello, but that’s indicative enough that he doesn’t want to break all ties, that you mean something to him.

3. In case he mentions that he misses you, that’s a sure sign that your ex boyfriend still loves you! He’s probably missing the romance between the two of you and may be considering a way to makeup with you.

4. If he asks you whether you’ve started liking someone, that’s a complete giveaway! He wants to know where he stands, so be upfront. Don’t play games by trying to make him jealous. That can backfire real bad, so avoid it.

5. Another sign that your ex boyfriend still loves you is his behavior towards you. If the two of you go out for a coffee and he seems a little nervous, this could mean that he’s trying not to show his true feelings. Make him relax and feel comfortable. One of you has to eventually come out with the truth about your feelings towards each other.

Digg Style Concept For Quotes

I would like to create a website similar in function as digg.com – except on my site users vote, submit and comment on quotes/phrases (sayings like “to be or not to be”) instead of news stories or links.

Essentially, I wish to create the “digg.com of quotations and phrases”

Google-esque minimalist but attractive layout design is acceptable.

A core concept of this website will be full facebook integration – users will be able to sign in using their facebook accounts, and allow their votes, and submissions to be shared on their facebook news feeds.

The following dynamic lists should be created:
Recent Popular, Top, Recently Submitted

Instead of “digging” a submission users will either: whoosh + or smoosh – a submission.

Website intended for wide adoption, but low profits.

Thanks!