Creating a Next-Gen Video Game Hot Rod: the Complete Workflow – Day 9

Today, one of our most popular tutorial series ever comes to an end, as we present the final part of Laurens Corijn’s incredible 9-day Hot Rod tutorial. In this part, Laurens takes us through how to finalise the remaining textures and take our model to completion!

This tutorial is Day 9 in a series – Go to Day 1, Day 2, Day 3, Day 4, Day 5, Day 6, Day 7 , or Day 8.


Video 1

Download

Note: click the ‘Monitor’ icon to view tutorial in full-screen HD.


Video 2

Download

Note: click the ‘Monitor’ icon to view tutorial in full-screen HD.


Video 3

Download


Video 4

Download

Note: click the ‘Monitor’ icon to view tutorial in full-screen HD.


Video 5

Download

Note: click the ‘Monitor’ icon to view tutorial in full-screen HD.


Video 6

Download

Note: click the ‘Monitor’ icon to view tutorial in full-screen HD.

We hope you enjoyed the series, and we’d love to see your results in the comments!

This tutorial is Day 9 in a series – Go to Day 1, Day 2, Day 3, Day 4, Day 5, Day 6, Day 7 , or Day 8.


Don’t miss more CG tutorials and guides, published daily – subscribe to Cgtuts+ by RSS.

Maximize Your Android Cell Phone Battery Life

No matter how great and feature-rich a phone is, once the battery goes down, it is as good as the toy you bought your kid for a few bucks. It is no surprise that most of the modern phones can’t boast of the battery power our good old phones, sans all the multi-media features, used to have.

So, if you’ve got a shiny new Android phone and love playing with it, it’d be a prudent to step to acquaint yourself with some tips that could maximize its battery life. The How-to Geek blog has a comprehensive article that should help you with the process. Check out the following guide to Android cell phone battery life extension.

Complete Guide to Maximizing Your Android Phone’s Battery Life

How to Create Your Own Tilt-Shift Photograph in Photoshop

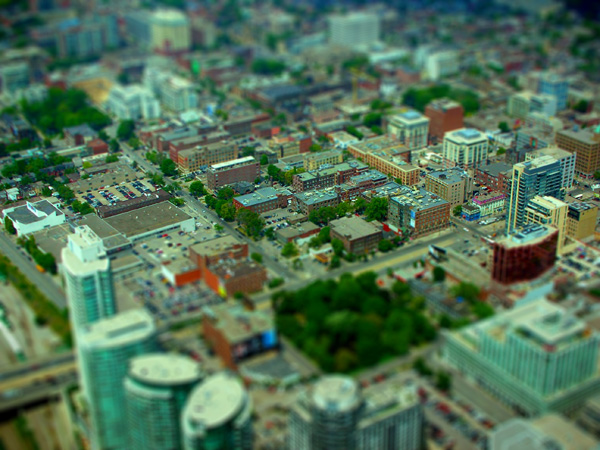
Miniature faking is a great way to spice up an otherwise dull shot. This effect is sometimes referred to as a “tilt-shift effect” because of how the finished product resembles a photograph taken with a tilt-shift lens. In this tutorial we will examine this interesting effect and outline how to achieve it without spending money on a new lens.


Final Image Preview


Step 1. How Does It Work?

Miniature faking tricks the eye into perceiving a life-size image as a miniature model. The miniature feeling of the photo is present because of the illusion of a shallow depth of field. This shallow depth of field is normally encountered in macro (close-up) photography, giving the photo’s subject the feeling of being much smaller than it actually is.


Step 2. Taking the Right Shot

The best shots for miniature faking are ones taken at a high vantage point. Usually, the larger the angle between you and the ground, the better. Lower angle shots are not useless, but the higher angled shots have the best results. This is because the higher angled shots emulate a shot looking down at a miniature model.

Take your time deciding the best location to get the effect you want. If available, venture into a city near you and go to an observation deck. This high vantage point makes for extremely interesting miniature photographs. In more rural locations, higher ground such as hills should do just fine in capturing a shot high enough to display the miniature effect well. Another key to taking a good shot for miniaturization is shooting in the daytime. Unless your night shot is extremely well lit, the effect of the shallow depth of field won’t be as obvious as it would in a day shot.


Step 3. Getting Started in Photoshop

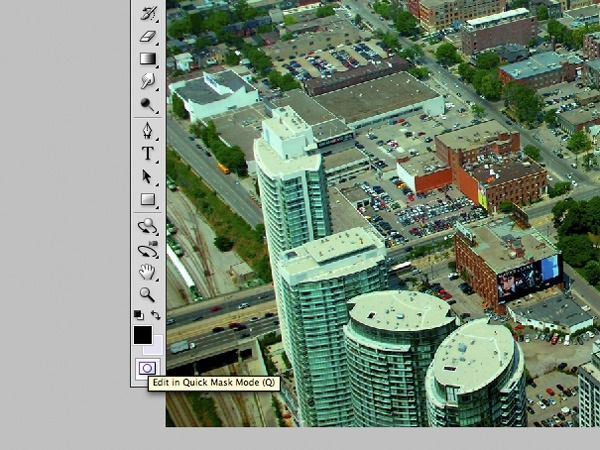
The first step in miniaturizing your photo is by switching into Quick Mask Mode in Photoshop by pressing “Q” or selecting the icon on your tool palette. Quick Mask Mode can also be found by going to Select -> Edit in Quick Mask Mode. The mask will enable us to lay the groundwork for which areas of the image will be in or out of focus.


Step 4. Choosing the Gradient Tool

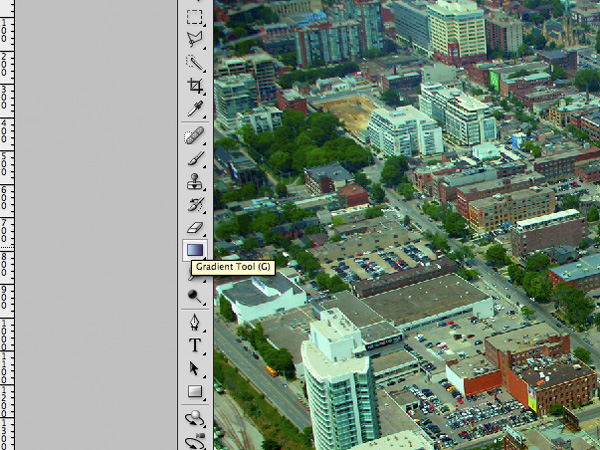
The next step is to choose the Gradient Tool by either pressing the icon on the tool palette, or by pressing “G” on your keyboard.

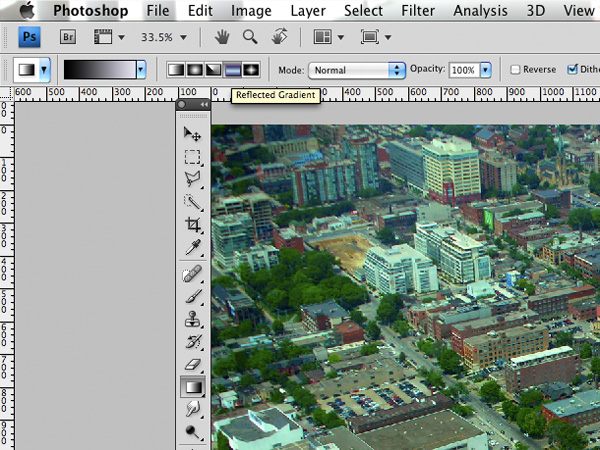
Make sure that the reflected gradient (icon fourth from the left) is selected and the gradient is moving from black to white.


Step 5. Drawing your Focus Line

This step will probably take the most time in the process and requires a lot of trial and error to get it perfect. When drawing the line, position the anchor point where you want the sharpest focus to be. The gradient will fill different depending on whether you drag the line up or down from the anchor point. Try either way to figure out which works best for you.

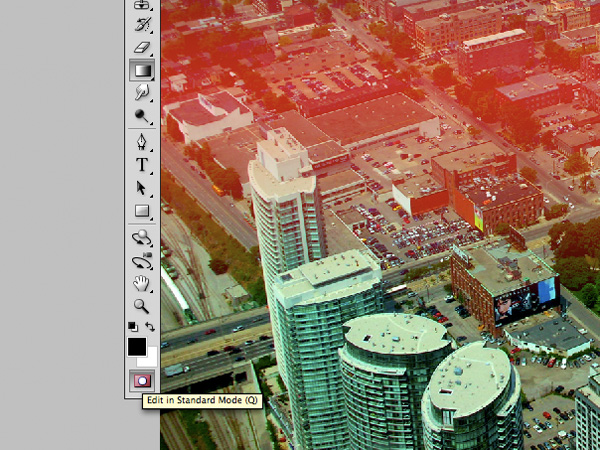
It is essential that you don’t make this long too long, as it will eventually decide the depth of field in your image. Don’t be concerned that your gradient turns out red even though we selected black to white as our gradient fill; it is totally normal!

Take heed not to make your gradient too thin, or else the blurred portion of the image will obscure the little part that is in focus. Also, making the gradient too thick will cause the depth of field to be too large, therefore taking away from the effect we’re trying to accomplish.

A perfect gradient should have a nice band of solid color where the sharpest focus will be, but also enough fade away that the lens blur will look believable when it is applied.


Step 6. Return to Standard Mode

When you are happy with your red masking area, return to Standard Editing Mode by pressing “Q” or by clicking the icon shown in Step 3. After returning to Standard Mode, you will see a rectangular marquee representing the gradient that you drew in the last step.


Step 7. Add the Lens Blur Effect

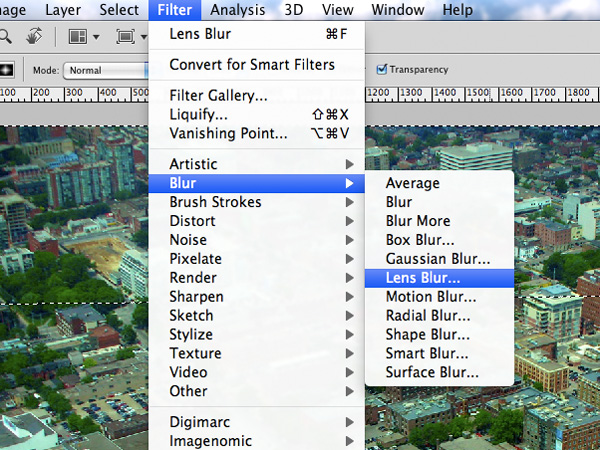
The next step is add the lens blur effect that will make the depth of field shallow. Go to Filter -> Blur -> Lens Blur.


Step 8. Adjusting the Lens Blur

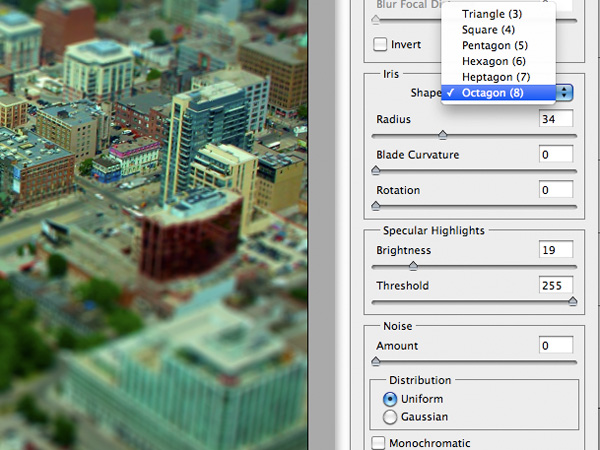
In the Lens Blur editing screen, you will see the preview of what your image will look like, as well as options on the right side. Many of the default settings are sufficient for the effect we are going for.

I like to change the Iris shape from Hexagon to Octagon, but the decision is yours. Fool around with the options to get the effect you desire. When you are satisfied, hit OK at the top right of the screen.


Step 9. Remove the Selection Marquee

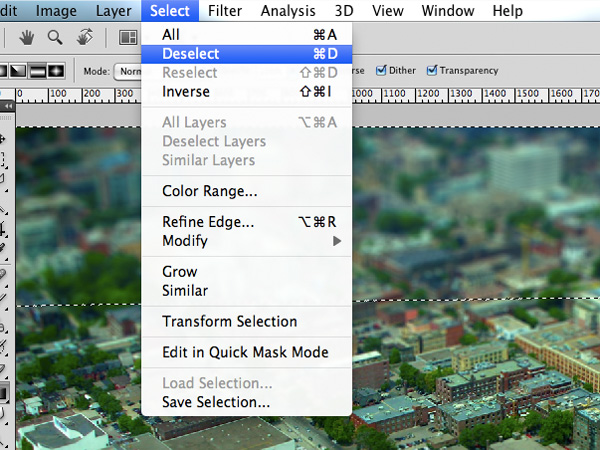
After applying the Lens Blur, press Control+D (Command+D on Mac) to deselect the marquee. Or go to Select -> Deselect.


Step 10. Boost Saturation

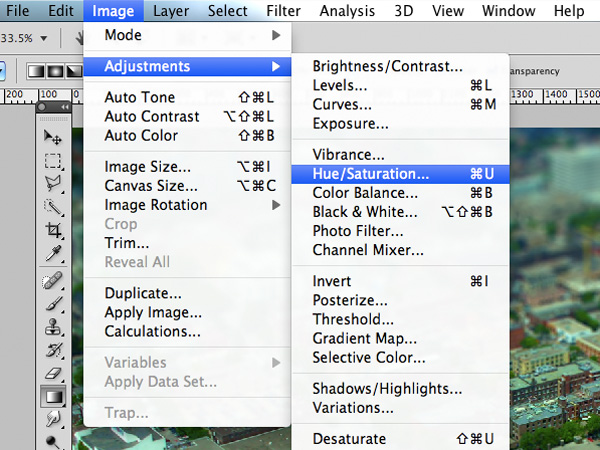
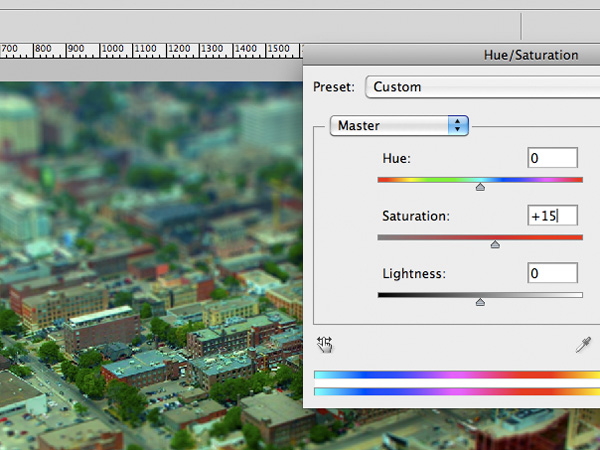
To get the feel of a small model, we will boost the saturation a bit to give the photo more of a “toy” feel. Open up the Saturation Adjustment Panel either by pressing Control+U (Command+U on Mac) or by going to Image -> Adjustments -> Hue & Saturation.

With the window open, move the saturation slider to the right to increase it. Don’t go overboard with the saturation, but just add enough to give the image the feel of a toy model. Finished!


Final Result


Conclusion

Miniature faking is a great technique that you can employ on many landscape photos. This process is most easily done the way you have just learned using Photoshop. This tutorial just touches the basics of miniature faking, but there is so much more that can be done using this technique! More advanced techniques can use selective focus and separate layers to create an even more realistic effect.

Miniature faking is a interesting topic to explore should you have the free time. I hope you learned a thing or two about depth of field and miniature faking and I can’t wait to see some of your results!


Further Reading and Inspiration

Miniature faking has really found it’s stride in photography, and many artists are using it to create captivating effects that catch the viewer’s attention. Here’s some more information on the techniques employed in this tutorial as well as some inspiration for your own miniature fakes.

Some more info on Wikipedia:

Inspiration:

Have fun experimenting, and feel free to share a link to your finished image in the comments below!

Why Net Premium Rocks


You’re likely aware of the fact that Tuts+ offers a Premium membership for $9 a month. With this membership, in addition to smaller benefits, like the removal of all ads on our sites, you’ll gain access to the premium content for not only Nettuts+, but all of our tutorials sites which publish premium content – that’s 400 exclusively awesome tutorials, screencasts, and freebies, and 800 source file downloads — with more coming each week!

And, better than that, becoming a member really helps us out. This then allows us to continue providing you wish the best tutorials available around the web.

Our Premium site

A Brief Sampling of our Amazing Content

  • CSS Noob to Ninja

    CSS: Noob to Ninja (12-Part Screencast Series)

    This exclusive premium video series will take you from a state of absolute CSS “noobness,” all the way up to ninja-status, capable of taking advantage of the latest CSS3 techniques. The series begins with the basics: the syntax, properties, etc. However, each new video expands upon the previous, as you work your way up and improve your skills. In this final week, you’ll complete the series, as you gain access to Parts 8-12: five new episodes.

    Sign Up to View


  • The Beginner's Guide to Web Design

    The Beginner’s Guide to Web Design

    Throughout this three-part series, you will learn how to create a website using the latest in web design techniques (HTML5 & CSS3). This series is aimed at those with minimal knowledge of web design.

    Sign Up to View


  • Build an Awesome Status Board

    Build an Awesome Status Board

    When Panic unveiled their status panel to the world, I was both impressed and inspired. In today’s in depth Premium tutorial and screencast, I’ll show you how to built a similar status board!

    Sign Up to View


  • Tumblr Theme Design: Start to Finish (Screencast Series)

    Tumblr Theme Design: Start to Finish (Screencast Series)

    Tumblr’s popularity over the last year has increased exponentially. The reason why is quite simple: Tumblr is flexible, powerful, and, most importantly, a pleasure to work with. Unfortunately, there aren’t many training resources available for the platform yet. In this video series, we’ll go through the process of taking a Tumblr theme, designed in Photoshop, and converting it into a fully working theme – in just a few hours.

    Sign Up to View


  • An In Depth Overview of File Operations in PHP

    An In Depth Overview of File Operations in PHP

    We will learn how to work with file operations using PHP. This is one of the most fundamental subjects of server side programming in general. Files are used in web applications of all sizes. So let’s learn how to read, write, create, move, copy, delete files and more.

    Sign Up to View


  • How to Code a Gorgeous Watercolor Website

    How to Code a Gorgeous Watercolor Website

    This tutorial is a useful guide for both expert and noob designers/developers who wants to learn more about how to convert complex designs to standards-compliant websites. We’ll learn the basics of slicing a PSD design, how to convert it into a 100% functional HTML+CSS+JavaScript mockup, and more.

    Sign Up to View


  • Learn How to be a TextMate Champion

    Learn How to be a TextMate Champion

    TextMate is, by far, the preferred text-editor for most web developers on the Mac. In this Premium screencast, we’ll be taking a look at some of the features most developers simply don’t use; ones which can massively increase your productivity by allowing you to type less and code more.

    Sign Up to View


  • Firebug - White to Black Belt

    Firebug – White to Black Belt

    Firebug is a Firefox extension that will streamline your developing process: it offers a plethora of tools for working with HTML, CSS, Javascript, and more. In this tutorial, I’m going to take you to a black belt level of Firebug usage that will karate chop your website woes!

    Sign Up to View


  • Create a Jobs Board with with CodeIgniter

    Create a Jobs Board with with CodeIgniter

    In this two-part download, we’ll be creating a basic ‘Jobs Board’, similar to “FreelanceSwitch Jobs” and “Smashing Jobs”, using the CodeIgniter PHP framework.

    Sign Up to View


  • How to Build a Newspaper Website with a Grid

    How to Build a Newspaper Website with a Grid

    You’ll learn how to utilize a grid to create a simple newspaper-like website. Along the way, you’ll learn helpful techniques, such as easy ways to target IE7 and IE6 with only a single character, using the 960 grid system, and even using CSS3 to create columns! It’s an hour long; ready to dig in?

    Sign Up to View


  • Combining Modern CSS3 and HTML5 Techniques

    Combining Modern CSS3 and HTML5 Techniques

    Just because some techniques don’t work in decade old browsers doesn’t mean that you shouldn’t be learning everything you can! Stay on the cutting edge, as we use everything from CSS shadows and animations, to HTML 5 mark-up and local storage, to utilizing jQuery to query the Picasa API. We’ll also take advantage of the excellent jQuery library, and review some best practices when coding.

    Sign Up to View


  • Generating a Particle System with JavaScript

    Generating a Particle System with JavaScript

    If you’ve ever seen a fireworks effect, created in Flash, I’ll show you how to reproduce the effect using pure JavaScript! Why let the Flash developers have all the fun?

    Sign Up to View


  • How to Create the New Trendy jQuery Sliders

    How to Create the New Trendy jQuery Sliders

    Query sliders are becoming more popular day by day; with more free and premium sliders pouring in regularly. Knowing how an advanced slider like this works is becoming a must. In this tutorial, we are going to create a full-fledged jQuery slider which supports inline comments. Let’s get started!

    Sign Up to View


  • Working with Advanced 3D CSS

    Working with Advanced 3D CSS

    CSS is capable of so much more than browsers can currently handle, namely when it comes to working in 3D spaces. In this week’s premium video tutorial, I’m going to teach you how to work with CSS transitions, animations, and specifically how to work with Webkit’s CSS 3D capabilities.

    Sign Up to View


  • A Deeper Look at Advanced Select Queries

    A Deeper Look at Advanced Select Queries

    o the SQL novice, joins can be intimidating and somewhat frustrating. Even when you think you have the query nailed, along comes an unexpected result which make you throw up your arms in surrender to the SQL gods. In this tutorial, we are going to build upon the excellent quick tip of working with MySQL and INNER JOIN recently posted and crack open the real power of a SELECT statement.

    Sign Up to View


Give it a Shot

100% Guarantee
If you’re already a member, thank you so much! We appreciate your support. If you’re not one just yet, but are considering it, why not give it a shot? You can pay monthly or yearly. So, if you’re on the edge, purchase a single month’s plan, take a look around, and then decide! And, of course, we’re confident enough to offer everyone a 100% guarantee.

Sign up for a Premium membership

The Official Guide to HTML5 Boilerplate


When we helped to promote the recently released HTML5 Boilerplate in early August, multiple comments were made, which expressed a desire for a full video overview of the template. Thankfully, Paul Irish, the co-creator, recorded a full video walk-through, exclusively for Nettuts+. In this screencast, he meticulously reviews each page, and then further goes on to explain why and when you would use each snippet in your projects.

The product of years of learning, this video is not to be missed! Even if you have no intention of using this template, you’ll still learn an array of helpful techniques.

You also might like Paul’s “10 Things I Learned from the jQuery Source” screencast. It’s equally educational and funny.

Quick Tip: Dissecting jQuery – Filters


Sporadically, over the course of each month, we’ll post a “Dissecting jQuery” video quick tip. The idea behind these is that we’ll take a single chunk of the jQuery source at a time, break it down, and determine exactly what’s going on under the hood, so to speak. Then, with that knowledge, we’ll learn how to better utilize the library in our coding. Today, we’ll review filters.


Video Tut


jQuery’s Source for the :hidden Filter

jQuery.expr.filters.hidden = function( elem ) {
		var width = elem.offsetWidth, height = elem.offsetHeight,
			skip = elem.nodeName.toLowerCase() === "tr";

		return width === 0 && height === 0 && !skip ?
			true :
			width > 0 && height > 0 && !skip ?
				false :
				jQuery.curCSS(elem, "display") === "none";
	};

The :visible Filter

Quite cleverly, the :visible filter only needs to call the hidden method, and return the reciprocal.

jQuery.expr.filters.visible = function( elem ) {
	return !jQuery.expr.filters.hidden( elem );
};

Hint: Search for filters: and setFilters: within the jQuery source code to view a listing of other helpful filters that are available to you.


Harnessing this Knowledge to Extend jQuery

<script>
	$('p:first').data('info', 'value'); // populates $'s data object to have something to work with

	$.extend(
		jQuery.expr[":"], {
			block: function(elem) {
				return $(elem).css("display") === "block";
			},

			hasData : function(elem) {
				return !$.isEmptyObject( $(elem).data() );
			}
		}
	);

	$("p:hasData").text("has data"); // grabs paras that have data attached
	$("p:block").text("are block level"); // grabs only paragraphs that have a display of "block"
</script>

Note: jQuery.expr[':'] is simply an alias for jQuery.expr.filters.


Stay tuned. In future episodes, we’ll continue to slice out more chunks of the jQuery source, and dissect them!

Real Estate Data

We would like to have a Canadian real estate database of different categories including Real estate agents, Builders, Property Management companies, Mortgage dealers/companies, Property insurance agents/companies, and house inspection categories etc.

Database fields required are “Company Name”, “Website URL”, “City” “About us info” and should be separated by Category.

The requirements are 5000 listings altogether. Data accuracy must be more than 95%. Each data should be unique and no repeat info. Data to be delivered in excel format.

We are not responsible for any direct, indirect damages, claim and loss to you or to any third party resulting from your work or used method.

Quick Graphic Edits

Hi,

I need 3 small graphic edits done. I have all the graphics, you just need to cut/copy/paste/edit stuff in right places. I need this project done immediately. Its easy and should only take you about 15 minutes to complete.

Here is what I need done…

#1. Add a monster to background.

From this concept design:
http://dl.dropbox.com/u/531720/MembersArea_lightbox.jpg

I need the green monster on the top left side of this image above, added to this background image located here:

http://www.clipartmonsterclub.com/images/memberarea.jpg

This will make my current design look a little bit more like the original concept. Unfortunately I do not have an exact psd file for the original concept design, so you may just have to use the above images. Here is a psd file that may help you, but you will see the background image is not correct in the psd file nor is the green monster within unfortunately.
http://dl.dropbox.com/u/531720/MembersArea2.psd

I just want to be able to drop the new background your create right over top the existing one on the website, therefore you need to keep all the correct dimensions and quality. No pixelation. You can see the current working website page here for this background image:
http://www.clipartmonsterclub.com/clipart/

Please place the green monster on the new background in the exact same place as the original concept design. Make sure there is NO pixelation in the final background design. Save it in high quality.

#2. Cut out a monster

I need you to cut out the green monster on top left of the below design, rotate it to the right 90 degrees, and make the image on a white background and/or transparent. This will allow me to just use it independently within the website. Again, no pixelation in the final file. Save in high quality.

http://dl.dropbox.com/u/531720/MembersArea_Category2.jpg

#3. Cut out another monster and quick edit..

I need you to cut out the orange monster on top left of this design below. In addition I need you to remove his top 2 hands above his head, and make the image on a white background and/or transparent. This will allow me to just use it independently within the website. Again, no pixelation in the final file. Save in high quality.

http://dl.dropbox.com/u/531720/MembersAreaB3_monsterstyleA.jpg

Please email me with any questions.

Regards,

Wyatt

WordPress Websites Builder – Landing Page

I’m in the process of designing a websites using WordPress. I have started but find this to technical for me and therefore need your help. My site gives away a free ebook and markets affiliate products.

I need a squeeze page and autoresponder installed, color scheme for the site and possibly some images uploaded. It must look very professional and neat

Ideally I would like to see some work you have done with WordPress in the past

I need 3-5 websites to start, and it may grow up to 100

You must have knowleage on affiliate marketing websites

Auto Tweeting Software Required

I require an Auto Tweeting Software which can do the following;

– MUST post from the WEB, cannot use API
– Be able to load accounts with usernames/passwords from a text file; and be able to have multiple account groups
– Be able to load tweets from a text file
– Be able to set a time for each account group to auto tweet (eg. Tweets will happen every ‘X’ to “X’ amt of minutes or hours
– Must be able to handle unlimted acct groups all auto tweeting at different intervals

Freelance Writer With Expertise In Pregnancy

I am in search of a US based freelance writer with expertise in writing professional articles about pregnancy. A current, retired or in training OBGYN would be perfect for this job.

More specifically, I am looking for the ability to write about what women (and men) should expect during each week of pregnancy. I am looking for several articles for each week of pregnancy, but will start with one week at a time and see if it is a good fit to move on to other weeks.

This could be a long term opportunity for a talented and prompt writer. If you do not do well with meeting deadlines or do not have English as a first language, this job is probably not for you.

I am looking for someone to start right away.

Os Commerce Customization And Editing

I need the following

1.) Add 3 html pages to my OS commerce site to link to already prepared nav buttons

2.) Insert new Header and add a tinny bit of html for the shopping cart button and link other Nav buttons to relevant OS commerce pages.

3.)insert a provided script for a peel page on the main page.

4.) Add a Specific sales process for specific free product limit the free product to choice of one meaning they cant order 5 lets say the cart only lets them order one which is tied to a specific S/H fee for the free product.

Once they have choosen the free product then they need to be asked if they want a choice of 2 upsell products which can be added to there cart but with free shipping since the free product has the shipping and handling charge already attached but if ordered alone S/h needs to be added.

I have already added Xsell but it does not seem to do what I want.

5.)Paypal is set up but need guidance as i have to add my new paypal email address to accept payments for this site without messing up other sites i have accepting payapal on other email address’s i have registered for the same paypal account.

6.) Add a free add on add on that allows for mouse to hover over product pic and enlarge it without having to click on it

thanks