Discover Audacity

Audacity isn’t a digital audio workstation. It’s an audio editor that’s cross-platform (including Windows, Mac and Linux), open source, and free of charge.

The program is very popular, and incredibly versatile – like the swiss army knife of the audio world. This versatility leads some people to use it as a DAW replacement. Are you a fan of Audacity? How far have you been able to take it?

This article was previously published on the AudioJungle blog. We’ll be bringing you an article from the archives a few times a month.

This is our seventeenth article in the series “Exploring Digital Audio Workstations”. If you’ve missed the earlier articles, you can find them here:

  1. Exploring Digital Audio Workstations
  2. Discover Pro Tools LE
  3. 11 Essential Pro Tools Tutorials
  4. Discover Logic Pro
  5. 11 of the Best Tutorials for Logic Pro
  6. Discover Propellerhead’s Reason
  7. 18 Reason Tutorials that Cover All the Bases
  8. Discover Steinberg’s Cubase 5
  9. 20 Instructive Cubase Tutorials
  10. Discover Cakewalk’s SONAR
  11. 14 Tutorials that Make Using SONAR a Piece of Cake
  12. Discover Ableton Live
  13. 17 Amazing Ableton Live Tutorials
  14. Discover FL Studio 9
  15. 21 Fruitful FL Studio Tutorials
  16. Discover Cockos REAPER
  17. Discover Music with Garage Band

About Audacity

The creator of Audacity, Dominic Mazzoni, is now an employee of Google. He initially created Audacity as a grad student, and remains very involved in the project.

The Audacity website lists the programs full set of features, which include recording, import and export (making it useful for conversion between many audio formats), multi-track editing, effects, sound quality, support for plug-ins (including VST and LADSPA), and spectrographic analysis.

The free price, open philosophy, long list of features, and relative ease of use, have given it a place on many hard drives – and not just musicians and music producers. Let us know what you think of the program in the comments.

Audacity Screenshot

10 Audacity Tutorials

1. Free Recording Software: Audacity Tutorial Part One

http://audiblemarketing.com The first in a series of tutorials to show how to use the free recording software called Audacity. This video shows how to download the program and the LAME mp3 encoder.

2. Free Recording Software: Audacity Tutorial Part Two

http://audiblemarketing.com The second video in a series of tutorials to show how to use the free recording software called Audacity. This video shows how to change your preferences on Audacity, as well as how to record your voice, zoom in and save a recording.

3. Audacity Tutorial for Podcasting

How to use Audacity for Windows to record a basic podcast.

4. Free Recording Software: Audacity Tutorial Part 1

Audacity is free recording software that can be use to record multiple tracks and layer them together. Find out how to use Audacity as a multi-track recording program with helpful tips from a software developer in this free video on computers.

5. Newbie home recording tutorial (1): Audacity

Really basic information how to connect microphone (1/8″ TRS jack – or 1/4″ TRS jack using a converter), how to check out Windows settings for it and how to make Audacity software up and running.

6. Basic Recording Guide. Getting Started with Audacity. Cheap Home Recording Studio

This is a video guide of the Basic Recording Guide on my site http://www.cheaphomestudio….

7. Mixing with Audacity

Learn how to extract audio clips from a longer recording and mix them back into a new music track. Download Audacity for free from http://audacity.sourceforge.net

8. Audacity Tutorial – Tech Tip 3 – Isolating Kick Drums

http://www.sonicacademy.com

In this tutorial we show you how to use the freely available audio editor ‘Audacity’ to quickly isolate and extract a kick drum from a drum loop for use in your own tracks!

9. Title V: Advanced Audacity Tutorial Part I

This tutorial will provide a review of the Audacity interface, as well as advanced tools such as noise removal, eq, compression, and envelopes.

10. Auto-Tune with Audacity Tutorial

This video will show you how to auto tune with Audacity!


Combine Stock Photography to Create a Sleepy Japanese Village in Photoshop

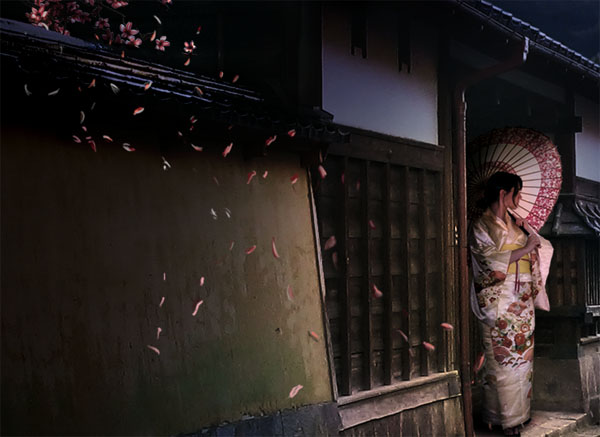
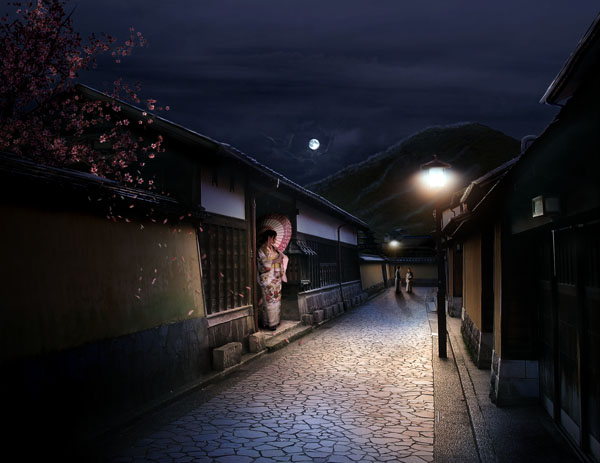
We often talk about what an incredible tool Photoshop is to create imaginary scenes from stock photography. In today’s tutorial, we will create a sleepy Japanese village in Photoshop by combining several stock photos. Let’s get started!


Tutorial Assets

The following resources were used during the production of this tutorial. To save time, give them a download before you begin.


Step 1

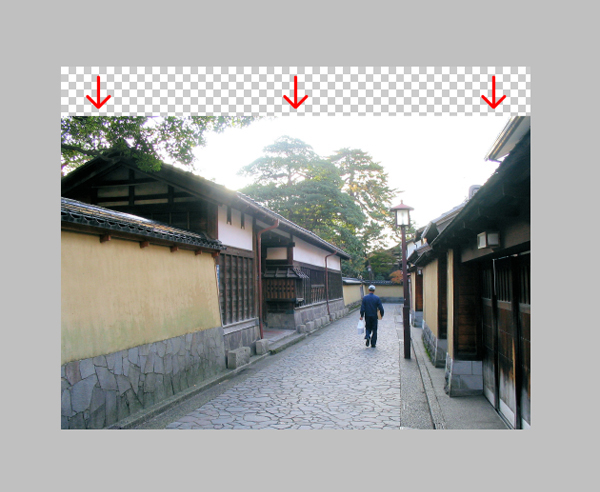
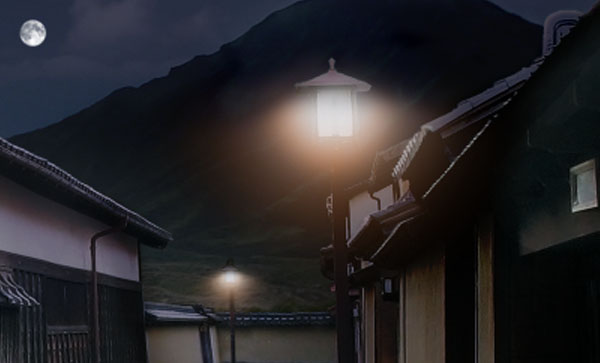
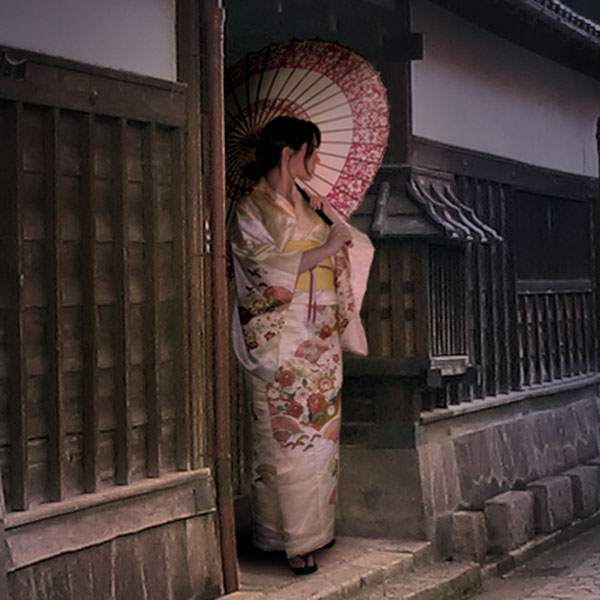
Start by opening the Kanazawa Samurai Houses in Photoshop. Double-click on the Background layer to unlock it and name it "Plate." Then move it down a little.

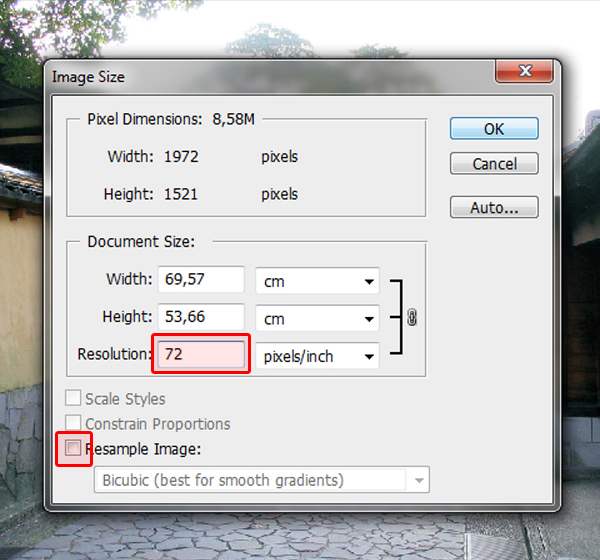
Since this image will only be used on the web, I suggest you set the screen resolution to 72 dpi. You can do this by going to Image > Image Size (Cmd/Cmd/Ctrl + Alt + I) and entering 72 in the Resolution field. Make sure the Resample Image case is not checked in order to preserve the picture’s quality. It is also a good idea to make sure the picture’s color mode is in RGB. In our case, it already is. I also suggest you save your file after every step.


Step 2

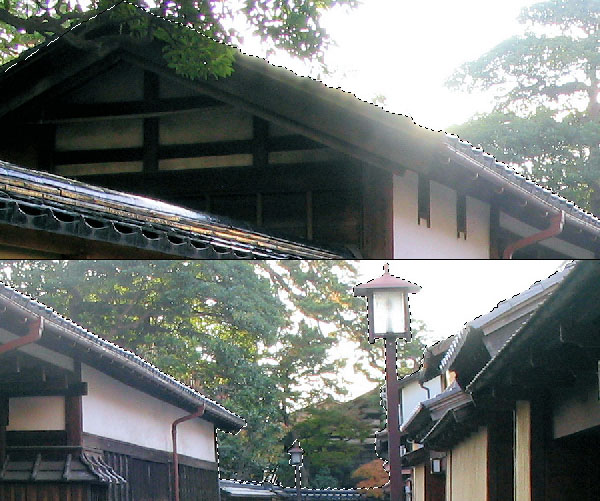
Now, using the Lasso Tool (L) along with the Polygonal Lasso Tool, trace the contour of the house’s and the alley wall’s roofs, keeping the two street lamps as well. For the parts that are hidden by the trees, use your imagination and try figure out how the roof would go. Don’t be afraid to really zoom-in in order to get the most precise mask.

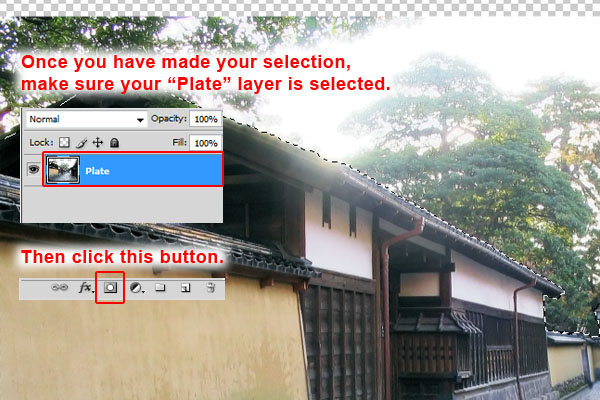
Once your selection is done, invert it (Shift + Cmd/Ctrl + I or Select > Inverse) and with your "Plate" layer selected, click the Add Layer Mask button.

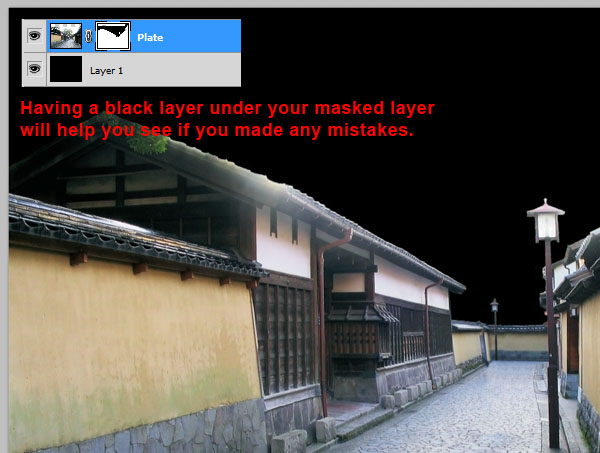
Now you can go into your layer mask and with a hard-edged black Brush, correct the places you feel don’t look right. Since the area we are masking is rather bright, placing a black filled layer under your "Plate" layer will help you see parts you might have missed. Don’t overdo it though, since most of the roof’s contour will be redrawn later on.


Step 3

Duplicate your "Plate" layer and name it "Plate Backup." Place it under your "Plate" layer and hide it. This is done in case something goes wrong when playing with your "Plate" layer.

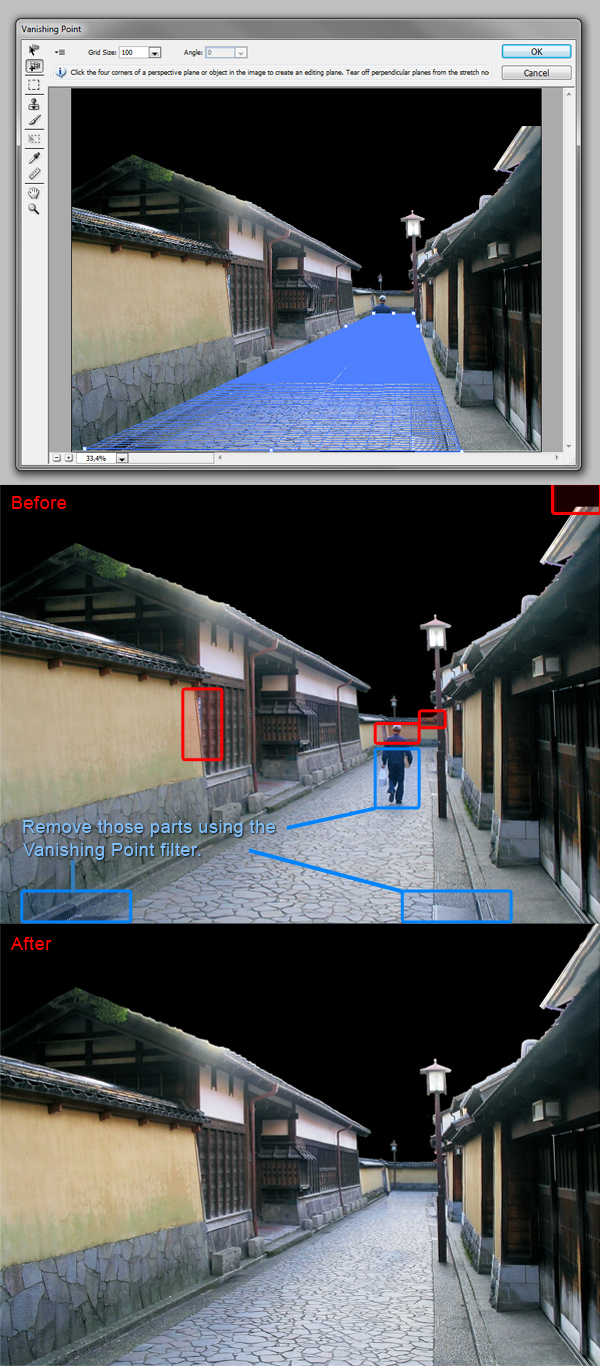
Open up the Vanishing Point filter (Alt + Cmd/Ctrl + V or Filter > Vanishing Point). Using the Create Plane Tool (C), create a basic four-point grid following the street’s perspective. Then with the Stamp Tool (S), start removing the bottom part of the man and the sewer grates. The Stamp Tool work just like the Clone Stamp, except it will follow the perspective you just created. In our case, we use it to keep the street perspective.

Once this is done, close the window and use the Clone Stamp to remove the upper part of the man. I also removed the small annoying blue shape between the left wall and the left house, the tree’s leaves covering the far away wall, and I completed the right house’s roof following its perspective. Those are all small details that are needed to fix in order to get a professional result.


Step 4

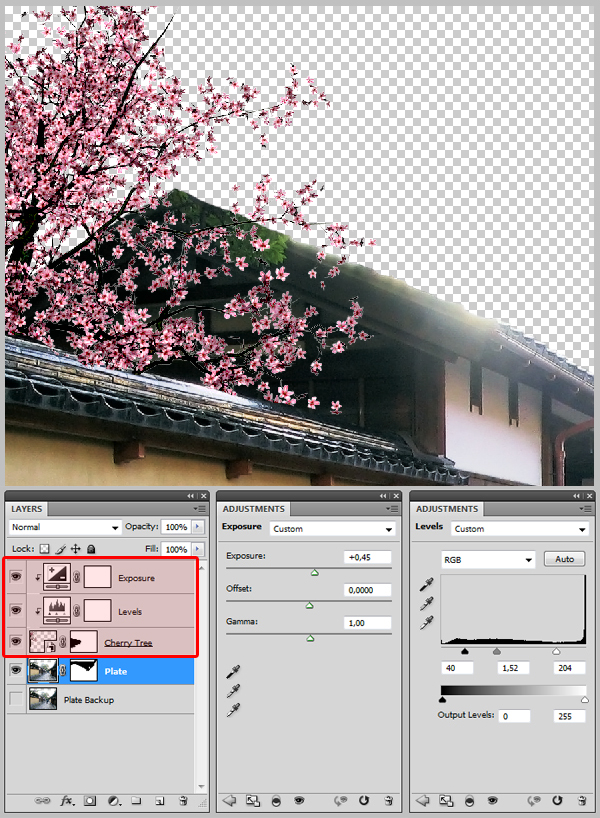
At this point, I removed the black background layer, which was not needed anymore. Download the "Cherry Blossom Tree 2" and place it to the left of your canvas. Name it "Cherry Tree." Add a mask to it, and with a hard edged black Brush (B), paint out the bottom so the tree looks like it is behind the wall. Then create an Exposure layer and a Levels layer, input the values indicated below and clip them to the "Cherry Tree" layer by holding ALT and clicking between the two layers.


Step 5

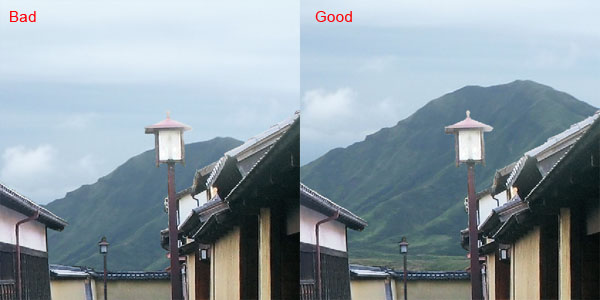
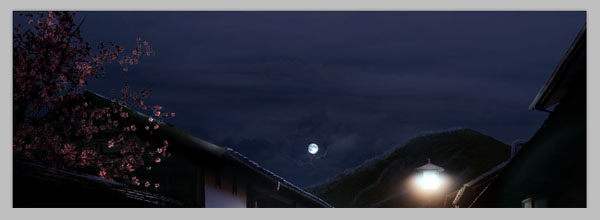
Download the "Japan Vacation XXI" and place it on your canvas, under the "Plate" layer. The basics rules of composition tells us that the majors visual lines created in an image should not cross each others. Therefore, make sure the mountain’s shape is not in conflict with the street lamp’s shape. If you are interested to learn the rules of composition, there is a really interesting article you can find here about it.


Step 6: Turning day into night

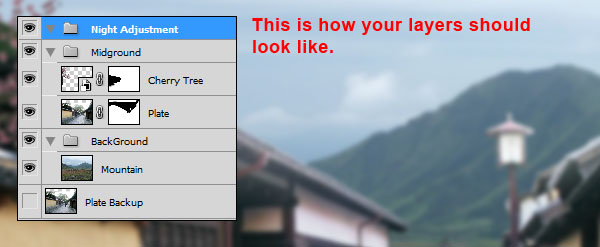
As we work, our file will be getting more complex. That is why we need to organize our layers. Create a new folder, name it "Background" and place the "Mountain" layer inside. Create another one, name it "Midground" and place the "Plate" and "Cherry Tree" layers inside along with the adjustment layers. Then create another one on the top of all, and name it "Night Adjustment." In this step we will be working in this folder.

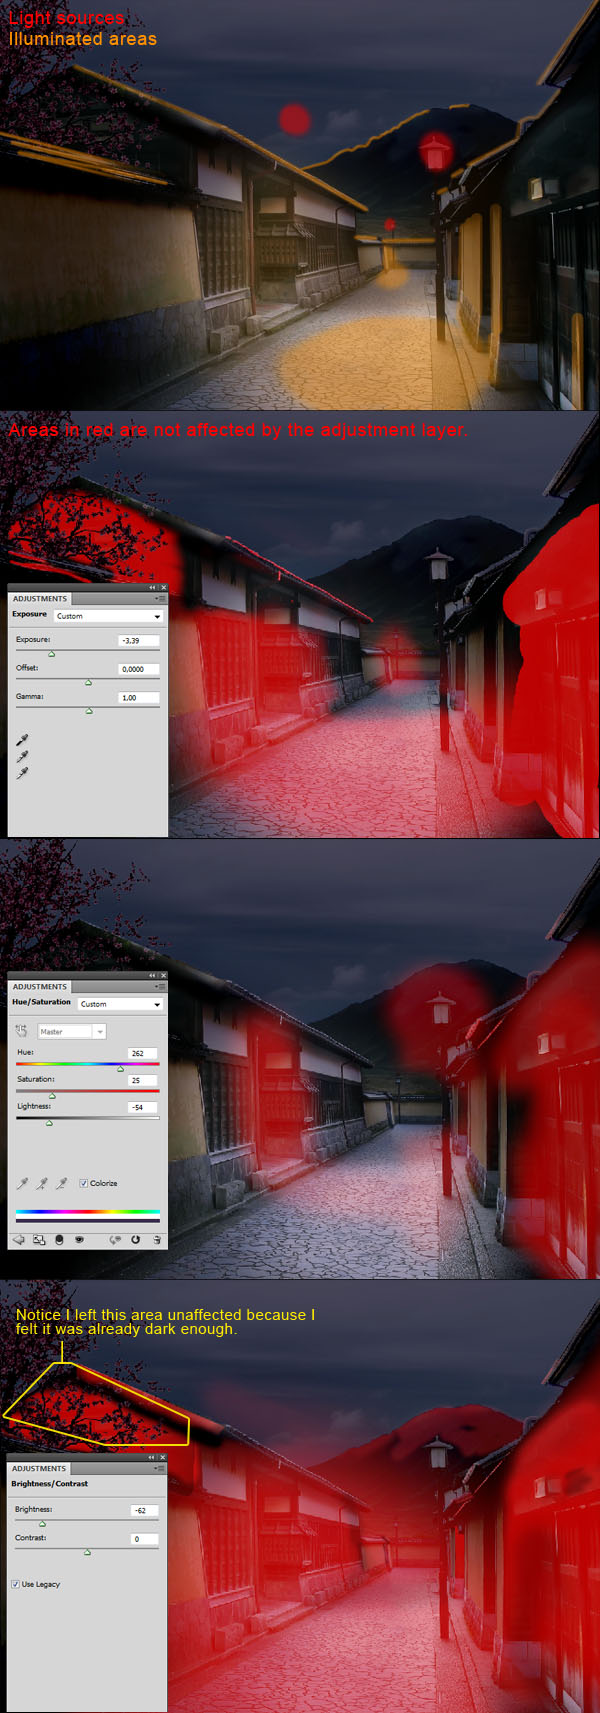
At this point, it was really a trial and error process. I can’t stress enough how important it is to know where your light will be coming from. In our case, it comes from the moon and the two lamps, so we know that the roofs will be illuminated along with the mountain, and the area near the lamps.

I first created an Exposure layer, lowered the exposition and painted in black, inside of the layer’s mask, the area I didn’t want to be affected by it. Then I made a Hue and Saturation layer, checked the case Colorize, give it a bluish tone and dropped the lightness. And finally, added a Brightness/Contrast layer, and dropped the brightness. I suggest you try do this part by yourself and try to find your own way of adjusting the light. As I said, this is really a trial and error process and there is no wrong way to do it.

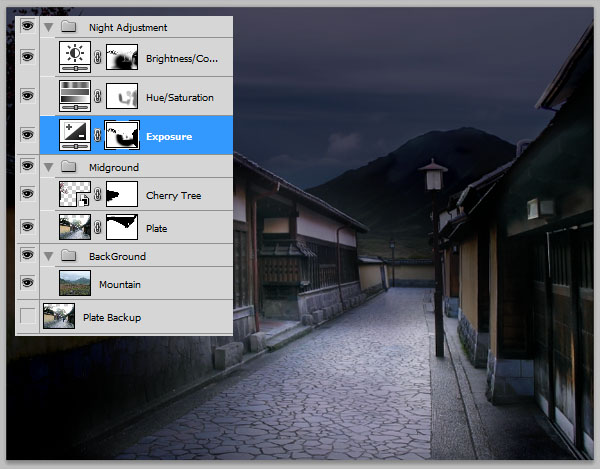
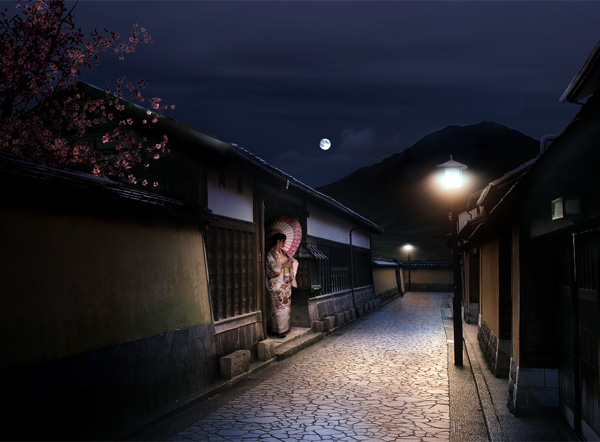
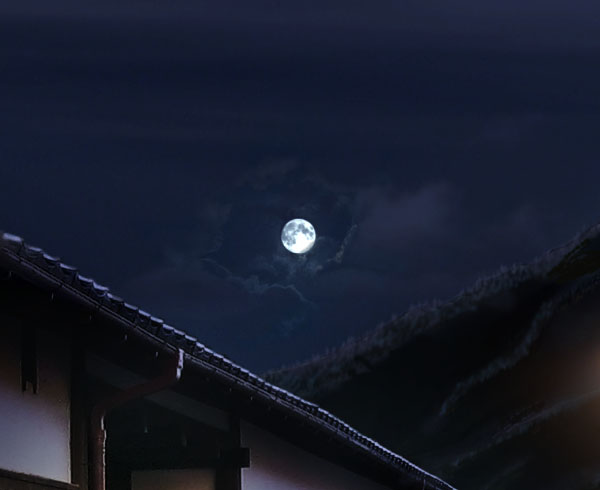
In the end, you should have this result.


Step 7

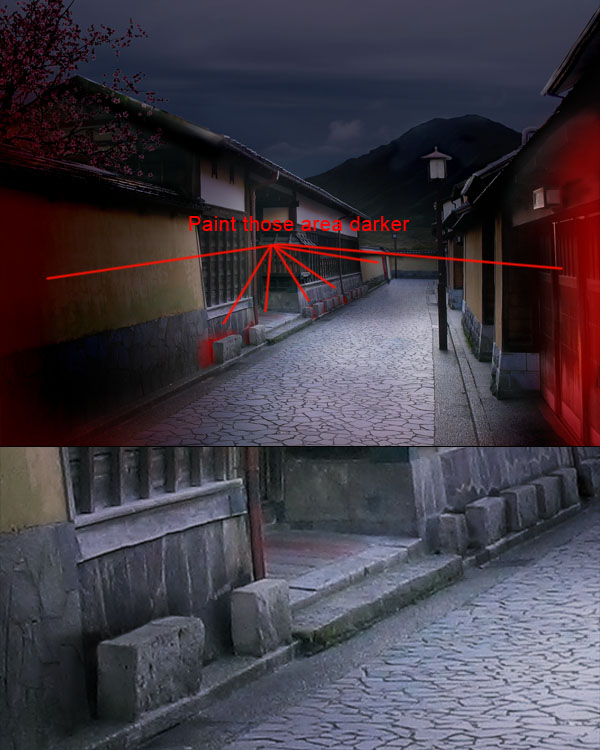
Still in the "Night Adjustment" folder, create a layer and name it "Shadows." Now with a small soft-edged black Brush (B), zoom-in and paint shadow behind the blocks on the left of the alley. Then with a larger Brush (B), darken the foreground elements, in order to create a "vignette" effect. This will also help the viewer focus on the center part of our image.


Step 8

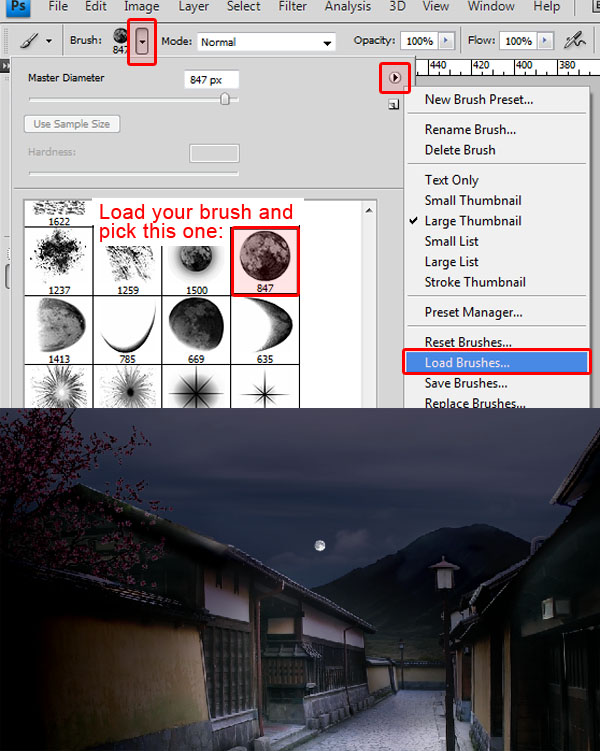
Download the "Moon Stars Sparkles" brushes set, and load them. Then take the second Brush in the set, which should be a full moon, give it a diameter of 36 pixels and a white color, and paint it on a new layer. Name the layer "Moon" and make sure you place it in your "Night Adjustment" folder.


Step 9

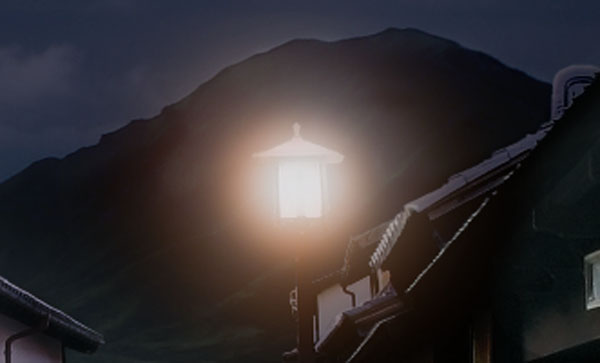
Now, still inside your "Night Adjustment" folder, create a new folder and name it "Nearest Light." Create a new layer inside, then, with a soft 190 px Brush (B), choose a near-red orange color (FF911A in my case), and click tree consecutive times on your canvas. Then reduce the size of your Brush to around 140 px, and with the white color selected, click two time in the center of the orange circle you just created. This is what you should get.

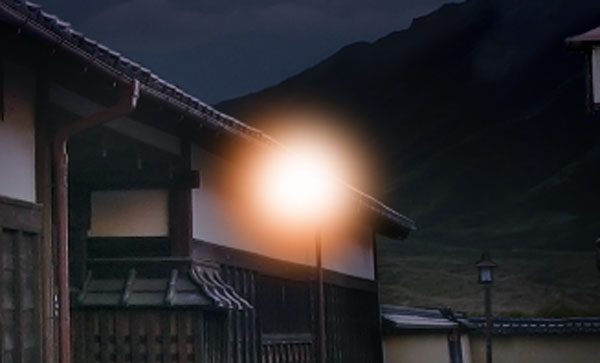
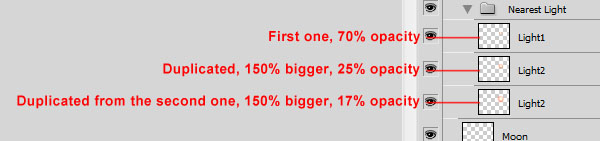
Give this layer a Screen Blending Mode, with about 70% opacity. Duplicate it, increase its size to 150% (Cmd/Ctrl + T to open the Transform tool, then, by holding Shift and Alt, you can increase its size proportionally, while keeping an eye on the % in the options window), and set this layer to 25% opacity, making sure it is also in the Screen Blending Mode. Then duplicate this layer, increase its size by 150%, and this time set the new on to 15% opacity. Give them a name, like "Light1", "Light2", "Light3", then move the group over the closest alley lamp. This is what you should get.

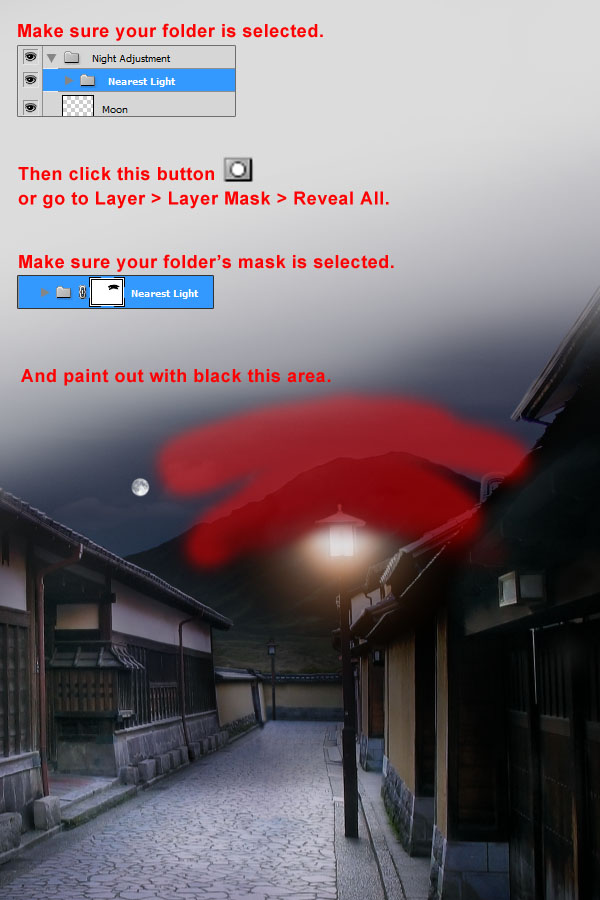
Now give the "Closest Light" folder a mask, and paint out the top with a black soft Brush (B) so the lamp is only illuminating downward.

Duplicate the folder, place the new one over the farther lamp, scale it down to about 40%, and name the new one "Far Light." Using the same method as I just explained, make it just a little bit brighter. This should be your final result.


Step 10

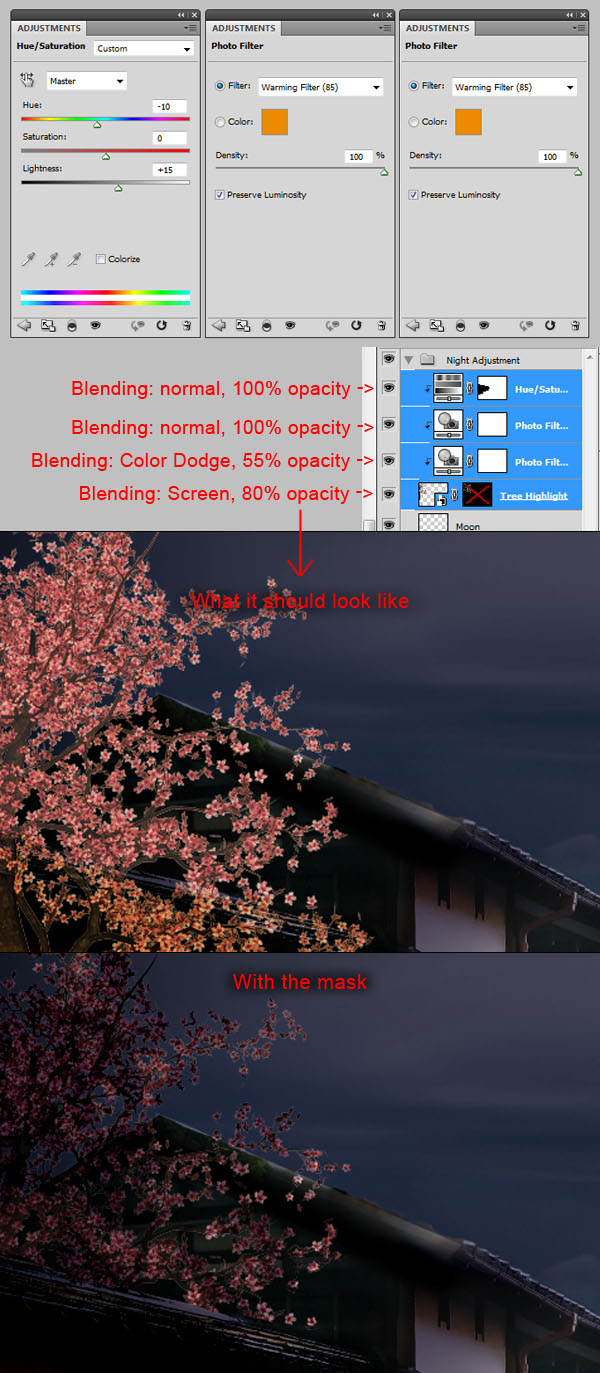
Now that we have made our three light sources, it is time to make these lights affect their nearby elements. Duplicate your "Cherry Tree" layer, place at the top inside of your "Night Adjustment" layer and name it "Tree Highlights." Create a Photo Filter layer, and choose the Warming Filter (85) and set it at 100% and clip it to your layer. Duplicate the Photo Filter layer and set it to Color Dodge, 55% opacity, and place it under the previous Photo Filter layer. Create a Hue and Saturation layer, set the Hue to -10 and the lightness to +15, and place it on the top all. Set your "Tree Highlight" layer to Screen and 80% opacity. Finally, fill your "Tree Highlight" layer’s mask with black, and with small white soft Brush (B), paint the area of the tree that you think would be illuminated by the lights sources we have spoken of previously. Once again, don’t be afraid to zoom in and take your time in order to get a well done effect.


Step 11

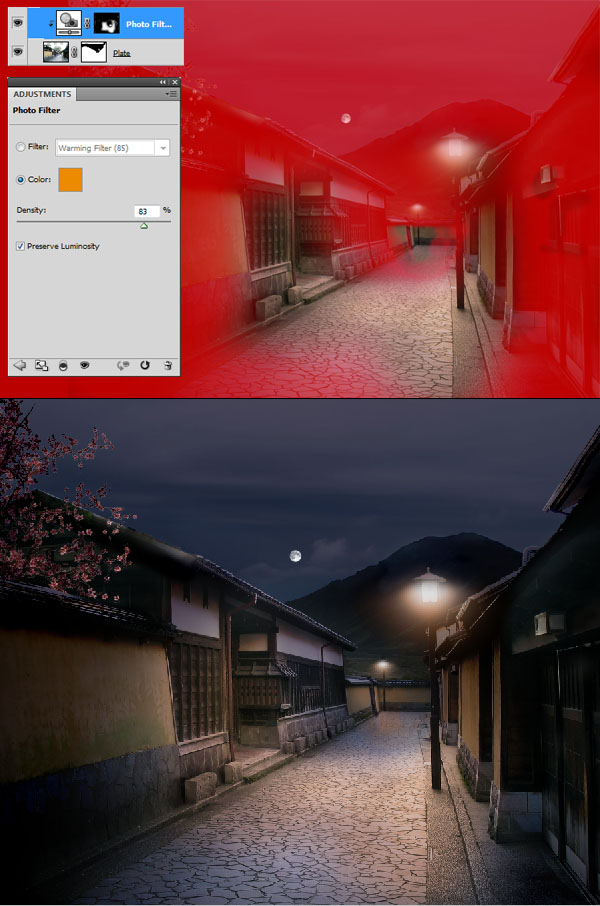
Let’s go back to our "Plate" layer located in the "Midground" folder. Create a Photo Filter adjustment layer, keeping the Warming Filter (85), at about 85% density, check Preserve Luminosity, and clip it to your "Plate" layer. Now, the photo filter is a wonderful tool for giving your artwork an ambient color in a photorealistic way. If you check the Preserve Luminosity, Photoshop will calculate how a given color will bounce against the colors behind. It usually takes years for a traditional artist to master how to use lights and colors. The beauty of today’s tools is that by using them correctly, you can make them calculate the whole thing. This is also why we are actually adjusting our "Plate" layer under all our "Night Adjustment" layers, that way we let Photoshop calculate how the illuminated floor would show up in a dark ambiance. This way we get a much more realistic result that if we had just tried to paint orange light on top of all layers.

Add a mask to the Photo Filter layer, fill it with black, and with a white soft Brush (B), and paint the area on the ground and the wall that would be affected by the lamp’s light. You should get this result.


Step 12

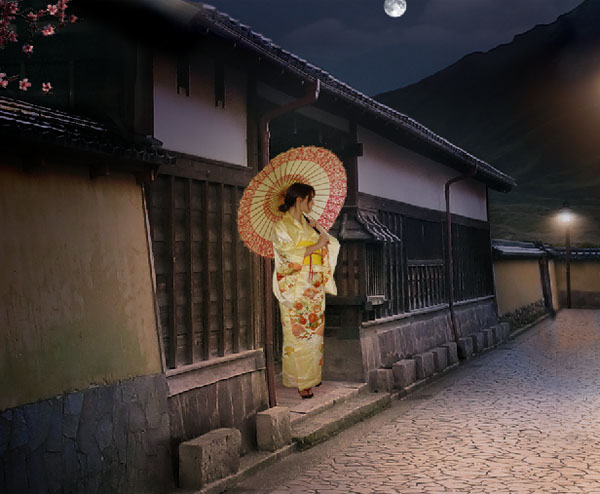
Now the image isn’t bad, but it lacks something important, a center of interest. Giving your artwork a center of interest is a must in order to make it interesting and give it purpose. Man-made structures, animals or human figures are good point of interest because it is where the human eye tends focus the most. If set correctly, your point of interest will give your piece depth, personality and mood. That said, download the Hanami 20 picture and open it in Photoshop. Use your favourite tools to extract the girl from the background, and paste it in your working file. Name the layer "Woman", and place it in a folder with the same name. In order to have the most control when color correcting this layer, make sure it is on the top, over the "Night Adjustment" folder.


Step 13

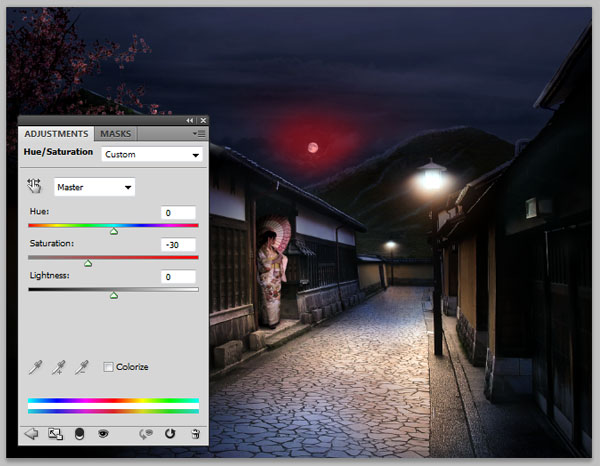
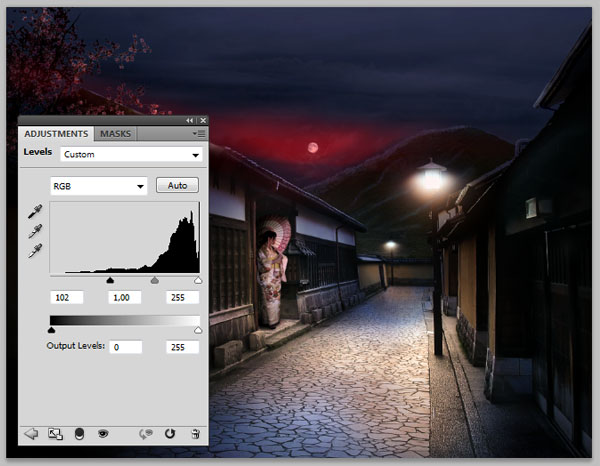
As you can see, there is a strong dominant yellowish color in this picture, so we will need to correct that. Also the highlights and the shadows need to be adjusted to fit with the ambient light we just set up. I used seven masked adjustment layers in order to correct it, so rather than write them up, I thought you would prefer to refer to the picture.


Step 14

Give either the "Woman" layer or folder a mask, and paint out with black the left area so the woman look like she’s inside the doorway. Also, create a layer under the "Woman" layer, name it "Shadow" and paint the woman’s shadow with a black soft Brush (B).
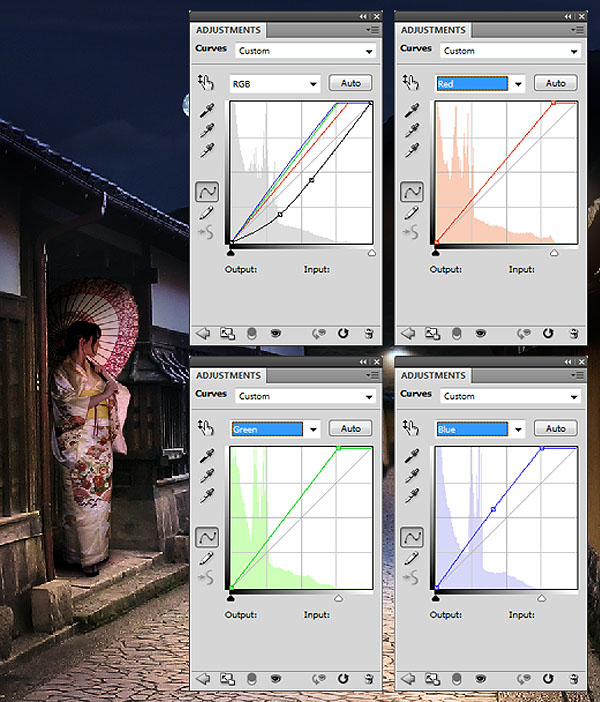

Step 15

The scene isn’t bad, but it looks a little flat. Let’s give it a bit more of contrast by creating a Curves layer on the top of everything, with the following settings.


Step 16

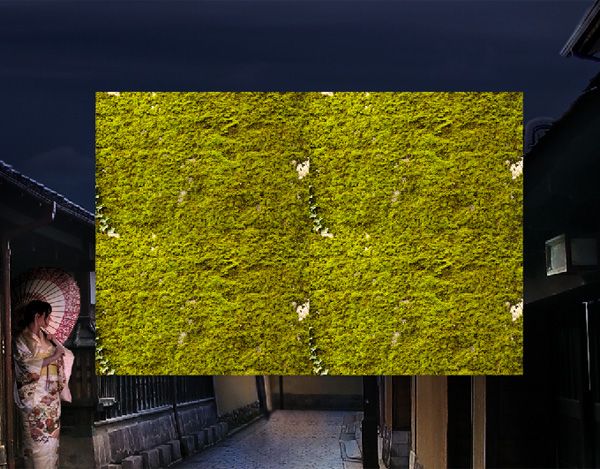
From here on, you could probably call this image finished. But there are little things we can fix to make it better. As we can see, we have lost most of our mountain’s texture when we darkened our scene. So get the Moss texture from CGtextures and place it onto your canvas. Duplicate it three times and tile the four layers as shown in the picture. Merge them together and name the resulting layer "Mountain Texture."

Find your "Plate" layer, holding Cmd/Ctrl, click on its mask in order to make a selection from it, invert the selection (Shift + Cmd/Ctrl + I or Select > Inverse) and with your "Texture" layer selected, click the Add Layer mask button.

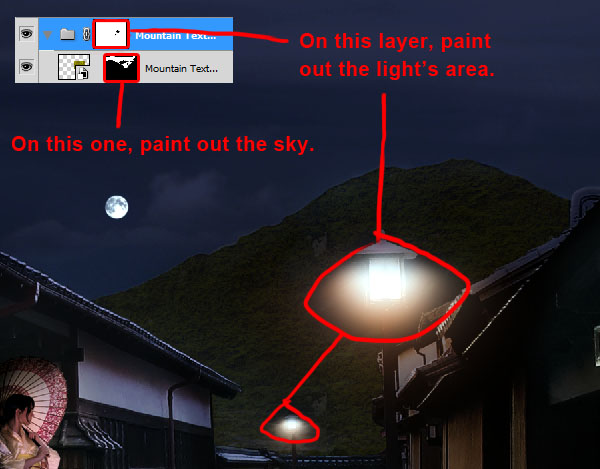
With a hard black Brush (B), paint your layer mask so you remove the texture from the sky. Then set the layer’s opacity to 10% and the Blending Mode to Difference. Create a folder, name it "Mountain Texture", and place your layer inside. Create a mask, and with a black soft Brush (B), paint out the light’s area so the texture doesn’t interfere with the light. Giving a layer multiple levels of mask using folders will allows you to manage all of them individually without affecting the other masks. For this example, we can paint in the light’s area without affecting the mask that is protecting our "Plate" layer and the sky.

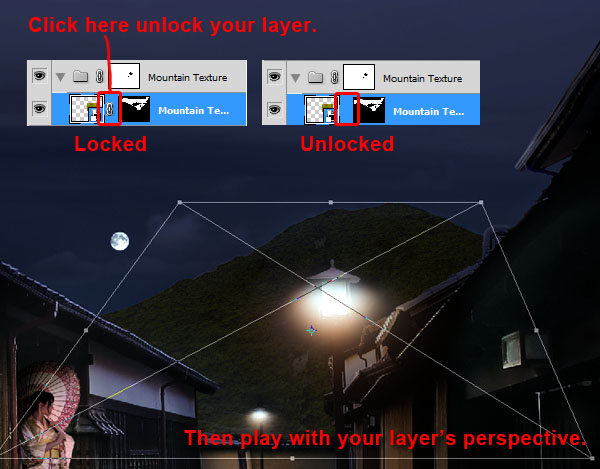
The texture is a bit flat, so we will give it perspective. Unlock your "Mountain Texture" mask and go to Edit > Transform > Distort or press Cmd/Ctrl + T, then right click on your canvas, and click Distort. Move the side anchors to give your texture perspective. Unlocking a layer’s mask allow you to freely transform your layer without affecting the shape of the layer’s mask.

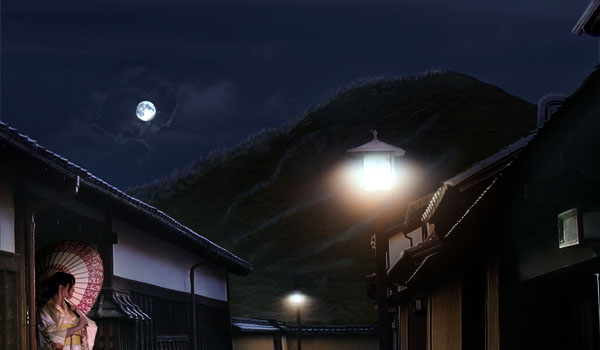
At this point I reduced the "Mountain Texture" layer’s opacity to 5% because I thought it was too apparent. Here is the final result.


Step 17

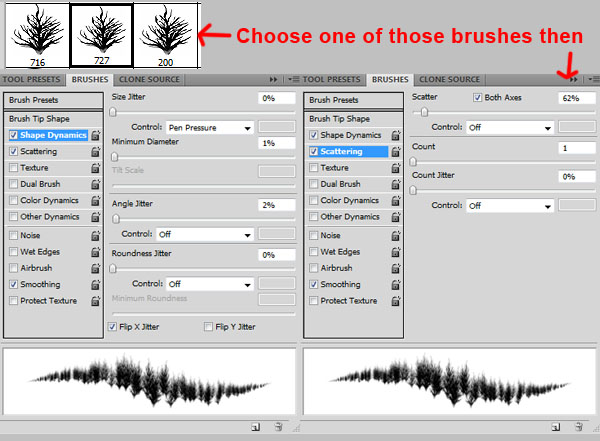
Now download the Mordecai Brushes and load them like we did for the moon in step 6. Now pick one of the Tree brushes and apply the settings below.

Pick up some blue shades from the sky (holding Alt when using the Brush Tool will give you the Eyedropper Tool). Create a new layer, name it "Mountain Highlight", and paint small highlighted trees on the mountain. You can choose to put the layer outside of the "Mountain Texture" folder so it doesn’t get affected by the folder’s mask.


Step 18

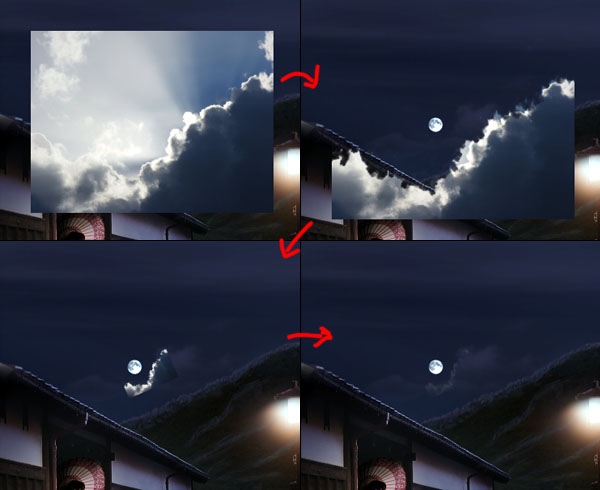
We also want the moon’s light to bounce off the clouds. We will use cloud pictures to do this in order to get a photo-realistic effect. Since the moon’s light hits the clouds from the back, we will need to find some backlit clouds. Hatestock from DeviantArt has a really nice gallery of these. Download Sky Stock 131 to start with, place it on your canvas, mask it, and remove the unwanted part using a scattered Brush. Then shrink it and make it at about 10% opacity.

Repeat with different photos until you get a satisfying result. You can use as many clouds as you want. Feel free to zoom in and paint details. Once you are done, merge everything into a layer, name it "Clouds Highlights" and set the layer to Luminosity.


Step 19

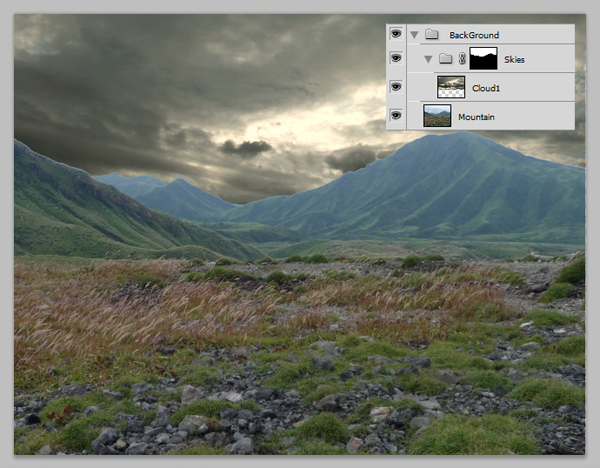
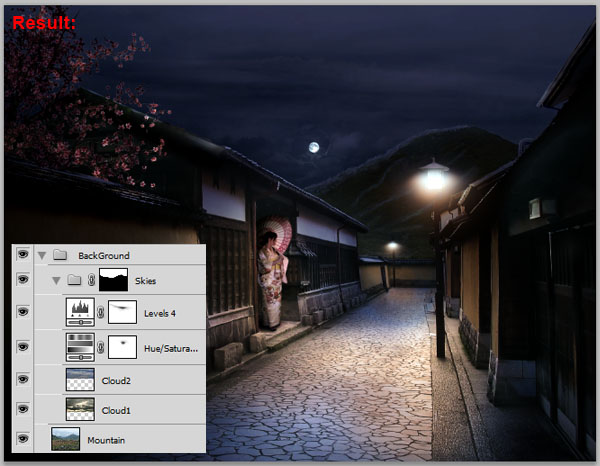
Now our sky is somewhat boring. We will fix that. Hide all of your layers except the "Background" folder by holding Alt and clicking on the eye next to the "Background" folder. Download "Sky 8" (http http://night-fate-stock.deviantart.com/art/sky-8-98984395?q=) and place it on your canvas. Scale it up to about 105%. Make sure the layer is inside the "Background" folder, over your "Mountain" layer, and name it "Clouds 1." Then create a folder for it (Cmd/Ctrl + G with your layer selected) and name it "Skies."

We will apply a mask to the folder so our new sky doesn’t affect the mountain. Hide the "Cloud1" layer, and with the Magic Wand tool, or any tool you like, create a selection of the sky. Then, when having your folder "Skies" selected, apply a layer mask. Reveal your "Cloud1" layer. You should get this.

Then set the layer to Overlay and set it to 30% opacity.


Step 20

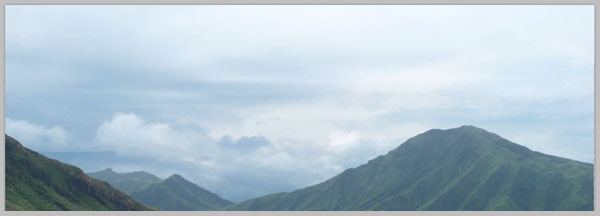
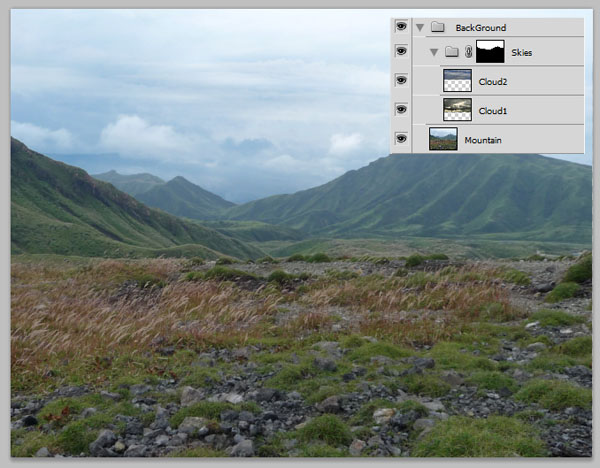
Let’s make the sky even more complex. Load the Sky stock 104 picture onto your canvas. Scale it down to about 62% so it fit your working area, and flip it horizontally (Edit > Transform > Flip Horizontal or Cmd/Ctrl + T, right click on your canvas and Flip Horizontal). Name it "Cloud2." Set the layer to Overlay with 50% opacity.

Then, reveal all of your hidden layers.


Step 21

At this point, I found that the sky looked too bright and saturated for a night scene. So, still in the "Skies" folder, I applied the following filters.


Step 22

Create a new layer and place it on the top. Name it "Leaves". Then, using a small Brush (B), at 100% hardness, paint some falling leaves next to the tree. I picked the colors directly from the tree using the Eyedropper Tool (I). When Painting, I tried to follow some kind of randomness to achieve realism. I also kept in mind the direction of the ambient lights.

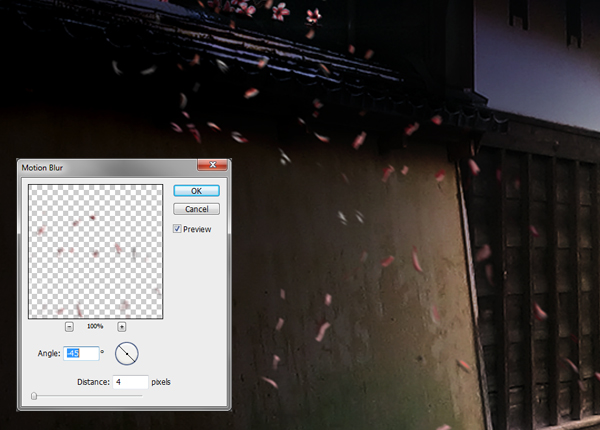
Then, duplicate the layer in case something goes wrong. Call the new one "Blurred Leaves", and hide the old one. Having the layer selected, apply a motion blur (Filter > Blur > Motion Blur) with an angle of -45° and a distance of four pixels.


Step 23

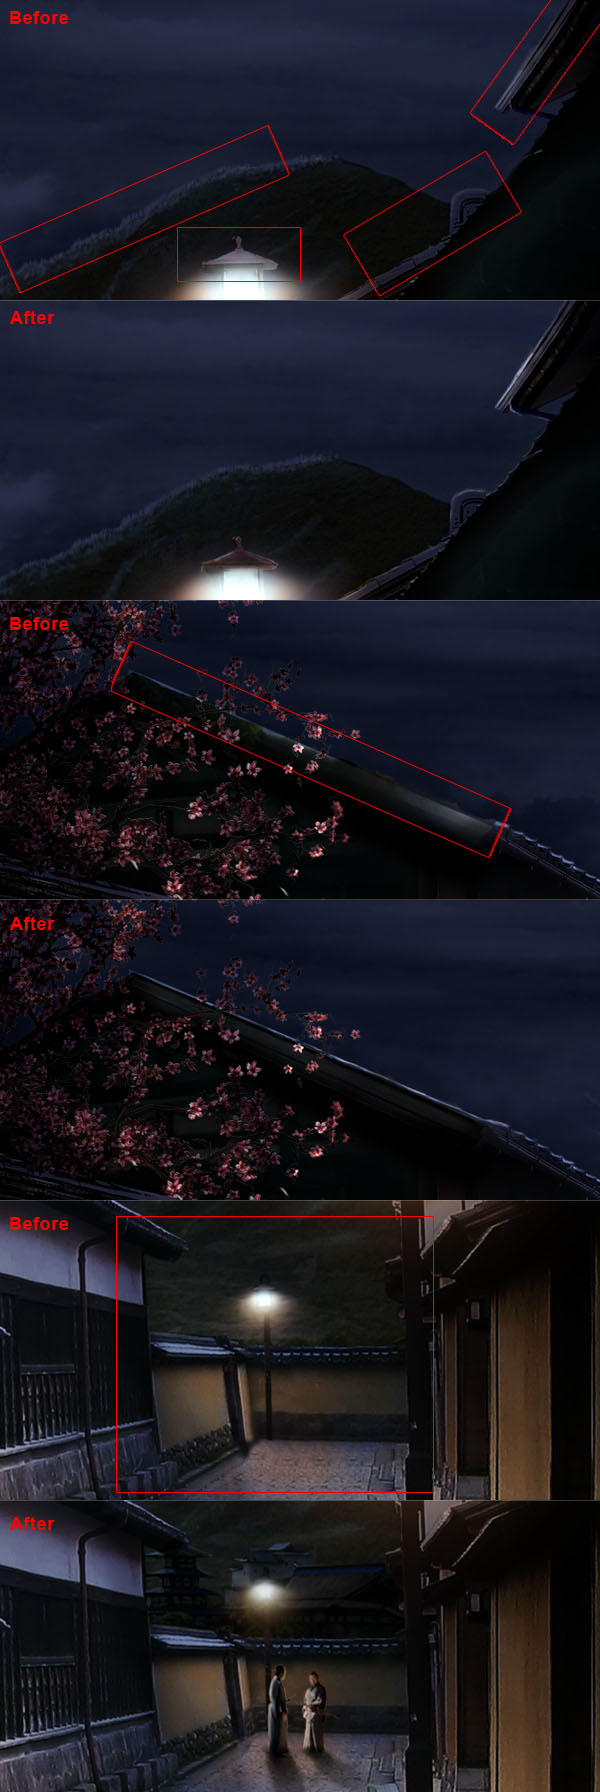
This is the last step, where we blend the whole image together, and fix everything we aren’t satisfied with. Create a new layer and name it "Final touches". Place it on the top of everything. On this layer, zoom in, and by picking the colors on your canvas, paint over everything that you feel looks wrong. Feel free to paint some more details as well like other people and background buildings. Don’t be afraid to zoom in and really take the time needed to make them as realistic as possible. Art is all about patience and perseverance. You may refer on the following pictures to get an idea of what can still be improved.

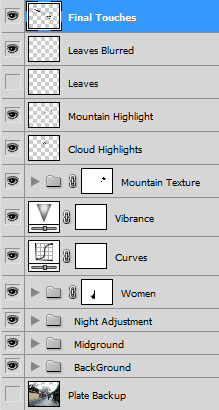
If you have missed anything, here is how your layer panel should look like in the end.


Final Image

Poll: Do You Prefer Written or Video Content?

We often see comments on this site asking us to post more video content. When we post video content however, we frequently receive comments from readers telling us that they prefer written content. Today, we’ve decided to put this to a vote. Do you prefer written or video content? Feel free to elaborate in the comments.


Do you prefer written or video content?online surveys

Best practices for modern Javascript development

Use the correct <script> tag

When you have to use some Javascript in an html file, you should always use the following <script> tag:

<script type="text/javascript">
    ... some JS code
</script>

But instead, how many times have you seen this when looking at the source code?

<script type="text/javascript" language="javascript">
    ... some JS code
</script>

In HTML, the language attribute is deprecated due to its redundancy with the type attribute. You should never use it anymore.

Keep your code in an external file

Using an external .js file for your Javascript code is a lot cleaner than writing it in your html document, and it also allows the browser to cache the file, which will result in a faster website.

Put your Javascript code in a .js file, then use the <script> tag in your html document to import the file:

<script type='text/javascript' src='http://www.catswhocode.com/myscript.js'></script>

Don’t wrap code in HTML comments

In the 90′s some very old browsers weren’t able to interpret Javascript. In order to prevent unwanted results on those browsers, it was considered good practice in 1994-1997 to wrap Javascript code within html comments, so browsers with no Javascript support will simply ignore it.
Here is an example of some code wrapped within html comments:

<script language="JavaScript">
<!--
...some code
//-->
</script>

However, in 2010, all browsers (Even IE6, that means a lot) can interpret Javascript, so there’s absolutely no need to wrap code within comments anymore. Even worse, if code is wrapped within comments and use the decrement symbol --, you’ll expect some weird problems due to the fact the browser may think it’s the end of the html comment.

Use a framework

Unless your Javascript code is really short and easy, you should always avoid reinventing the wheel by using a framework of your choice. In my opinion, jQuery is the best and has an awesome community, so you should give it a try if you haven’t already.

Always declare your variables using var

You should introduce any variable you create with the var statement, otherwise it gets to the global scope. Also, using var makes your code more readable and self-explanatory.
Example of variable created using the var statement:

var name = "Jean";
var size = data.length;

Keep your code unobtrusive

Some years ago, when a programmer wanted to add an event to an html element (for example, if you want to validate a date when the user typed something) he simply put Javascript code in the html, using a special attribute such as onblur, onchange, onclick, etc.
Example:

<input type="text" name="date" onchange="validateDate()" />

This works great, but it is a bit dirty. HTML should only contain the document description. Just like it’s bad practice to use inline CSS styles, it’s bad practice to use inline Javascript.

Instead, what about using some unobtrusive Javascript? Using jQuery, it is pretty easy to do, as you can see in the following example:

$(document).ready(function(){
	$('input[name=date]').bind('change', validateDate);
});

Include your scripts at the bottom of your HTML files

Not so long ago, it was generally considered good practice to insert your Javascript files within the <head> and </head> tags of your html document.
But browsers read html files from top to bottom, and load external files dynamically. Which mean that inserting scripts within the <head> and </head> tags will make your Javascript load before some of the page content.
In order to always load scripts after the content, Javascript files should always been included at the bottom of your html files, as shown below:

    <script src="myscript.js?" type="text/javascript"></script>
  </body>
</html>

Use JSLint

JSLint is a web-app which takes a JavaScript source and scans it. If it finds a problem, it returns a message describing the problem and an approximate solution.
JSLint is great to find bugs in your code, and also things that may be written in a better way. This site is definitely my favorite coding buddy when developing some Javascript.

Don’t use document.write

The good old document.write method has been deprecated for years, however it is still very common to see it while browsing code.

document.write("hello world");

Instead of using this deprecated method, you should use the DOM and the innerHTML function to insert text on a page:

document.getElementById('hello').innerHTML('hello world');

Like CatsWhoCode? If yes, don’t hesitate to check my other blog CatsWhoBlog: It’s all about blogging!

Best practices for modern Javascript development

Stationery Sales

college stationery sell academic books and educational CDs and to a wide range of academic institutions and has ask that i design and write a programme to monitoe its sales each week. They currently have two salepersons employed.
at the end of the week each salesperson enters his/her nameand the following details.

The where the sales were made: (Assume each salespersondeals with only 1 college)

The Number of books sold

The Number of CDs sold

The company wants you to keep track of the customers weekly orders, i.e each college should be listed indicating the given gross sales order value placed.

if a college places an order of €100 or over they recieve a discount of 3%, an order of €200 or over they will recieve a discount of 3.5% and all orders of €300 and over recieve a discount of 4%. The company requires you to display the total gross sales figures and the net sales figure after the discounts, if any, have been deducted.

The sales personrecieves a flat rate of €500 per week but gets an additional bonus of 5% of their gross sales value if they sell over €600.

You are also to generate the weekly pay for each salesperson.

The prices for the aboue merchandise are as follows: At the moment College Stationery has two book price rates

Items Price
Books
Rate 1 €30.00
Rate 2 €50.00
CD €59.99

You are required to design, write and test a programme that will out put the following sales details.

College Stationary Ltd.

The gross sales for College A is 99999
The net sales for College A is 99999

The gross sales for college B is 99999
The net sales for college B is 99999

The total gross sales for the week 99999
The total discount given is 99999

The pay for Salesperson A is 99999
The pay for Salesperson B is 99999

Deliverables
1. A design for the above problem, i.e pseudo – code and test grid in Word/Notepad
2.A Java programme to complete the above task

Quick Flash Required

i need a quick flash, i could have done it myself, but i dont have the time at the moment.

Basically i need a flash swf which will fit one of my webtemplate i have pix 991Wx319H. the flash must do the following

1. move the logo mulitple times from left to right(motion tween)
2. create a sparkle for a diamond in my logo
3. couple of pictures fade in and out.

what i will provide
1. Background image
2. logo

what i need
1. least time spent
2. SWF with transparant background(export with transparency)
3. Great work
4. FLA as well.

since im short of time, i will choose the best guy/girl who got a great portfolio.

Advanced Trading Software Tool

ADVANCED TRADING SYSTEM

Introduction:

The program has to perform the following steps. First it retrieves market data out of external feed (for example stock exchange) through an interface. Based on that information it makes a decision based on our trading strategy and convert this to trading signals (buy/sell). It then sends these trading signals through an interface to a broker and afterwards process feedback (e.g. confirmations, errors, …) from these external systems (for example the broker).

The advanced trading system is divided in these modules:

[1] The TRADING module contains all processes that are the ‘core’ of the advanced trading system. This includes a payment to the broker, executing trading strategies, sending orders and receiving money from the broker. The trading module is the ‘core’ of the advanced trading system. These processes describe how data from a provider is processed. This includes real time streaming market data, historical market data, fundamental and macro data (eps, consumer confidence, unemployment, …). Frequently the active combinations of strategies, parameters and securities is updated to select the best combinations. Data are then analyse based on the active trading strategies, which generates a order that will be sent to the broker.

[2] The MONITORING module monitors all important activities and create warning if necessary. The monitoring module monitors all important ‘core’ processes and generate warnings when unexpected values are detected or unwanted actions take place. This includes monitoring of payments, execution of orders and the performance of the trading strategy, financial accounting and all parts of the system. The results are first stored in the database and if necessary warning will be sent through SMS, email or the website, depending on the settings.

[3] With the CONFIGURATION module it is possible to configure settings and create analyses and reports on performance of portfolios and strategies. The configuration module makes it possible to setup, configure, define and analyse the advanced trading system. This includes:
• Repairing any missing data when for example no market date have been received for a while or historical data have to be updated.
• Defining of strategies with various parameters, this includes the timing of updating the active strategies, parameters and securities and the timing of execution of the signals.
• Managing risk appetite, the trading strategies, loss exit scenarios, forbidden securities and excluded trading / opening times.
• Configuring security settings like accounts, passwords and authorisations. Also the way warnings have to be sent (SMS, email or website) can be defined per type of warning.
• Managing the accounts with providers and brokers, including their cost/fee structures.

[4] The FINANCIAL ACCOUNTING module takes care of all bookings in the general ledger. The financial accounting module manages all bookings that have to be registered based on the executed orders and all payments. It is also possible to configure how automatic bookings have to take place. Financial reports can be created as well. In this module it is also configured how fees have to be registered: fixed, percentage of portfolio or part of performance.

[5] The PAYMENT module enables the user to manage payments from / to investors, management and the broker. The payments module takes care of the processing of payments from / to investors, management and the broker. These processes describe how initially money of investors is sent to the broker. After a while, the broker will be requested to send money back to the bank account. In addition, manual payments can be performed as well.

Communication:

[1] The broker communicates with the exchange and the custodian. At the exchange the equities are bought/sold at a certain price that represents a value and the custodian holds the administrations of these equities.
• Via the broker it is possible to send orders (represented by data) to buy/sell equities at the exchange.
• The money that will be paid/received by the broker comes from / goes to the account at the broker.
• The trade is then finished by exchanging information on the equities.
• The broker can also be requested to give a complete overview (data) of all orders and all the equities in the portfolio that is registered at the custodian.

[2] The bank holds the money. To buy/sell equities the broker needs that money on a special account.
• The broker receives money for the special account to buy/sell equities. The broker can be requested (data) to give information on the amount on the account (balance and transactions).
• By sending requests and orders (data) to the bank information on the account (balance and transactions) is given and payments will by executed by the bank.
• A request (data) to withdraw money from the account at the broker is sent to the broker. The money will then be transferred to the account at the bank.
• The money of the investors is put on the account at the bank as well.

[3] The advanced trading system, the provider, the broker and the bank will apply some kind of fee/cost structure.
• The provider will be paid a fee and an additional fee. This money has to be paid when the provider sends a bill.
• The cost structure for the broker is based on a fixed fee and a fee per trade. The broker will withdraw this money automatically from the account.
• The costs for the bank consist of a fee. The bank will withdraw the money from the bank account.
• The portfolio that is managed for the investor, the advanced trading system will receive a management fee and a performance fee. The money that is needed for the fee is booked in the general ledger.

Need An Army Of Writers/rewriters

Looking to have thousands of articles written & rewritten over the next few weeks by multiple providers.

Applications without samples will not be considered.

Teams are welcome to apply, but must include samples of articles and/or article rewrites from the writers involved.

Titles will be keyword-based and writers MUST have an understanding of SEO for content: Interlinking, metadata etc.

Full brief will be supplied.

Awarding to multiple providers. NDA to be signed, full copyright transfer to us, deposit can be paid to established freelancers, but no more than 25% with balance payable on accepted delivery. Escrow will be used in all cases.

Articles must be copyscaped with greater than 98% originality for originals and greater than 40% originality for rewrites. Articles with spelling and grammatical errors will not be accepted under any circumstances.

Looking for individuals and teams to work with for the long term. Do the right thing by us and we will do the right thing by you.

IMPORTANT NOTES:
1. Absolutely no boilerplate bids or poor grammar/spelling in your proposals.

2. Include your rate for original articles (300 words), AND rewrites (300 word rewrites of the original articles that YOU wrote)

3. Your daily and weekly capacity

4. Do NOT quote only for originals, or only for rewrites. Project is structured as per the details below. Non-negotiable, sorry.

Project details are:
– Articles distributed in batches of 15
– Each article to be 300+ words
– 5 originals
– 10 rewrites (two rewrites per original)
– All articles are in one topic niche (eg ‘laptops’) to reduce research time
– Specific keywords and article structure will be provided
– Rewrites to have 40% originality
– Rewrites can incorporate bullet points, short quotes etc

Fix WordPress Template

i need someone to finish adding items for wordpress template. i purchased the template and it’s on the server but need to have everything added to it to make it appear like the sample site. in addition, i need to have a a logo designed and will need to have a couple of pictures replaced to take the place of the pictures used on the sample (mock version) site.

here is how there sample site appears: http:// themeforest. net/item/ultra-web-studio-blog-portfolio-wordpress-theme/full_screen_preview/121611

and mines is missing a ton of stuff and appears this way: http:// thesocialmarketingmaven .com/

i need this completed as soon as possible and need someone with excellent communication skills. prefer someone who can communicate via skype to address changes together.