This year Cgtuts+ is taking part in Blog Action Day to raise awareness about clean water and water conservation, we have s econd fantastic water-themed post for you! In the second part of this 2-day tutorial, Cristian Pop walks us through 3 more methods of creating condensation effects in 3DsMax. Today, Cristian will be taking a look at thinkingParticles, 3Ds Max 2011′s new Object Paint and the incredibly useful fr Wet shader. Let’s get started!
Access to clean-water is something that’s all too easy to take for granted. Chances are that if you wanted a drink right now, you could walk to a room nearby, turn on the tap and get one. It would work first time, be relatively free, and it certainly wouldn’t make you ill. And you can do this whenever you want, for whatever purpose. In fact, from the moment the average person wakes up to the moment they fall asleep they use over 465 litres of water. Per day.
There are however, currently one billion people worldwide that have no access to clean water. Just a single $20 donation is enough to supply one person with clean water for 20 years. Please take the time to read some of the details at the following link, maybe add your name to the petition in support of this movement that we’ve embedded below, and perhaps even consider donating if you can afford it.
Thank you, and now onto the second part of today’s content!
This tutorial is Day 2 in a series – Go to Day 1 when you’re done to see the other 3 methods!
4. Using thinkingParticles
ThinkingParticles is an advanced rule-based particle system for 3dsmax. In this section, we’ll take a look at the tP nodes and how to link them together to create rules, to control the particles. tP has an advanced saving system, that allows you to save and re-used specific rules, whenever you want.
Step 1
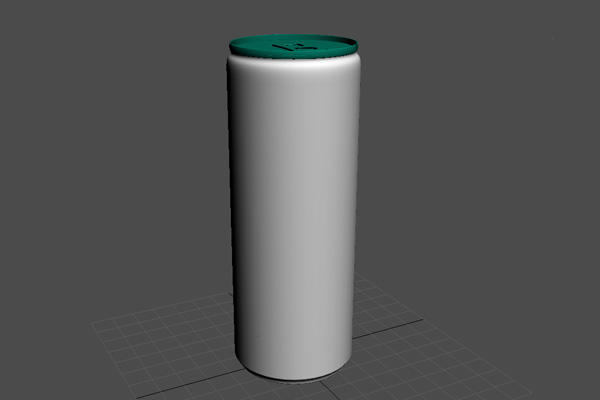
Import “can.obj” into your scene.
Step 2
Select the “can_body” object and in the “Modify Panel”, add a “Poly Select” modifier to it. Select the faces where you want to distribute the condensation water drops.
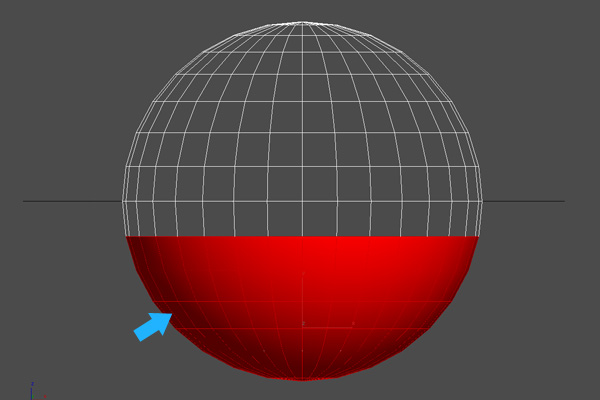
Step 3
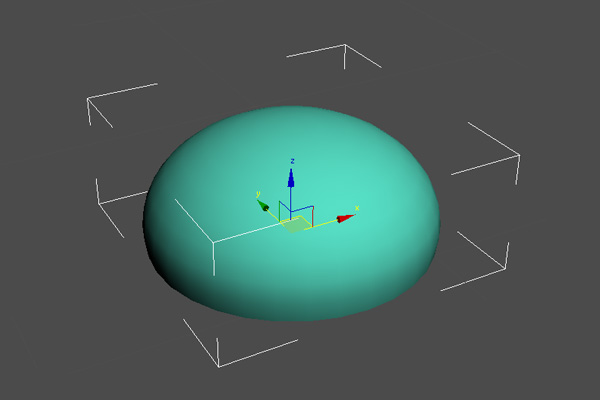
Now, create a small “Sphere” object, convert it to an “Editable Poly”, then delete the following faces. This object will be used as particle shape, to create the condensation water drops.
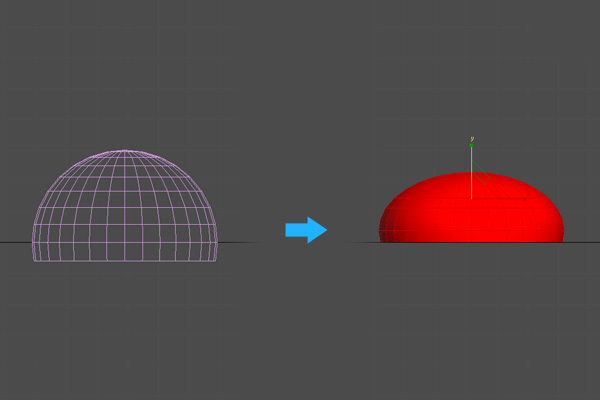
Step 4
Select the remaining element and scale it down on the ‘z’ axis, as shown.
Step 5
Go to the “Command panel > Create > Particle Systems > Thinking”, and create a “thinkingParticles” system in the viewport.
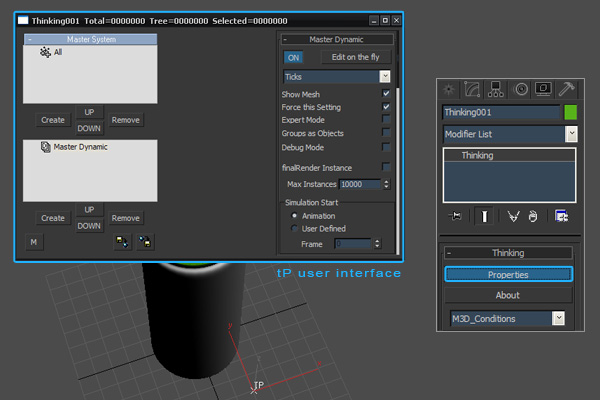
Step 6
Go to the “Modify” panel and click the “Properties” button in the “Thinking” rollout, to open the “tP” user interface. You can also use the hot keys of ‘Alt + Shift + P’ to open and ‘Alt + Shift + C’ to close it.
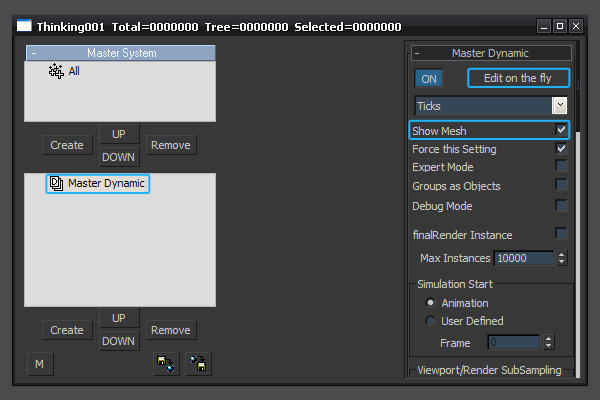
Step 7
In the “DynamicSet Tree” view, highlight “Master Dynamic”. Disable “Edit on the fly” to see the changes in real time and enable “Show Mesh” to see the particle shape.
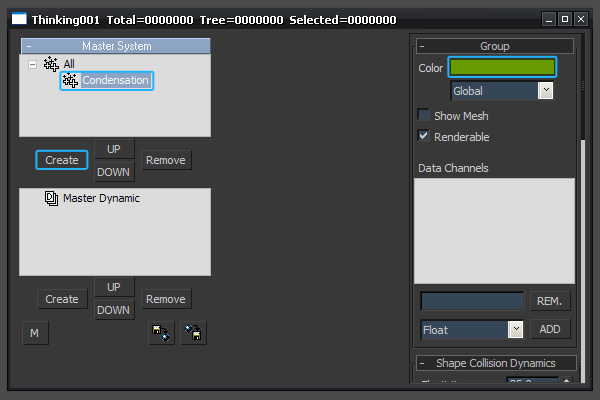
Step 8
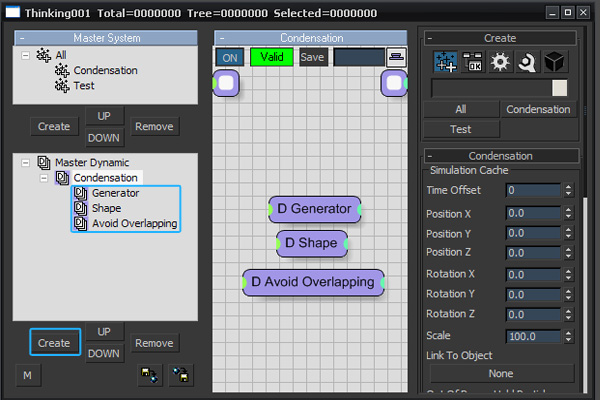
In the “Particle Group Tree” view, click the “Create” button, under “Master System”. Name the group “Condensation” by clicking on the name “Group” twice (slowly). In the “Condensation” group rollout, change the color to green. This group will contain the condensation particles.
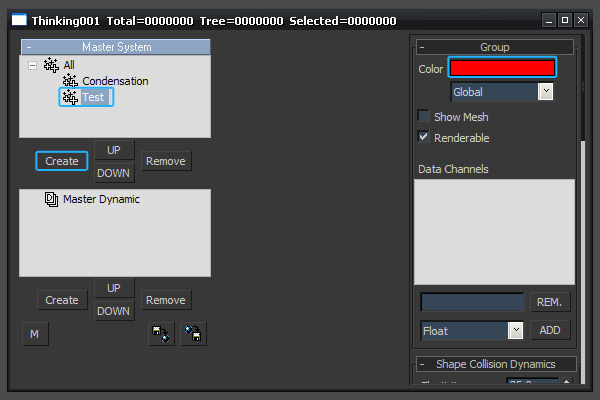
Step 9
I always create a group, used for testing the particles. So, create a second group, and name it “Test”. Change its color to red.
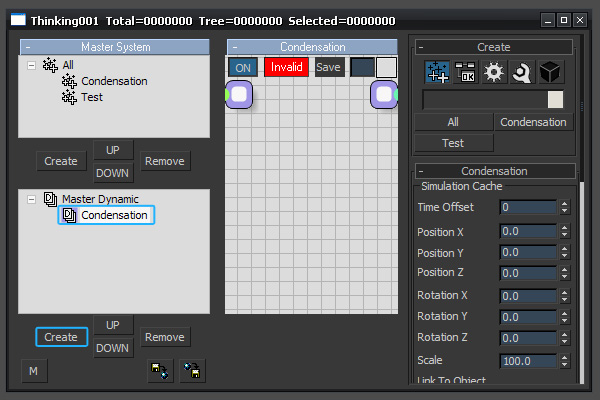
Step 10
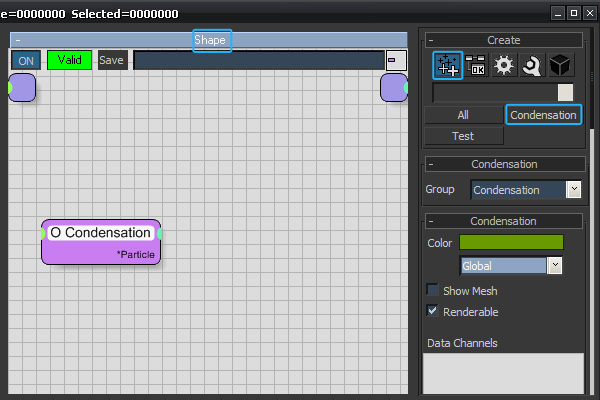
To dictate what the particles do, you need to create “Dynamic Sets” (rules). In the “DynamicSet Tree” view, click the “Create” button, under “Master Dynamic”, and name the new Dynamic Set “Condensation”.
Step 11
Under “Condensation”, create 3 other dynamic sets, and name them: “Generator”, “Shape” and “Avoid Overlapping”.
Step 12
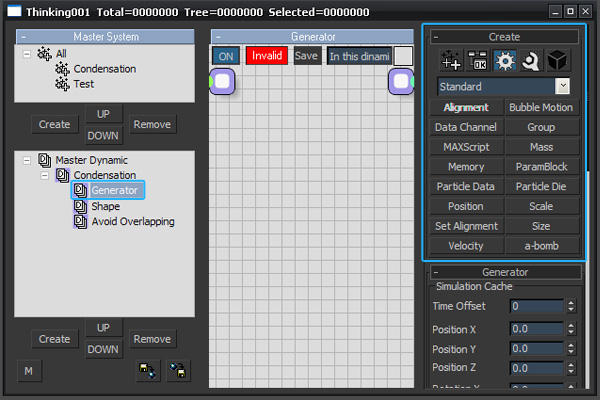
Highlight the “Generator” dynamic set, and then go to the right-hand side of the dialog, where you will see a new set of “Create” rollouts.
Step 13
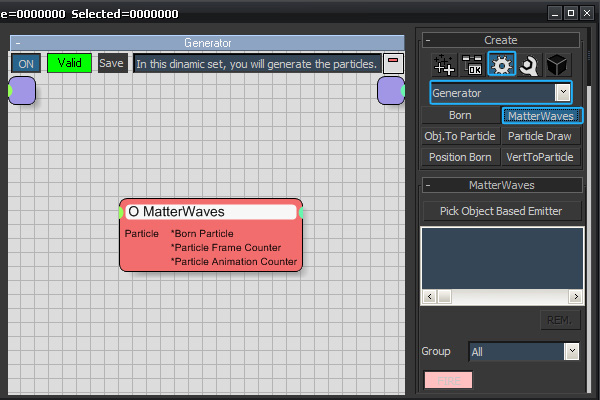
Go to “Create rollout > Operators > Generator”. Select the “MatterWaves” node to highlight it, and then click in the schematic portion of the “Wire Setup” view, to add this node to the “Generator” dynamic set. MatterWaves is an advanced particle system operator for tP that allow you to create amazing particle animations based on multiple materials and maps that let you control every aspect of each particle. Later we’ll use a “Noise” map to control the particle size.
Step 14
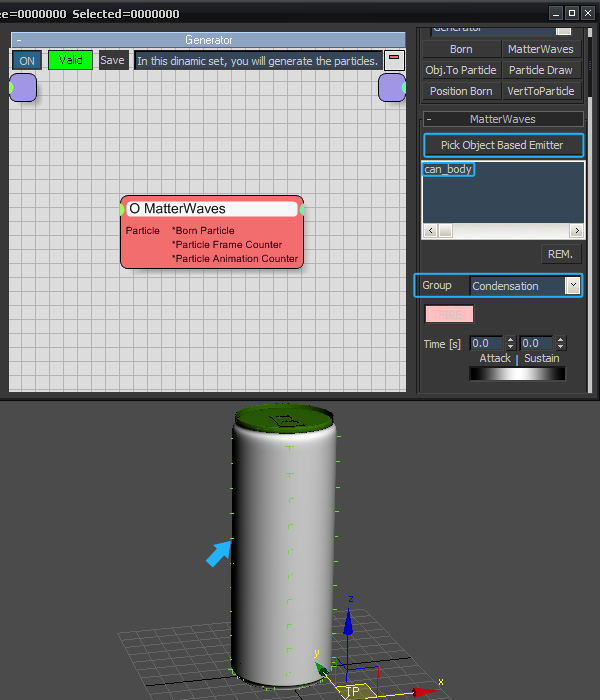
In the “MatterWaves” rollout, click the “Pick Object Based Emitter” button and select the “can_body” object. Then, add the particles to the “Condensation” group.
Step 15
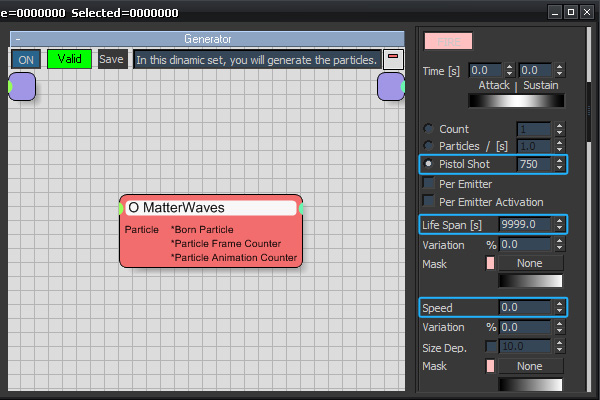
Set the generation type to “Pistol Shot”, to generate all the particles on the very first frame. Set the particle amount to a higher value, increase the “Life Span” value and set the “Speed” value to ’0.0′.
Step 16
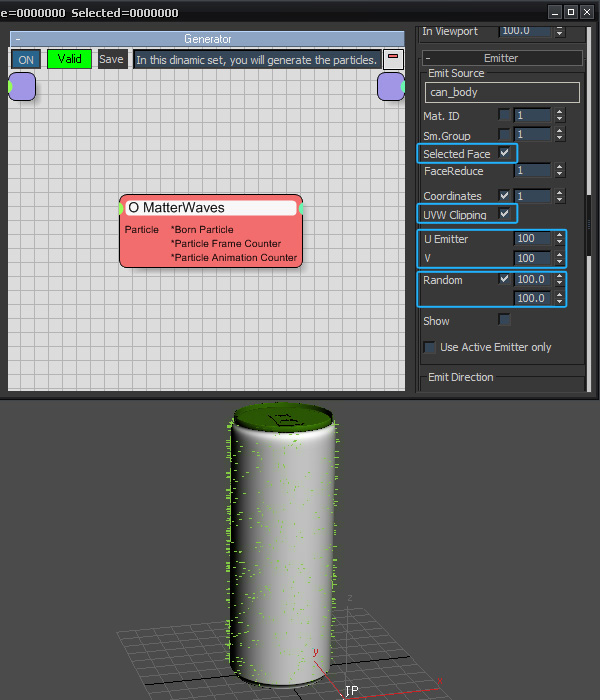
In the “Emitter” rollout, activate the “Selected Face” checkbox, because we want to create condensation only over the selected faces. Enable “UVW Clipping” and set the “U/V Emitter” values to ’100′. The “U/V Emitter” spinners allow you to define evenly spaced particle emitters based on the UV coordinates. Also, activate the “Random” checkbox, to create random particle positioning on the can’s surface.
Step 17
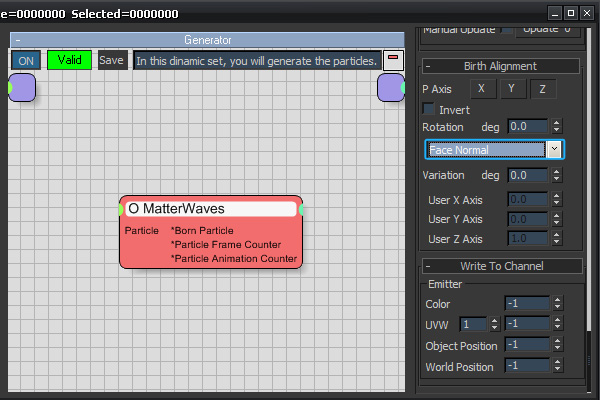
In the “Birth Alignment” rollout, select the “Face Normal” alignment, from the drop down list.
Step 18
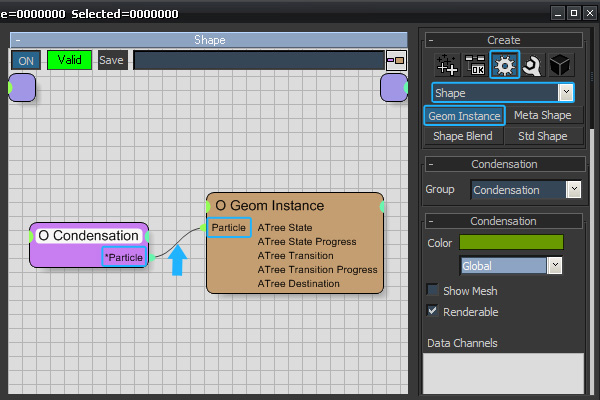
It’s time to assign the “Water drop” shape to the particles. In the “Shape” dynamic set, add the “Condensation” group (Create rollout > Groups).
Step 19
Go to “Create rollout > Operators > Shape” and add a “Geom Instance” operator to this dynamic set. Click on the “Particle” output of the “Condensation” group, and drag a wire to the “Particle” input of the ?Geom Instance? operator. Now these parameters are connected.
Step 20
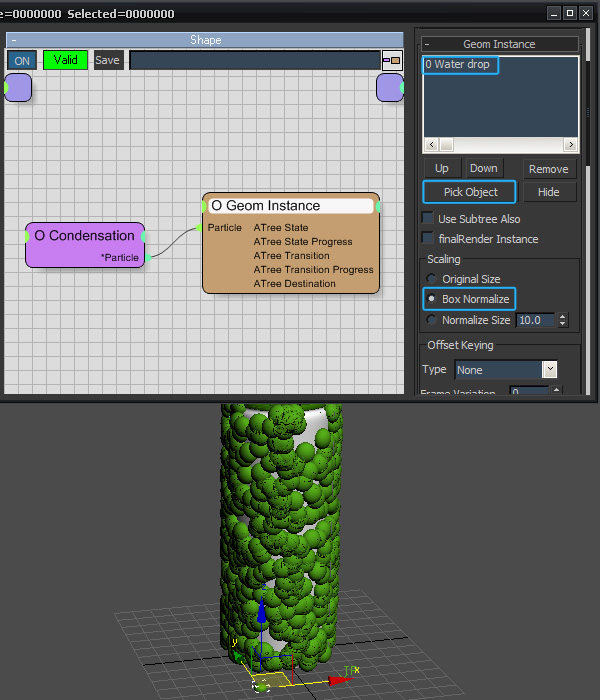
In the “Geom Instance” rollout click the “Pick Object” button and select the “Water drop” object. Under “Scaling” select the “Box Normalize” option, to be able to control the scale of the particles from “MatterWaves”, using a map.
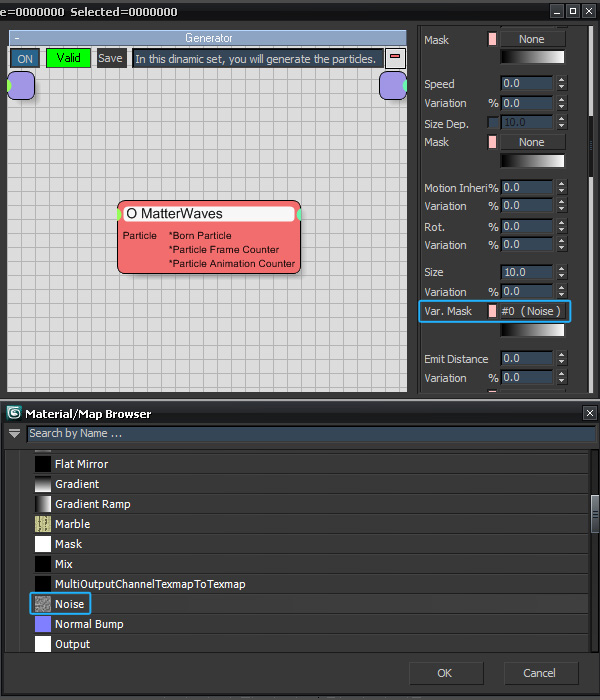
Step 21
Once we can see the particle shape, we can work on scaling. Go back to the “MaterWaves” operator, and under “Scale”, add a “Noise” map to the “Var. Mask” slot.
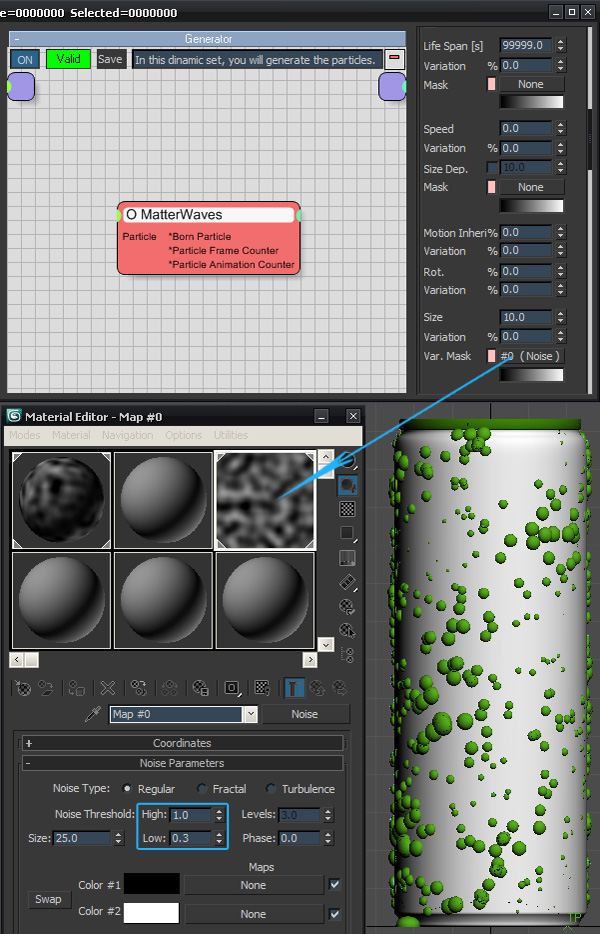
Step 22
Drag the “Noise” map from “MaterWaves” to a material slot in the “Material Editor” (as instance), to be able to change its parameters.
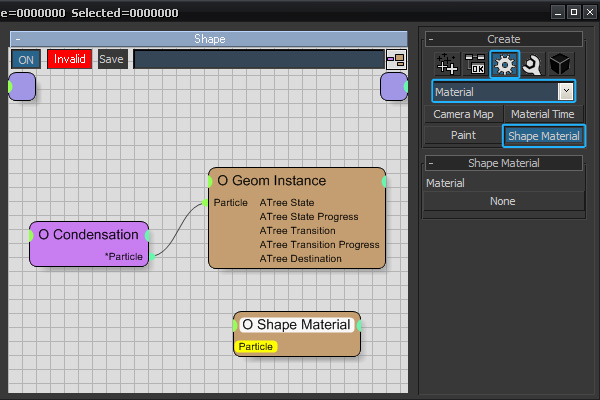
Step 23
Now, we’ll assign a material to the particles. In the “Shape” dynamic set, go to “Create rollout > Operators > Material” and add a “Shape Material” operator.
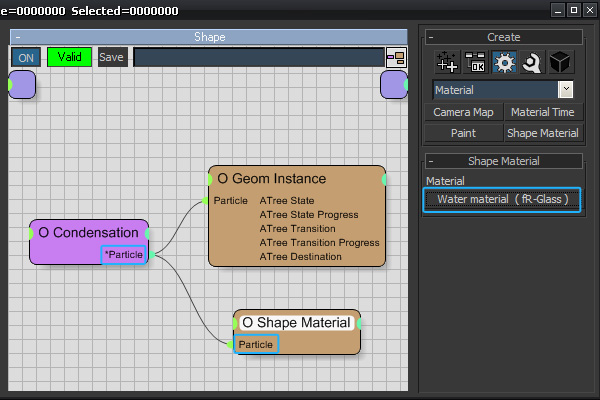
Step 24
Connect the “Shape Material” operator to the “Condensation” group. In the “Shape Material” rollout, add the water material to the slot.
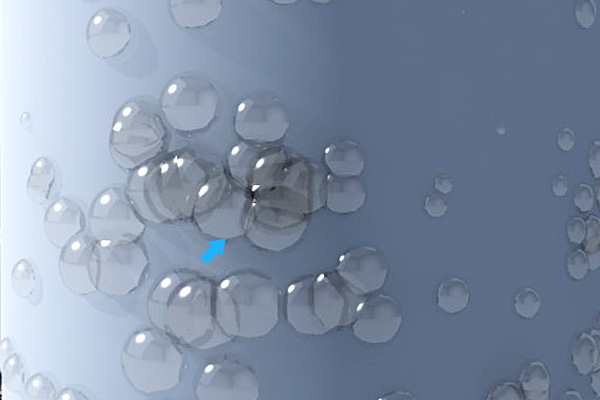
Step 25
As you can see, some of the particles are overlapping, and can cause some problems when rendering.
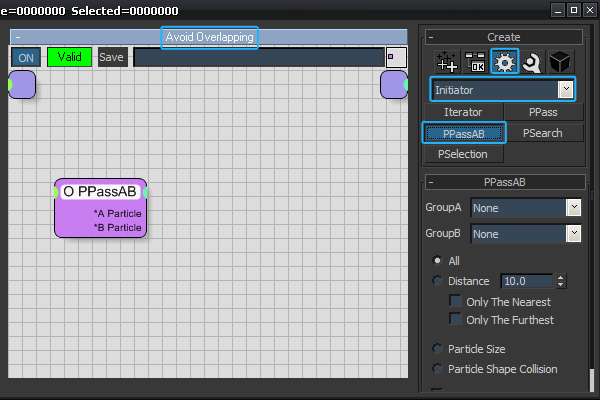
Step 26
Go to “Create rollout > Operators > Initiator” and add a “PPassAB” operator to the “Avoid Overlapping” dynamic set. “PPasAB” is used to create highly optimized inter-particle interactions. Measuring the distances between particles, we are able to delete those particles that are too close to each other.
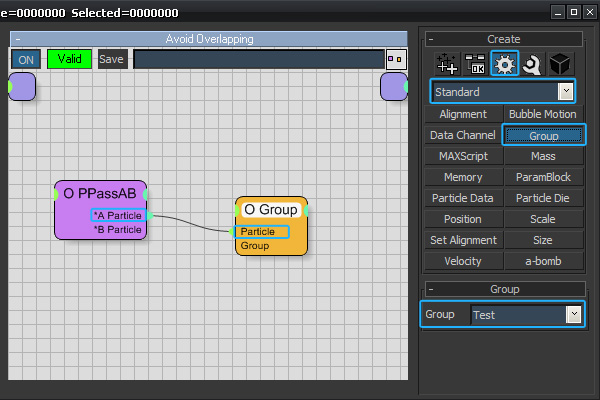
Step 27
To test the particles, we’ll send them to the “Test” group (colored in red). Go to “Create rollout > Operators > Standard” and create a “Group” operator. In the “Group” rollout select the “Test” group, then connect the “*A Particle” output of the “PPassAB” operator to the “Particle” input of the “Group” operator.
Step 28
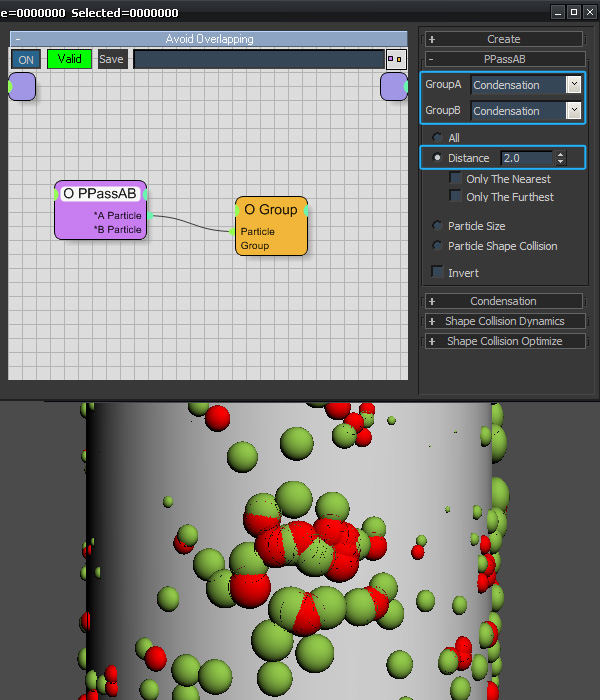
In the”PPass AB” rollout, select as “GroupA” and “GroupB” the “Condensation” group (because we are testing the particles from the same group). Select the “Distance” option. As you can see, if the distance between the particles is less than the “Distance” value, then those particles will be sent to the “Test” group.
Step 29
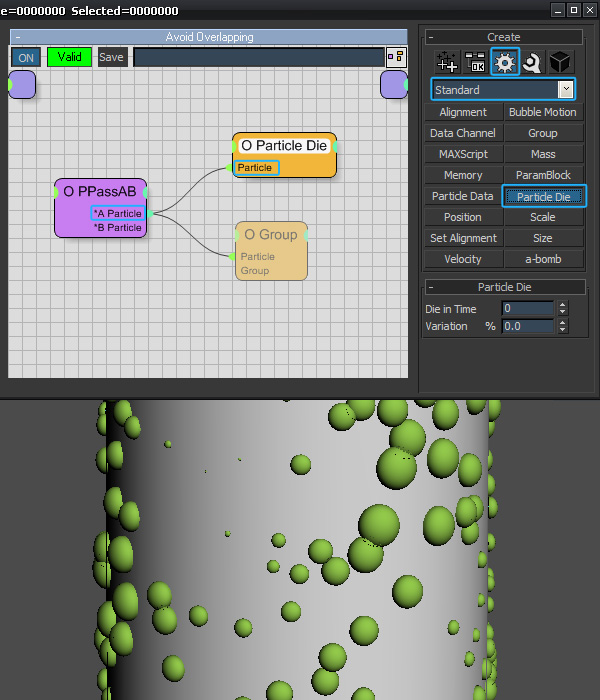
Once we have tested what distance value is working better, we can delete those particles that are overlapping. First of all, disable the “Test” group (right click on the node > Disable). Then, go to “Create rollout > Operators > Standard” and add a “Particle Die” operator. Connect the “*A Particle” output of the “PPassAB” operator to the “Particle” input of the “Particle Die” operator, and the particles are deleted.
Step 30
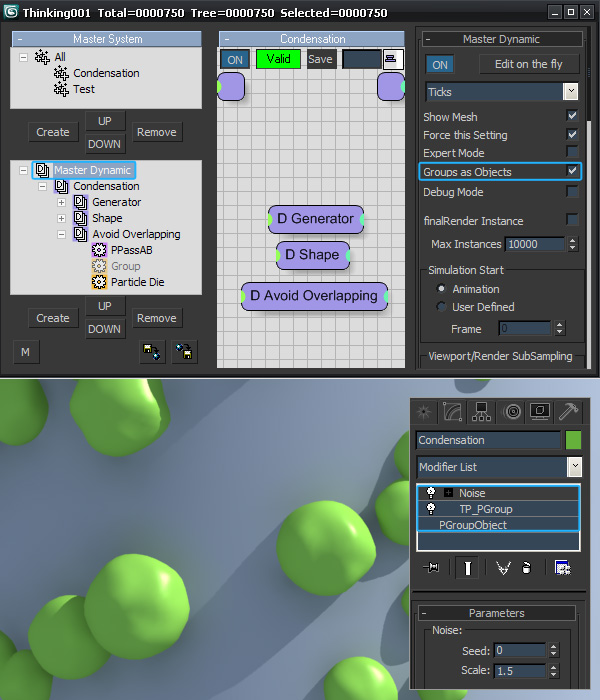
When using tP, you can apply all kind of modifiers to the groups. First, you need to activate the “Groups as Objects” checkbox, in the “Master Dynamic” rollout. In this exemple, I’ve added a “Noise” modifier to the “Condensation” object.
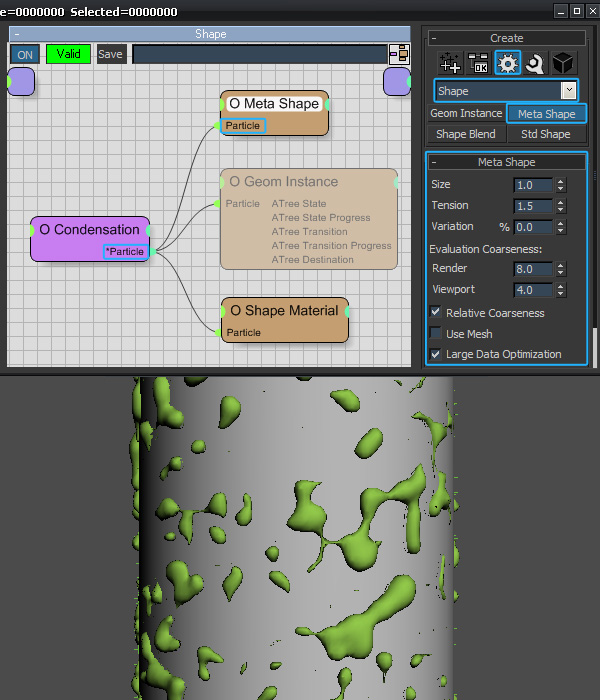
Step 31
Instead of using the hemisphere shape for the particles, you can use the built-in “Meta Shape”, used for liquid effects. Go to “Create rollout > Operators > Shape” and create a “Meta Shape” operator in the “Shape” dynamic set. Disable the “Geom Instance” operator, and then connect the “Condensation” group to the “Meta Shape” operator. Feel free to experiment with the “Meta Shape” parameters.
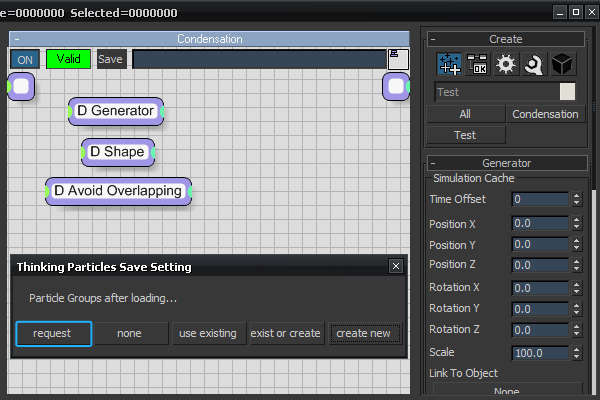
Step 32
Once finished, we can save the rules that create the condensation effect, as a “Black Box”. The “Black Box” is actually a dynamic set (or more, or just a part of a dynamic set), saved to your hard disk, that can be re-used. First of all, find the “3rdpartyBlackBox” folder on your hard disk, and create a new folder called “Test”. Highlight the “Condensation” dynamic set. Select the 3 dynamic sets, then right-click anywhere in the “Wire Setup” view and save the dynamic sets (name the file “Condensation.thi”) to the “Test” folder.
Step 33
Once clicked the “Save” button, the “Thinking Particles Save Settings” dialogue box will appear. Click the “Request” button.
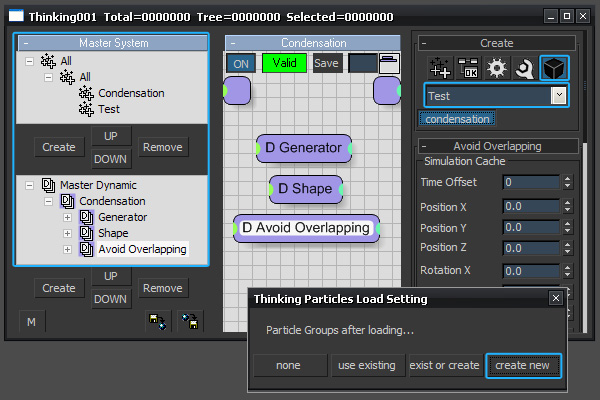
Step 34
Remove the 3 dynamic sets and the particle groups. Highlight the “Condensation” dynamic set, then go to “Create rollout > Black Box > Test”. As you can see the “Condensation” node is there. Add the node to the dynamic set. In the dialogue box that appear, tP is asking you, how to handle with the particle groups after loading. Because we delete them before, we’ll choose to “Create new” particle groups.
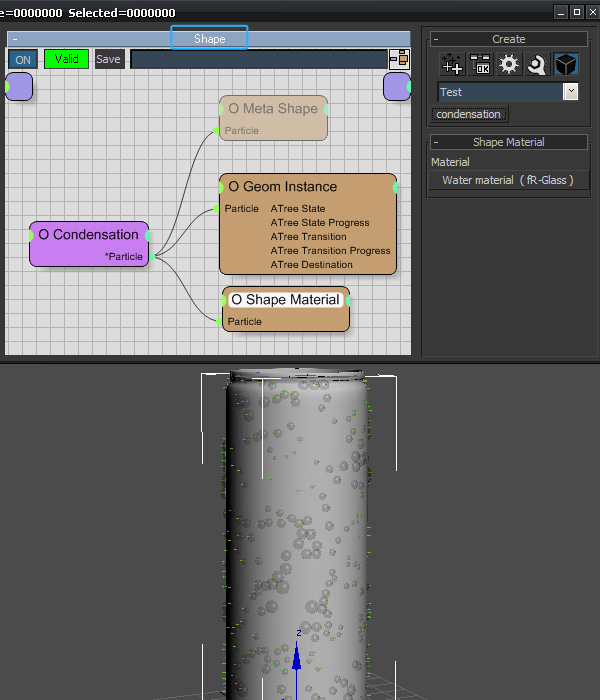
Step 35
You only need to re-pick the “Can_body” and the “Water drop” objects, and you are ready to render the scene, because even the materials and the maps are saved in the black box node.
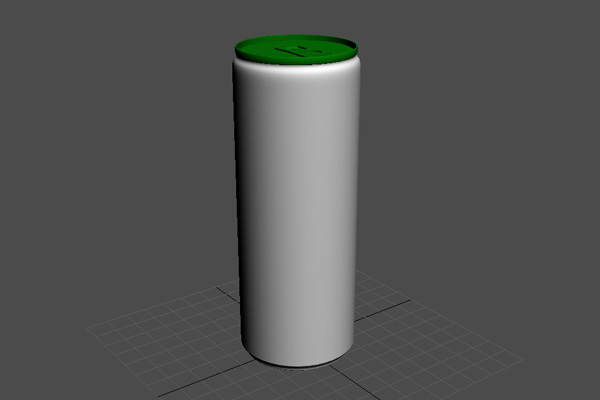
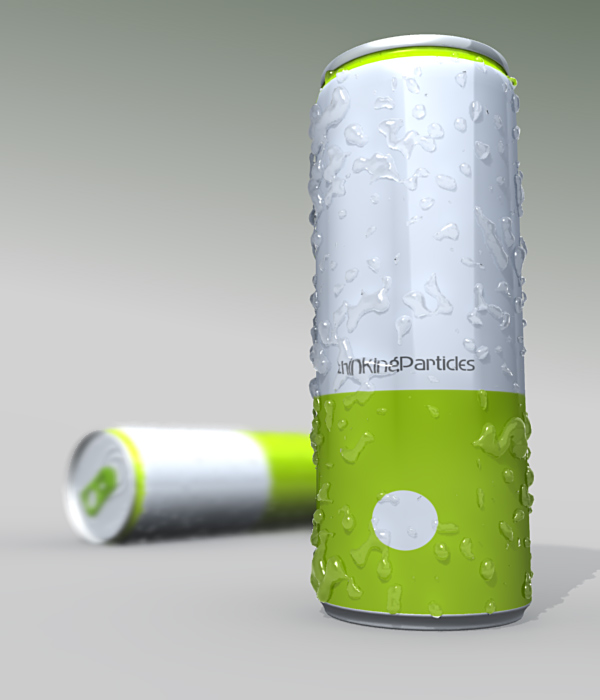
Final Image
Below you can see my result created with tP.
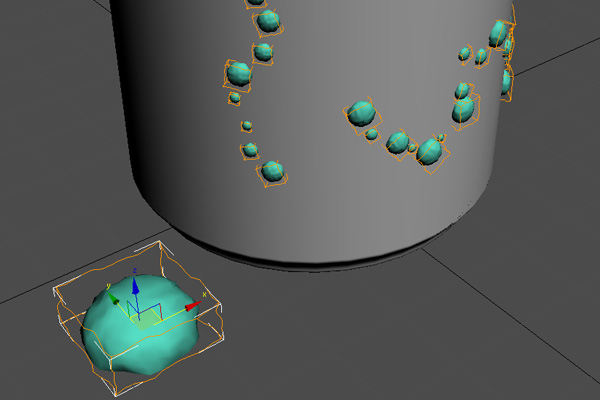
5. Using 3dsMax 2011′s Object Paint
The Object Paint tool allows you to paint specific objects onto the scene or over the surface of a selected object. This method can be used easily to create “special” condensation effects.
Step 1
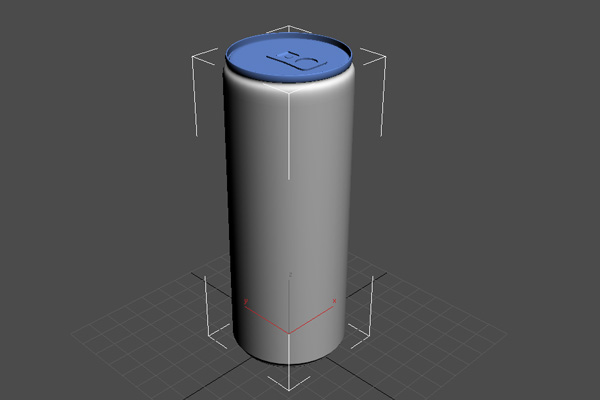
Import the can object into your scene.
Step 2
Again, create a “Water drop” object, as you did in the first section.
Step 3
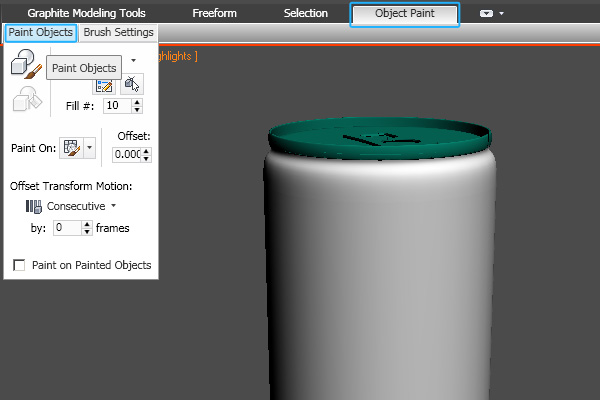
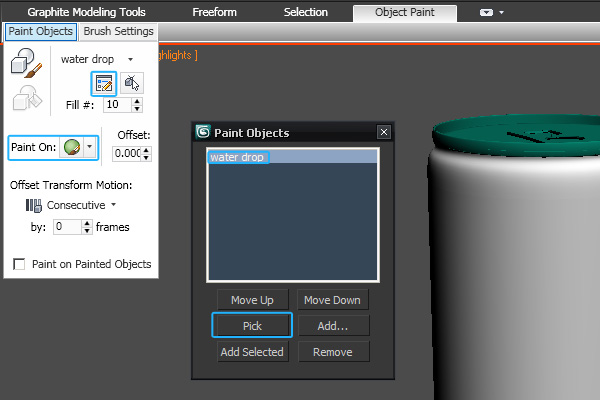
Open the “Graphite Modeling Tools” and go to “Object Paint” > “Paint Objects” section.
Step 4
Here, click on the “Edit Object List” icon, and in the “Paint Objects” dialogue box, add the “Water drop” object. Then, choose to “Paint on Selected Objects”.
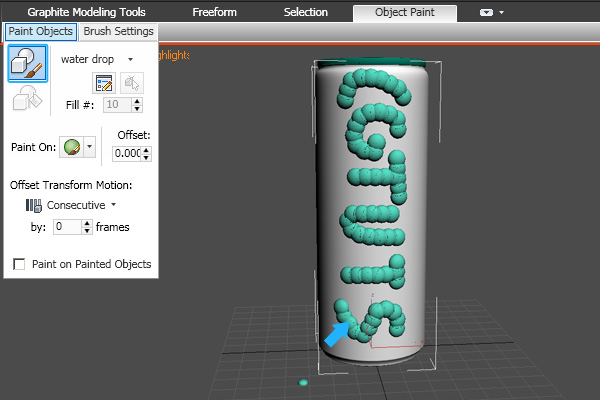
Step 5
Select the “Can_body” object, and then click on the “Paint” icon and start painting.
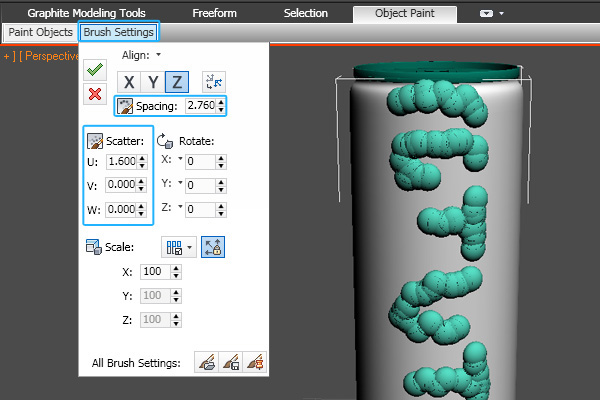
Step 6
Once you have painted the “Water drop” objects, go to the “Brush Settings” section. You can change the distance between the objects, using the “Spacing” spinner. In the “Scatter” group, you can apply a random offset from the painted stroke for each painted object.
Step 7
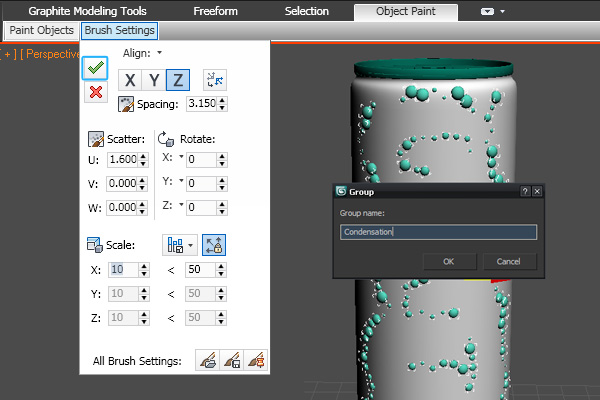
In the “Scaling” group, choose “Random Scaling” from the dropdown menu. Set a minimum and maximum value for object scaling.
Step 8
Once finished, click on the “Commit” button, then select all the newly created “Water drops” and group them.
Step 9
The painted objects are created as instances, so when you change the shape of the original object, all the painted objects will be affected.
Final Image
Below you can see my result.
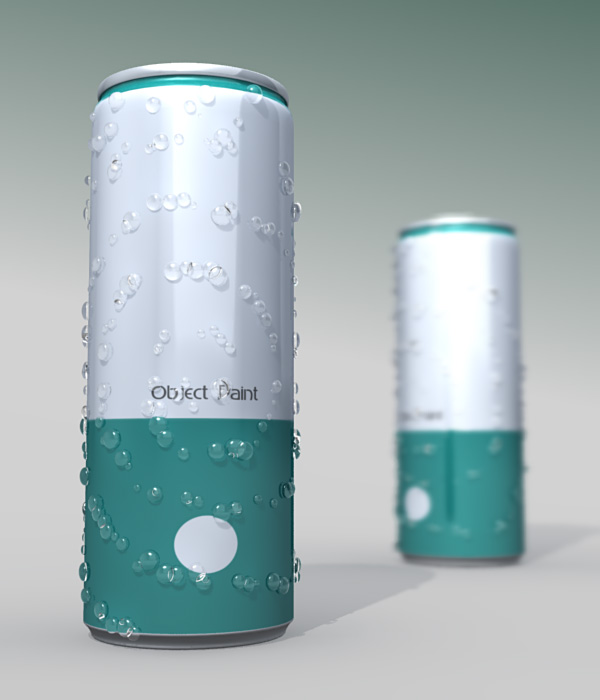
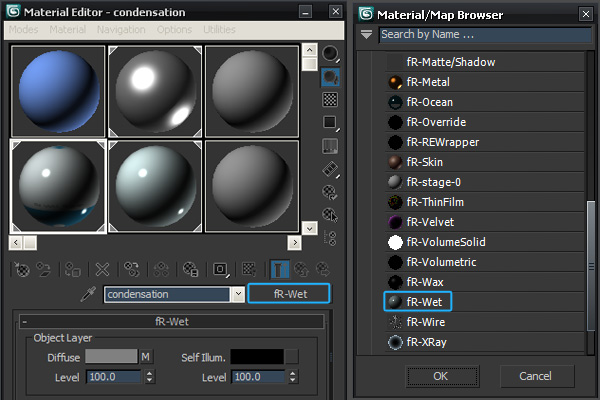
6. Using the fR Wet shader
The fR Wet shader is designed to add a liquid layer on top of any object. It’s the easiest and fastest method to create condensation, but it can be used just for non-transparent objects.
Step 1
Import the can object into your scene.
Step 2
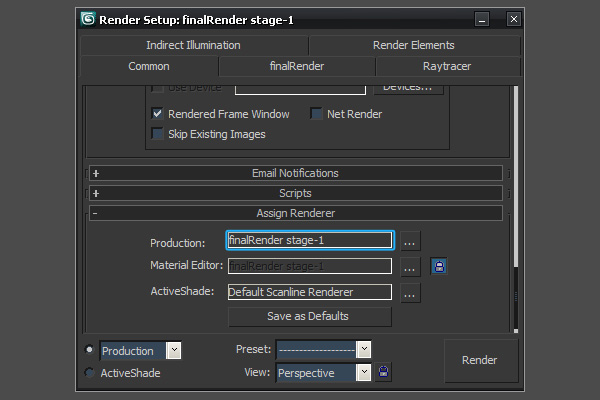
The “fR Wet” shader works only with the “finalRender” renderer.
Step 3
Create a “fR Wet” material and assign it to the “Can_body” object.
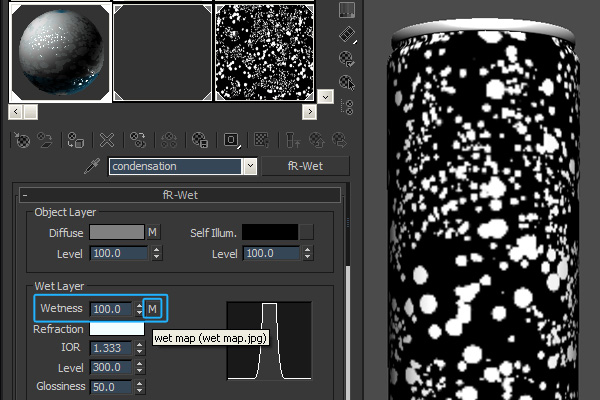
Step 4
To create the condensation effect, just add the “Wet map.jpg” image to the “Wetness” slot.
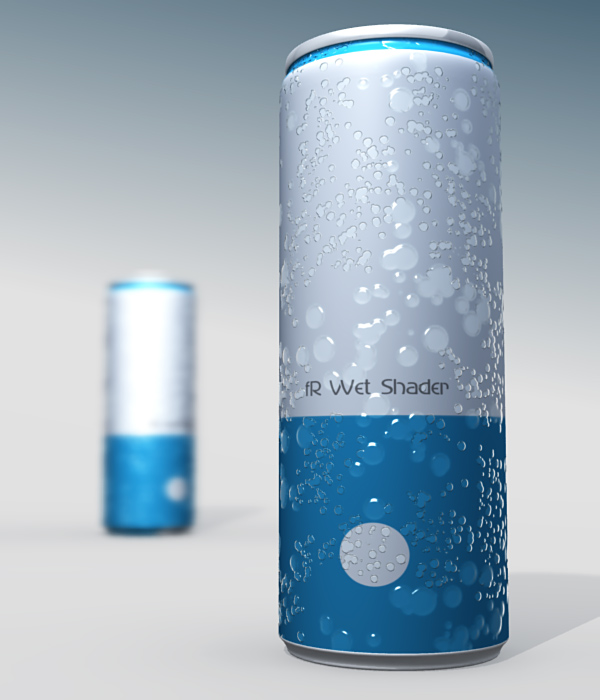
Final Image
That’s all. You can click the render button and fR creates the condensation effect in no time.
I hope you enjoyed this tutorial.
Don’t miss more CG tutorials and guides, published daily – subscribe to Cgtuts+ by RSS.