Mysql – People Search Clone Script

looking for a script that acts very similiar to a people look up portal.

this will not be for free searches. to search, you have to pay with paypal, then you get access.

It will also have paypal integration for member subscription based database searches ( look up feature )

their will also be a admin back end where admin can populate the database, manage / view memberships

i need this project completed in 3 – 4 days

if you cant commit to the time frame and SHOW ME PROGRESS do not bid

Undercover Kicks Let You Pedal or Hoof It in High Style

<< Previous
|
Next >>


strasse_02

<< Previous
|
Next >>

Bike commuters face a dilemma every morning: Wear stylish-yet-inefficient street shoes, or suffer in stiff, ugly bike shoes all day. The third option, lugging an extra pair to work so you can have both power and panache, is a less-than-attractive compromise.

Shoe startup DZR has changed that equation by crafting some great-looking, comfy kicks that conceal SPD-compatible cleats. The versatility allows you to make nice with your clipless pedals without straining your feet or your fashion sense.

Clipless pedals let riders lock their feet to a bike for a more powerful and efficient pedal stroke. Clipless pedals are safer and far more productive than toe cages. But they also require small cleats on the bottom of the shoe in order to clip on to the pedal.

In addition, bike shoes have stiff soles for efficient power transfer. For obvious reasons, because of the stiffness of the shoe and the bottom cleat, bike shoes are a drag to walk around in all day.

DZR’s new line of shoes is an attempt to reconcile the bike shoe with the street. It’s been done before, but rarely has it worked so well.

A hollowed-out section on the bottom of the shoe conceals an SPD cleat (not included). Meanwhile a nylon shank in the sole provides more stiffness than your average sneaker, while remaining flexible enough to walk comfortably.

We even ran around in them a bit without noticing the rigidity — although we wouldn’t exactly want to jog in these things.They were fantastic on the bike, clipping in and out easily, with a noticeable stiffness on the up and down pedal strokes.

Yet they’re also extremely comfortable to wear and damn good-looking. The Strasse model we tested has a skate shoe cut, with herringbone tweed uppers and black accents. The logo on the heel doubles as a reflector when light hits it, which is great for night riding. Don’t want to walk around in your cleats? Swap them out with the screw-in rubber covers shaped to fit the exposed section in the sole. Unless you revealed the piece of metal embedded deep in the sole, no one would know these are bike shoes.

Yet, like all compromises, they’re not perfect. In order to remove the rubber plug in the bottom of the shoe to install the cleat, you have to slice it out with a knife. It was easy enough to do, but also seemed like a good way to lose a finger. We think the shoe ought to come with that bottom section already removed.

Also, the cleats tend to touch the ground in a noticeable way on concrete and (worse) hardwood. While you can remove them and replace them with the rubber covers, we expect most people would consider it too much of a pain to do every day.

Overall, however, these innovative and fashionable kicks make a great combination that will look just as good on the bike or at the bar. Just don’t get trashed and try to ride home, OK?

WIRED: Concealed cleats make shoe easy on the eye and the ride. Nylon shanks provide more stiffness than Chucks, without going full-on Lance. Rear reflector is discreet during day, lights up like a Daft Punk show in car headlights. Men’s and women’s shoes available.

TIRED: You want us to slice the bottom with a knife? The only way we want to cut rubber soles involves a Beatles album and a turntable.

See also:

Photos: Jim Merithew/Wired.com

HP’s 3-D Laptop: One More D, 300 More Dollars

<< Previous
|
Next >>


HPEnvy3D1

<< Previous
|
Next >>

First they came for our 2-D televisions. Now they want our laptops.

If you thought 3-D was a tough sell for the living room, now imagine if you had to lug the technology around with you. That, in fact, is the big sell of the HP Envy 17 3D, and any other 3-D-equipped laptop: It gives you the world of three dimensions on the go. Can you feel the excitement? No? Well, ahem.

Let’s cut to the chase. You are not going to buy a 3-D laptop for the same reason that you have not bought a 3-D television: You simply do not care.

On paper, a 3-D laptop sounds like it makes sense. After all, if the Cineplex is showing the same movie in 2-D and 3-D format at the same time, you pay the extra buck and go to the 3-D version. So if your laptop can do the same, well, you’ll shell out a little extra for it, right?

Wrong. If the HP Envy 17 3D was just an Envy 17 plus 3-D tech, that’d be one thing. But it’s clear HP has had to make many compromises to squeeze 3-D into this form factor — compromises made at the expense of everything else inside.

There’s nothing really wrong with the specs: 17.3-inch, 1920×1080-pixel screen, 640-GB hard drive, 6 GB of RAM, 1.6-GHz Core i7 CPU, and an ATI Radeon HD 5850 graphics card. These aren’t ultra-highend specs — the usual stomping ground of the Envy line — and it shows on the benchmarks. The Envy 3-D performed about in line with older, smaller machines we’ve tested that cost hundreds of dollars less. Not bad, but hardly memorable.

The 3-D experience isn’t much to write home about, either. Relatively still scenes look good through the included active shutter glasses, but once the action starts, the image quickly gets blurry and fuzzy. Compared to a theater, or even a decent 3-D TV, where 3-D suffers partly because of the limitations of the human brain, the experience is pretty pathetic.

And suffice it to say, we just can’t imagine a lot of people sitting at their desk, wearing goofy glasses so they can watch Alice in Wonderland in 3-D on their computer. (No, you can’t turn a standard 2-D source into 3-D on the fly, and 3-D PowerPoint is right out.)

Now factor in a $1,600 price tag — $300 more than the non-3-D Envy 17 — and the picture grows murkier.

The ultimate value proposition, I guess, is this: Not only do I have to lug this giant computer and enormous power brick around with me (plugging in is recommended in 3-D mode, as battery life hits a whopping 39 minutes), but I have to haul around glasses, too? Pffhhhhhhhttttt.

WIRED: Three dimensions, people! Can you dig it? Backlit keyboard. Impressive “Beats” audio system. Dazzling, super-bright display. Includes Adobe Photoshop and Elements combo.

TIRED: 3-D experience is gimmicky, weak and already boring. Loud, grinding fan drowns out those awesome speakers when laptop heats up. There’s just no excuse for a computer this big to have arrow keys this pathetically small.

See also:

Photos by Jonathan Snyder/Wired.com

Say ‘Moshi Moshi’ to a Sleek Handset With Multiple Personalities

<< Previous
|
Next >>


moshimoshi1

<< Previous
|
Next >>

The first thing you’ll notice about the Moshi Moshi 04 is its 1960s-inspired Eero Saarinen styling. So cool-looking is the brushed aluminum and high-impact plastic hunk of eye candy, it almost makes the handset’s impressive functionality seem secondary.

But as seductive as the design is, the Moshi Moshi 04 knows too many tricks to be considered just a pretty curio. In fact, it does triple duty on your desktop — it’s a handset you can use to make phone calls, a speaker phone for conference calls and a set of portable stereo speakers.

British manufacturer Native Union has produced several iterations of these mobile-phone handsets. They take their name from the idiomatic greeting the Japanese say when answering their phones. (It means hello, sort of.) Most of the Moshi Moshis are designed by Frenchman David Turpin, but this one has been dreamed up by renowned British designer Michael Young. It comes in two colors — gold and silver.

The handset talks to your gadgets using Bluetooth 2.1, so it can be connected to two separate devices at once. Pair it with your cellphone to answer regular calls, and it will continue to work flawlessly as a handset for Skype calls from an iPad or as a set of auxiliary speakers for any Bluetooth-enabled PC. You can also pair it to two different phones, two iPads — whatever combination you please.

There’s a built-in multipoint microphone for conference calls. Set it down on a table, click the single button on the back, and everybody in the room can join in a conversation. The quality will of course vary depending on the acoustics of the room, but the sound does start off a tad tinny.

The handset itself has a gentle, concave shape. It feels natural to hold it while conversing, and it actually makes you forget that you’re talking to somebody on a cellphone. And if you’re one of those people who worries about cellphone radiation, you’re provided with more than just physical comfort — Native Union says the handset reduces up to 95 percent of the radiation you would otherwise absorb through direct use of your mobile phone. So you can toss the tinfoil hat.

Music playback is surprisingly decent through the pair of 2-watt speakers engineered by HiWave. Bluetooth audio usually doesn’t sound much better than a trebly AM radio, but the Moshi makes listening to music from a phone or iPad a perfectly acceptable experience, and the bass is solid even without the benefit of a subwoofer. It’s certainly an upgrade from the native speakers built in to the iOS devices and most smartphones.

The Moshi Moshi 04 sits on a recharging base reminiscent of a ying yang symbol. Its rechargeable battery gets about six hours of talk time and two hours of music playback. Standby time is 120 hours.

WIRED: Beautiful futuristic design. Can be paired with two devices simultaneously. Versatility cuts down desk clutter. Stereo speakers are impressive.

TIRED: At more than 9 ounces, handset is a tad heavy. Music playback over Bluetooth can stutter, depending connection strength and distance between devices.

How to Take Great Photos With Whatever Camera You Got

Do you want to start taking photography more seriously? Do you want to understand the basic concepts behind your camera’s settings and take photos that you will come to treasure in the years to come? Whether you’ve got a simple point-and-shoot camera or the latest DSLR, How to Take Great Photos With Whatever Camera You Got by Rockable Press will give you all the down-to-earth advice that you will need to take the best photos possible with whatever gear that you have. This book covers several topics including light, composition, exposure and aperture, and will even explain how to shoot photos similar in quality to what you see in magazines or television. Today, we have decided to share the first chapter of this book; It’s Not the Hammer, It’s the Carpenter for you all to enjoy.


Preface

Look at this shot and remember it. I won’t talk about it again until the end of the book. (No, don’t peek.)

Almost everyone these days has a digital camera but what makes one person’s photographs more interesting than the next? In this book we will show you many ingredients that you can add to your photos to make them stand out and make them into photographs rather than snapshots.

We’ll cover the different types of cameras, composition, lighting, the basics of exposure and then move on to finishing and the display of your images in a more professional manner.

Most of the images included in this book have the lens focal length, the ISO, shutter speed and aperture included in the image to try to help show the effect that all these parameters may have on an image. They are not there as a guide on how you should shoot, but to show what effects they may have.

Fig 0-1. image information: 1. focal length, 2. ISO, 3. shutter speed, 4. aperture.

This book is for everyone, whether you are just starting out with your first point-and-shoot or have had a better consumer camera for a while but just can’t get “that” look of photos you see in magazines or online.

As a professional photographer that has taught many photographers both amateur and professional, I know sometimes we get caught up in “tech speak” which becomes meaningless to people just starting out. So in this book, we will explain it in plain English so that everyone is able to understand, learn and get the most out of any camera they may have.


It’s Not the Hammer, It’s the Carpenter

A popular joke among photographers is: “Wow, that’s a great photo, you must have a nice camera.” The funniest part of that is a lot of people believe that it’s true. People look at my camera, a high-end professional model, and say, “That must take great pictures” I always say, no it doesn’t take any pictures at all, I do. And that’s the truth. Cameras are a tool and just like the hammer in the title, without someone knowing how to swing it, it really doesn’t do very much.

The photographer is the biggest difference in how an image looks. More megapixels or better lenses can not compensate for talent. A lesser camera in the hands of someone that has the eye and the vision will far exceed the results of someone with the best and most expensive camera but who can’t understand what makes an image.

But let’s discuss what different types of cameras there are and what makes one a consumer camera and another a professional one. There are some features that in the right hands can make a difference but it’s not what you might think.

Point & Shoot Cameras

The name itself “Point & Shoot” kind of tells the story — just point and shoot the picture without any thought or knowledge, but is that the whole story? Back in the good old days of film (that’s the smelly plastic stuff that came in rolls), consumer cameras were very limited. They had very small negatives and weren’t capable of producing much more than a 4?× 6? print. But the digital point and-shoot cameras of today are much different. It’s hard to find one that doesn’t have at least 10 megapixels, which mean they can easily be made into 12?× 18? wall prints. Some have very good lenses made by such top names in optics like Zeiss and Leica. They have modes besides full auto that allow you to take control. Those different modes and settings can be used to make various artistic decisions that we will learn about later in this book.

They do have some limitations. They have smaller digital sensors than DSLRs (or Digital Single Lens Reflex — a type of camera we’ll learn more about in just a minute) and that can lead to some picture quality differences between say a point-and-shoot and a DSLR of the same megapixel rating. They tend to produce more noise in low light situations also. But one side effect that is actually a good thing is that smaller sensors are actually better at macro photography (close-up life-size images). The lenses on point-and-shoots are not interchangeable so you don’t have all the choices that a DSLR would have but most have a very usable zoom range.
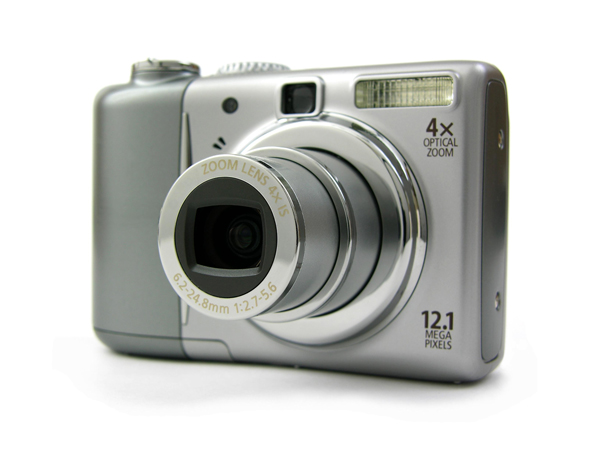
Fig 1-1. a standard pointand- shoot digital camera.

Their flashes are smaller and less powerful, which limits how far from the camera the flash can effectively illuminate a subject. Because of their small size, point-and-shoots often have smaller batteries which means they often can’t operate as long without needing their batteries changed, or if integrated into the unit, recharged.

Now, I’ve told you of their limitations but that does not mean at all that they limit your creativity. That part is still largely up to you. In fact, their small size and compactness makes it easy to carry them around. You will find yourself happy that you had a camera with you when the time and place was just right to get that perfect shot — one you would have missed if all you had was a huge monstrosity of a camera which you decided to leave behind at home or in your car rather than drag it along with you.

Hybrids

The next step up from the pure point-and-shoot cameras are something of a hybrid. They still have the same sensors as a point-and-shoots, but may add interchangeable lenses or accessory lenses that slip over the fixed lens to extend the capabilities of the camera. They may also have a “hotshoe” that allows an external flash unit to be attached, again, to extend its capabilities. People who upgrade to these cameras often want the ease of use of a point-and-shoot with some extended capabilities but are afraid to make the leap up to DSLRs for fear they may be too difficult or complicated to understand (don’t worry, they are not).
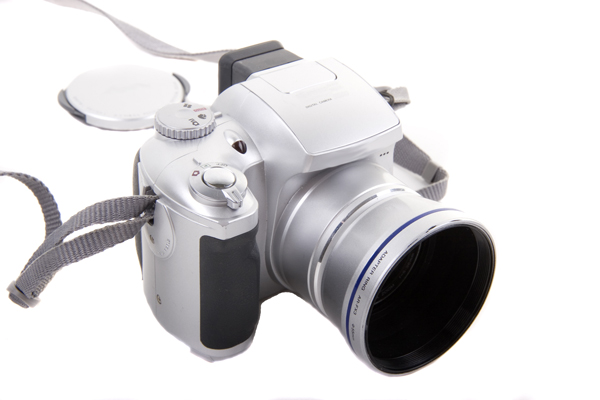
Fig 1-2. a hybrid (sometimes called prosumer) camera.

DSLRs

From there we get into consumer DSLRs. A single lens reflex has a series of mirrors and prisms between the viewfinder and lens that allow you to see through the lens as you look into the viewfinder. This allows you to shoot what you see instead of just an approximation.

DSLRs open up a lot of opportunities and options for photographers. In the first place, they have larger sensors, which help capture images that have better clarity and lower noise, and they have better low light capabilities. Then there is the biggest advantage of DSLRs, the ability to change lenses. All the top manufacturers have literally tens to hundreds of different, high quality lenses to choose from: everything from normal lenses, to wide angles, to telephotos. This allows you to have the right lens for any situation.
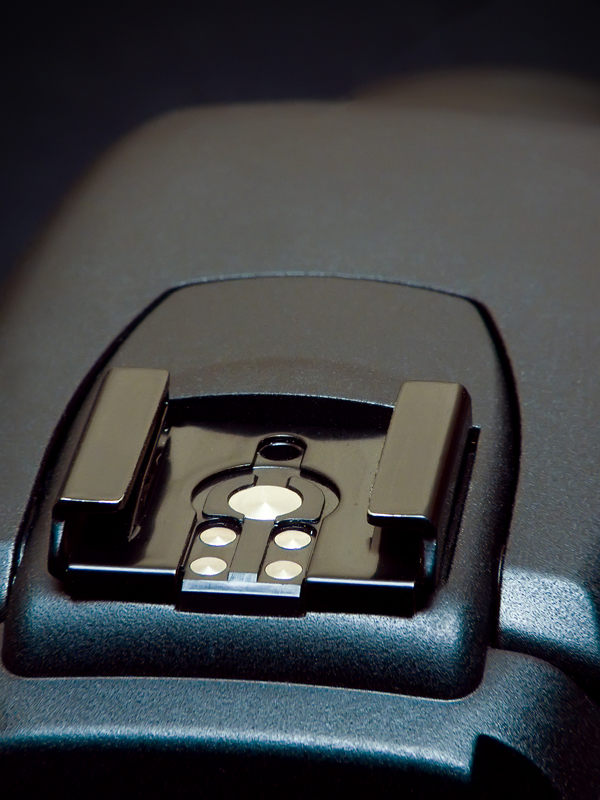
Fig 1-3. a hotshoe. A hot shoe is a slip-in interface or “shoe” into which you would slide an external flash unit. The “hot” part means that it triggers and sends information to.

DSLRs are larger and able to carry larger batteries, and so can shoot more pictures before needing a charge or change of batteries. They have hot shoes and offer many different choices for auxiliary flash units. There are a multitude of accessories available, everything from remote controls to devices to have a flash off the camera or even to have multiple flashes all fire at once.

One major difference you will find when you move up to a DSLR is the amount of lag time between when you press the button and when the shutter opens. In point-and-shoot cameras there is always a lag which leads to a lot of missed shots. DSLRs, on the other hand, are for all practical purposes instantaneous. If you shoot a lot of sports or action shots a DSLR will make a big difference here.

DSLRs also have the ability to shoot multiple frames per second (FPS), usually between two and five. Again, this is great for shooting action subjects, sports and wildlife, because the camera is able to capture distinct moments of fast-moving scenes — scenes for which we may not be able to press the button at exactly the right time to be able to capture them.

Professional DSLRs

Professional DSLRs may not be everything you think. Yes, they are the best quality, but that may not always translate into superior photographs. In a lot of cases, pro DSLRs share the same sensors and features with some of the higher end consumer DSLRs. Sometimes pro cameras even have fewer features and instead focus on quality of materials and build.
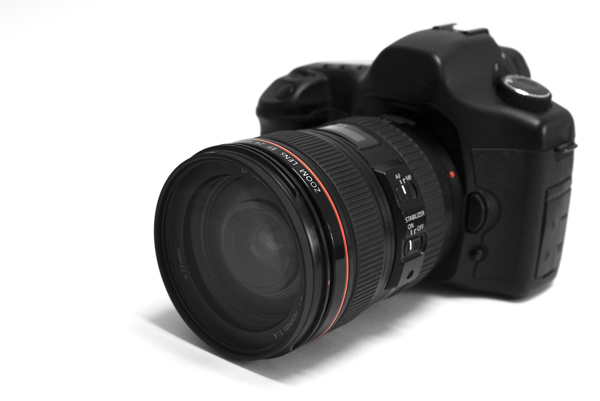
Fig 1-4. DLSRs feature high-quality, interchangeable lenses.

Professional cameras are not only built for the ultimate in image quality but they are also built to withstand the rigors of professional use. The bodies are often magnesium or other high strength, low weight alloys instead of plastic. The bodies and lenses are many times weather sealed for use in all types of conditions. Whereas many consumer shutters are built to hold up for 10,000 clicks in their life, professional shutters are built to last for 100,000 clicks or more before needing replacement.

The lenses that professionals buy are also of a much higher quality and that does lead to improved image quality. But the good news about that is that many of those high end professional lenses will also fit the lower end consumer DSLRs.

In the hands of a knowledgeable professional, these cameras are the ultimate. But if someone doesn’t know an f-stop from a bus stop… these cameras are no better than a point-and-shoot and really make… bad hammers.


Chapter 2: Stop Taking Snapshots, Start Taking Photographs

If you enjoyed Chapter 1, please consider purchasing the rest of this eBook from the Tuts+ Marketplace. Chapter 2: Stop Taking Snapshots, Start Taking Photographs will describe the difference between a snapshot and a photograph and will then discuss the different types of Photography including portrait, landscape, travel, photojournalistic, and still life.


Read More

Turn a Photo Into a Nature Inspired Illustration – Psd Premium Tutorial

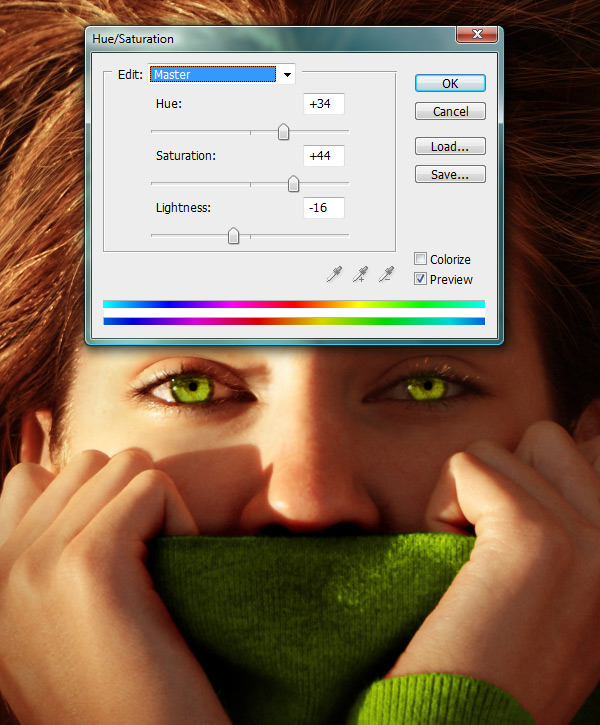
With all the stock photo sites freely available to us, we tend to forget that we can actually make everything ourselves. The problem with sticking solely to online resources is that once two pieces are based on the same image, they are alike no matter what you do to them. In this Psd Premium tutorial, author Alex Beltechi will demonstrate how to transform a photo taken by a photographer friend of his into a nature-inspired illustration. Along the way, Alex will perform many advanced photo manipulation techniques including how to redraw hair and make advanced color adjustments. If you are looking to take your photo manipulation skills to the next level then Log in or Join Now to get started!

Professional and Detailed Instructions Inside

Premium members can Log in and Download! Otherwise, Join Now! Below are some sample images from this tutorial.


Psd Premium Membership

As you know, we run a premium membership system here that costs $9 a month (or $22 for 3 months!) which gives members access to the Source files for tutorials as well as periodic extra tutorials, like this one! You’ll also get access to Net Premium and Vector Premium, too. If you’re a Premium member, you can Log in and Download the Tutorial. If you’re not a member, you can of course Join Today!

Read More

The Lifesaver Adjustment Layers – Basix

Are you new to Photoshop? Have you been trying to teach yourself the basics of Photoshop but have found the amount of educational material available on the net a bit overwhelming? As the world’s #1 Photoshop site, we’ve published a lot of tutorials. So many, in fact, that we understand how overwhelming our site may be to those of you who may be brand new to Photoshop. This tutorial is part of a 25-part video series demonstrating everything you will need to know to start working in Photoshop.

Photoshop Basix, by Adobe Certified Expert and Instructor, Martin Perhiniak includes 25 short video tutorials, around 5 – 10 minutes in length that will teach you all the fundamentals of working with Photoshop. Today’s tutorial, Part 8: The Lifesaver Adjustment Layers will explain how to apply non-destructive tonal and colour changes. Let’s get started!


Read More