Create a Vintage Art Deco Poster with Illustrator’s Grain Effect


You might not know the name A. M. Cassandre, but you’ve surely seen his work. His early 20th century French advertising posters have become iconic images of the Art Deco movement, and have inspired a new generation of designers worldwide.

One of the characteristic aspects of Cassandre’s work is the grainy texture used to shade objects. In painting, this technique is achieved by the artist using his thumb to flick paint off the end of a toothbrush. In printmaking, the grainy tone is created with aquatint.

Illustrator users can keep our hands clean and duplicate this technique with various texture effects. This is a beginner tutorial, which starts with basic shape-building methods. More experienced users can skip ahead to the texture part. Let’s get started!

Continue reading “Create a Vintage Art Deco Poster with Illustrator’s Grain Effect”

Create an Art Nouveau Poster in Illustrator – Vector Premium Tutorial


Today, we have another Vector Premium tutorial exclusively available to Premium members. If you want to take learn how to create a vintage, Art Nouveau poster using Adobe Illustrator, then we have an awesome tutorial for you. We’ll cover how to create the main female image, with Mucha inspired flowing hair, as well as characteristic deco elements that bring this poster together.

Continue reading “Create an Art Nouveau Poster in Illustrator – Vector Premium Tutorial”

Quick Tip: How to use Global Color in Adobe Illustrator


In Illustrator, a Global Color is one that remains linked to a swatch in the Swatches panel, so that if you modify the swatch, all objects using that color are updated. It’s a quick and easy way to try out different hues and moods in your artwork.

Continue reading “Quick Tip: How to use Global Color in Adobe Illustrator”

Community Project: Gig Poster Showdown!


If your digital art-form was a band, what style of music would it play? Is your Vector style bright and crazy like J-Pop? Do you rock Photoshop harder than Death Metal? Are you more like a Super Group of Show Stopping Mixed Media? As part of this Creative Session, we’re calling on our readers to strut their stuff on the Tuts+ virtual stage and go head to head in a massive Battle of the Bands Posters!

Continue reading “Community Project: Gig Poster Showdown!”

FAC Kick Samples Volume 1

Number of samples: 16
Audio format: AIF (16 bit, 44100, stereo, normalized -1db)
Genre: Rock

Most of these kicks have been made in Ableton Live. I used Operator, Analog and Sampler, but I also made some of them with the Roland Juno-106.

Samples contained in this pack are ROYALTY FREE so use them in your projects. As a payment, I will really appreciate your feedback on my Facebook page and your contribution of sharing this page.

Produced by Fred Anton Corvest (Sound Design Addicted!). Check out more samples from Fred on the Sound Design Addicted Facebook page.


Read More

Quick Tips: Alternate Picking

Alternate picking is a technique used by almost every guitarist. There are other forms of picking which some guitarists prefer, but that?s a topic for another article. What I have compiled here is a list of “quick tips” that will bene?t your development when practicing this technique. Take these tips into consideration when practicing some of your favorite alternate picking drills & licks.


Quick Tip 1: Take It Slow… Really Slow

In every piece of instructional material, they mention that you should take it slow. What they fail to mention, is the most important part. Be relaxed.

Just because your playing at 40 bpm, doesn?t mean that your necessarily playing slow enough. Your slow is not someone else?s slow. Usually exercises will tell you to begin at 60 bpm, but you should only begin here if you?ve been playing a decent amount of time and are accustomed to the guitar. You really do have to play incredibly slowly, paying attention to how tense your muscles get, and if you can stay relaxed for an extended period of time.


Quick Tip 2: Posture While Practicing

Posture is one of the most overlooked aspects of playing guitar. The importance of posture can?t be overstated, as it could save you from permanent injury and could also be the sole reason for slow progress. Just because some of your guitar heroes have poor posture, does not mean you should copy them.

A few guidelines for posture are:

  • Sit up straight and don?t slouch.
  • Keep your body, namely your shoulders, wrists & neck relaxed.
  • The guitar should be fairly raised, so use a footstool if possible.
  • If standing, don?t have the guitar hanging around your knees if you haven?t gotten used to it. Straining your back and bending your wrist this much is quite dangerous.

Quick Tip 3: Breathing

Breathing doesn?t seem like it should be of any concern, but you?d be surprised. When learning something new, or your training your muscles to do something a little faster, check your breathing. You?ll be surprised at how much your breathing changes when your body is tense and unrelaxed. Breathing is an easy thing to look out for and can make a huge difference.


Quick Tip 4: Use A Timer

When learning a new technique it?s important that you continue the exercise for a decent amount of time. For example, take an exercise on alternate picking and repeat it at a very slow tempo for five minutes straight. If you can?t do it, then you probably haven?t built enough stamina and strength.

It?s important to build these, as it will guarantee you can do it. It?s no good being able to play sixteenths at 80 bpm only four times.


Quick Tip 5: Be Ef?cient

Being ef?cient is all about using the correct ?ngers for the lick or exercise your trying to learn. Also, consider how far your ?ngers have to travel to reach the fret. It?s much better to be able to relax your ?ngers and have them hover over the frets, then to have the tense and a couple of inches away. Learning to keep your hands and ?ngers relaxed while minimizing the effort and time it takes to fret notes will improve your speed and tone.


Quick Tip 6: Consistency

Consistency is yet another very important tool in your toolbox for practicing. Learning a technique takes a lot of time because your literally training muscles to do something that they weren?t initially created for. This means that the muscles have to grow accustomed to the tasks that you set for them.

The only way to accomplish this is to train them slowly and frequently. You should begin adding this to your practice regime by focusing on one technique at a time. For example, take three of our favorite alternate picking exercises and practice them for ?ve minutes each non stop. Do this for ?ve days a week or how many days you practice a week. That?s an hour and ?fteen minutes of picking work a week. Also, ?fteen minutes isn?t even that long, so you could run that regime more than once a day if you wanted to.


Quick Tip 7: Take Breaks

Just a ?nal tip, that should be mentioned because we?re talking about technique. Take breaks! Breaks will allow your muscles to rest, and get ready to continue working. During these breaks, ?nd some stretches for your hands, necks, shoulders, forearms.


Quick Tip 8: Pick from The Wrist

Alternate picking comes from the wrist. Using your wrist yields the most control and consistency. You should aim to keep your forearm relaxed on the body of the guitar, and the ?eshy part of your palm close to the bridge. This makes it very easy to incorporate palm-muting into your playing. Keep your shoulder relaxed, and watch for any tension causing your shoulder to rise up and tensing your forearm.


Quick Tip 9: Holding The Pick

Everyone has a preference when it comes to holding a pick. Marty Friedman has quite an unorthodox technique, but it works for him.

The ideal starting point is to hold your pick between your the side tip of your index ?nger and your thumb. Try and keep the rest of the ?ngers on your picking hand in a loose ?st. This is the most relaxed position to start from.

For fast picking, only let a little bit of the pick poke out from your ?ngers, and hold it at a slight angle. This enables the pick to slice the strings, and lessens the resistance against the strings.


Final Notes

Don?t push yourself past what your capable of doing. If you feel any strain or pain whatsoever, STOP! Seriously, pain or discomfort is your body telling you that this isn?t good. There is no sense in the phrase “No Pain, No Gain”, especially when we?re talking about something that could cause serious damage if not done sensibly.

Muscle-memory is built slowly and consistently. Keep that in mind, and you?ll be on the right track. Proper form, slow practice, and consistency will yield great results.


Read More

Saving Time with Logic Pro 9: Keyboard Shortcuts

Twice a month we revisit some of our reader favorite posts from throughout the history of Audiotuts+. This tutorial was first published in December 2009.

Imagine the precious seconds you lose every time you take a simple action via a menu option or clicking a button on the screen. Once you memorize a set of keyboard shortcuts and make new shortcuts for tasks you find yourself doing frequently, you begin to save a lot of time. You’d be surprised how quickly those seconds add up into minutes and hours. Here’s a cheat sheet of common keyboard shortcuts you should memorize, along with a quick primer on using the Keyboard Commands manager.

This is the third tutorial in a short series on helping you save time in Logic Pro 9. We’ll be covering:

  • Screensets — arrange Logic’s windows to suit your way of working, and reuse those settings for improved workflow.
  • Templates — you can create template sessions based on various needs for various situations?—?this helps you get into the creative action with a minimum of fuss. We’ll cover this topic in the next tutorial.
  • Keyboard shortcuts — the focus of this tutorial!

Essential Keyboard Shortcuts

You can see all of Logic’s keyboard shortcuts in the Keyboard Manager. I’m listing them here because there are so many, you many have trouble figuring out which ones to memorize. The follow shortcuts are the ones that will really make working with your projects much quicker. Secondly, you can print this reference out and look at it as you use Logic — as far as I’m aware there’s no keyboard shortcut cheat sheet that comes with Logic.

We won’t cover the standard File menu shortcuts that you should know from using computers in general, though I will reiterate that Cmd+S is the shortcut to save your project and you should make it a goal to get this shortcut to become a subconscious habit so you’re saving your work all the time and don’t need to think about doing it.

  • Record Enable Track: Ctrl+R
  • Record: R
  • Toggle Mute Track: Ctrl+M
  • Toggle Solo Track: Ctrl+S
  • Play/Stop: Space
  • Rewind: ,
  • Fast Rewind: Shift+,
  • Forward: .
  • Fast Forward: Shift+.
  • Create Marker: Ctrl+K
  • Rename: Cmd+Return
  • Toggle Cycle Mode: C
  • Open Mixer: Cmd+2
  • Open Arrange: Cmd+1
  • Close Window: Cmd+W
  • Toggle Bin: B
  • Bounce: Cmd+B
  • Zoom Window: Shift+Cmd+M
  • Import Audio: Shift+Cmd+I
  • Learn New: Cmd+L (for learning hardware controller signals)
  • Toggle Zoom: Z
  • Quantize Selected Events: Q
  • Select Previous Region: Left Arrow
  • Select Next Region: Right Arrow
  • Select Previous Track: Up Arrow
  • Select Next Track: Down Arrow
  • New Track: Option+Cmd+N
  • New Track with Duplicate Settings: Cmd+D
  • Hide/Show Track Automation: A

This is by no means a comprehensive listing of shortcuts. It’s not meant to be — these are the ones that are actually useful in a day-to-day project setting, with none of the more obscure and less useful shortcuts in the way.

Apple Remote

One of the reasons that set of keyboard shortcuts is so useful is because it allows you to record-arm a track, start recording, stop recording and playback, and navigate. In other words, there’s no reason to reach for your mouse when you are tracking.

Logic’s designers realized that the most useful shortcuts are the ones that enable the user to do things easily reaching over for the keyboard while standing at a MIDI controller or microphone, so they made the Apple Remote work with Logic. If you managed to get in on Macs while they were still shipping with the machines themselves, or have bought one separately, here’s what you need to know, in the format of Button: Function:

  • Rewind: Rewind
  • Forward: Forward
  • Play/Pause: Play or Stop
  • +: Previous Track
  • -: Next Track
  • Menu: Record
  • Rewind long-hold: Fast Rewind
  • Forward long-hold: Fast Forward

Keyboard Stickies

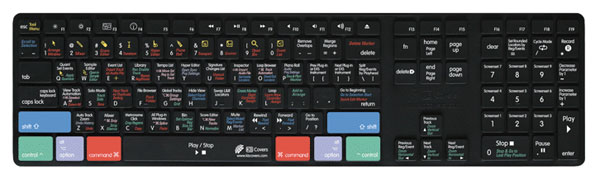
With hundreds of preset key commands and hundreds more unassigned commands, you can’t be blamed if you feel you need an aid to remember what everything does. Fortunately, you can get overlays for your keyboard that help you remember keyboard commands.

You can get these in varieties for most Apple keyboards and Apple laptop keyboards here. There isn’t much support out there for non-Apple keyboards, which is unfortunate as their keyboards and mice are utterly horrendous from an ergonomic perspective, but you might get lucky with some research.

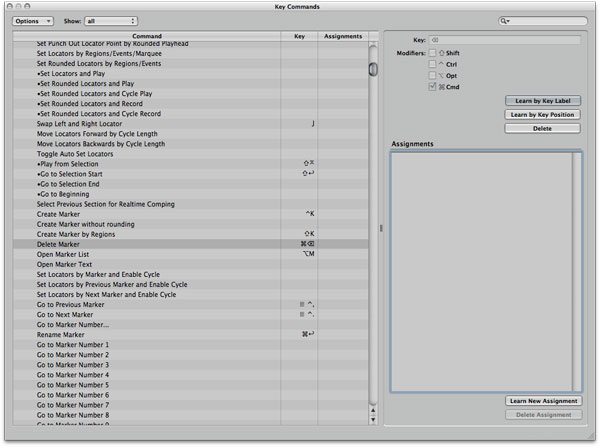
The Keyboard Commands Manager

Many of the commands that can have keyboard shortcuts assigned to them do not, by default, have any shortcut bindings. For any of the more advanced commands, you’ll need to assign your preferred key combo. Let’s take a quick look at how the manager works.

The Options menu provides you with the ability to select preset key command lists based on your keyboard type, or import someone else’s set. You can also export yours. Once you’ve got a custom setup perfected, I recommend you export your key commands and back them up — you won’t know until you lose them how important they can become to your workflow.

The list box shows you all possible commands, grouped into areas of relevancy. This is where you select the commands you wish to create or replace shortcuts for.

Once the desired command is selected, any keystrokes you make will be interpreted as the new shortcut. Be careful about overwriting shortcuts by accident! Unless I have missed something, there’s no Undo option.

There are three buttons on the right:

  • Learn by Key Label setting tells Logic to ignore the placement of the key on your keyboard, and just pay attention to the label. This means if you have one key on your keyboard in two different places — the numbers, for instance, on a keyboard with a numpad — the shortcut will work using both keys.
  • Learn by Key Position is the opposite — if there’s a duplicate button, Logic will remember which one you used and will only work with that particular key.
  • Delete does what it says — deletes the existing shortcut!

Beneath those buttons is the Learn Assignment section which is for setting commands from a controller. You can read more about this process here.


Read More

Workshop #146: Doik by Gannon

At Audiotuts+ we regularly put up a reader track for workshopping and critique (find out how to submit a track). This is how it works: you upload your song, and every week or so we’ll publish one here and step away from the podium. The floor is yours to talk about the track and how the artist can fix problems in and improve upon the mix and the song.

This track has been submitted for your friendly, constructive criticism. They have put their track (and their heart and soul) in your hands to learn and get useful feedback.

  • Do you enjoy the song or track itself? Does it have potential?
  • Can the arrangement be improved?
  • How did you find the mix? What would you do differently?
  • What do you enjoy about the rhythm track? What can be done to improve it?
  • Is the choice of instruments relevant and effective for the style/song?
  • Are the lyrics (if any) effective? Does the style, arrangement and genre of the song suit them?
  • Can you suggest any specific techniques that might improve the track?
  • Do you have any other constructive feedback?

Doik by Gannon

Artist’s website: soundcloud.com/gannonsamuel

Description of the track:

I wouldn’t really know what kind of genre this fits with… I like to call it ambient acoustic – it’s as ignorable as it is listenable… I’ve gone for a deliberately ‘raw’ kind of mix. I’d been doing a lot of electronic ambient stuff and wanted to do something completely different using actual recorded sounds and instruments rather then synths.

Anything at all that you’d like to to say I’m sure would be helpful.

Cheers, Sam.

Doik by gannonsamuel

Terms of Use: Do what you will with it, let me know where it goes if it goes somewhere though, its nice to follow things…

Have a listen to the track and offer your constructive criticism for this Workshop in the comments section.


Submit Your Tracks for Workshopping

Need constructive criticism on your own tracks? Submit them using this form.


Read More

6 Simple Ways to Achieve Separation in Your Mix Downs

Creating a full, rounded and involving mix can be pretty challenging and one of the hardest bits is placing each instrument in it’s own defined space. Once you move past more than three or four elements there is always a danger of things becoming muddy. This is why we need to create separation.

Ensuring that our instruments are clearly defined is not quite as hard as you may think. Like anything else in music production it really comes down to technique and experience. Let’s take a look at a list of ten things that should help you when completing your mixes.


Step 1: Sound Selection

The mixing process really starts as early as the sound selection process. Get things right at this early stage in your project and you could save yourself a huge amount of work later in the mixing process.

The trick is to choose sounds that compliment each other in both timbre and frequency. For example using a large number of instruments that share the same low frequency can create a very confused mix with little definition. Solving this problem would be an up hill struggle.

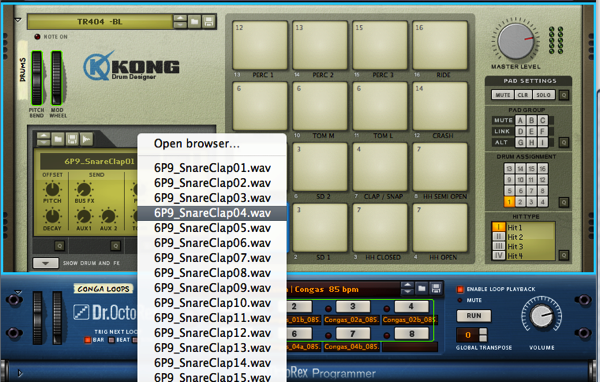
Selecting the right sounds in Reason 5

Above all keep your mix down in mind when you are selecting the instruments you plan to use in your mix. Most of the time all it takes is to remain conscious of the fact that decisions you make here will have a knock on effect when creating separation between your sounds later.


Step 2: Groove Inspection

Just as important as the sounds you use is the construction of your project’s groove. This is something else to consider during the writing process. If possible try to place key sounds that share similar frequencies in their own ‘space’ in the groove.

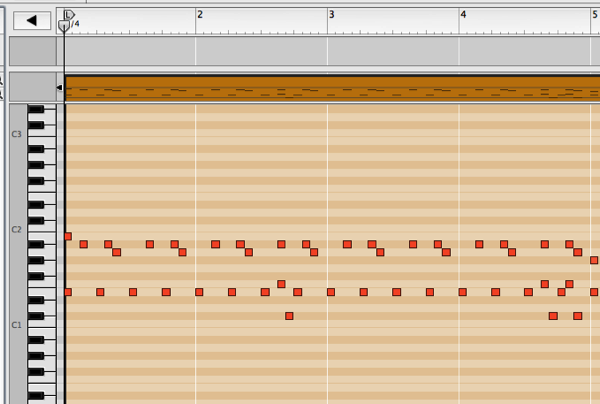
Thinking about your sequences carefully can really help during the mixing process

An perfect example of this is the offbeat bass line, with each bass hit sitting perfectly in between a 4/4 kick drum part. With no clashing low frequency parts this is one of the easiest combinations to mix and perfect separation is extremely easy to achieve.

Of course this is a pretty extreme example of perfect groove construction and not many people use this sort of ‘black and white’ programming but it should give you a clear idea of what can work and why. With this in mind you should be able to apply the theory to your own grooves.


Step 3: Kill the Lows

If you follow the simple techniques in the first few steps then you should already be making progress and your grooves may already be sounding pretty good. Add a bit of processing in the right places and things will only get better. One of these processes that is vital to a clean mix is high pass processing.

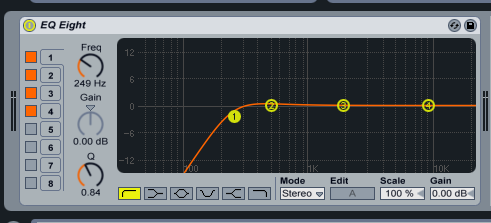
Pretty much every DAW ships with an EQ capable of cutting lows

I find that removing the low end frequencies from sounds that predominantly live in the higher frequency ranges allow them to breathe and gives the key low frequency sounds their own space as well. You shouldn’t get too zealous here, be careful not too over filter sounds as remove too much and they’ll become coloured and thin.


Step 4: Think About Your Sound Stage

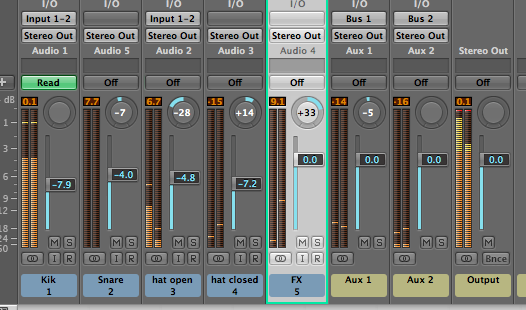
Moving away from frequency related issues for a second, let’s think about our stereo sound stage. Simple panning is one of the most powerful tools at our disposal for creating wide mixes with plenty of separation, so it should be one of the first things you turn to at mix down.

You can start by panning instruments in similar frequency areas. Percussion, guitar and vocal parts are all at the top of the list and can be spread across the stereo stage to create width and definition. Once you have made these initial changes more subtle pan edits can be made to the critical parts in your mix. In only a short time you should be able to make your mix sound more open and natural.

Panning is added at the start of a project in Logic.


Step 5: Less Is More

Once you are a good way into your project you may find that you are still experiencing a ‘fuzzy’ mix, with a lack of definition. One of the main causes of this is simple over crowding.

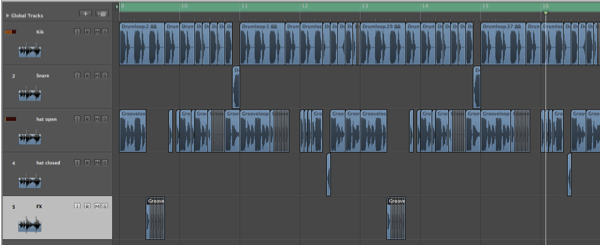
Try to be ruthless here and ask yourself if everything you are using really needs to be in the project. Try playing back the project with anything less than crucial playing.

Somebody once said to me “If it doesn’t sound good with 10 parts, it certainly wont sound any better with 20.” This really couldn’t be more accurate, if your project isn’t sounding right adding a load of new parts is rarely the answer. Usually less really is more, try listening to your favourite track, the likelihood is it’s not over loaded with elements.

This Logic project contains only a few parts


Step 6: Distance and Depth

Finally let’s think about your mix in a three dimensional sense. We’ve briefly looked at separation of frequencies and how to use panning to give your material width but you can also use reverb to move your instruments backward in the mix, essentially making things sound more distant.

Depending on the size of reverb that is chosen various sounds can be put at varying distances. This contrast between spaces adds further separation to each of the sounds treated.

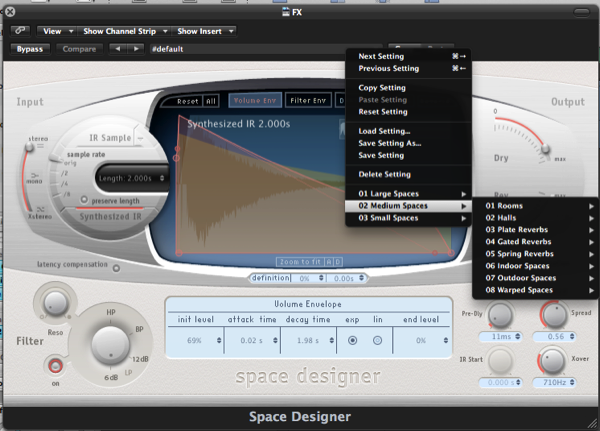
Logic’s Space designer includes a huge number of varied reverb patches

A good example would be a vocal mix. The lead vocal could be processed with a room or plate reverb, while the backing vocals are treated with a larger hall reverb. Finally any ad libs or effects could be passed through a contrasting gated verb. Combine this montage with some panning and filters and you should have a nicely defined vocal spread.

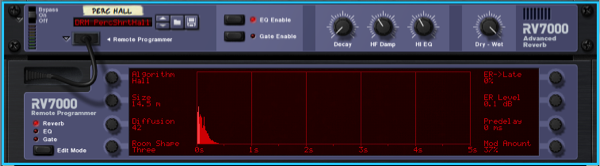
Most DAWs feature studio quality reverbs now, Reason’s RV7000 is a great example

Obviously this is just a basic guide to just a few key techniques for mastering the art of mixing. Hopefully this will get some of you beginners on the right track and help you tackle your mixes. Any questions or suggestions, leave a comment and thanks for reading!


Read More

Open Mic: What Time of Day Do You Produce Music?

Are you an early bird or late night owl – or just can’t stop? What time of day do you do most of your music production?

Each week we open our mic to readers and lurkers alike to come out of the woodwork and tell us your thoughts and opinion, your experiences and mistakes, what you love and what you hate. We want to hear from you, and here’s your chance.


Read More

Seo / Link Building

Hello,

I need a Search Engine Optimisation SPECIALIST to rank my (.org) website.

It’s in a very competitive market which is finance- personal loans. My site is for UK visitors so everything has to be targeted for the UK.

I need a very cheap and cost effective solution, above all it has to be good quality. For link building it has to be PR5 or above.

Budget it low thus you have to be reasonable in price.

Thank you.

Logo Redesign Businesscards And Stationary

Hi creative designers

I want to spice up my logo
Can you give it a stylish, attractive 3d look and feel. The colour scheme stays but you can ad any grey, chrome of carbon look to it. I want revisions till 100 pro cent satisfaction.
the budget is 30 dollar. If you can make a creative and fresh business card (front and backside) stationary and envelope design to go with it you get an extra 30.
fast delivery gets a bonus. 20 dollar if you deliver within 5 days. Making the total budget 80