An Overview of the CAGED System

The CAGED system is a very large yet simple step in the right direction for the guitarist of any level. It teaches things as basic as understanding the fretboard, all the way to understanding and playing different modes. If you want to learn to solo like your favorite guitarist, it starts right here.


Step 1: Form C

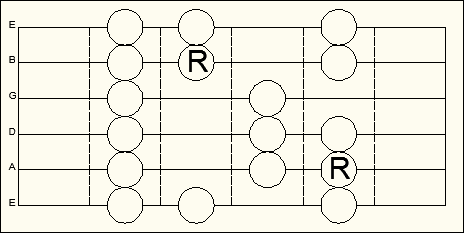
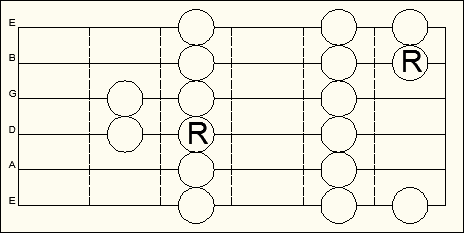
Form C will be the first pattern that we investigate. Following the diagram is quite simple: start at the lowest root note (labeled “R”), play up the scale past the next root, all the way to the top of the pattern, then start descending. When you descend, play the scale all the way past the first root, down to the bottom of the pattern, then go back up the pattern and stop at the root note that you started with.

For the sake of convenience, this entire tutorial will be based on the key of D major. Just to clarify, the form IS called Form C, even though its in the key of D. The reason it is called Form C is that if you slide the pattern down to open position, you will see the open C major chord in the pattern.

Anyway, now that we have established that we are playing in D major, it is obvious that the root note must be D. For this pattern, start with your fourth finger (pinky) on the fifth fret of the A string.

Download audio file (Form C.mp3)


Step 2: Form A

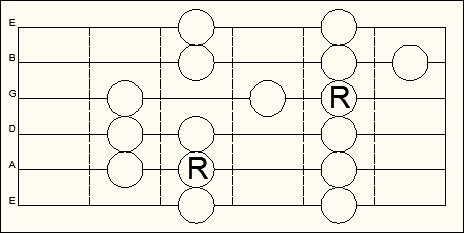
Form A, like Form C, will start on the fifth fret of the A string. With Form A, however, you start with your second (middle) finger. It is called Form A because if you shift it down to open position, you can see the open A major chord in the pattern.

Learning this pattern is slightly more tricky than Form C because a shift is required when moving from the G string to the B string. So, start at the bottom root note, and work your way up the pattern. When you play the notes on the G string, you will use your first (index) finger, your third (ring) finger, and your fourth (pinky) finger. You will then shift up a fret by using your index finger on the next note. Once you reach the top of the pattern, start descending.

On the B string, you will use your fourth finger, third finger, and first finger, and then use your pinky on the first note you play on the G string in order to shift back down a fret. From there, play the rest of the pattern all the way to the bottom, and then back up to the root.

Download audio file (Form A.mp3)


Step 3: Form G

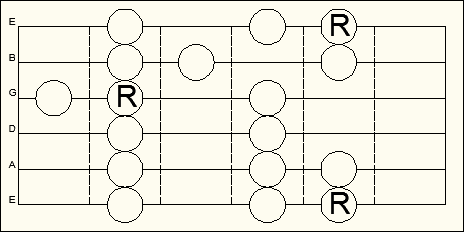
Form G is possibly the most difficult pattern in the CAGED system. It has not only one shift, but two shifts: both down a fret and up a fret. You start it with your fourth (pinky) finger on the tenth fret of the low E string. The notes on the D string will be played with your first (index) finger and your fourth (pinky) finger in order to shift down a fret on the next string.

The G string is the only one string that is shifted down a fret, so in order to shift back up a fret on the B string, you will play the notes on the G string with your first (index), second (middle), and fourth (pinky) fingers. The first note on the B string will be played with your first (index) finger. Once you reach the top of the pattern, start descending. Descending from the B string to the G string entails using your fourth (pinky) finger on the first note of the G string.

After playing the third note on the G string with your first (index) finger, use your fourth finger and first finger on the D string. Start descending on the A string with your fourth finger. Play to the bottom of the pattern, and back up to the root.

Download audio file (Form G.mp3)


Step 4: Form E

Form E is probably the most basic pattern due to the fact that there are no shifts. It starts with your second finger on the tenth fret. Quite simply, make your way up to the top, and come back down, then up to the root.

Just in case your not sure, the notes on the B string are supposed to be played with your second and fourth finger, and NOT your first and third or first and fourth. By using your second and fourth fingers, you will be disciplining yourself and teaching yourself to use a finger pattern that is not as easy or comfortable, thus making you more flexible and dextrous as you practice it.

Download audio file (Form E.mp3)


Step 5: Form D

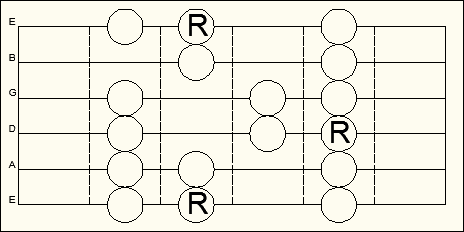
The D form is the fifth and final major scale pattern in the CAGED system. Like the G form, it too shifts both down a fret and up a fret. Unlike any other form, however, it starts on the D string.

The first note of this pattern is to be played with your second finger on the seventh fret of the D string. After you play the third note on the G string, shift up and play the first note on the B string with your first finger. Play the rest of the scale up and then start descending.

After playing the third note down on the B string, play the top note of the G string with your index finger. Play the notes on the G and the D string. In order to shift down a fret, you will play the notes on the A string with your fourth and first finger, and then you’ll play the first note on the E string with your pinky. Play the notes on the E string, and go back up to the root, but remember that the A string notes are to be played with the first and fourth fingers in order to shift.

Download audio file (Form D.mp3)


Conclusion

You now know all five major scale patterns! These patterns allow you to play all over the fretboard, and as long as you remember which pattern you’re in, you’ll never hit a wrong note! Although you know these patterns, there is still much more to learn, such as comprehensive scales and modes. Even though this is only the beginning of a long process, it is still a HUGE step forward. Good luck!


{excerpt}
Read More

Workshop #221: Epic Heart by Hiko Chase

This track has been submitted for your friendly, constructive criticism. What useful feedback can you give the artist? The floor is yours to talk about the track and how they can fix problems in and improve upon the mix and the song.

Download audio file (182EPICHEART.mp3)

Description of the track:

Emotional climax, epic feelings.

Artist’s website: www.trueheromusic.com

Terms of Use: This track is available for download.

Have a listen to the track and offer your constructive criticism for this Workshop in the comments section.

  • Do you enjoy the song or track itself? Does it have potential?
  • Can the arrangement be improved?
  • How did you find the mix? What would you do differently?
  • What do you enjoy about the rhythm track? What can be done to improve it?
  • Is the choice of instruments relevant and effective for the style/song?
  • Are the lyrics (if any) effective? Does the style, arrangement and genre of the song suit them?
  • Can you suggest any specific techniques that might improve the track?
  • Do you have any other constructive feedback?

Need constructive criticism on your own tracks? Submit them for a workshop using this form. Most but not all submissions are published. There may be a wait of up to two months.


{excerpt}
Read More

Marketplaces Exceed 1,000,000 Members: Infographic!

Hey folks! I’m Jordan McNamara, the Community Manager for Envato and I wanted to share some exciting news with you about the Envato Marketplaces.

The 12th of September was an exciting day for me as a member of our thriving Marketplace community. I along with everyone here at Envato HQ watched eagerly as the global Marketplace member count steadily grew higher and higher and higher…

We were close, very close to the 1,000,000 member milestone. With every page refresh the count grew higher and I began to reflect on just how staggering having 1,000,000 members really is and on just what a fantastic community everyone has helped to build here.

I remember starting at Envato in 2009 and being blown away by the 250,000 or so accounts that were registered at the time. I bragged to all of my friends “Can you believe there’s a quarter of a million members!?”. Little did I know in just under two and a half years I would be writing this post!


View the Infographic!

To celebrate this exciting occasion we wanted to do something interesting and fun that celebrates the Marketplace community and the sites themselves. So with that in mind, we are proud to present the 1,000,000 Members Infographic! We’ve packed it full of fascinating facts and data about our members and our nine Marketplaces.

Click to Jump to the Infographic!

Every day we continue to be amazed at the astonishing speed our community of creative members grows. We’ve enjoyed every minute of the journey and are proud and thankful of the achievements our members have made. Here’s to the next million!

View the Infographic!


{excerpt}
Read More

The Complete Social Media Strategy for the Musician and Engineer Part 2

Creating a web presence is one of the most important marketing tool a band has. Today our fans aren’t local, they can be all around the world, loving your particular niche of music. By having a solid web presence you can reach those fans that would never have heard of you.

Last time we left off we had installed a WordPress website on your own domain, and we had created all the necessary pages that a website should have. If you missed the first part, check it out here.

Now we’ll be looking into making your e-mail account look professional, as well as setting up all the must-have social media accounts.


Step 1 – E-mail

Having your own domain has its benefits when it comes to e-mail. You can make your e-mail look professional by adding your domain name to it, but the downside is that most host e-mail sucks. Luckily, we can use your domain name in your e-mail address while still using a good e-mail client. I don’t understand anybody that doesn’t use Gmail, because it’s the most convenient and intuitive e-mail program you can use.

If you already have a Gmail account you can easily hook a new e-mail address to it. No need to create a new account or log into separate accounts, just add your band or studio account to your personal account in the Mail Settings.

First thing you do is you click “Add another email address you own”, and it takes you to a new window where you put in the email information from your new email address and then you just follow the simple steps until the end. After you do this you will get a confirmation email from Google to your new account with a confirmation code number that you put into the window at the end of the aforementioned window. Simply follow the directions in the Google emails and you should be all set. They’re pretty good at explaining everything you need to do.

Now you need to add the Pop3 email account so that you can check the mail on your server. Because the email you get to your band account doesn’t go automatically to Gmail, you need a way to tell Gmail that it needs to check an external server for mail as well. Like before, it’s pretty straightforward if you just follow the steps.

Make sure you tick the Label Incoming Messages box so that you can keep track of which e-mails are which. It’s easier to keep track of.

Now we should have a working email address hooked to Gmail, making everything easy to track but also professional on the outside. [email protected] looks much cooler than [email protected], or even [email protected]. That’s why we connect them, because if you have a domain already there’s no reason you can’t have a professional looking email.

[Editor’s note: Alternatively, you can have Gmail look after the e-mail for your domain by setting up a Google Apps account.]


Step 2 – Social Media Accounts

Depending on your needs, some social media accounts are more useful than others. However, in a musical context there are three that you should really focus on: ReverbNation, Facebook, and Twitter.

ReverbNation

Reverbnation is the hub for online music presence. Myspace is dead and Reverbnation is its rightful heir in the music realm. Not only does it offer you a whole plethora of possibilities to set up your music profile and market it, but it also links to both Facebook and Twitter. This makes Reverbnation a really streamlined hub for all your social media activities. Bobby Owsinski recently published an interesting post about the Promote It tool in Reverbnation and how to use it.

Reverbnation is really the hub where you can sync everything up, so even if you don’t create your webpage and get your domain, having a Reverbnation account is definitely one of the more important social media steps you should take. However, having a separate domain and site that’s run solely by you is, and should be, on your list of priorities.

Attention: Don’t post a lot of pictures at the same time on Reverbnation if you have it hooked up to your Facebook or Twitter. Because every time you upload a picture it will update your Facebook status. So if you’re uploading 20 awesome pictures from a gig it will completely spam the newsfeed of all of your fans, which you should never do. I have done it, and I learned it the hard way. With a lot of apologies.

Facebook

Facebook is great for connecting to fans, and if you are a studio it’s a great way to showcase your business and your client’s work. Posting pictures, stories and small notes on your Facebook page is much better than mindlessly posting your rates or deals that you’re offering. If you look at Facebook more like a hangout instead of a one way tunnel for your marketing spiel then you’ll definitely do better. I don’t really use my Facebook to its utmost advantage but I still try to connect to everyone who asks a question or posts a comment.

Attention: Make the most of your friends and family to begin with, because you’ll need 25 fans to get an actual Facebook domain. A Facebook domain is a must, and it just goes back to the email section. You want to look like you’re serious, and an unrecognizable Facebook username is not going to cut it. If you’re having trouble, there’s nothing wrong with soliciting your friends to like your band. They should like you anyway right?

Rockable Press has an amazing book, Successful Facebook Marketing that touches upon many of the successful tactics you can use in order to get more exposure on Facebook. Whether you’re a musician, a home recordist or a commercial studio, you can definitely learn tricks from this book.

Twitter

Twitter is a great social networking tool for bands as well as recording engineers. You can easily create pretty good relationships, and it’s easy to find likeminded people to follow. I use Twitter a lot as a blogger, and equally so when I was promoting band related stuff. Like the Facebook account, I hooked Twitter up to my band’s Reverbnation page and sent out updates of shows, photos and other music related material out from Reverbnation.

Use hashtags for the city you are in, and look for other bands and accounts that are in your local area. This is great when you’re promoting a show and you’ve established a relationship with a big local Twitterer. For instance, @tucsonnightout was really good about retweeting all of my shows to the greater Tucson area, hopefully generating some buzz and greater outreach than my very new Twitter account that I had just set up. Twitter takes a little time to get useful, but once you’ve got followers you can really get a return on effort.

YouTube

Youtube is a great social networking tool if you like creating music videos or recording yourself live. The band 1860 used Youtube to great success when they were starting out. They basically recorded a bunch of their songs as they were being born during practice and uploaded them to Youtube for everyone to watch. This gave the fans an interesting way of following the evolution of a band they liked. Many people are perfectionists and don’t like uploading or publishing anything unless it’s studio quality stuff, but sometimes posting works in progress and song ideas can be very beneficial for a band.


Conclusion

If you follow the steps in these past two tutorials, you’re well on your way to having a formidable web presence. However, don’t expect that just because you’ve set everything up, people are going to come rushing to your website and listening to your songs.

It takes time to gather a following, and getting actual true fans can be difficult. But doing so on the web isn’t nearly as difficult as the old way of playing shows every night and having one on one conversations with fans. You have a bigger reach now, and a voice that can be heard all around the world. Use it to your advantage.


{excerpt}
Read More

Photo Effects Week: Create a Fantasy Miniature World in Photoshop

This week we are celebrating the launch of PhotoDune, Envato’s new stock photography website with a series of photo effect and photo manipulation tutorials that showcase the images from our new marketplace. In this tutorial we’ll demonstrate how to create a miniature world using some interesting techniques. Many of the photos used in this tutorial are available for free for Psd Premium Members. Let’s get started!


Tutorial Assets

The following assets were used during the production of this tutorial. We have granted a complimentary personal license for some of the assets to Psd Premium Members for the stock photos used in this tutorial. The images can only be used for the purpose of this tutorial and they can be accessed in the source files of your premium download. If you are not a premium member, you can download the images used in this tutorial below.


Step 1

Create a new Photoshop document with 3000×1900 pixel resolution. With the Rectangle Shape Tool (U) draw a shape like this.


Step 2

Create a new shape below the first one with the Pen Tool (P). Then duplicate the shape and reflect it horizontally.


Step 3

Place the Grass texture inside the document with File > Places command (this will place the grass as a Smart Object). Set the grass layer as a Clipping Mask by clicking on the separation line between the shape layer and the grass texture while holding the Alt key. Decrease the texture dimension with Cmd/Ctrl + T. If needed duplicate the grass layer to fill the shape entirely. Finally add an Unsharp Mask (Filter > Sharpen > Unsharp Mask) filter to the grass using a small Radius and an high Amount.


Step 4

Add a Hue/Saturation Layer Adjustment to boost the green colors with the saturation slider. Create a group for the top parts and apply a Layer Mask by loading the selection from the shape top layer, simply click on the layer’s thumbnails in the Layer Palette. With a small brush paint black inside to hide the upper straight lines, this will create a nice grass effect.


Step 5

Repeat the steps 3-4 for the lower shapes, this time use the Soil Texture and hide the lower parts. You have to separate the left part from the right part. Tip: organize your layers in group is the best option.


Step 6

In a separate blank layer, select a light brown color and paint with a small hard brush inside the soil texture to create some roots. Set the layer blending mode to Color Dodge. I also created a divider between the two sides.


Step 7

With a soft brush I painted lights and shadows using respectively white and black color. I created a new layer for each part.


Step 8

Create a new layer and fill it with white. Now in the menu, 3D > New Shape for Layer > Sphere to create a 3D shape, alter the sphere dimension to fit the base layer and finally rasterize it. Double-click on the layer in Layers Palette and set the Blending If propriety as below. Duplicate the sphere layer and set the blending mode of the copied one to Color Burn with 70% opacity.


Step 9

Create a black ellipse shape a apply a Gaussian Blur filter. Set the blending mode to Soft Light and the opacity to 80%. Put this layer above the sphere layers. I created another layer to add a white light spot on the top part of the sphere.


Step 10

Add a Hue/Saturation Layer Adjustment to simulate the water color, decrease the opacity to 60%, use a Layer Mask to apply this only to the sphere. Then create a black circular shape as below and set the blending mode to Overlay.


Step 11

Do add more depth to the water add a new layer and fill it with gray. Next go to Filter > Render > Clouds. Apply a Layer Mask to this layer and set the blending mode to Soft Light with 80% opacity. Try to decrease the layer dimension to achieve a different result, but remember to unlink the Layer Mask before.


Step 12

In a new layer paint some black in the bottom part of the sphere, set the Blending Mode to Soft Light an Opacity to 60%. As you can see, It’s time to hide the top part of the sphere with a Layer Mask in the Sphere layers.


Step 13

The next step is to create the sphere shadow. Simply use the Ellipse Tool (U) to draw a circular black shape and select a 60% opacity value, then blur the shape. Also notice that I add a little white spot inside the sphere, just paint some white color inside a new layer.


Step 14

Place the Jellyfish image inside the document, and open up the .psb associated file by clicking in the layer’s thumbnail in the Layer Palette. You can do this only if you place the image as a Smart Object Layer. Next press Cmd/Ctrl + I to invert the image and Cmd/Ctrl + Shift + U to desaturate. Save and close the .psd file. Set the jellyfish layer to Darken. Finally duplicate it and set the blending mode to Color Burn at 20% opacity.


Step 15

With the Stamp Tool (S) clone in a new layer part of the grass to hide the lower part of the sphere.


Step 16

Draw a circle with the Ellipse Tool (U) using a gray color. Apply this Layer Style and set the blending mode to Overlay at 20% opacity. Rasterize the layer and press Cmd/Ctrl + I to invert it.


Step 17

In the next step we’ll add some decoration to the base layer. Insert the garden image, and select part of the purple flowers, apply a Layer Mask to show only that part. Refine the mask border by painting with a small brush. Next add an Unsharp Mask filter to the flowers with a low radius and an high Amount.


Step 18

Repeat the step 17, place the flowers in different place, and if you want, change the flowers color with a Hue/Saturation Layer Adjustment applied as a Clipping Mask.


Step 19

You have to do the same process for mushrooms and pebbles. Use the image below as a reference.


Step 20

Basically the same things have to be repeated with the ship. But you’ll need to alter it’s shape with Cmd/Ctrl + T.


Step 21

I added a shadow to the ship and placed the little bottle. I added a light blue background too.


Step 22

Open the Air-balloon image, and make a selection of a balloon with the Quick Selection Tool (W), the with the Move Tool (V) Drag&Drop the balloon inside the project document and convert the layer into a Smart Object. Add a Hue/Saturation Layer Adjustment as a Clipping mask to boost the color and an Unsharp Mask Filter to boost details.


Step 23

Select another balloon from the image and repeat the step 22. Try to respect the light source orientation of the balloon. Moreover the second balloon will cast a shadow on the drop. So you have to draw it, into a new layer.


Step 24

It’s time to make the clouds. There are many methods to do it. The easiest one is to create a new blank layer and paint with a black soft brush with an opacity of 20%. You can use the Dodge and Burn Tool to refine the clouds lighting and the Smudge Tool to refine the shapes.


Step 25

Open the birds image and select the birds with the Quick Selection Tool. Put them in random order above the drop.


Step 26

Place the plane image inside the document and repeat the Step 3.


Step 27

With the Pen Tool (P) draw a shape like below and add the following Layer Style.


Step 28

In a new layer paint with a small brush the little cords between the plane and the banner.


Step 29

I added a text to the banner.


Step 30

And finally I added a shadow to the base layer.


Final Image


{excerpt}
Read More

Color Correcting Photographs Using the Curves Adjustment

There are a number of ways that you can color correct an image in Photoshop. The method that we are going to be demonstrating in this tutorial is through the use of a curves adjustment layer. Some of the advantages of using a curves adjustment layer for this type of correction is that the image file size is minimally impacted and you can easily go back at anytime to modify your adjustments if your not satisfied with the results. Let’s get started!


{excerpt}
Read More

Need 1k FB fans from Spain (10/26/2011) by nativepro

I need 1000 Spain fans/likes added to a Facebook page. Fans must be 100% from Spain only – no other countries mixed in. Must be real, active FB users. No fake profiles! This is a confidential project, and you must keep the url of the fan page private even after the job has been completed… (Budget: $30-$250 USD, Jobs: Facebook)


desenvolvedor web PHP/CakePHP by ricardocouto

Preciso de um programador PHP que trabalhe com o framework CakePHP e que fale português, pois todo o sistema é em português e não há motivos para ser em outra língua. Atualmente existe um projeto que preciso de grande dedicação, mas existem outros projetos… (Budget: $5-$30 USD, Jobs: AJAX, CakePHP, MySQL, PHP, Software Architecture)