Changing WordPress Theme

Need to fix theme of ihowto.com

– design should be clean and similar to http://www.ehow.com/ehow-money/

-we need all the details of the theme to be active , like wp robot which is insalled but have to be well set up

– Add Ipad , Iphone , Apple Tv , Best Lists

-need complete ad management for the site

– in navigation , we need to add these cateogries and sub cats

Financial

– how to make money online
– how to trade stocks
– how to trade options
– how to trade fore…

Aetuts+ Hollywood Movie Title Series – Sherlock Holmes

This entry is part 26 of 26 in the series Hollywood Movie Titles

In today’s tutorial we’ll be making the Sherlock Holmes 2 intro title animation. In the first part, we’ll be in Cinema 4d where we’ll create and animate the logo, lights and materials. From there, our second part will be spent in After Effects compositing all the elements we’ve created together and doing a final color correction pass to complete our project.


Tutorial

Download Tutorial .mov

File size: 342.5 MB


{excerpt}
Read More

Quick Tip: How to Create a Cute Cartoon Dinosaur


This Quick Tip will show you how to create a cartoon dino using only basic shapes like rectangles and circles. This is a step-by-step tutorial for beginners. The icons from the inkscape toolbar are added to the images to make it easier to find the tool and function I am describing in the text. Let’s get started!

Continue reading “Quick Tip: How to Create a Cute Cartoon Dinosaur”

Create a Mosaic Portrait Using Adobe Illustrator and Scriptographer Plug-in


In today’s tutorial we will learn how to create a vector mosaic from a raster image using a Scriptographer plug-in, which allow us to widen the standard functions of Adobe Illustrator. To create a vector portrait we will use the scripts developed by Russian designer Vladimir Seregin.

Continue reading “Create a Mosaic Portrait Using Adobe Illustrator and Scriptographer Plug-in”

An Introduction to FL Studio’s Mixer

You heard of FL Studio and how it is an awesome sequencing program so you decided to take the plunge and buy it. You fire it up and realize, “I have no idea where anything is or how it works.” Well thankfully for you my friend we are going to cover the FL Studio’s mixer from head to toe and to operate it with lightning speed! If you are ready to get mixing then dive on in!


The Mixer Window

Before we can begin to tackle the ins and outs of the mixer (literally), we first need a good understanding of the mixer’s layout and how the different sections function. What we need is a map. However, a map doesn’t do us much good if we don’t know where to find it in the first place! Here are two simple ways to access the mixer inside FL Studio…

  • The easiest way to access the mixer is by pressing the shortcut F9. This will hide and show the mixer from its last location on the screen.
  • If you are more of a button person, simply click the mixer icon on the tool bar at the top of the screen.

Now that we have the mixer window available to use, lets briefly analyze the different major sections and get an idea of what they are all about…

  1. This is your master channel for FL Studio. Ultimately, all of your audio that you will pass through this fader before going to your speakers or headphones.
  2. These are your general workhorse channels inside FL Studio. Each of your instruments, synths, samples, etc. will most likely pass through one of these tracks. While I am only showing a few here, you can have up to 99 of these tracks in a given project.
  3. These are your auxiliary send tracks inside FL Studio. These tracks function almost exactly the same as your standard tracks except that they are meant specifically for either FX processing or additional audio outputs. Why you ask? One such example would be a reverb channel for your whole mix instead of having the same plugin on every single channel.
  4. This final section sort of the dynamic area of FL Studio’s mixer. As you select different channels this section will reflect more information about that channel such as effects, larger peak meter, etc.

With these larger sections in mind, lets delve deeper the working of the mixer.


Channel Features

What is nice about just any mixer is that once you understand how one channel works, you understand how they all work! Lets look at each function in a given channel and what it is they do…

  1. This is your generic mixer channel which has various tools to help you when you mix. Starting at the top we have a peak meter for volume, followed by a pan control; so far pretty generic. Next we have a mute switch represent by the little green light. However keep in mind while most DAWs have the mutes light up when active, FL Studio mutes are when the green light is off; think of it light a disarm more than a mute.

    Continuing down the line we have the volume fader, a stereo separation knob, phase invert, and stereo swap. The stereo separation knob can be used to either completely remove the center from your stereo image or to make the channel true mono. The phase invert and stereo swap obviously do as the names suggest.

    Finally at the bottom we have a few icons with one labeled FX, another showing a clock, and another a floppy disk. The FX icon when clicked on or off will turn off or on all the effects for that particular channel at once; this is useful if you want to temporarily disengage an entire FX chain. The clock icon will activate the delay compensation for that channel and finally the disk icon will arm that particular channel for audio recording.

  2. The IN section of your channel will choose which audio input from your sound card/interface you wish to record from if you are using microphones. You can choose either stereo inputs (say microphone 1 and 2) or simple mono inputs. The dialog will reflect the options available to your particular sound card/interface.
  3. These are your FX inserts for your selected channel. Simply clicking on the pull down box will reveal all the plugins you currently have loaded into FL Studio. At the end of each insert you have again the mute light with the addition of a mix knob. This knob will allow you to blend your FX with the original signal before going on to the next FX insert.
  4. Here we have a admittedly redundant section in FL Studios mixer. Aside from the nice addition of a parametric EQ we have the exact same controls as we did in section 1. The stereo separation, pan, phase, swap, delay compensation and channel gain controls are all here and if you move them here you will seem them move in section 1 as well.
  5. Finally we come to the output section of our selected channel. Usually this section is set to (none) in which case it will output to the master channel. However say your channel was meant to be a headphone send to an additional output on your interface, you could send it from here.

Hopefully now you have a much better grasp over what the functions of the mixer are and where they are located. However that is only half the battle as you now need to find a way to actually bring in a sound source to a mixer track. Lets look at how to do this as well as look at some internal routing quirks that FL Studio’s mixer has.


Mixer Routing

First and foremost we will need an audio source to route into our mixer. In FL Studio there are common two ways you can achieve this. Lets take a look at these two methods for routing audio into the mixer.

  • The quickest and flashiest method is to use the plugin picker to select your synth. To do this either click your center mouse button or press CTRL+F8 and you should see all your available plugins appear before you. Next simply select the plugin you wish and drop it on a mixer track. This will then assign the synth to that particular mixer track as well as rename it and color the track.

  • Your alternate method is to manually load the synth and assign it to a channel. To do this, go to the step sequencer menu and right click one of the samplers, synths, etc. and select either insert or replace. From here you can choose your synth.

When you do this your synth should automatically feed itself into the master channel which of course is not what we want. To assign it to a different channel click the synth and you should see both the synth and a separate dialog box called Channel settings appear. In the top left corner there is a routing box labeled ‘FX’. Simply click and drag this box to choose between the various mixer tracks. Note however that the mixer tracks do not change name or color when you use this method so keep in mind where you are routing your audio to!

Now that we have our synth successfully routed into the mixer we can look at some of the internal routing in the mixer. As with the other feature of the mixer, once you understand how this works on one channel you can apply it to all the channels. So with that in mind let?s first see how exactly our mixer track is going to the master channel.

Select your synths mixer track and take note of the small downward yellow arrow towards the bottom of the channel. This indicates that the channel output is being sent somewhere inside the mixer. If you would then look over at your master channel (without unselecting your synth track!) you will see an upward yellow arrow with a gain knob. This is where your mixer track is being sent to and the gain knob controls how much of the signal is being passed on. If you have ever used an aux send in another DAW this is essentially the same function.

Generally speaking you will always want your tracks to send to the master channel except in cases where you want to send multiple tracks to a buss before they go onto the master. For the sake of example let’s see how we would buss multiple tracks to one track before going to the master.

  • With your synth track still selected you will notice the Send1,2,3,4 tracks also have gain knobs.
  • Turn off the master send gain (click the yellow arrow in the master channel) and turn up your synth tracks gain knob into Send1

What you essentially are doing is sending the output of your synth track to Send1, and then Send1 will go to the master channel. You might yourself be asking, “But why?” Well think of it this way. Say you have all your different drums each on their own separate track and your drum mix is perfect; except for the fact that it is too loud. Do you want to risk manually turning down every drum track proportionally? Or would you rather turn down your Drum Buss fader on Send1, which in turn will turn down the overall volume of every drum while leaving your drum mix itself untouched? Sounding pretty good right now isn’t it?

Finally lets look at one last related feature called side chaining. Side chaining a process by which we use one channels audio to control another channels plugins. If you have ever heard the pumping effect in a trance track then you have heard someone use side chaining. I won’t dive into specifics, but if you want a plugin to recognize another mixer track for a side chain here is what you do…

  • Select the track you wish to control the side chain plugin (our synth track for example).
  • Activate the send from your synth track into the channel with the side chaining plugin. To do this simply click the grayed out upward arrow on the destination track.
  • Next turn the gain knob on the destination track all the way to 0.

Now at first glance this may seem a little strange, especially if you are coming from a DAW such as Pro Tools. Essentially what we are doing is sending our track to another channel like normal, but we are turning the volume down to 0. In FL Studio, when the send gain is at 0 it treats it as a side chain instead. From here you should be able to select your Synth track inside a side chain plugin. Like I said earlier FL Studio has some odd quirks and this is by far one of the more prevalent ones.


Conclusion

So what have we learned? FL Studio’s mixer has a handy set of tools that are available on every track inside the mixer. The mixer does have some odd quirks on how it handles internal routing but it isn’t anything too far out of left field. Before I leave you I want to give you some general shortcuts particular to the mixer that may come in handy…

  • Alt + Left/Right – Moves the selected track, plugins, and routing either left or right by one track. Handy for reorganizing your mixer as your project gets more dense.
  • CTRL + L – Links your selected synth, sample, etc. to the selected mixer track. Avoids having to use the Channel Settings window.
  • F2 – Change selected tracks name and color.
  • S – Solo currently selected track.

Again I hope you can now easily navigate FL Studio’s mixer and will never have to worry about those things again. Thanks for reading!


{excerpt}
Read More

Open Mic: How Often Do You Visit Audiotuts+?

Each week we open our mic to readers and lurkers alike to come out of the woodwork and tell us your thoughts and opinion, your experiences and mistakes, what you love and what you hate. We want to hear from you, and here’s your chance.

Here’s a nice and simple question for you: How often do you visit us on Audiotuts+? We’re curious!


{excerpt}
Read More

Getting Started With Filter Forge 3.0

Photoshop’s default filters and effects don’t always give you the look and flexibility that you are looking for. Over the last several months, we have been introducing you to Filter Forge, a powerful third-party plugin that allows you to apply 4,000 amazing effects to your images, and even create your own. In this tutorial, we will explain how Filter Forge works and how you can get started with this fantastic plugin. Let’s get started!


To learn more about Filter Forge, you can visit their website, download the trial version of the software, or check out their filter gallery.

Editor’s note: This post was sponsored by Filter Forge.


{excerpt}
Read More

Create a Baseball-Inspired Text Effect in Photoshop

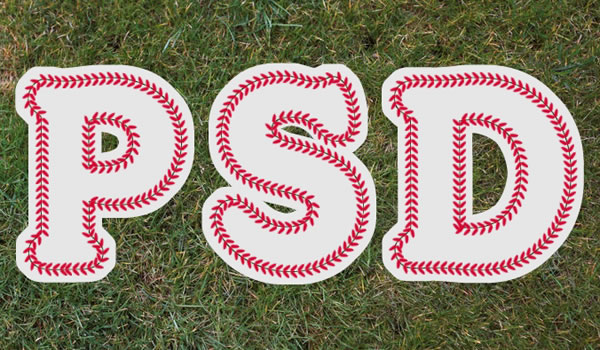
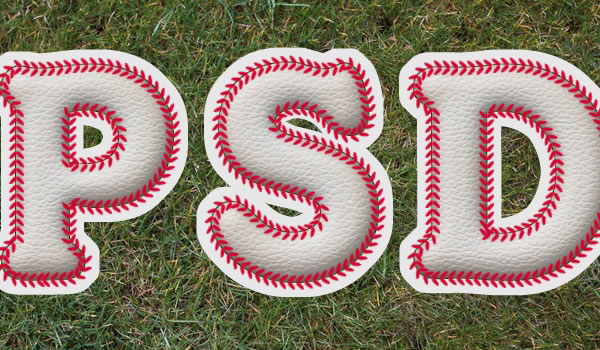
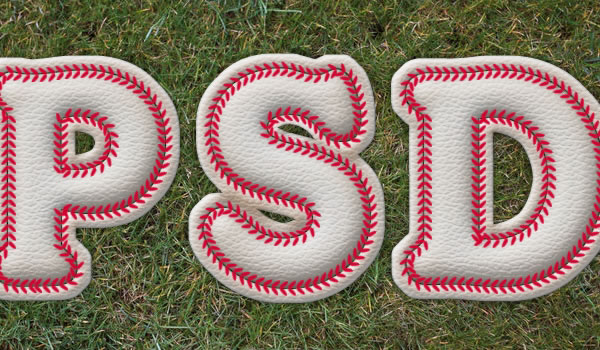
Applying texture to a text effect can be a lot of fun. In this tutorial we will explain how to create a baseball-inspired text effect using layer styles, patterns, and brushes. Let’s get started!


Tutorial Assets

The following assets were used during the production of this tutorial.


Step 1

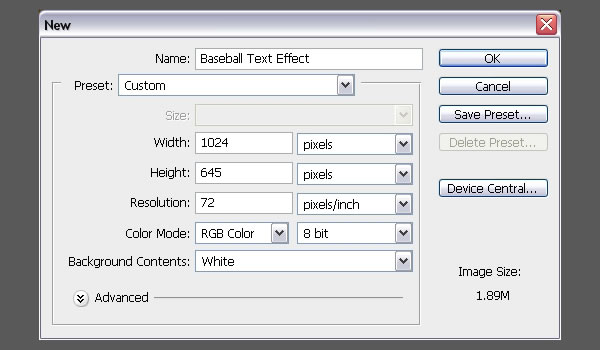
Create a new document that is 1024 x 645 px.

You can use any other values for the Height and Width depending on the text you are going to create.

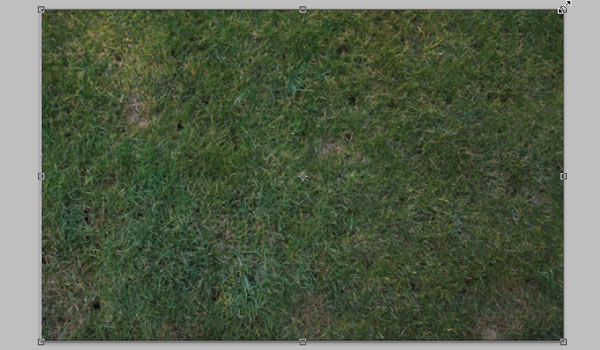
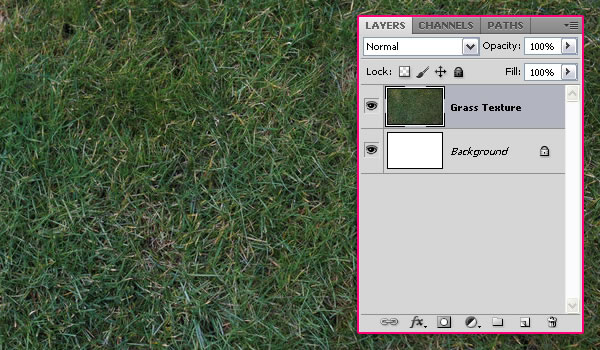
Download the Grass Texture 1, and place it on top of your “Background” layer, then resize it as needed.

Rename the layer to “Grass Texture”.


Step 2

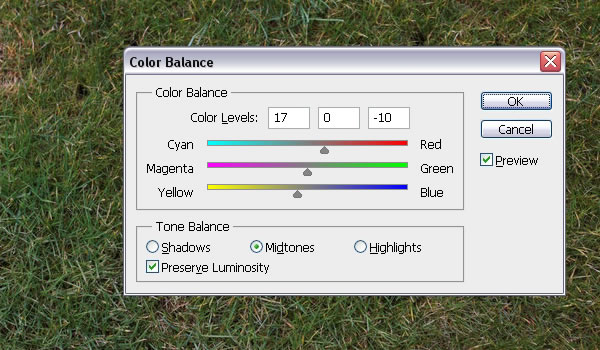
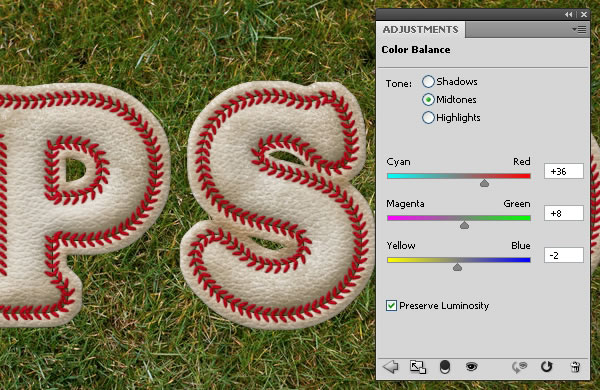
The grass colors are a bit dark and desaturated. To fix that, go to Image > Adjustments > Color Balance, make sure that Midtones is the active option under Tone Balance, then modify the values as shown below.

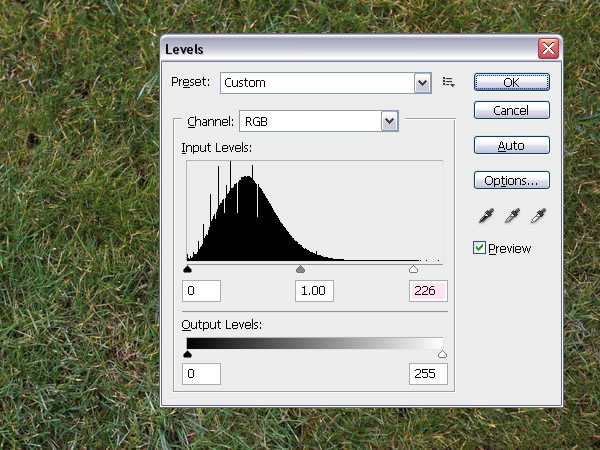
Go to Image > Adjustments > Levels, and change the Highlights value to 226. This will brighten up the texture a little bit. We will be using Adjustment Layers later, so that would be it for the grass texture for now.


Step 3

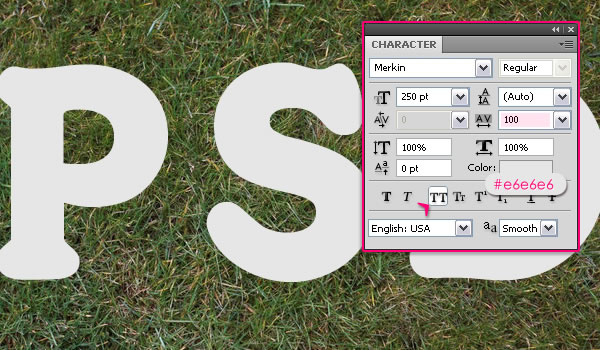
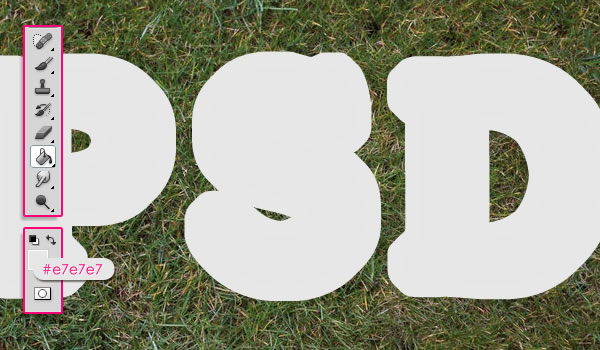
Create the text using the font Merkin. The color is #e6e6e6 and the Size is 250pt. Set the Tracking value to 100 to avoid overlapping, and click the All Caps icon.

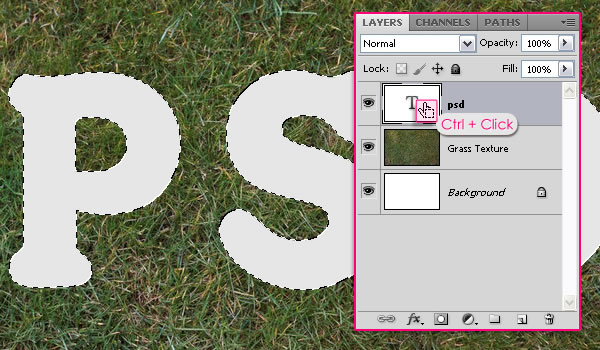
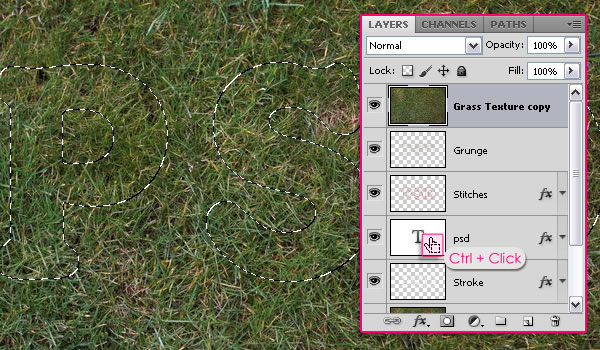
Press the Ctrl/Cmd key and click the text layer’s icon to create a selection.


Step 4

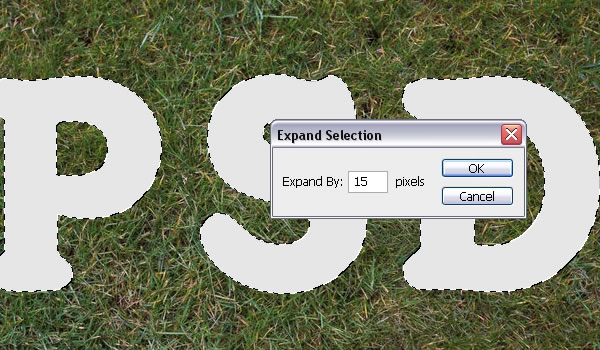
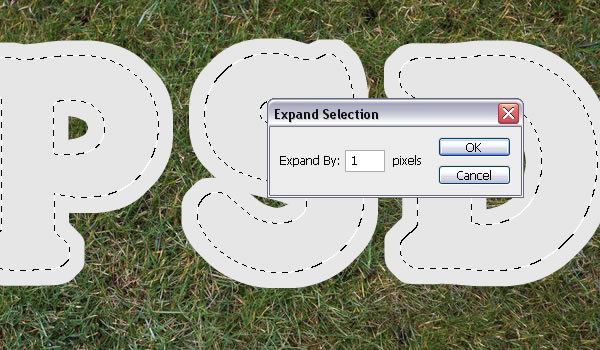
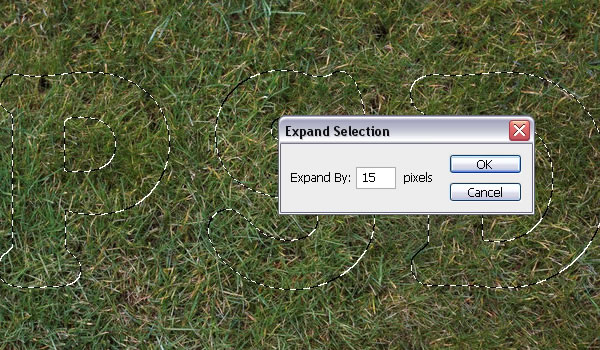
Go to Select > Modify > Expand, and type in 15. This will expand the selection 15 px outwards.

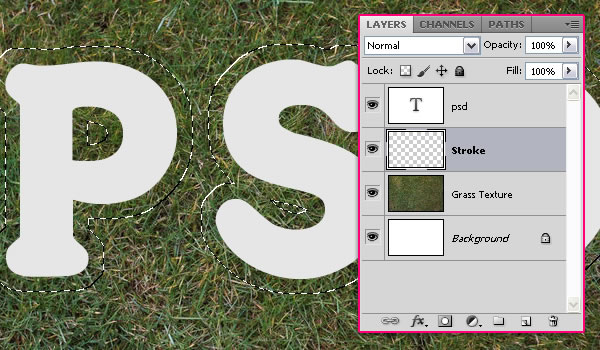
Create a new layer below the text layer and call it “Stroke”.

Set the Foreground color to #e7e7e7, and fill the selection with that color. You can go to Select > Deselect, or press Ctrl/Cmd + D to get rid of the selection.


Step 5

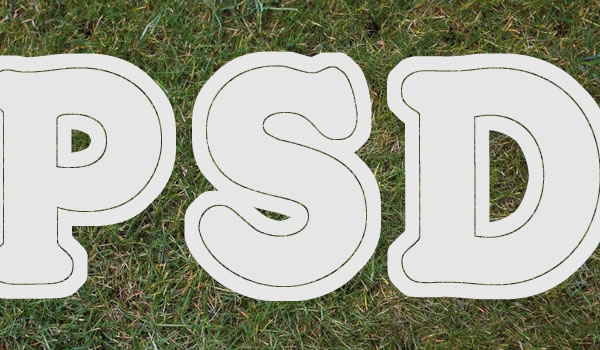
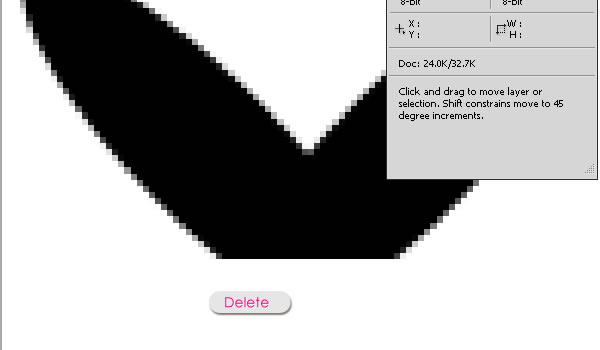
We are going to separate the stroke from the text. So Ctrl/Cmd + Click the text layer’s icon once again, then go to Select > Modify > Expand, and type in 1.

Make sure that the “Stroke” layer is active (selected), and hit Delete to get rid of the inner parts of the stroke.


Step 6

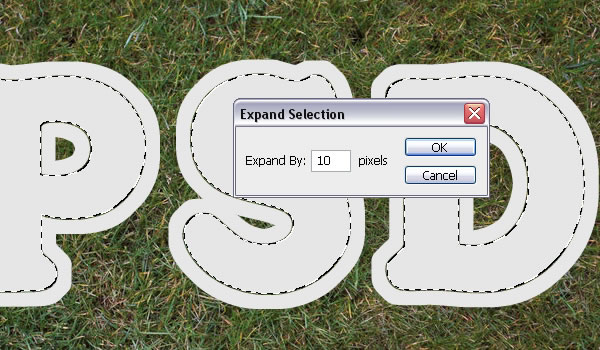
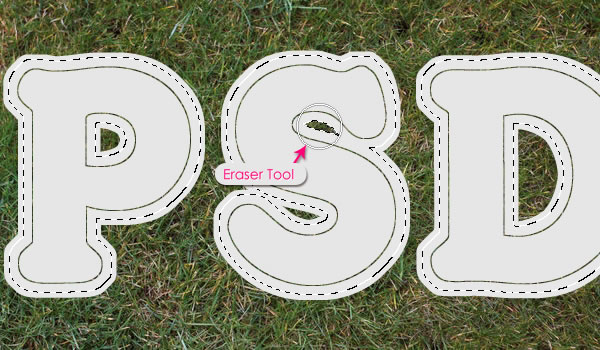
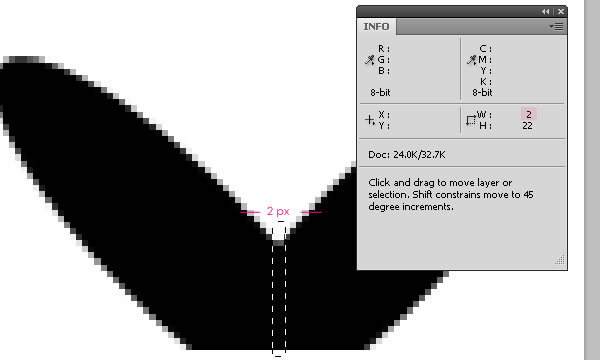
This is optional, but if you want to delete parts of the stroke that connect some edges of the letter to enhance the stroke, then you can use the Eraser Tool. OR, you can simply Ctrl/Cmd + Click the text layer’s icon to create a selection, then expand it (Select > Modify > Expand) in values that are less than 15. For example, the value 10 will be used here to enhance the stroke at the top of the letter S.

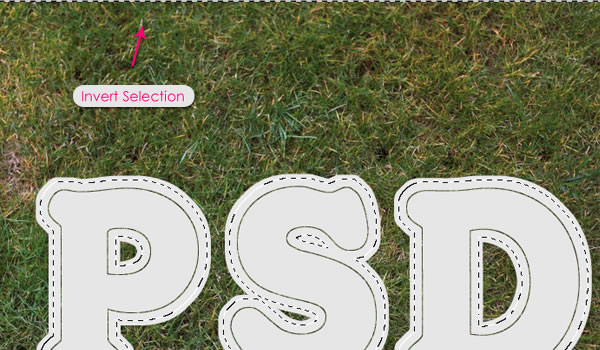
Go to Select > Inverse to invert the selection.

Use the Eraser Tool to remove the unwanted parts. This method gives the exact shape of the unwanted areas, instead of erasing it randomly. Of course, smaller “Expand” values enable you to erase larger areas, and vice versa.


Step 7

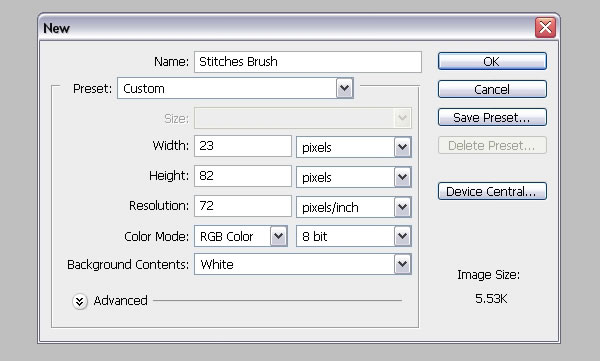
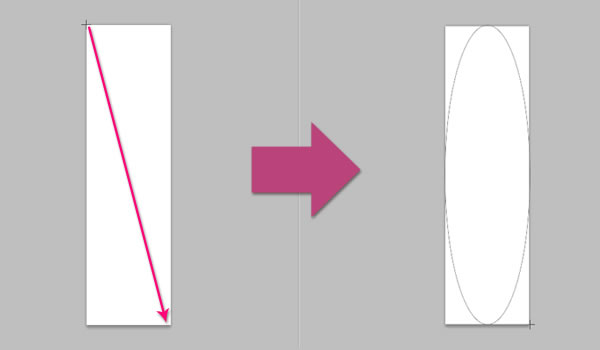
Now, it’s time to create the Stitches Brush. So go ahead and create a new 23 x 82 px.

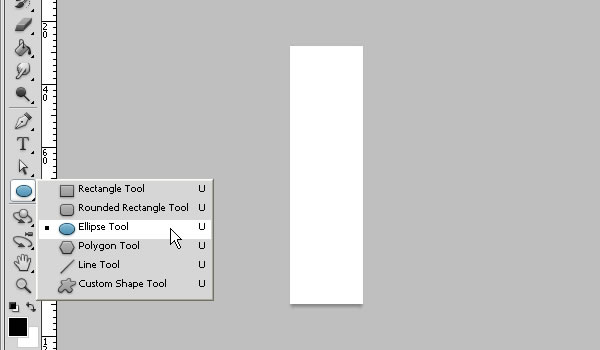
Pick the Ellipse Tool and set the Foreground color to Black.

Click on the top left corner of the document and drag to the lower right corner to create an ellipse.

Don’t worry if some edges of the ellipse do not appear, they will in the next step.

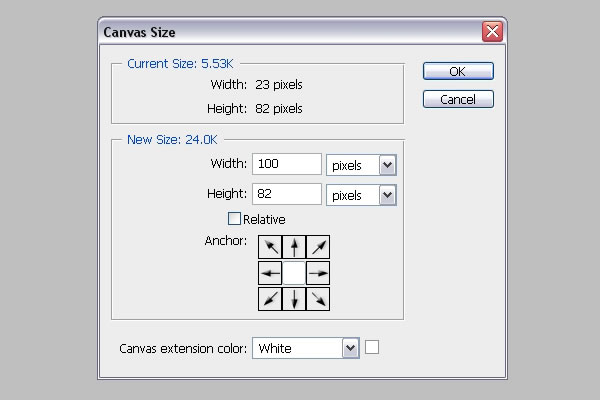
To show all the edges and continue creating the brush, go to Image > Canvas Size, and set the Width to 100 px.


Step 8

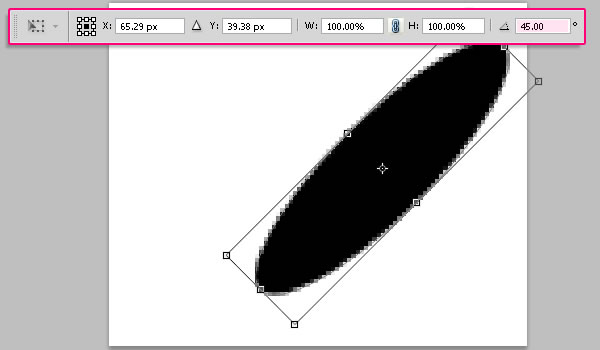
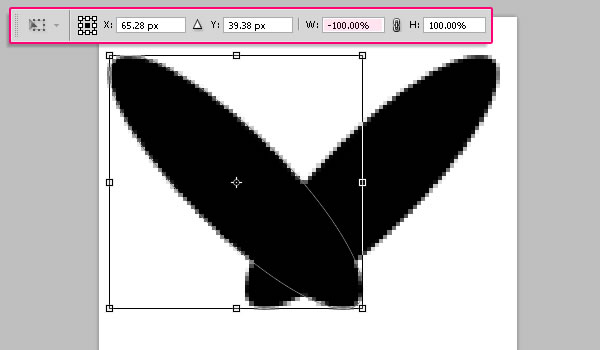
Press Ctrl/Cmd + T to enter the Free Transform Mode. Rotate the ellipse 45° clockwise. (You can type the value in the Rotate field in the Options bar at the top). Hit Enter/Return to accept and get out of the Free Transform Mode

Duplicate the ellipse shape layer, and press Ctrl/Cmd + T to free transform the copy.

Type -100% in the Width field (in the Options bar at the top) to flip the ellipse horizontally. Hit Enter/Return to accept.

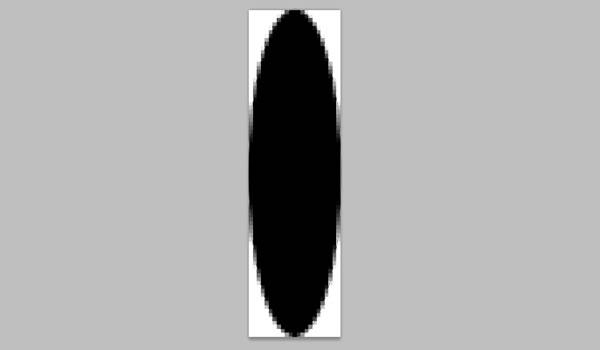
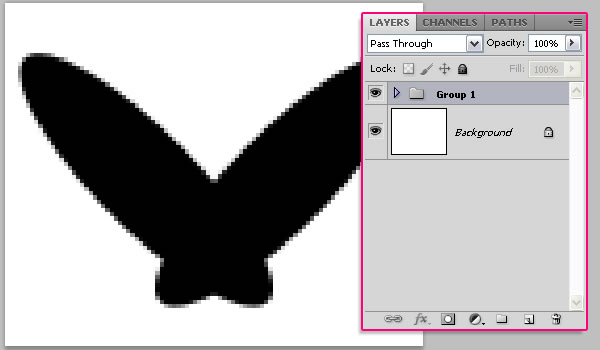
Next we are going to rasterize the two shape layers, but first, group them so that you’ll have the original layers available in case anything goes wrong after rasterizing.


Step 9

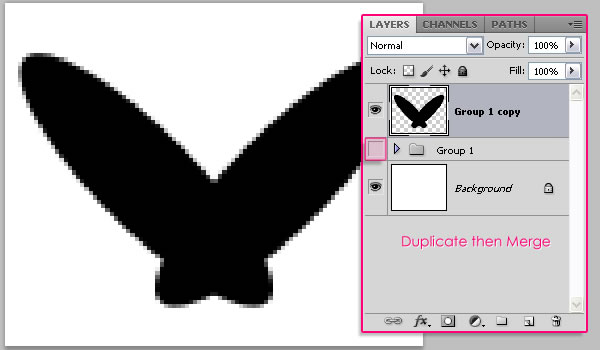
Duplicate the group, go to Layer > Merge Group, or press Ctrl/Cmd + E to merge the group layers and make the original group invisible by clicking the eye icon next to it. Now, both shape layers are rasterized and merged in one layer.

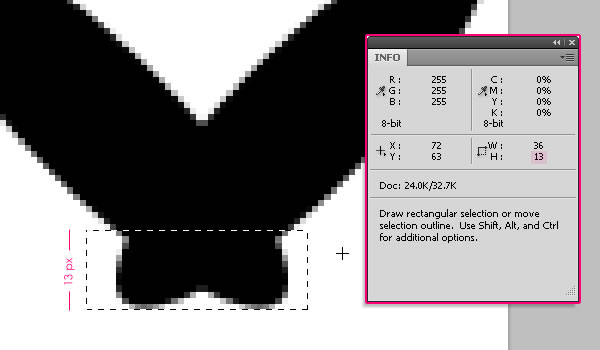
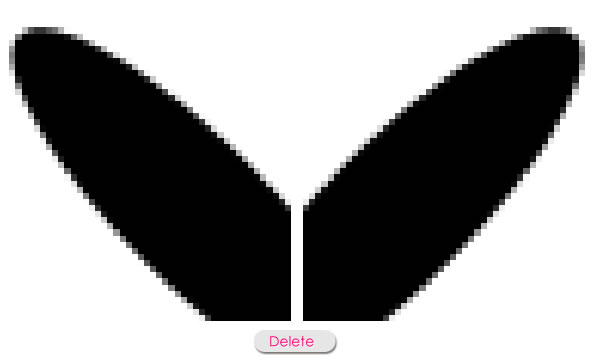
Use the Rectangular Marquee Tool to create a selection around the lower part of the stitch. The selection’s Height should be around 13 px, you can check that in the info panel (Window > Info).

Hit Delete to get rid of the selected part, and press Ctrl/Cmd + D to get rid of the selection.

Once again, use the Rectangular Marquee Tool to create a selection in the middle part of the stitch. The selection’s Width should be around 2 px.

Hit Delete and press Ctrl/Cmd + D.

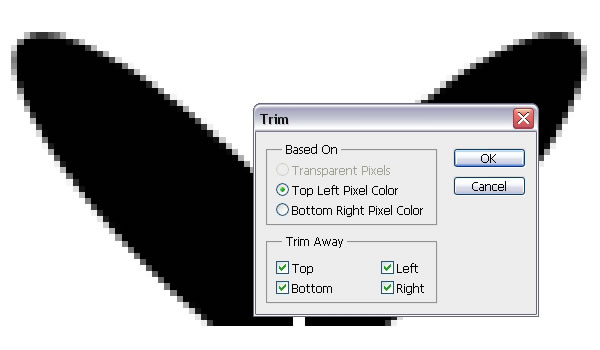
Go to Image > Trim and apply the values below. Once you click OK, the extra white space around the stitch will be removed. This helps define the brush’s size more precisely.

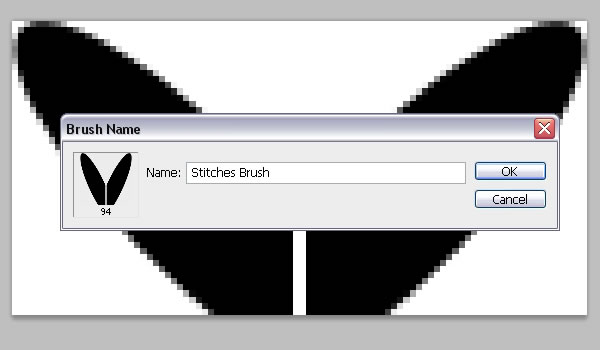
Finally, go to Edit > Define Brush Preset and type in a name for the brush. You can save the PSD file if you want as well.


Step 10

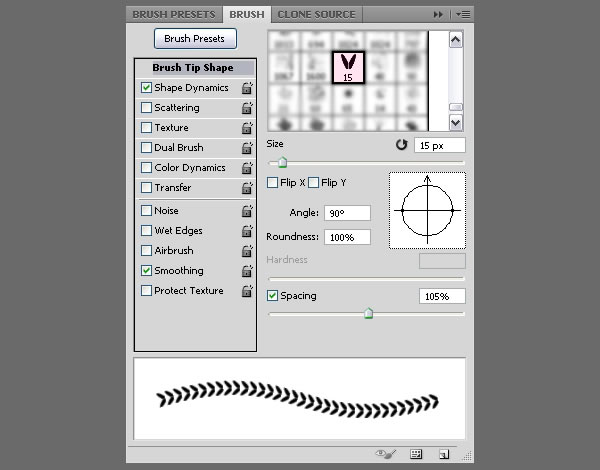
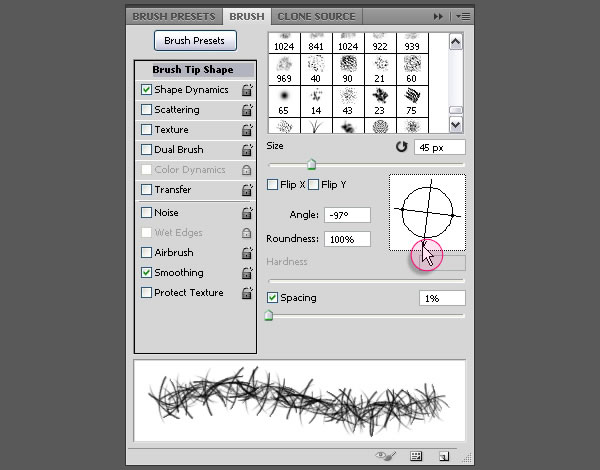
Back to the Original document, open the Brush panel (Window > Brush), and choose the “Stitches Brush” (it’ll probably have a size of something around 90 or 100 px). Change the settings under Brush Tip Shape as shown below, and make sure to change the Angle to 90°.

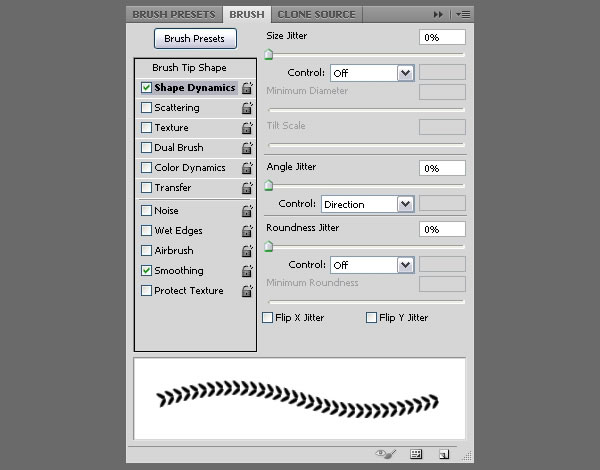
Change the settings under Shape Dynamics as shown below too, and make sure to choose Direction from the Control drop down menu under the Angle Jitter tab. This is important as it will make the stitches follow the direction of the text path instead of having the same angle everywhere.


Step 11

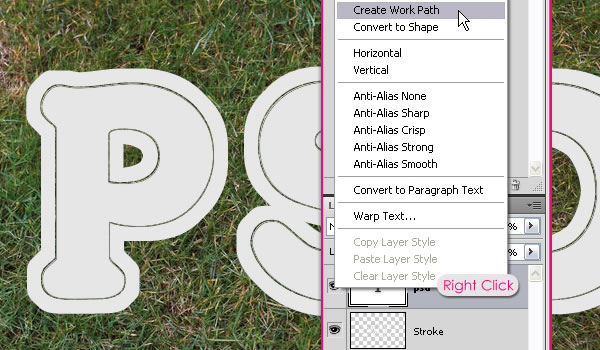
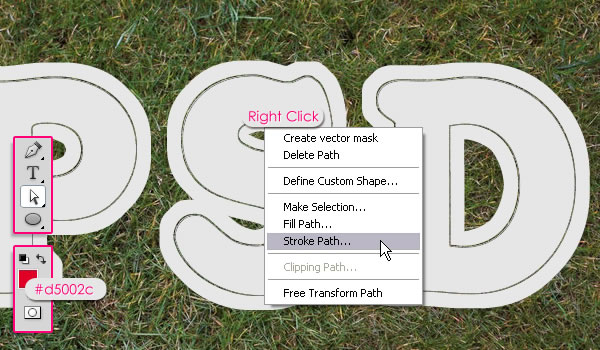
Right click the text layer and choose Create Work Path.

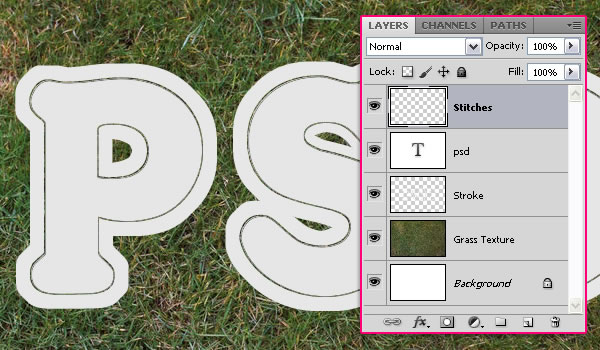
Create a new layer on top of all layers and call it “Stitches”.

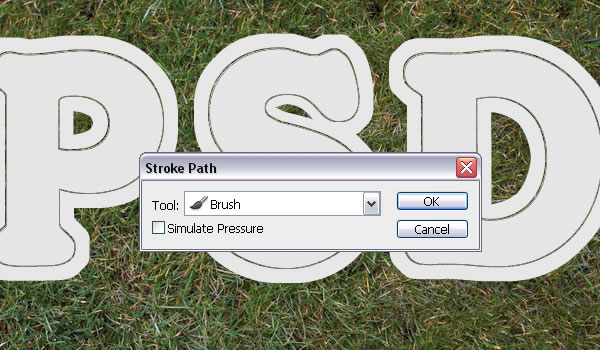
Set the Foreground color to #d5002c, pick the Direct Selection Tool, right click the path, and choose Stroke Path.

Choose Brush from the Tool drop down menu, and make sure that the Simulate Pressure Box is un-checked.

This will stroke the path with the stitches. Hit Enter/Return to get rid of the path.

Next, we are going to apply some Layer Styles.


Step 12

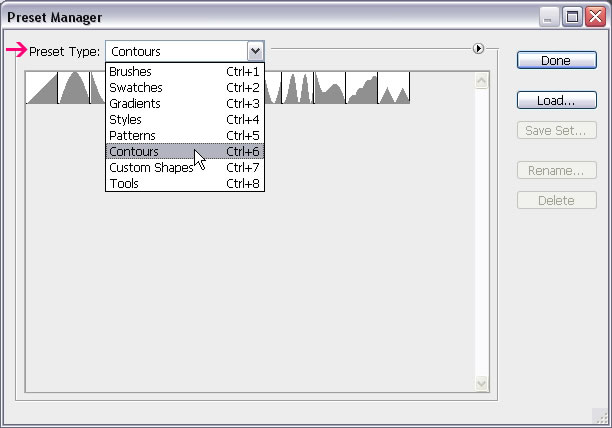
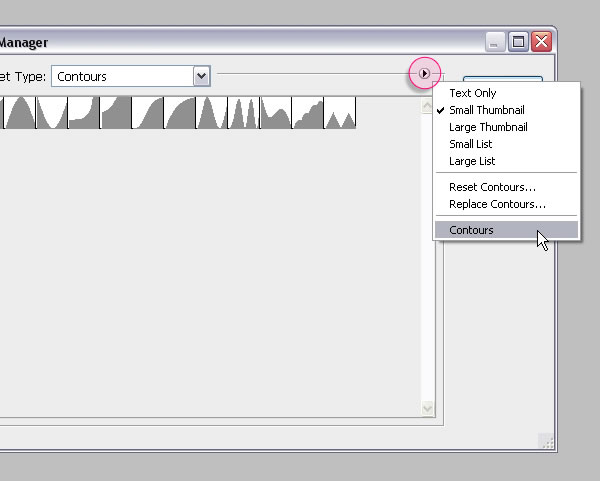
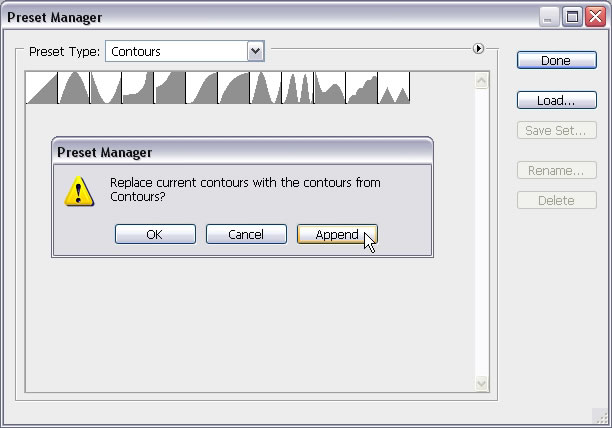
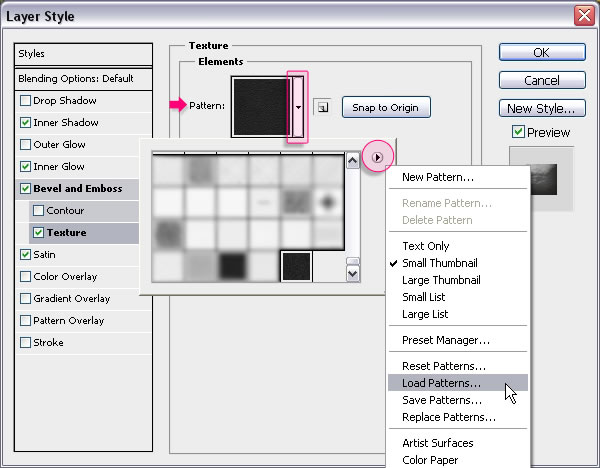
Before applying the Layer Styles, you might need to Load the Contours used. To do so, go to Edit > Preset Manager, and choose Contours from the Preset Type drop down menu.

Click the small arrow in the top right corner, and choose Contours

Click Append to add the new contours to the existing ones.

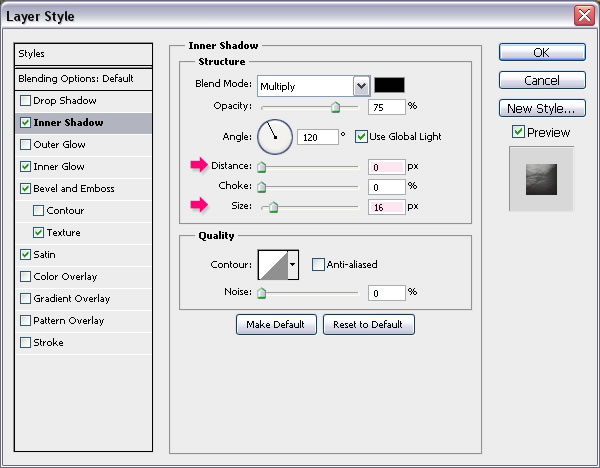
Double click the text layer to apply the following Layer Styles:

Inner Shadow: Change the Distance to 0 and the Size to 16.

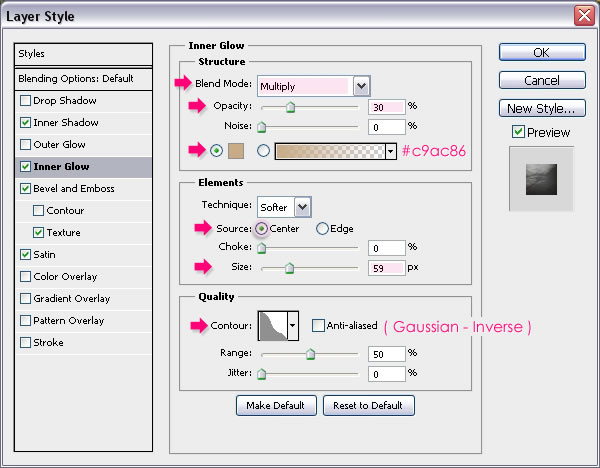
Inner Glow: Change the Blend Mode to Multiply, the Opacity to 30, the color to #c9ac86, the Source to Center, the Size to 59, and the Gloss Contour to Gaussian – Inverse.

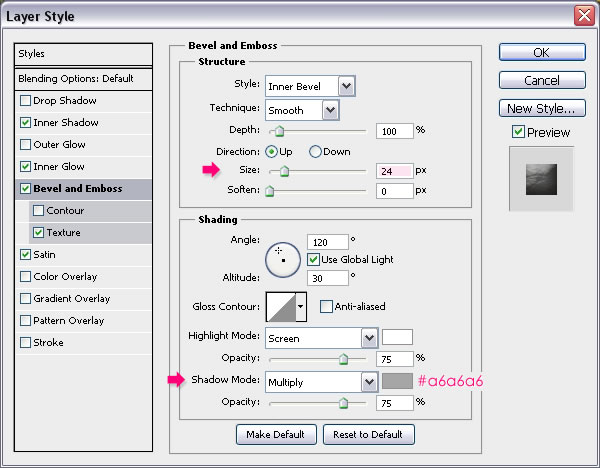
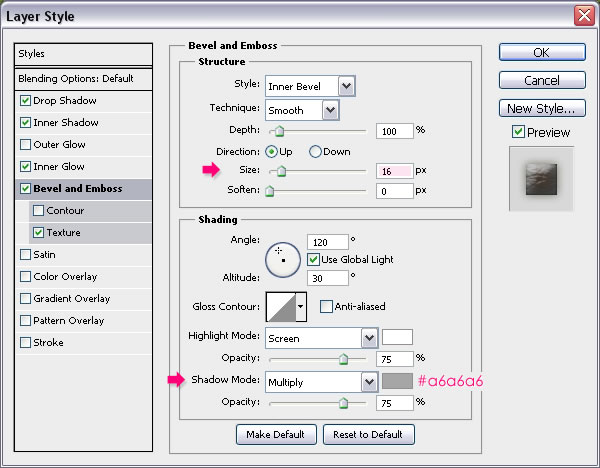
Bevel and Emboss: Change the Size to 24 and the Shadow Mode color to #a6a6a6.

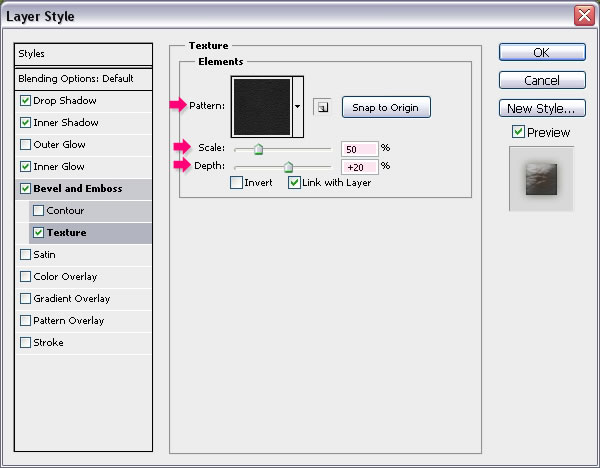
Texture: Load the .pat (pattern) file in the Seamless leather texture folder to use it.

Then change the Scale to 50 and the Depth to 15.

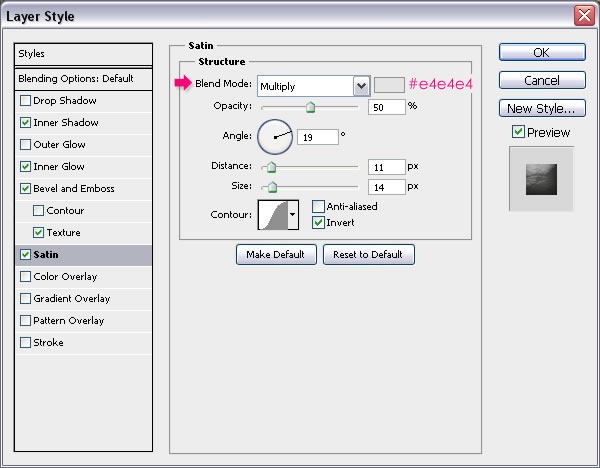
Satin: Just change the color to #e4e4e4.

This will create a nice leather-rubber effect.


Step 13

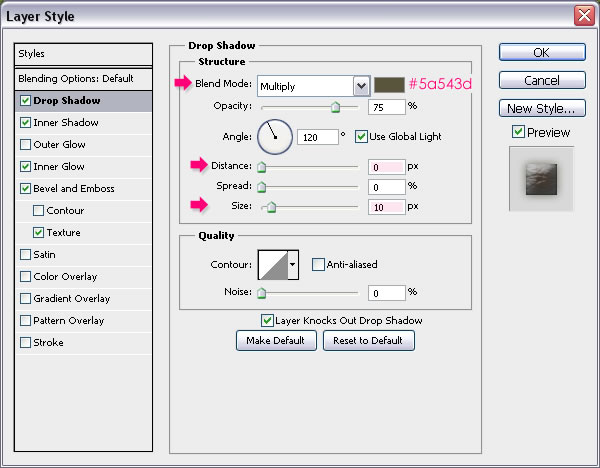
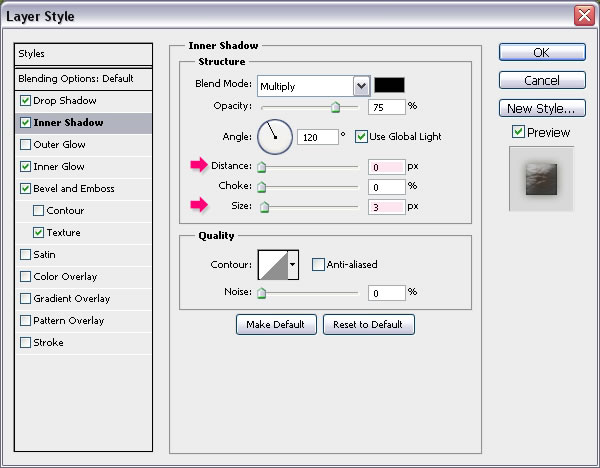
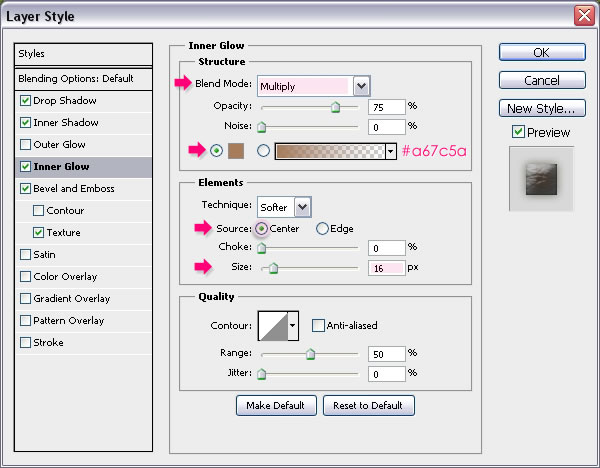
Double click the Stroke layer to apply the following Layer Styles:

Drop Shadow: Change the color to #5a543d, the Distance to 0 and the Size to 10.

Inner Shadow: Change the Distance to 0 and the Size to 3.

Inner Glow: Change the Blend Mode to Multiply, the color to #a67c5a, the Source to Center, and the Size to 16.

Bevel and Emboss: Change the Size to 16 and the Shadow Mode color to #a6a6a6.

Texture: Use the same Leather texture, and change the Scale to 50 and the Depth to 20.

This will apply the effect to the stroke.


Step 14

Double click the Stitches layer to apply the following Layer Styles:

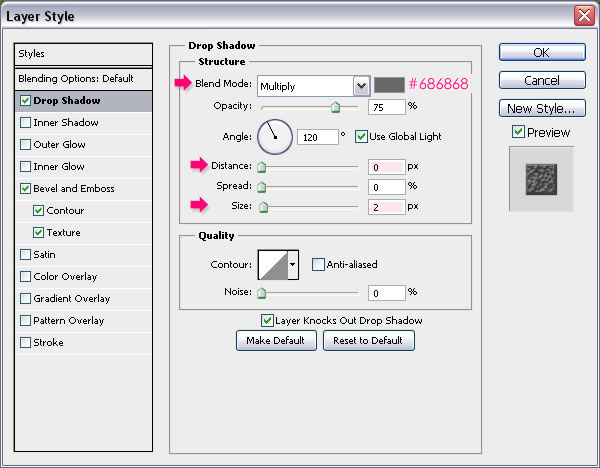
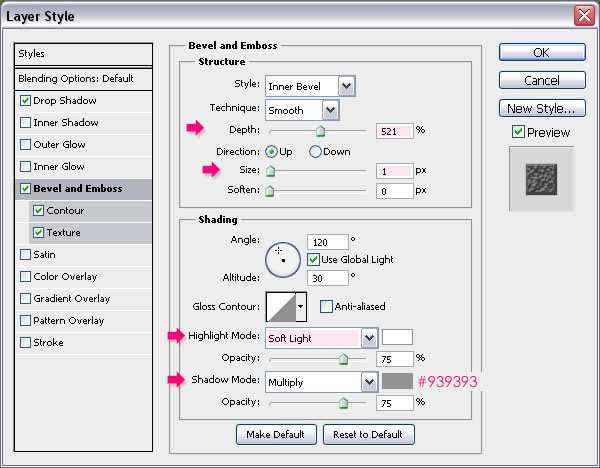
Drop Shadow: Change the color to #686868, the Distance to 0 and the Size to 2.

Bevel and Emboss: Change the Depth to 521, the Size to 1, the Highlight Mode to Soft Light, and the Shadow Mode color to #939393.

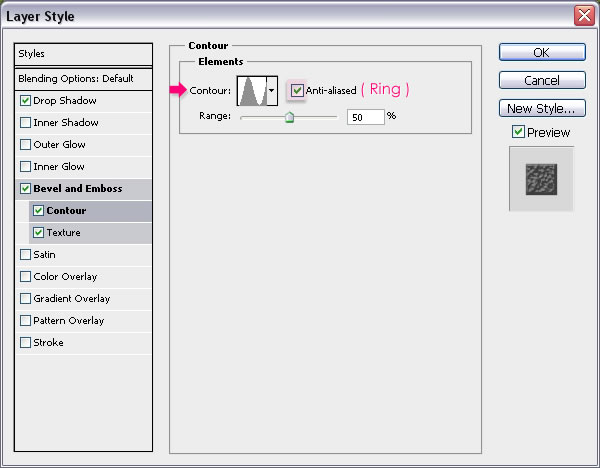
Contour: Choose the Ring contour and check the Anti-aliased box.

Texture: Use the Metal Landscape pattern, and change the Scale to 31 and the Depth to 100.

This will add some depth and dimension to the stitches.

That’s it for the Layer Styles.


Step 15

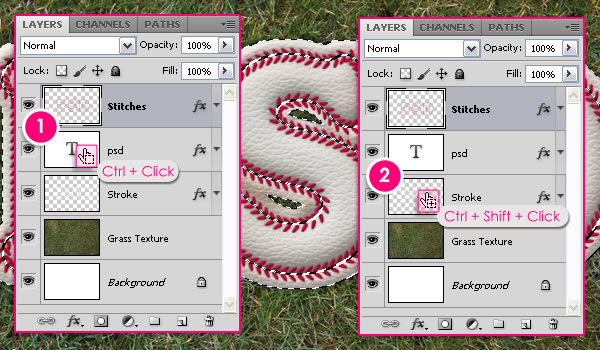
Ctrl/Cmd + Click the text layer’s icon to create a selection, then Ctrl/Cmd + Shift + Click the “Stroke” layer’s icon to add the stroke to the text selection.

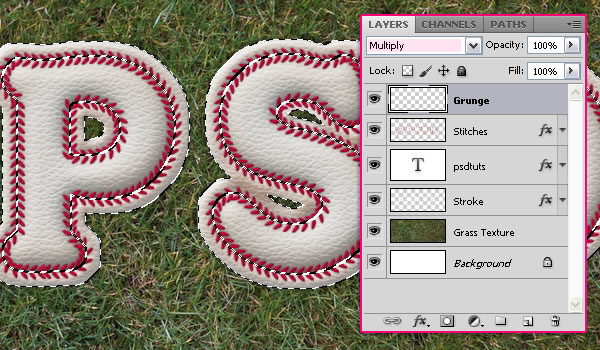
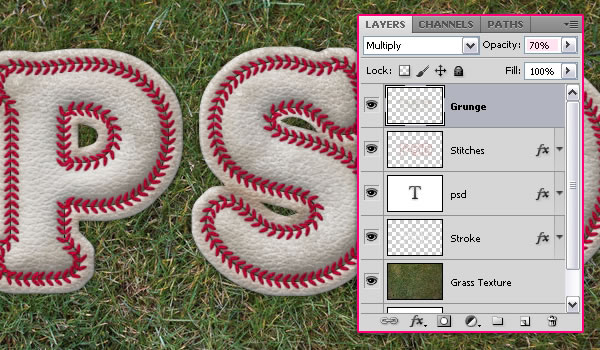
Create a new layer on top of all layers and call it “Grunge”, then change its Blend Mode to Multiply.

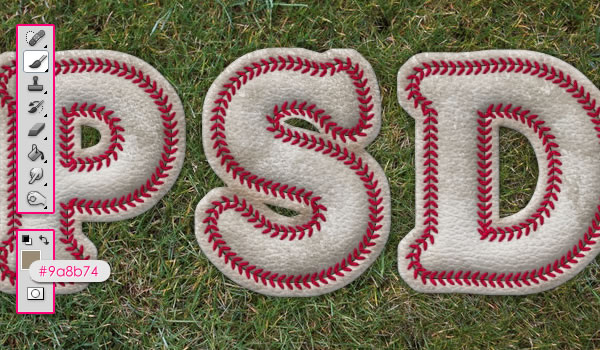
Set the Foreground color to #9a8b74, and choose one of the Undercover Grunge Brush Set brushes to add some dirt to the text.

You can adjust the Opacity value if you like. Here it is set to 70%.


Step 16

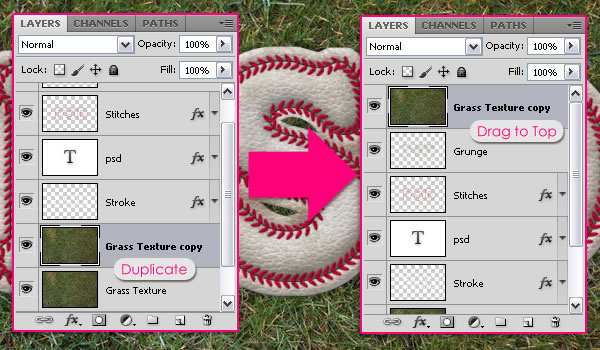
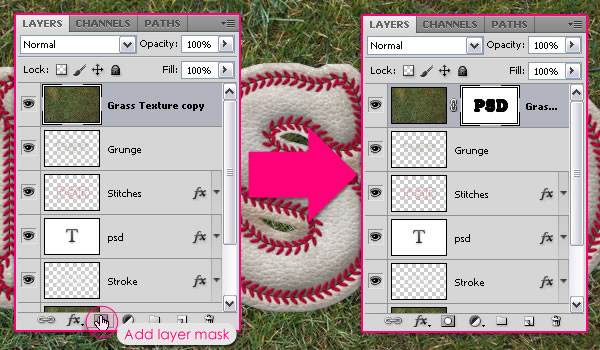
Duplicate the “Grass Texture” layer, then drag and drop the copy on top of all layers.

Ctrl/Cmd + Click the text layer’s icon to create a selection.

Go to Select > Modify > Expand, and type in 15 to select both the text and the stroke. Then, go to Select > Inverse to invert the selection.

Click the Add layer mask icon down the Layers panel (Window > Layers). This will make the text appear again. We will use the mask to add some grass over the text later on.


Step 17

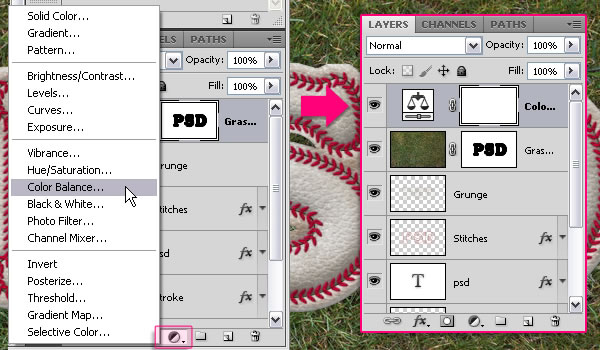
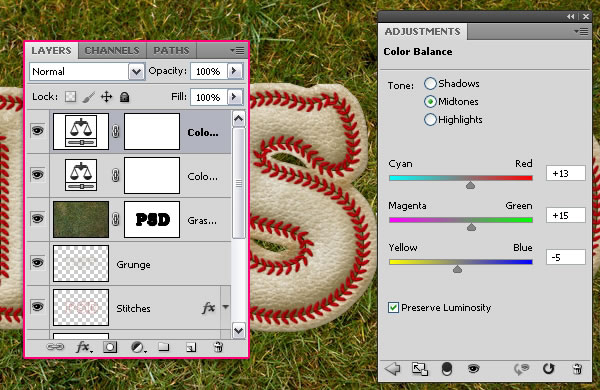
We’ve modified the grass colors a little bit at the beginning of the tutorial. And now, we will add some Adjustment Layers to enhance the colors of the whole image, which will add a nice vintage feel and help blend all the elements nicely.

So click the Add new adjustment layer icon down the Layers panel, and choose Color Balance.

Make sure that the Midtones option under Tone is active, and change the values as shown below.

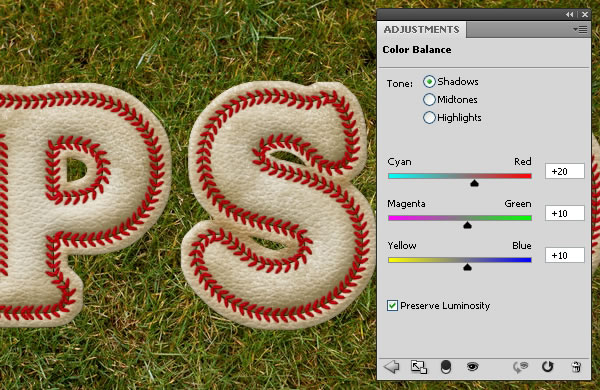
Now select the Shadows, and type in the values below.

Add another Color Balance Adjustment Layer, and change the values of the Midtones as shown below.

And change the Shadows values as shown below as well. Those values will bring out the many beautiful colors in the grass that weren’t as vivid before.


Step 18

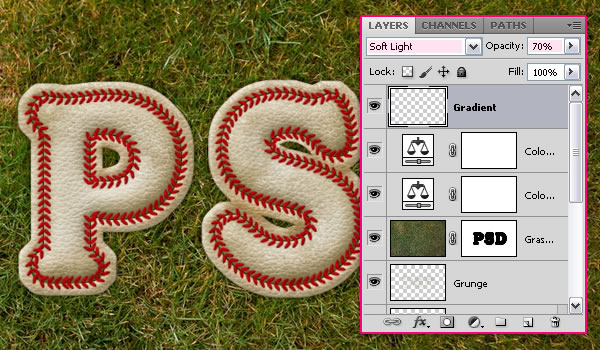
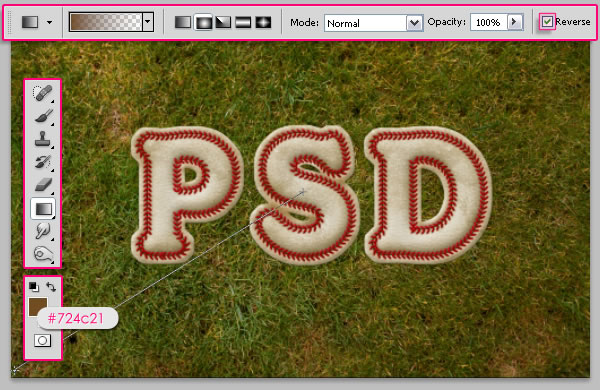
Create a new layer on top of all layers and call it “Gradient”. Change its Blend Mode to Soft Light, and its Opacity value to 70%.

Set the Foreground color to #724c21, pick the Gradient Tool, choose the Foreground to Transparent fill type, click the Radial Gradient icon in the Options bar, and check the Reverse box. Click in the middle of the document and drag to one of the corners to create the Gradient.

This will add a simple depth to the image so that it doesn’t look so flat.

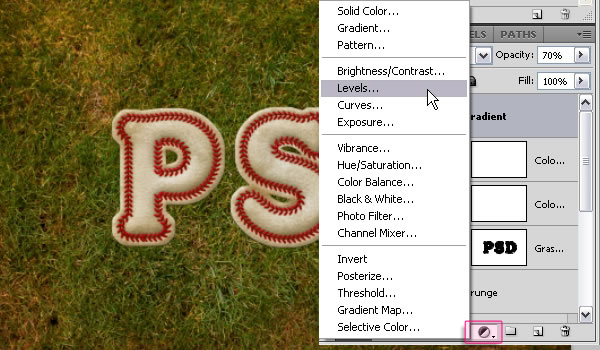
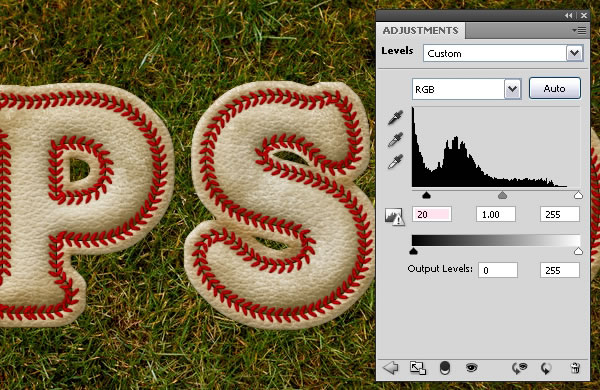
Click the Add new adjustment layer icon and choose Levels this time.

Change the Shadows value to 20. This will darken up the image a little bit. You can play around with the values if you like.


Step 19

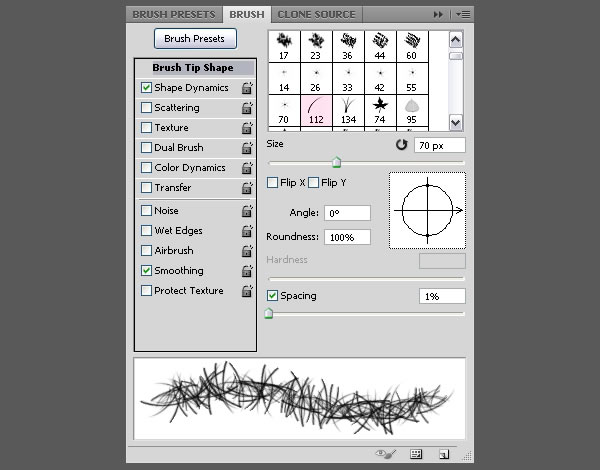
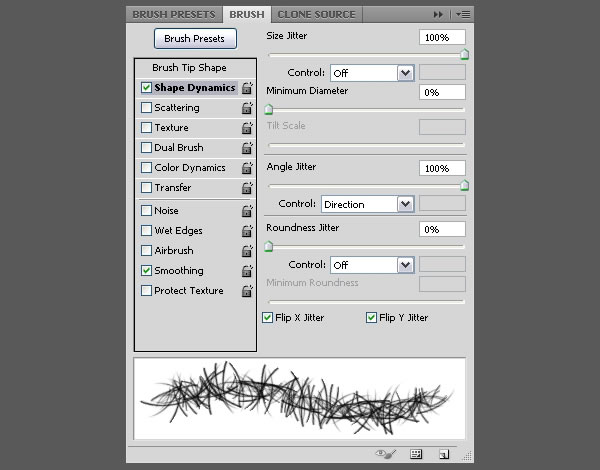
Time to add some grass over the text. So open the Brush panel (Window > Brush) and choose the Dune Grass brush. Modify the Brush Tip Shape as shown below.

Change the Shape Dynamics values as shown below as well.

Keep in mind that you can always rotate the brush’s tip under the Brush Tip Shape tab, by moving the Angle arrow around, or typing different values. This will make adding the grass easier in different angles and areas.
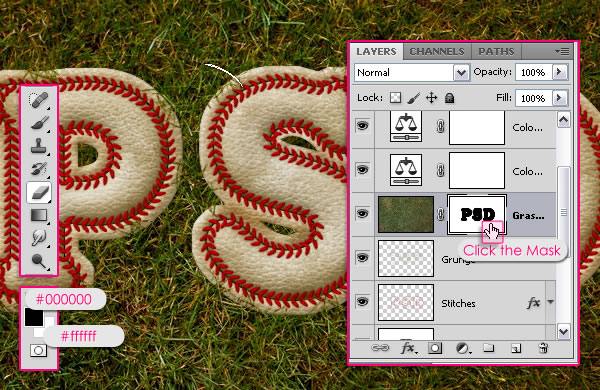

Step 20

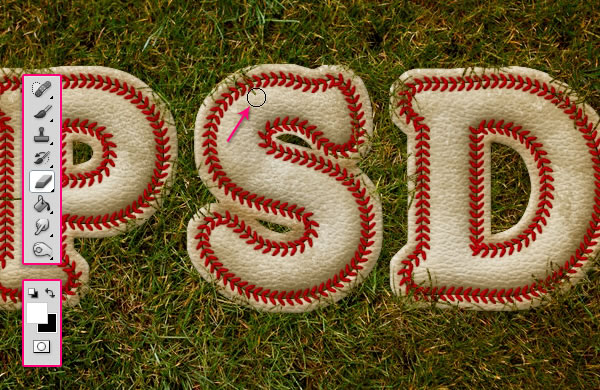
Set the Foreground color to #000000 and the Background color to #ffffff, pick the Eraser Tool, click the “Grass Texture copy” Layer Mask.

Paint some short strokes near the edges of the text randomly. You can always press Ctrl/Cmd + Z to undo if you don’t like the result then paint again. You can also change the brush’s Size and Angle whenever you need to. Just try not to drown the text in the grass, keep it simple.

If you set the switch the Foreground and Background colors, you can use the Eraser Tool to erase any unwanted parts with a hard round brush.
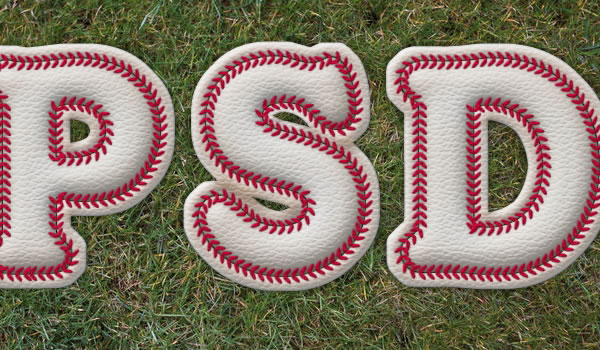
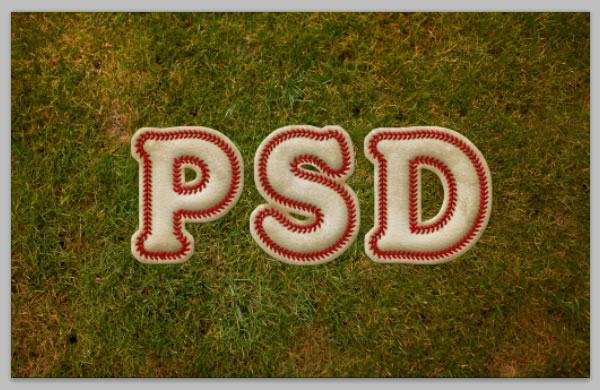
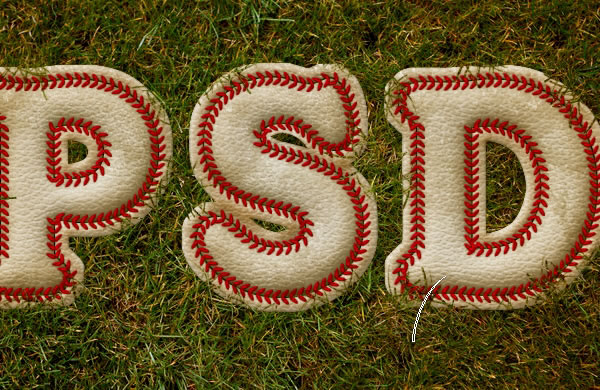

Final Image


{excerpt}
Read More