Themes let you customize every aspect of the design and functionality of a WordPress site. But what if you want to let your client customize some aspect of the theme? Perhaps you want to sell a theme on Envato Market and you want to let buyers adjust the color scheme and logo to match their brand.
That’s where the WordPress theme Customizer comes in. By making your theme Customizer-ready, you let site owners instantly change their website look and feel from within the WordPress admin UI.
In this short video tutorial from my recent course on writing Customizer-ready WordPress themes, I’ll demonstrate the Customizer interface. I’ll show you the default controls that come with WordPress, and then go through examples of different controls that you could add (the actual process of adding them is covered later in the course).
In the full course, Writing Customizer-Ready WordPress Themes, I’ll teach you how to harness the power of the Customizer in your themes. We’ll add all of those extra sections that you just saw previewed in this video, with detailed instructions to help you get everything set up. You’ll see how easy it is to let users of your theme customize the color scheme of their site and add elements like logos and text.
Download A Quick Guide to the WordPress Customizer Interface
Are you branding your new business? Maybe you have a logo, but need to extend your corporate identity into business cards, letterheads, and more? Or is your current brand needing a refresh?
Customers expect your brand identity to be professionally designed and consistent across all media. You don’t want your brand to feel dated, lack visual appeal, or appear carelessly constructed. That reflects poorly on your business.
Now’s a great time to update your identity design materials or create a new set. You want a letterhead that matches all of your stationery. So, whether you hand a customer your business card or a sales invoice, they feel the same brand design reaching across all of your company’s identity.
If you’re not sure how to take your existing brand and expand it across multiple media, or you’re pressed for time, then what you need is a brand identity package.
And if you’re a designer or marketer that helps small businesses with their branding, then these identity templates are a great way to quickly create a quality solution—especially if your project is on a tight deadline.
With a professional brand identity package, you get a great set of corporate identity designs that are easy to customize, and ready to put to use in your business.
Beautiful Brand Identity Designs
We have a ton of brand identity templates on GraphicRiver. There are a number of styles to choose from, such as corporate identity, minimal style, and colorfully creative.
In this article, we feature 15 of the best corporate identity packages you can use to extend your brand and market your business. Each is set up for common print-ready formats. You can edit them in Photoshop or Illustrator, add your custom details, and get them off to the printers.
All these brand identity packages featured below have unique designs inside that work together cohesively as a systematic set. They come with multiple branded components, such as:
stationery designs
letterhead templates
organized invoices
branded business cards
stylish envelopes
creative folders
And many include additional items like, attractive DVD cases, compliment slips, Facebook timeline covers, iPhone and desktop wallpapers, and more. There’s no limit to what you can extend your brand into.
A quality brand distinguishes a business in the market. You want yours to stand out with a creative design. Get an impactful brand—one designed professionally—then expand it across print and multiple media. These identity sets can help you do just that!
15 Brand Identity Package Sets
Here are fifteen of the best corporate identity packages. These brand identity templates all have beautiful designs, a number of identity design file types, and multiple design styles to choose from:
If you need a corporate identity template with a fresh design, then this set is a great choice. It includes stationery design with letterhead, business card, envelopes, and folder. It has a minimal design with a splash of triangular color. Your logo could readily be placed on these identity assets. And you can edit the layers, text, or colors easily with one click!
This set of modern stationery has a cool design, which is great if you’re launching a new company or refreshing your existing branding. Whether you need to get venture funding or market your business better, this brand identity package is a great choice. The files are setup in Illustrator and are ready to add your brand, customize, and print.
Triad is a minimal stationary set. Whether for a high end salon or architectural firm, this branding set makes a big impact with simple design aesthetics. It comes with a full stationery set of letterheads, envelopes, and double-sided business cards. The files are layered professionally in Photoshop, so you can readily customize them to your brand.
This is a modern style corporate identity package. The design elements are well distributed throughout this stationery set, to keep the brand consistent, but with a touch of well-constructed variety.
Whether you have a photo studio or another business, this is a professional identity set. Business card layout, letterhead design, invoice design, envelope, presentation folder. Also, many of the files come in both PSD and MS Word formats.
If your company is highly creative, then this identity set was made for you. Whether you run a motion graphics studio or a marketing company this brand kit is setup and ready to put to use. It features a vibrant design against a minimal layout. Your logo can fit right in with this colorful stationery set!
This set of corporate stationery has all the assets you’d expect for a traditional print brand identity, but it also includes related web assets. It’s a fully-packed corporate brand identity set.
It features an exciting swooping three-dimensional design that carries across multiple-media. Whether you’re a financial group, web development company, or a new startup, this is an innovative set of professional identity designs for your growing business.
This is a massive corporate identity package. It’s loaded with full stationery designs, as well as a full-spectrum of marketing assets. This brand identity set will save you a lot of time because it includes so many useful brand files in one package. All of the items are easy to edit. You can change the text, rework the color scheme, add your logo, and readily match your identity to this robust kit.
If your business is more craft than corporate, or you want your business to have an authentic feel, then this is the best stationery template set for you. It features a professional, minimal style design, with a crafted appeal.
Whether you run a furniture store or hand craft your own wooden art pieces, this brand identity design has what you need. It’s a simple design that works for many purposes. It comes with letterhead, business card, envelope and presentation folder. It’s easy to adopt and customize to your business!
This is a professional, striking corporate identity package. Save time with using this set to extend your business brand. All the files are fully-layered and editable. It’s set up for professional printing with 300DPI print-ready files. And the files come in both Photoshop PSD and Illustrator AI/EPS formats. If you want to change the color scheme, add your text, insert your logo, it’s easy to do with this brand identity template set.
If you run a creative business, then you need a expressive stationery package. This is a clean, modern design with colorful branding elements. It’s great for a design company or a financial company that wants to stand out in the market.
All of the items are easy to edit. You can readily insert your logo, tagline, and contact details into this energetic set. Extend your brand with this vibrant pattern stationery set!
Present yourself with professional creative style to your customers. This corporate identity package has a full set of stationery for your traditional print media, as well as modern web assets, like Facebook timeline cover and branded wallpapers. It’s designed to represent an innovative digital company across multiple-media types. All the design files are 100% vector, so easy to edit and customize for your business.
This corporate identity is ready to be customized for your business. It’s design is professional and can help you extend your logo and identity across a full line of stationery. If you’re launching a new business or extending the brand of an existing one, this minimal style elegant identity set is a quality choice. Add your logo and quickly customize the colors to fit your branding.
This colorful stationery set is made to brand a creative company. If you’re a millennial company, or a fresh startup, and in need of a vibrant identity, then this template set is made for your business. The high-energy design elements are set against a clean minimal design.
You can add your logo or even simply your company name, and have a colorful stationery set ready to brand your business with flair and pop! Another option is to purchase additional matching brand items: such as Abstract Modern Brochure or Abstract Colorful Trifold Brochure.
This is a giant corporate stationery identity design set. It also includes a number of additional files that will help you carry your brand further into wallpapers and digital media. There are 36 files in total. All the layers are vector shapes, set set up for easy customization and editing. It’s a beautiful design, with striking colors, and made for any company that wants a professional creative identity!
This is one of the largest brand identity packages we offer on GraphicRiver. It’s designed by Elite Author: GraphicArtist. And includes print identity designs that go well beyond a standard stationery set.
It’s packed with a full range of print assets, brochures, packaging, financial files, presentation template, web elements, and more. It’s a complete corporate brand identity package. If you’re in need of fully-realizing your branding needs, then purchase this identity template set now!
How to Extend Your Brand Identity Design
A fresh identity with new stationery and extended media allows you to represent your brand professionally. Your business is your baby. It’s what you’ve put all your blood, sweat, time—and even more sweat into! Your brand matters. It’s how your customers relate to your company and remember you. If you want your business to be successful, it’s a must to invest in a top-shelf brand identity.
Let’s look at how to extend your brand beyond your logo. You’re looking to build a business that grows. Let’s set your brand up for that success you’re aiming for. Here are a few steps to take your brand from that little spark of a logo into a more fully-realized brand identity.
1. Take Stock of Your Existing Brand
Before deciding on a brand identity package, it’s important to look at your existing brand. For a refresher, we have an article that covers all aspects of branding:
You want your stationery and media branding assets to compliment your existing business brand. It’s a package that needs to work together to represent your company. Consistency is critical.
You can have variations across your brand, but there needs to be a visual glue that holds it all together. And you can absolutely be creative, but you want to make sure your existing logo fits well, and your fonts and colors are used appropriately.
If you already have a logo, then choose an identity set that will work well with it. Or if you don’t have a logo we have logo templates as well or designers that can help you custom design a logo.
Any one of the templates above could be just the right fit for expanding your brand. If you want to browse through more options though, just jump over to our corporate identity templates on GraphicRiver.
2. Customize Your Identity Design
Once you’ve chosen your brand identity template, now it’s time to customize your stationery set, prep it for print, and get your new branding materials printed on high quality paper.
You’ll need Photoshop or Illustrator to work with these template files. All of our templates on GraphicRiver are designed to be easy to customize. You can just add your company contact info to your business cards, drag your logo into the appropriate layer on the template, and make adjustments to fit your brand, like tweaking color choices or changing out fonts. The files are already set up to print professionally, so when you’re ready just get them off to the printers.
As you customize your brand you want to make sure you’re working within your company’s brand guidelines. You can learn more about setting them up for your business here:
If you need help with customizing your identity design package, or crafting your brand guidelines, we have professional graphic designers at our Envato Studio that you can work with. They have the experience and knowhow to get the job done right!
3. Market Your New Identity Set
With your new identity materials back from the printers, now it’s time to put your new brand identity materials to work for your business. Start using your new letterhead and branded envelopes to craft sales letters to potential customers. Hand out your business card to new important contacts you meet.
Keep in mind, these new brand materials are made to market your business, so get them out there and working. Your new brand material will also help retain your existing customers. The professional your invoices look, the more seriously your business will be taken, and the quicker you’ll get paid.
Also, if you’re a designer or marketer, then help your client choose the best identity design for their branding needs. And advise them on how to integrate their new materials into their marketing plan.
Level-Up Your Branding With an Identity Package!
Don’t wait on expanding your brand! It’s important to have the right creative branding representing your company. Your business will be seen as higher quality, you’ll make more connections with potential customers, and it will help you grow quicker.
Browse our wide-selection of corporate identity packages, and purchase one that’s the best fit for your flourishing small business. We also have a number of best selling print templates to help you brand professionally and fill your business needs.
Say you have a binary image file you wanted to transfer across a network. You’re amazed that the file wasn’t received properly on the other side—the file just contained strange characters!
Well, it seems that you attempted to send your file in its raw bits and bytes format, while the media used was designed for streaming text.
What would be the workaround to avoid such an issue? The answer is Base64 encoding. In this article, I will show you how we can use Python to encode and decode a binary image. The program is illustrated as a standalone local program, but you can apply the concept to different applications like sending your encoded image from your mobile device to a server, and many other applications.
What Is Base64?
Before moving more deeper in the article, let’s define what we mean by Base64.
Base64 is a way in which 8-bit binary data is encoded into a format that can be represented in 7 bits. This is done using only the characters A-Z, a-z, 0-9, +, and / in order to represent data, with = used to pad data. For instance, using this encoding, three 8-bit bytes are converted into four 7-bit bytes.
The term Base64 is taken from the Multipurpose Internet Mail Extensions (MIME) standard, which is widely used for HTTP and XML, and was originally developed for encoding email attachments for transmission.
Why Do We Use Base64?
Base64 is very important for binary data representation, such that it allows binary data to be represented in a way that looks and acts as plain text, which makes it more reliable to be stored in databases, sent in emails, or used in text-based format such as XML. Base64 is basically used for representing data in an ASCII string format.
As mentioned in the introduction of this article, without Base64 sometimes data will not be readable at all.
Base64 Encoding
Base64 encoding is the process of converting binary data into a limited character set of 64 characters. As shown in the first section, those characters are A-Z, a-z, 0-9, +, and / (count them, did you notice they add up to 64?). This character set is considered the most common character set, and is referred to as MIME’s Base64. It uses A-Z, a-z, 0-9, +, and / for the first 62 values, and +, and / for the last two values.
The Base64 encoded data ends up being longer than the original data, so that as mentioned above, for every 3 bytes of binary data, there are at least 4 bytes of Base64 encoded data. This is due to the fact that we are squeezing the data into a smaller set of characters.
Have you ever seen part of a raw email file like the one shown below (which most likely originates from an email not being delivered)? If so, then you have seen Base64 encoding in action! (If you notice “=”, you can conclude that this is a Base64 encoding, since the equals sign is used in the encoding process for padding.)
Base64 is carried out in multiple steps, as follows:
The text to be encoded in converted into its respective decimal values, that is, into their ASCII equivalent (i.e. a:97, b:98, etc.). Here’s the ASCII table.
The decimal values obtained in the above step are converted into their binary equivalents (i.e. 97: 01100001).
All the binary equivalents are concatenated, obtaining a large set of binary numbers.
The large set of binary numbers is divided into equal sections, with each section containing only 6 bits.
The equal sets of 6 bits are converted into their decimal equivalents.
Base64 decoding is the opposite of Base64 encoding. In other words, it is carried out by reversing the steps described in the previous section.
So, the steps of Base64 decoding can be described as follows:
Each character in the string is changed to its Base64 decimal value.
The decimal values obtained are converted into their binary equivalents.
The first two bits of the binary numbers are truncated from each of the binary numbers obtained, and the sets of 6 bits are combined, forming one large string of binary digits.
The large string of binary digits obtained in the previous step is split into groups of 8 bits.
The 8-bit binary numbers are converted into their decimal equivalents.
Finally, the decimal values obtained are converted into their ASCII equivalent.
Encoding an Image
Let’s now get to the meat of this article. In this section, I’m going to show you how we can easily Base64 encode an image using Python.
I will be using the following binary image. Go ahead, download it and let’s get Python rolling! (I’m assuming that the name of the image is deer.gif.)
The first thing we have to do in order to use Base64 in Python is to import the base64 module:
import base64
In order to encode the image, we simply use the function base64.encodestring(s). Python mentions the following regarding this function:
Encode the string s, which can contain arbitrary binary data, and return a string containing one or more lines of base64-encoded data. encodestring() returns a string containing one or more lines of base64-encoded data always including an extra trailing newline (‘\n’).
Thus, we can do the following in order to Base64 encode our image:
Non-destructive photo editing is a powerful technique that lets you preserve your image’s original data while still modifying it. You can even and go back and change every edit you make. Learn how to edit non-destructively in this 60 second tutorial.
Destructive Versus Non-Destructive Post-Production Workflows
In raster image editing programs like Adobe Photoshop you can edit an image two ways: destructively and non-destructively. With destructive editing you overwrite the original pixel values, and can’t go back and change things later. With non-destructive editing you use Adjustment Layers, Smart Objects and other tools and techniques to modify the image without overwriting the original data.
Take the image in the screencast above. One way to increase the saturation is to select Hue/Saturation from the Adjustments menu. Push the saturation and click OK. If we push the saturation it too far, there’s no way to go back and tweak the edit. I have to accept it, or undo it entirely. This is destructive editing. The changes are “baked in” to our image.
To make the same change non-destructively, you use a Hue/Saturation adjustment layer instead. Once again, increase the saturation. This time, even if we go too far, we can double click on the adjustment layer and dial the effect back to a better amount. We can even add a Layer Mask to control exactly what areas of the image are affected.
When possible, you should always use non-destructive techniques over destructive techniques. They give you a lot more flexibility and protect the original image’s data.
60 Seconds!?
This is part of a new series of quick video tutorials on Tuts+. We’re aiming to introduce a range of subjects, all in 60 seconds—just enough to whet your appetite. Let us know in the comments what you thought of this video and what else you’d like to see explained in 60 seconds!
Download Non-Destructive Photo Editing in 60 Seconds
Until 18 March, you’ll receive a free year subscription to Envato Tuts+ when you purchase a hosting plan from SiteGround.
With up to 50% off, SiteGround offers three plans to get you on the way to hosting bliss. Whether you’re just starting or already have a few existing sites, you’ll receive the following support:
Easy Start
One-click setup tools for WordPress, Joomla!, Drupal and most other popular web apps. Free migration assistance is also available for existing projects.
Cutting-Edge Infrastructure
All servers come with SSD drives and run the hottest new virtualization method: Linux containers. The latest technology, like HTTP/2 and PHP7, is always integrated as soon as it’s ready.
Fully Managed Service
Server software and hardware are optimized for speed and security. A 24/7 expert support team is available, so that server management is no longer a hassle.
Dev Tools
Easily create git repos, make staging copies with one click, and control your site with SSH or app-specific command line interfaces. Those are just some of the tools available to make the development workflow a breeze.
Your Free Year on Envato Tuts+
Your free year on Envato Tuts+ gives you access to all 21,000+ written tutorials, over 740 video courses, and 180 downloadable ebooks on a range of topics including web design, code, design & illustration and photography.
Redemption of this offer is valid for new SiteGround customers and new Envato Tuts+ subscribers only. This coupon code is valid for one redemption only of a Tuts+ yearly subscription worth $180. By taking part in this promotion, you understand that any fraudulent activity associated with your account may result in your account being suspended or other action deemed appropriate by Envato Tuts+.
ON1 Photo 10 for Photographers with Andrew Childress
In this week’s feature interview I catch up with Andrew Childress to hear about his course on ON1 Photo 10, a new and improved version of the popular photo post-processing application.
With its unique, layers-based approach for styling images, ON1 Photo 10 sets itself apart. Our new course, ON1 Photo 10 for Photographers, is for anyone who wants to bring unique looks to their images.
You can take our new course straight away with a free 10-day trial
of our monthly subscription. If you decide to continue, it costs just
$15 a month, and you’ll get access to hundreds of courses, with new ones
added every week. Here’s the introduction:
We all know that one of the best benefits to working digitally is that there’s an undo button, the famous Control-Z. But what if you want to undo more than the last step in Photoshop?
Histograms
Then Kirk was back with another Photoshop fundamentals 60 Seconds video: What are Histograms?
Street Photography Indoors (Yes, Indoors!)
Though it might sound like an oxymoron, Amy Touchette argues that you can—and should—practice street photography indoors. She also gives us some great tips on how to go about it.
Free Creative Camera Movements Coffee Break Course
Cindy Burgess kicked off a new series of Coffee Break Courses with a ten-minute how-to on the most common and useful of movements: the pan. This course is completely free. Watch the introduction below to find out more.
To take this free Coffee Break Course, simply go to the course page
and follow the steps to create a free account. If you already have an
account, just log in and you’ll be able to get started right away.
Edit Video With Sony Vegas Pro
Finally, Mark Thorburn introduced us to his non-linear editor of choice, Sony Vegas Pro, with a new short course. Sony VEgas Pro is an affordable, user-friendly program for both new and advanced editors. PC-only.
Watch the Course
In Video Editing With Sony Vegas Pro you’ll get a head start with the principles of video editing by working through a fun project: a short travel video.
See you next week!
Download Tuts+ Last Week: ON1 Photo 10, Photoshop Basics, Camera Movement, and Sony Vegas Pro
From clothes to accessories, fashion illustrations have a
long history as a visual reference for a designer’s concepts or current
fashion trends.
What makes a good fashion illustration, though? With help from
content from Envato Market, let’s count down 10 top tips for creating great
fashion illustrations to better your own sense of design and improve your
illustrative work!
1. Understand Anatomy
It’s not always apparent if you’re looking at a stylized
fashion figure that the artist is at their best when working from anatomically
correct proportions. Knowing how to correctly draw a body allows for a variety
of freedom when drawing figures and correctly drawing clothing. So whether you’re
drawing from photographic reference or from life, you’ll be prepared with
knowledge of the shape and proportions of what may not be visible when drawing
clothed figures.
If you are presented with a figure whose body is hidden
underneath a large dress, for instance, knowing the gestural form beneath it
allows you to create poses that may not exist quickly and easily. Being able to
move your figure around without having to directly copy from a photo or ask a
model to make said pose means more flexibility when your client asks for a
specific pose or concept.
2. Stylize to Optimize
When you do stylize your figure, after having learned basic
anatomy, you’ll want to do so in order to bring more focus to a particular
element of design. For instance, fashion figures are often long-legged and much
taller than the average human. In average human proportions, a figure is six to
seven heads tall, whereas a fashion figure is eight or even nine heads tall, with most of that additional length being taken up in the legs. This is often
used to bring the viewer’s attention to the length of a dress or give the
artist more space in which to create folds, movement, or texture within the
fabric itself.
Exaggerate features of the figure or face of the figure in
order to accentuate the designs being displayed. A tiny waist or large hips can
show off the curves within a dress. Few facial features will keep the focus on the clothes or body itself. If the focus is on accessories or hair, make the hair
big or understate the clothing. Much like caricatures or cartoons,
exaggerations within the drawing will diminish some features or make others
more prominent. Use stylization to tell a story with your fashion illustration.
3. Move With Purpose
A static fashion figure can be alright to draw, but you’ll
find that it’s often a boring piece. Unless you’re telling a story about the serenity
of design, you’ll want your figure to move within the space you set it. When
you pose a figure dynamically, you create action for the clothing, hair,
accessories or whatever else you’re drawing. You’ll also instantly aid your
storytelling within your illustration. Is a figure dancing, walking, or flying
through your picture plane? Answer such questions with your drawing.
Illustrations tell stories through imagery.
Movement can also help the viewer understand what makes up
the clothing you’re drawing or painting. We’ll discuss texture and
weight within textiles more fully below, but understand that if a fabric is
light and flowy or heavy and stiff, one of the best ways to show that is
through how it moves when placed on a body or when the body itself is in
motion.
A good way to understand how bodies, clothing, and various fabrics move
is to watch models walk down a runway. They’re constantly in motion and often
make a point to really show how their garment moves through exaggerated motions
and turns.
4. Use Your Composition to Tell Your Story
In addition to clothing and movement aiding your
storytelling, composition absolutely matters too. Is the figure frolicking
through an empty white space, or are they in a setting complete with a
background and other figures?
This is where fashion illustration may collide a
bit with editorial illustration. Perhaps you’d like to illustrate the figure
walking down a runway or through a busy city. Allowing a simple background into
your work may help viewers understand the context for where or when a design is
worn. Please note, however, that if a background is busy, it may overwhelm the
fashion design itself.
Alternatively, you can eliminate many details if you use
your composition to help fill them in. Perhaps you’ve decided only to create a
line drawing. Allow portions of your figure’s movement, dress, and hair, to
complete an image without having to draw it in. The viewer’s eye will do the
rest of the work.
Take advantage of negative space and you’ll create more
dynamic illustrations without having to create a background. Suddenly the plain
white or solid color used within your piece is a part of the design itself, and
you’re allowing the figure to exist not only within that space but because of
that space.
5. Differentiate Between Fabrics With Texture
In my opinion, one of the most fun parts of fashion
illustration is when an artist can show the weight and texture of a fabric
within their drawing or painting. Whether they’ve taken the time to render corduroy
or are skilled at showing the fabric’s weight through movement, I, as a viewer
and artist, love to revel in these sorts of details. Instantly I understand
the garment I’m seeing, and it’s far more tangible than everything being worn or
shown looking the same.
Sure, it’s a green dress, but is it silk, tulle, or a heavy
woven material? The way it’s drawn, the way it drapes around a figure, and even
the way it’s colored or painted should give the viewer an idea of the sort of
textile being depicted. At the very least, I want to understand what a garment
may feel like when worn. If I’m being sold clothing from an illustration, for
instance, I should be able to figure out if the clothing is warm and cozy or
light and breezy. You’ll want to viewer to understand if the textile is smooth
and soft or stiff and itchy.
You can show that something is smooth and soft by using
longer, curved lines with illustrating, or show that it’s stiff and itchy with
shorter, more rigid line work. Additionally, drawing in knitted textures would
help the viewer understand that it’s a hand-knitted sweater versus a machine-woven
garment or something made from jersey.
Practice textures within textiles by
drawing swatches of your own clothing or experimenting with different textile
styles you may be viewing in fashion magazines or on fashion-related websites.
6. Make Patterns Aplenty
Surface designs are often a big deal in fashion. They can
make simple pieces more interesting and even be a focal point within an
illustration. There are only so many silky dresses that will go down a runway
before patterns start popping. Being able to really show off a
Moschino show in illustrated form would be nothing without being able to
showcase the patterns created for their garments.
Patterns can also tell stories in their own right. Classic
patterns like houndstooth and chevrons may showcase current fashion trends or
tell the story of clothing from a certain era. Consider the stories to be told
of individuals who wear quiet, understated prints like simple dots or stripes
versus loud, bright florals or paisley designs.
Textile patterns can also help coordinate various pieces
when you match up a color or two from a print within other garments or
accessories in a design. This is especially apparent when you’re illustrating a
line of clothing and begin to notice how various pieces within a set, though
not all worn together or by the same person, may call back to each other with
the use of the same patterns or colors from a pattern.
7. Get Your Hair Done
Hairstyles, color, and textures can do a lot of an overall
design. Different types of hairstyles may be worn by different people for a
variety of reasons. Consider the way in which culture and ethnic heritage may
affect the types of hairstyles a figure could wear. Not only will you be
telling a story about who the person is or where they may be from, but you’ll
also be allowing limits for the hair’s movement and style itself.
For instance,
someone with very thin and straight hair wouldn’t be able to wear their hair in
locs like someone with thick and textured hair. Learning how to illustrate
braided, straight, curly, or other hair styles will also widen your skill set
for every illustration occasion.
Hair can also help in the composition or be a main focal
point as well. In terms of composition, the movement of the hair can be just as
important as the movement of a garment. You’ll notice in many of the images in
this article that most of the hair depicted is long and often moves with the
dresses drawn in the illustration. You may want to consider hair to be another
piece of the illustrated puzzle when creating fashion illustrations.
Additionally, hair can be a main focal point of a fashion
illustration. If the story of the illustration is to depict a hairstyle or show
off various hair accessories, the hair may be what drives the composition of
the piece or even holds all of the action within it as a dress in a larger,
full-body illustration would. Many of the tips for clothing apply for hair as
well: form, texture, composition, movement, and style are all relevant points
when featuring a hairstyle within your fashion illustration.
8. Focus on Accessories
Sometimes the entire focus may be not on a garment or hair,
but on an accessory. This may mean a portion of the body is the only thing
depicted in a fashion illustration or that there is no figure present at all.
Additionally, you may be creating a full-bodied illustration and accessories
may just feature heavily in your illustration.
Consider, for full-bodied pieces,
what sort of stories can be told with the addition of accessories. Imagine
drawing a beautiful, historical queen. What sort of accessories would she wear?
Crown, jewelry, fancy shoes, and a scepter, perhaps. You can tell a story of
decadence the more accessories you add, or of simplicity by only featuring a small
bracelet or simple necklace within a design.
Consider, for accessory-focused pieces, what
you would think about if you were drawing garments on figures: texture,
patterns, composition, stylizations, and more. The same tips that apply to
clothing and hair also apply to accessories. You’re telling stories with
objects placed on or around a figure.
Consider, for accessory-only
pieces, what sort of information you’d like the viewer to understand without
seeing an associated figure. For instance, if you’re only drawing shoes and a
handbag, coordinating the two based on material or design may tell a story of a
well put together person. Or a pair of sneakers and a backpack would tell the
story of a student or young person.
9. Understand Perspective
The topic of accessories brings us to another foundation
skill: perspective. Understanding how objects exist within a space can only
help you illustrate them in an accurate way. While stylization is definitely
welcome within your designs, knowing the rules can help you break them in
interesting and aesthetically pleasing ways.
Consider the idea, explored above, of only drawing shoes and
handbags. In order to make those objects seem tangible without having a figure
within your illustration to help, draw them as though they not only exist in
space, but exist on a plane and someone could reach out and touch them. That will
allow the viewer to better connect with the object and understand the size and
shape of the object.
Additionally, if you have two or more objects together in
a small scene or even floating about in space, you’ll likely want to show that
they’re interacting. This means showing they’re on the same plane and subjecting
them to the same style of perspective as well as overlapping objects, using
similar lighting, and using the same design style to illustrate both (unless
you’re making a purposeful statement or telling a story by not doing so).
10. Render
Non-Textile Surfaces Differently
Much like being able to show how an object interacts with
others within the same space, non-textile objects should be rendered so the
viewer understands what is being depicted.
For instance, if you’re illustrating
Cinderella’s glass slipper, you’re going to have to create a transparent,
reflective shoe that the viewer will understand is glass or crystal or
something similar, rather than something that looks exactly like a leather or silk shoe.
If the artist has created a metallic dress and they mean for
it to be made of metal versus just being gold or silver in color, they’ll need
to really showcase the reflective properties of that material (as well as
construct it within the limits of a metal object) so the viewer understands that
it’s not just paint that’s making something look gold, but rather gold itself
being depicted.
Much like showing the texture, weight, and limits of
movement within a textile, being able to render various objects so the viewer
understands what they’re comprised of not only helps communicate concept design
and storytelling within a fashion illustration, but also allows the viewer
to better connect with what’s been drawn as being analogous to a real-world
object or familiar material.
Let’s Break It Down!
Now that we’ve run through all ten tips for creating
fantastic fashion illustrations, let’s break it down with a handy checklist:
Understanding anatomy will help you draw fashion
figures in a variety of poses.
Stylize to optimize the garment, accessories, or
design being depicted.
Create figures in motion in order to keep your
figure from looking static and stiff.
Use both positive and negative space in order
get the most out of your composition.
Render textiles and show the weight and movement
limits of them so viewers understand what sort of fabric is being illustrated.
Draw patterns within your textile designs in
order to create more interesting clothing or tell stories within your work.
Don’t forget about how important hair and
hairstyles can be to a design, composition, or your overall illustration.
Don’t forget about accessories: they can
complete an illustration or be one in their own right.
Understanding perspective and how objects
interact with one another or a figure within space will help you draw nearly
anything needed for your illustration.
Render non-textile surfaces accordingly so the
viewer understands the difference between each surface within your
illustration.
One of the biggest challenges web designers face is getting stakeholders to agree on the homepage. Organisations often have far too many people wanting their content on the homepage. The result is a mess; far too much information crammed into too small an area.
Our new Coffee Break Course, How to Get Homepage Design Approval, helps you solve this problem. In this quick video course, Paul Boag, founder of UK web design agency Headscape, will share his secret to getting agreement on homepage content: the User Attention Point Exercise. This is a technique which will ensure clients prioritise the needs of users over their own agenda.
If you haven’t tried one of our Coffee Break Courses before, they’re ultra-short video courses designed to teach a skill or concept in a single sitting. This one is less than ten minutes long, and by the end of it you’ll be much better equipped to help your clients decide on an effective, uncluttered homepage. Watch the introduction below to find out more.
You can take our new Coffee Break Course straight away with a free 10-day trial of our monthly subscription. If you decide to continue, it costs just $15 a month, and you’ll get access to hundreds of courses, with new ones added every week.
Download New Coffee Break Course: How to Get Homepage Design Approval
Ionic is a popular framework for creating modern, hybrid, mobile applications, using JavaScript, HTML, and CSS. Ionic is powered by AngularJS and Apache Cordova. Because developers can use technologies they are already familiar with (JavaScript, HTML, and CSS), the learning curve isn’t that steep.
CodeCanyon offers a wide range of application templates to kickstart your Ionic development. In this article, I show you ten templates that might inspire you for your next project.
As the name indicates, this templates is primarily aimed at restaurants. The application enables restaurant owners to list their menus and accept orders from customers. The template is nicely designed and powered by WordPress, Drupal, or any other backend that supports JSON.
This template fully embraces Google’s Material Design specification for web and mobile applications. The template is packed with features. It has support for SQLite and WordPress, and it integrates with various services, such as Facebook, Instagram, Foursquare, and Dropbox. The template receives regular updates, which is another big plus.
Don’t be misled by the name of this template. It is more than a bare bones template. In fact, it is packed with features, such as Stripe integration, a shopping cart, SQLite, WordPress, and Drupal support, audio streaming, and various social integrations. The template is frequently updated with new features and bug fixes.
Mobionic is a fully featured, multipurpose Ionic template that fits a range of application types. It integrates with WordPress and has support for push notifications, Google Maps, and YouTube. The template includes a modern design that is easy to customize to your project’s needs.
MobSocial integrates with WordPress and includes several templates, such as blog, chat, and news. It features an elegant user interface, integrates with Google’s AdMob platform, and provides support for push notifications. If you want to see the template in action, then visit the online demo.
Selig is an elegant, multipurpose template aimed at bloggers. It integrates with WordPress and uses Flickr for managing and displaying photo galleries. It is easy to customize and has support for Twitter and Facebook login. Push notifications are powered by Pushwoosh.
NewsMob offers an all-in-one solution. This item includes an Ionic template as well as a backend, feeding the mobile application with data. The backend enables you to create content, manage users, and send push notifications. Interested? Try out the demo available on CodeCanyon.
This template is focused on local businesses. The design is minimalist but easy to customize. The template includes several content categories, such as news, products, services, and catalogs. The template is pretty basic, but that is sometimes all you need.
This template has an impressive feature list and, equally important, it is very well documented. It is powered by WordPress and uses a number of Ionic plugins to add support for push notifications, ads, audio and video integration, and location services. The template sports a beautiful design that is easy to customize to fit your project’s needs.
The goal of Ionizer is to get developers up to speed with Ionic development as fast as possible. As a result, the template is packed with features and integrates with several services, including WordPress, Firebase for realtime chat, YouTube, and Rotten Tomatoes. The template offers a range of user interface and navigation options, including infinite scroll, responsive cards, and pull-to-refresh.
Create an Ionic Template and Win $1000
If you’re already comfortable with the Ionic framework, then you may want to consider entering Envato’s Most Wanted contest for Ionic templates. How? Create a unique Ionic template and submit it to Envato Market by 27 April 2016.
The five best templates receive $1000. Interested? Read more on the contest’s website for details about the contest’s requirements and guidelines. If you need to refresh your Ionic skills, then check out the following Envato Tuts+ resources:
Now in its 13th incarnation, Sony Vegas pro is a non-linear editing system for video. While its use still lags behind in popularity compared to more famous non-linear editors like Adobe, Avid and Final Cut, Sony Vegas offers all you would expect and is a real contender used by many professional video producers (at a price that’s easy to afford).
From standard definition to 4k and 3D, Sony Vegas pro will handle multiple file formats in the same session, loaded directly into the working timeline. As a stand-alone piece of software it really can handle your entire project including sophisticated audio tools.
Working from a PC instead of a Mac means that it is also a favourite ‘first time’ choice for those looking for something more sophisticated with the option of a consumer version with less bells and whistles than the professional offering.
Sony Vegas is user friendly and intuitive, meaning you can increase the sophistication of your films at your own pace, trying new effects and more complicated operations as your confidence and knowledge grows.
In this course, David Bode looks at altering, trimming, adjusting, editing and more in Adobe Premier Pro.
Video Editing in Adobe Photoshop Kirk Nelson will help you expand your mastery of the vast array of features in Adobe Photoshop, by looking at its video editing capabilities.
In Video Editing With Sony Vegas Pro you’ll get a head start with the principles of video editing by working through a fun project: a short travel video.
60 Seconds?!
This is part of a new series of quick video tutorials on Tuts+. We’re aiming to introduce a range of subjects, all in 60 seconds—just enough to whet your appetite. Let us know in the comments what you thought of this video and what else you’d like to see explained in 60 seconds!
Most business owners understand the importance of marketing—in theory, at least. Usually, however, marketing ends up being an afterthought to a business owner’s already-full schedule. With this challenge in mind, this guide will walk you through planning a minimalist, iterative marketing strategy that works with the turbulent, unpredictable ride that goes with running a small business.
While marketing is an essential element of business, there are a few reasons why small business owners have a difficult time making it a priority:
1. Lack of Time
One key obstacle that prevents entrepreneurs from planning and executing their marketing tasks is that they are often strapped for time. According to Sage North America’s survey of 6 million SMEs in the United States, 47% of small business owners are working more hours per week than they were five years ago, with the majority of them working longer days and most weekends. Since business owners are working more than ever, it’s getting harder for them to squeeze in tasks that are outside their day to day operations—and this includes marketing.
2. Limited Budgets
Small business owners don’t just lack time for marketing, they usually can’t commit the funds either. A survey from office supply chain Staples shows that one third of small businesses don’t have a marketing budget, while those that do average at around $2,000 per month. While this amount can cover some basic marketing materials and tools, it’s not enough for hiring additional help dedicated to marketing.
3. DIY Marketing Can Be Difficult
The above challenges often force entrepreneurs to do all the marketing tasks themselves. Often, they can’t afford to hire extra help to focus on marketing tasks alone.
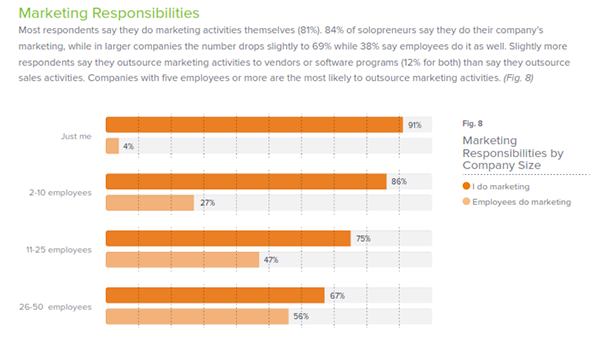
Companies with five or more employees are the most likely to outsource marketing tasks, according to a survey by Infusionsoft. But even when businesses get big enough to have more than ten employees, it’s still usually the owner who takes the helm for marketing responsibilities.
The same survey from Infusionsoft reports that small business owners prefer to do customer service or product development more than they care to do marketing, advertising, or sales. This makes sense. Entrepreneurs often launch a business because they are passionate about the product or service they are trying to sell. This makes marketing seem more like grunt work rather than a rewarding task in itself.
If these obstacles sound familiar, know that you’re not alone. Many small businesses owners are working against these same problems, but there is a clear path forward.
Guiding Principles to Lean Small Business Marketing
Given this many obstacles that you might face when running a small business, it’s important to adopt a lean or minimalist approach to your marketing plan. Here are the principles to keep in mind before you get started:
1. Invest Only in What Matters Most
It’s tempting to say “Yes” to any and every marketing channel or tactic that comes your way. But no matter how skilled you are, you can’t fit everything in. Whenever you’re adding a marketing task to your to-do list, consider carefully whether your efforts and resources could be better spent on other opportunities that could bring in better results.
2. Master the Art of “Little Bets”
According to entrepreneur and author Peter Sims, who popularized the idea, a “little bet” is “a low-risk action taken to discover, develop, and test an idea.” Rather than focusing on big wins or huge returns, it’s better to conduct low-cost and low-effort tests to see if a channel or tactic will work.
For example, instead of spending days brainstorming and writing ten new articles for your company blog, you can list a few topics you want to cover, and send the list to your readers via email or social media. Ask them to choose which ones they want to read about first. This helps you make the right choice for topics before you spend time on writing.
3. Be Quick to Drop Things That Don’t Work
Whenever small business owners have to spent so much time, money, or energy on a strategy that doesn’t work, loss aversion can sometimes kick in. This leads us to keep investing in a bad decision even if it’s better to cut our losses, because we’re worried about wasting the resources we’ve already invested. So even if no one seems to be “liking” or sharing your company Facebook posts, loss aversion can keep you hanging on to your inactive Facebook page just because you’ve had it for two years.
Remember that when you eliminate a strategy that doesn’t work—whether it’s blogging, social media, or sending out flyers—you also eliminate hundreds of hours, tasks, and decisions that aren’t going to bring you any tangible results. More importantly, you can divert these scarce resources into strategies that will actually pay off.
Following these principles can help you move forward with your marketing despite the limitations on your time, money, and interest. Understanding these ideas is simple, but how can we turn them into action when it comes to planning our marketing activities?
How to Write a Marketing Plan
There are many different ways to create marketing plans intended for investors, employees, and other people or organizations that you’ll have a business relationship with. The goal of a lean marketing plan, however, is to help new business owners who are trying to grow their business. If that’s sounds like you, then let’s dig in!
This plan is designed for action and real-world testing rather than meeting formal business guidelines. Because of this, it’s best to keep your lean marketing plan on a single page and just adapt it over time as you test your results.
Here’s what you should include in your plan:
1. Your Target Customer
Describe your target customers and be as specific as possible. Include their demographics, location, and the industry they are in (if any). This information will come in handy as you choose the marketing strategies that will fit well with your audience.
2. Customer Goals and Problems
As a reminder for the marketing messages you’re going to create, write down your target customers’ main goals and problems. What are the goals your company is helping them accomplish? What problems are you solving for them? Writing these items into your marketing plan can provide you with a reference you can use when planning your messaging. Here is an article that will help you with client targeting:
After you reacquaint yourself with your target customers and their needs, go straight to selecting one or two marketing channels that you will use to reach out to them.
Remember that most of them are likely to be irrelevant or unimportant to you, so don’t be afraid of throwing out some of these ideas. You need to get targeted with your approach.
Only one or two of the channels on this list have potential to give good returns on your invested time and money. You want to focus your resources on those high return channels.
Pick just one or two channels to start working on. Below is a list of marketing channels to choose from:
Via Social Media Networks
One network is equal to one channel:
Facebook
LinkedIn
Twitter
Instagram
Snapchat
Pinterest
YouTube
Review Sites
One site is one channel:
Yelp!
InsiderPages
Citysearch
From Your Own Website
Each method below counts as a single channel:
Blogging
Whitepapers
Ebooks
Podcasting
Case Studies
Here are a couple of helpful tutorials to on writing case studies and white papers:
Again, keep in mind to select just one or two channels for now and focus on them exclusively. Once you’ve found success and can afford to spend on other tactics, that’s when you broaden your strategy—one more channel and strategy at a time.
But with this long list of marketing channels, which should you test first? Here are some questions to consider:
Which Channels Are You Most Likely to Reach Target Audience?
Focus first on the channels where your customers are most likely to receive your messages. When marketing to people in a specific location, flyers and posters might work well if they’re placed in areas your target customers are most likely to see. If you’re choosing between different social media sites, familiarize yourself with their diverse user demographics to see where your audience fits in.
Pew Research Center published an analysis of different social media users and Sprout Social collected data from Pew and other sources to create infographics displaying the demographic details for each of the major social networks. For example, we learn from this data that LinkedIn users tend to be at least college graduates. Another report from Business Insider shows that most Snapchat users tend to be between 18 to 24 years old. It shows that when targeting educated professionals, LinkedIn is the way to go, while Snapchat is aimed at a younger audience.
Which Channels Have a Low Barrier to Entry for You?
These are the channels that you are already familiar with and because of this, they will require the least amount of time or money to get started. You don’t need to be an expert in these channels, but at the very least, some existing knowledge will give you an idea of where you can look for additional information and tutorials as you go along.
But what if you’re not familiar with most of these channels? Then it might help to talk to your employees, a marketing professional, or anyone else who has been helping or advising you with your business. They can tell you if they have some competence on some of these channels and can help you get off the ground, at least while you get more comfortable with the tools.
4. A Specific Marketing Strategy for Each Channel
For each channel you choose to test as part of your marketing plan, you should lay out a simple strategy that is easy to execute and can help you make quick decisions. This strategy should be so specific that at the end of the month, you should be able to look at it and unequivocally say whether you’ve been successful or not. Here are the points you should include:
Marketing Channel. Pick a marketing channel given the list and questions in the section above. You don’t have to stick to the list, but it would be ideal to pick a channel that fits your audience.
Strategy.Have a specific, measurable goal, a deadline for the goal, and the method you’ll use for achieving it.
Tests. What are the “little bets” you’ll take along the way that can make it easier for you to accomplish your strategy with minimum effort and cost? These are the small wins that will help point you in the right direction.
Activities and Tasks. What are all the tasks involved? Which ones are recurring? If you have other people helping you out, it will also help to determine who is responsible for each task.
Priorities. Take another look at the task list above. Which of these tasks should you avoid doing because they won’t bring in returns? Which of the tasks are must-haves that directly affect your goal? Knowing your priorities in advance can help you make quick decisions when you’re pressed for time and funds.
Costs. It’s also important to include how much money your strategy will cost, if any, and how much time per day or week you can allot for your marketing tasks. This can help you be more mindful about whether you’re investing more time than you initially bargained for. If you find that both the financial and time invested into this strategy ends up being more than what you’re willing to pay, you can quickly make concrete decisions about what to do next.
Backup Plan. What will you do in case you don’t meet your goal? Whether you’ll be testing a new goal, trying a completely different channel altogether, or focusing your energies on another aspect of your business, it’s important to be specific about what the next step is. Otherwise, you risk getting caught in a loop of reinvesting in strategies that don’t work.
A Lean Marketing Plan in Action
Here’s an example of a detailed lean marketing plan:
Business:
Acme Dog Groomers, Inc.
Target Customers:
Dog owners, aged 25 to 40, living within a 20-mile radius of the shop. Their dogs primarily have long coats. These dog owners are at least middle class, are employed professionals, and spend at least $50 per month on accessories, toys, and other non-essential products and services for their dogs.
Goals and Problems:
They want their dogs to maintain a clean, beautiful coat—but they don’t have the time to do it themselves regularly. They want their dogs to have a calm, relaxing experience at the groomers and don’t want them to be agitated while grooming. They also want a safe, friendly space for their pet to stay in whenever they need to go out of town.
Marketing Channel #1:
Yelp
Strategy:
Have an updated, accurate Yelp profile that’s at least 4.5 stars in two months.
Tests:
If the first five customers we ask don’t leave a review within 1 week of their last visit, consider asking them why the next time they come in and then tweak our approach accordingly.
Activities and Tasks:
Claim our Yelp listing, update details on our profile, add good quality photos, write an enticing description, respond to all reviews (positive or negative), export the reviews to a spreadsheet for later analysis, analyze all existing reviews and look for opportunities to improve, encourage our existing satisfied customers to review us on Yelp.
Priorities:
Claiming our Yelp listing and updating our profile, encourage our existing satisfied customers to review us after their next visit. Search for existing high-quality photos of the shop and upload at least two. Reply to all existing reviews one-by-one, though there’s no rush to reply to them all in one sitting. The other tasks are optional.
Costs:
2 hours total for updating our profile and photos, and 1 hour a week for responding to reviews.
Backup Plan:
If we don’t reach 4.5 stars in two months from the satisfied customers, see the concerns of those with low reviews and address these problems in the business.
Marketing Channel #2:
Flyers
Strategy:
Distribute flyers near vet clinics within a 20-mile radius of the shop. Have at least 20 new walk-in clients within 90 days as a result of the flyers. Track the success of the flyers by including a discount coupon in each flyer.
Tests:
In one location, see which coupon people will respond more to: 10% off their first grooming or a “buy 1 take 1 deal”. The winning coupon will be printed on the rest of the flyers for all the locations.
Activities and Tasks:
Research flyer printing service prices, design flyers, design the “10% off” coupon, design the “buy 1 take 1 coupon”, assign staffer to distribute test flyers.
Priorities:
Search for existing elegant business flyer templates and coupon templates online (to minimize design time), design the coupons. Avoid spending too much time on customizing the design or on picking a printing service.
Costs:
$200 budget maximum, 2 hours total for customizing the flyer and coupons, 30 minutes maximum for searching for an affordable flyer printer online.
Backup Plan:
If the goal isn’t met, try direct mail instead.
Refining Your Lean Marketing Plan
As you act on your lean marketing plan, you’ll be learning new things that will help you set better goals and pick the channels that give you the best returns. This action-oriented process means that you’ll make some mistakes and have failures along the way—and that’s fine.
As long as you keep making little bets, keep testing your marketing materials, and quickly drop the channels that don’t work, you’ll be on the right path. All this means that each new iteration of your marketing plan will be more effective and more accurate than the last one.
The web is built on the HyperText Transfer Protocol (HTTP). When we go to a web page, our browser makes requests to a web server. The web server processes our request and ultimately sends a response.
In this short video tutorial from my recent course How to Become a Web Developer, I’ll explain how it all fits together.
Watch the Tutorial
Watch the Full Course
Web development can be a daunting topic to get started with. Unlike with conventional applications, not only do you need to be familiar with how the web works, but you also have to understand a variety of technologies and languages.
In the full course, How to Become a Web Developer, you’ll learn everything you need to know to get started with web development. You’ll learn how to create web pages using HTML, CSS and JavaScript. Not only that, but you’ll learn about some of the fundamentals of the internet: URLs, DNS, HTTPS and more!
Download How the Web Works: HTTP and the Web Server
This is a continuing episode in my tutorial series on email privacy and security. Earlier episodes detail a variety of ways to encrypt and secure your email. This episode will talk about how we as technologists can rebuild email for the digital age.
The importance of email privacy hit home for me recently as I emailed friends about my brain tumor diagnosis. There was no easy way to get the word out without sharing a very personal note with mail servers for Gmail, Hotmail, Yahoo, Comcast and Apple (.me). Any semblance of privacy at that point was purely illusory. Most of the emails I exchanged with healthcare providers over the following weeks would also be highly insecure.
Rather than discuss how email can be improved to enhance security, I declare it’s fundamentally broken in ways that we need to overhaul for the modern digital communications age.
In this tutorial, I’ll describe how email’s broken and talk about principles of Apple Pay, the company’s new mobile payment system, that could be applied to build a modern messaging infrastructure that offers end-to-end security. Not all of Apple Pay’s inspiration is technical; some of its greatest strength lies in shifting the emphasis away from corporate profit and data gathering and towards benefitting consumers with faster, more secure, more private transactions.
Keep in mind, I do participate in the discussions below. If you have a question or topic suggestion, please post a comment below. You can also message me on Twitter @reifman or email directly.
What’s Broken About Email Privacy and Security
Email privacy and security are fundamentally broken. The vast majority of emails we send float around the Internet unencrypted as plain text.
[Email] has no network security designed into it at all. Partly this is because what we use for email was meant to be a temporary measure, a stopgap while the real protocol was developed. That was 1982. It got a small update in 2008, but email remains profoundly insecure.
Most free webmail service providers like Google think of its users as products not people. Gmail is free, so it can learn as much about us as it can for its advertising business.
If you use a common mail host like Google’s, all of your email is accessible to it, its internal analysis engines, and any government with illegal or court-approved access. Outbound emails you’ve sent to people at other mail hosts can be relatively easily recovered through similar surveillance or access.
Your IP address is logged as you access and send messages, providing a partial trail of your physical location (if that’s not already recorded by your cellphone’s service providers).
In fact, just accessing and sending emails with your phone opens up additional attack vectors: your cell phone company, backup provider such as iCloud, or forced surveillance in customs during a border stop. For example, earlier this year, a T-Mobile representative called me to respond to Un-truthful Carrier: Ten Lies T-Mobile Told Me About My Data Plan and startled me as he casually rattled off the common domains I was accessing data from on my phone.
Given these weaknesses, anything you write in an email likely is discoverable forever. And there’s no way of knowing if, when, how and by whom your email’s been accessed.
Furthermore, messages can be altered and faked by impostors (such as with a man in the middle attack). Email can be used to subject you to phishing attacks and deliver trojan horses. As Norton says, “Email is a dangerous thing.”
Public key encryption remains quite difficult to set up and use. Even if you’re able to, most of the people you regularly email probably won’t be. If you’ve been reading my tutorials, you probably have realized this by now. It’s hard to get our friends to start using it and hard to use routinely.
Even when used properly, encryption does nothing to protect the identity of the people you’re emailing with unless they are using anonymous email addresses and logging in using a service such as TOR. Message envelopes remain open.
What Apple Pay Does Well
While Apple Pay is not a messaging system, it provides a conceptual inspiration for a more secure email system. Here are some of the things that it does well that we can learn from. You can read more in the Apple Pay Security and Privacy Overview.
Your purchases are private between your credit card company and each individual merchant.
Your card number and security code aren’t shared with anyone.
Apple doesn’t collect any transaction information that can be tied back to you.
Neither Apple nor your device sends your credit or debit card number. Before they approve the payment, your bank or payment network can verify your payment information by checking the dynamic security code to make sure it’s unique and that it’s tied to your device.
All aspects of the transaction are encrypted and managed by Apple.
The Secure Element is an industry-standard, certified chip designed to store your payment information safely. The Device Account Number in the Secure Element is unique to your device and to each card added. It’s isolated from iOS and Watch OS, never stored on Apple Pay servers, and never backed up to iCloud.
You can suspend Apple Pay whenever you want to stop using it.
Apple took steps with Apple Pay to improve our lives, making shopping quicker, easier and private, without trying to maximize its profits. They challenged the status quo of the unscrupulous credit-card providers and did so with the consumer in mind. It represented a shift in the direction of the development of the kinds of services that make up the fabric of our everyday lives.
Apple Pay takes a balanced, long-term approach to redesigning and deploying payments, hinting at how a single provider can provide a secure service in the best interests of its customers.
A More Secure Email Architecture
If we apply some of the principles of Apple Pay to a privacy-oriented email system, it would offer similar features:
The cloud store of your inbox would be encrypted and anonymized, indecipherable to prying eyes and governments.
Messages in transit would be fully encrypted.
Message envelopes between recipients would be encrypted.
Mobile apps that store message data locally would also operate on encrypted data.
The initial exchange of messages between parties would be performed in a way that protected their privacy.
Account deletion is complete and verifiable.
Certainly, there are providers trying to move messaging in this direction.
Lavabit once offered a secure email system that provided a number of these features, but its founder shut it down rather than face the threat of complete government access. Silent Circle similarly did so as well.
But now the founders of these inspired privacy-oriented mail systems are back.
The Dark Mail Alliance
The Dark Mail Alliance consists of the founders of these two companies, Silent Circle and Lavabit, making an effort to build a secure, private email system which pushes the industry to support open standards that provide common privacy protections across the sector—many of which remind me of Apple Pay.
The Dark Mail Mission
To bring the world our unique end-to-end encrypted protocol and architecture that is the ‘next-generation’ of private and secure email. As founding partners of The Dark Mail Technical Alliance, both Silent Circle and Lavabit will work to bring other members into the alliance, assist them in implementing the new protocol and jointly work to proliferate the world’s first end-to-end encrypted ‘Email 3.0’ throughout the world’s email providers. Our goal is to open source the protocol and architecture and help others implement this new technology to address privacy concerns against surveillance and back door threats of any kind.
Recently, ZDNet reported that the first Dark Mail providers are coming soon. Says Levison, “Because so much time has been dedicated to developing the dark mail protocols, someone else may have better luck taking the open-source code and getting the first dark mail email provider up and running.”
Apple Pay set a precedent that doing right by consumers is the right thing to do and hopefully will make it more likely that other companies will openly consider adopting Dark Mail support. For now, we watch and wait—without any routine email privacy.
Please feel free to post your questions and comments below. You can also reach me on Twitter @reifman or email me directly. You can find my other tutorials by browsing my Envato Tuts+ instructor page.
In this quick video, we’ll see how we can take advantage of a third-party application in order to debug WordPress applications using IDEs that don’t have built-in debuggers.
For more information about the applications that were covered in this tutorial, check out the following links:
Other IDEs that are mentioned are Sublime Text, Atom, Emacs, and Vim. Furthermore, if you’re interested in IDEs that do offer built-in debugging, check out PhpStorm.
This is part of a new series of quick video tutorials on Tuts+. We’re aiming to introduce a range of subjects, all in 60 seconds, just enough to whet your appetite. Let us know in the comments what you thought of this video and what else you’d like to see explained in 60 seconds!
Anything Else?
In the meantime, I hope this proved to be useful in helping improve your development workflow.
For more information about WordPress development, you can see all of my courses and tutorials on my profile page, and you can follow me on my blog and/or Twitter at @tommcfarlin where I talk about software development in WordPress.
Please don’t hesitate to leave any questions or comments in the feed below, and I’ll aim to respond to each of them as time permits.
Download Debugging WordPress Projects in 60 Seconds
There are times in which we inherit a WordPress project that’s already been in use for some time. This means that we’re likely dealing with some form of legacy code, be it at the theme level or the plugin level.
Sometimes, we’re able to simply upgrade the dependencies that exist in the project. Other times, we have to leave the core files but need to replace some of them with our own. To make sure our changes aren’t overwritten if the customer upgrades their version of, say, the plugin in question, then we may need to deregister a script or a stylesheet in order to register our own that’s located elsewhere in the project.
To do that, we can hook into the wp_enqueue_script API function and write some custom code. Here’s how to do exactly that:
In the video above, example.min.css or example.css (whichever one exists) is removed from the enqueued WordPress styles.
After doing this, you should be able to hook into the same function and register your own custom styles to help improve the current state of the project.
More Details
Learn more about WordPress Development on Envato Tuts+:
This is part of a new series of quick video tutorials on Tuts+. We’re aiming to introduce a range of subjects, all in 60 seconds, just enough to whet your appetite. Let us know in the comments what you thought of this video and what else you’d like to see explained in 60 seconds!
Anything Else?
In the meantime, I hope this proved to be useful in helping improve your development workflow.
For more information about WordPress development, you can see all of my courses and tutorials on my profile page, and you can follow me on my blog and/or Twitter at @tommcfarlin where I talk about software development in WordPress.
Please don’t hesitate to leave any questions or comments in the feed below, and I’ll aim to respond to each of them as time permits.
Download Deregistering WordPress Stylesheets in 60 Seconds


 copy.png)