Geisha Makeup Photo Retouching (Photo Retouching)

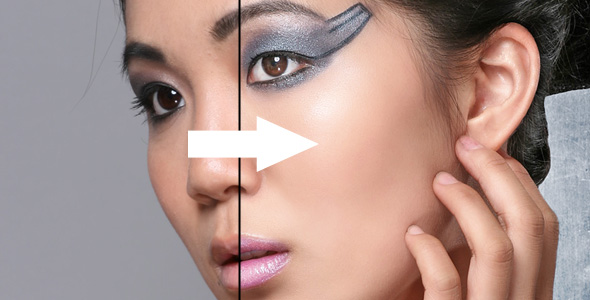
A 50 minute video tutorial, explaining how to go from a dull-looking modelling shot of an otherwise beautiful woman, to a full-fledged geisha inspired makeover.

The video is 800×600, so you can see everything that’s going on (preview is widescreen).
You also get the same PDF file that I worked on in the tutorial, so you can see exactly what goes on! (file is lower resolution and watermarked).

The following topics are covered in detail:

  • Whitening the skin.
  • Making thick red lipstick.
  • Adding blush.
  • Adding eyelashes.
  • Adding jewellery (earrings and tiara).
  • Changing and duplicating the hair.
  • Removing the background, and changing it.

The following topics are covered briefly:

(if you want a more detailed tutorial on these, check out my other linked tutorials below)

  • Skin cleaning.
  • Skin smoothing.
  • Facial correction with the liquefy filter.
  • Adding and correcting shadows and highlights (lighting).

Photo by Bill Jones.

Music in preview:
Pablo Gómez – What you think

Related tutorials:

Interested in a more detailed tutorial on facial retouching? Check out my other tutorial!
Glamour Portrait Photo Retouching
Interested in a full-body retouch, with less focus on the detail, but more on the overall retouching process? Check out my other tutorial!
Beauty Modelling Photo Retouching

Download Geisha Makeup Photo Retouching (Photo Retouching)

Creating a Stunning WWII Composition: Part 1 (Gear & Setup)

In this fantastic two part series, we’ll be covering a huge range of valuable techniques for photographers. Simon uses an existing background image from a trip to Prague as the basis for a historical WWII composition, hiring and photographing a model to complete the image.

Creating a Stunning Historical Composition

Following a flash of inspiration while shooting in Prague in 2006, Simon revisits an image captured while there to composite a model dressed in a WWII Officer’s Uniform. We start off the first instalment in this two part series by being told the story behind the background image.

We then move swiftly into the studio, to be shown the lighting setup and what is looking to be achieved from it. Simon also chats about the challenges of matching the lighting on his model to that of the existing location background image.

We are then taken into a post-shoot chat where we view the selection of other background images captured in Prague as well as those captured in the studio of the model. Simon discusses the changes he made to the lighting and illustrates why these were done.

He also shows us a lighting diagram of the set, to help explain in further detail about the lighting arrangement and camera settings used.

To finish up he gives us a sneak preview of the image he will be showing during the comprehensive retouching and compositing in part two of this video.

NB. The model in this photograph is depicted smoking a cigarette. We want to point out that this isn’t something we would endorse, and you’re always better off using a prop than the real thing.

Download Creating a Stunning WWII Composition: Part 1 (Gear & Setup)

Step by Step: Shooting a Tantalising Food Image (Shooting)

Menus, magazines, recipes book and food websites are packed with delicious-looking images of food. But if you’ve ever tried it yourself, you’ll know that food is not easy to shoot. Many times, high-end food shoots require specialized professionals such as food stylists and chefs, who prepare the food especially to be photographed.

That said, you’ll be pleased to know that it is possible to produce high quality food shots on your own! In this Premium tutorial, we’ll go through shooting a basic food, cereal.

Preparing the Props

To begin, we’ll get all the objects prepped. This includes the cereal, bowl, banana, spoon, milk, and everything else. You’d be amazed at how much you need to think about before you even get your camera out of the bag! We explain the importance of keeping the little details in mind, and show everything that goes into the physical setup of the shoot.

Lighting and Background

A general rule for food photography is that the main light usually needs to behind the subject. For this shoot, I’m taking this principle to the extreme. I’ll be using two lights. The tutorial explains our lighting setup in detail, complete with sample shots that explain how each light affects the image.

Of course we’ll also delve into camera settings, and what you need to consider to pull off the perfect shot.

food photography tips

Adding Action

To add a sense of action to the image, we’ll walk you through the process of capturing a single milk droplet, falling from the spoon. It’s a great way to make the photo more interesting, but a tricky technique to perfect!

food photography tips

Post-Production

Finally, we’ll walk you through post-production, looking at various adjustments to take the image from a mediocre shot to something that really stands out. This includes cropping, toning settings, and an interesting sharpening technique you may not have come across before!

Download Step by Step: Shooting a Tantalising Food Image (Shooting)

How to Turn Your Photos Into Anaglyph 3D Images (Adobe Photoshop)

Anaglyph images are used to provide a stereoscopic 3D effect, which is a technique capable of creating the illusion of depth in a picture. Although these kinds of images aren’t new, it’s easier than ever making them thanks to digital photography and Photoshop! In today’s tutorial, we’ll be walking you through the process from start to finish.

Our Perception

Each of our eyes captures an image with a slightly different viewpoint, and our brain puts them together calculating the distance between the object and ourselves. Something like the following:

The colors are used for illustration only. I wanted to show you there is an intersection of our sight, and there are some small parts which only each eye can see. You can easily illustrate this by looking in front of you and closing one eye at a time.

In today’s Premium tutorial, we’ll be trying to recreate this using some crafty photographic and post-processing techniques!

Taking & Processing the Pictures

We’ll start out by explaining how to capture the perfect pair of images for this technique, outlining the calculation required and the best process to follow.

It’s Photoshop Time

Whether or not you’re a Photoshop pro, our simple series of steps is really easy to follow. We’ll correctly align the two images, and then colour them to properly achieve the 3D effect. Two examples will show you the process for both a black and white image, and a colour one.

If Things Go Wrong…

It’s hard to always capture the perfect image – or series of images – for this technique, and things often go wrong. We’ll walk through common problems, and use another example to show how they can be easily rectified.

Software Alternatives

I had the opportunity to try two pieces of free software for achieving this effect, both of which are really easy to use – as easy as selecting the pictures and pressing a button! Although I haven’t used them much, they can be a decent alternative for those who don’t own Photoshop.

We offer a brief overview of both pieces of software, and clearly explain how they work!

Making Your Own Glasses

Don’t have your own 3D glasses? Not to worry – it’s time for some manual labor! We’ll give you a full list of materials, and even provide a downloadable template to create your own pair of glasses. You’ll be enjoying your fantastic 3D image in no time at all…

Download How to Turn Your Photos Into Anaglyph 3D Images (Adobe Photoshop)

The Ins and Outs of Amazon EC2 (HTML & CSS)

In this 6-part screencast series, we’ll explore Amazon’s Elastic Compute Cloud (EC2)—a highly scalable, reliable, and cost effective means of cloud computing. Whether you’re an absolute beginner or have some experience with AWS , you’ll appreciate these succinct and methodical video tutorials. We’ll create and connect to an instance, configure it, install a LAMP webserver w/ phpMyAdmin, and explore security/backup methodologies.

Download The Ins and Outs of Amazon EC2 (HTML & CSS)

Freelance Confidential (Includes PDF, ePub + MOBI) (Business)

It also COMES IN ALL 3 DIGITAL FORMATS ! Buy the eBook and you get the PDF , ePub and MOBI (Kindle) versions as well!

Want the book in FULL COLOR PRINT ? No problem! Get the book via Amazon here! (You also get the 3 digital formats too!)

In Freelance Confidential, FreelanceSwitch Editor Amanda Hackwith uncovers the whole truth on freelancing!

Drawing from the survey statistics of over 3,200 freelancers from around the world, and in depth interviews with 10 notable freelancers, including Ed Gandia of International Freelancers Academy, James Chartrand from Men with Pens, and Location Independent’s Lea Woodward.

It’s 140 pages of pure information and insight, packaged into a highly readable book on how your freelancing business compares to the rest.

What’s Inside:

• Full color charts with survey statistics from over 3200 participants of the 2010 Global Freelancers Survey, compared to the ground-breaking 2007 survey. Which means you will know trends before they effect your bottom line!

• Expert advice from seasoned entrepreneurs like James Chartrand, Ed Gandia, Linda Formichelli, Chris McConnell, Travis King, and more!

• Exclusive interview with Collis Ta’eed, co-founder of Envato, on the state of freelancing today and where things are headed. Hear how Collis would get started if he had to do it all over again!

• Rare advice and next steps: The realities of freelancing, debunking the biggest freelancing myths, advice for marketing, diversifying income, even getting support from friends and family!

What the Experts are Saying:

”…Delivers a great dose of fresh perspectives and encouragement. Don’t wait – read it today!”
– Ed Gandia – The Wealthy Freelancer

”…a goldmine of information for freelancers in any industry.”

– Lea Woodward – Kinetiva.com

”…a required read for all existing and potential freelancers.”

– Jeffrey Way – Nettuts+

Download Freelance Confidential (Includes PDF, ePub + MOBI) (Business)

The Civil War Cannon: Modeling – Part 5 (Autodesk 3Ds Max)

The ‘Civil War Cannon” is 3D Studio Max tutorial series by Cgtuts+ Co-Editor Chris Tate. This tutorial series focuses on the creation of a detailed, high resolution Civil War Cannon model using 3D Studio Max, xNormal and Photoshop. The entire pipeline is covered in detail, starting with the creation of the model and then moving onto Uvmapping and texturing.

Throughout the project, we’ll utilize a wide range of tools and techniques, including basic poly modeling and spline work, to more advanced subdivision modeling. We’ll also make use of many of 3ds Max’s modifiers and uvmapping tools.

After completing the modeling and Uvmapping, we’ll move over to xNormal to bake out an Ambient Occlusion Map and then into Photoshop to create our Diffuse, Bump and Specular maps. Lighting the scene, shader creation and completing a final render are also covered in detail.

Tutorial Series Details

  • Author: Chris Tate
  • Software: Autodesk 3Ds Max 9
  • Software: Adobe Photoshop
  • Software: xNormal (Free)
  • Difficulty: Intermediate/Advanced

Other Parts In This Series

Download The Civil War Cannon: Modeling – Part 5 (Autodesk 3Ds Max)

GitHub Pages and Auto-Updating Demos FTW (Web Development)

In this Premium video tutorial, we’ll learn a handful of neat tricks. Firstly, we’ll learn how to use the new online editor, Cloud9, to access, edit and update a GitHub account from any computer in the world. Next, we’ll review GitHub pages, and how they can be used to dynamically display live previews of your repositories. Finally, we’ll add in another layer of convenience, and redirect these GitHub live previews to our custom domain.

Still Confused?

Okay, well think of it this way: wouldn’t it be cool if, every time you updated a GitHub repository, a live preview demo was updated simultaneously? Currently, you may push the files to your GitHub account, and then, again, upload the same files to your web site, via FTP . If you frequently make updates to projects and demos, this can be a pain in the butt. That’s why, in this lesson, we’ll learn how to kill two birds with one stone. Every time you push an update to your repository, the preview on your own domain will dynamically update as well. Let’s dig in!

Download GitHub Pages and Auto-Updating Demos FTW (Web Development)

Create A Gasmask Angel in Illustrator CS5 (Illustration)

If you want to learn how to create detailed vector linework, with varying levels of depth, color and add persepective to creative characters, then we have an awesome tutorial for you. Learn all about creating interesting characters that fit into a larger personal series of artwork, with loads of professional vector tips along the way.

In this tutorial I’m going to talk you through creating a Gasmask Angel, as well as building upon a perspective stock image with your own sketch, and going through to vectoring it. You’ll learn techniques in perspective line art, and how to use gradients to distort and enhance your beautiful lines.

Download Create A Gasmask Angel in Illustrator CS5 (Illustration)

Build an AS3 Tetris Game From the Ground Up (ActionScript)

In this Active Premium tutorial we’ll be creating a variant of the classic Tetris game, explaining general game concepts as well as some specific to this genre.

Introduction

Let’s start with a short history lesson for those who are not familiar with this game (even though I doubt that it’s an unknown game to anyone).

Tetris is a puzzle video game from the 80s in which pieces made out of four square units (or cells) fall down in a grid (or matrix) and you have to move and rotate them until they land so that you obtain horizontal lines of units without gaps.

The pieces in the game are called tetrominoes and are geometrical shapes composed of four squares. There are five unique tetrominoes; however in the Tetris game we use two more which are reflections of two pieces from the first five.

The game was designed and programmed by Alexey Pajitnov and released in 1984 and still remains a popular game although many variations of the game were created (but using the same concept).

To read more on Tetris game, Tetrominoes, and associated topics, you can read their wiki pages: Tetris and Tetromino.

Prerequisites

For this tutorial I’ll be using FlashDevelop (see a guide to installing and using that here) but you can use whatever software you like (Flash CS3 +, Flash Builder, FDT ). If you don’t like or you can’t get FlashDevelop for whatever reason I strongly recommend that you use something other than Flash because of the weak code editor it has and because we will only be writing classes and you’ll like the features that you find in a strong code editor. But if you’ll only be copying and pasting, Flash will do just fine.

Download Build an AS3 Tetris Game From the Ground Up (ActionScript)

Create a Snow Covered Mountain Town Matte Painting (Adobe Photoshop)

A matte painting is a backdrop that filmmakers use when the scene they need doesn’t or can’t exist in real life. In the past, they were created by actually painting a scene on a canvas. Today, they are created digitally by combining photographs to produce the scene that they need. In this premium tutorial, author Ed Lopez will demonstrate how to create a snow-covered, coastal, mountain town scene using Photoshop. This is a written tutorial but it also includes about 2 hours of video instruction.

Download Create a Snow Covered Mountain Town Matte Painting (Adobe Photoshop)

Speed up Workflow in the Terminal (Web Development)

The terminal is great, especially for web development, but typing out long, obscure commands and directories deep in the filesystem can get tedious. Aliases and functions allow you to create short, memorable names for commands you type all the time. In this Premium video tutorial, we will learn how to create and use both of these to speed up your command line workflow.

Download Speed up Workflow in the Terminal (Web Development)

Obliterate Your Objects with Blender: Part 2 (Blender)

In this tutorial, Gottfried Hofmann (the creator of Blender’s particle system documentation) walks you through the modeling and setup stages involved with obliterating a logo into silvery dust! Part 2 of the series consists of two videos and will go on to deal with finalising the scene and getting the look you want. The tutorial also includes full Blender scene-files as well.

Tutorial Series Details

  • Author: Gottfried Hofmann
  • Software: Blender 2.5
  • Difficulty: Intermediate/Advanced

Other Parts In This Series

Download Obliterate Your Objects with Blender: Part 2 (Blender)

Obliterate Your Objects with Blender: Part 1 (Blender)

In this tutorial, Gottfried Hofmann (the creator of Blender’s particle system documentation) walks you through the modeling and setup stages involved with obliterating a logo into silvery dust! Part 2 of the series consists of two videos and will go on to deal with finalising the scene and getting the look you want. The tutorial also includes full Blender scene-files as well.

Tutorial Series Details

  • Author: Gottfried Hofmann
  • Software: Blender 2.5
  • Difficulty: Intermediate/Advanced

Other Parts In This Series

Download Obliterate Your Objects with Blender: Part 1 (Blender)

Beauty Modelling Photo Retouching (Photo Retouching)

A tutorial covering, in depth, all the entire workflow of retouching a beauty modelling photo. Through a 70 minute video tutorial, I will take you through basic colour correction, skin smoothing, the liquify tool, doing details such as lips, eyes and make-up, fixing lighting, adding backgrounds, cutting out the picture, and more!

Each tool used is explained thoroughly, so you understand what’s going on all the time.

If you need to gain knowledge on how to retouch full-body modelling photographs in a professional manner, then this tutorial is for you!

Check out both the preview video and preview images for a sneak-peak at what you’ll learn, and a before/after comparison.

You also get the very same PSD that is worked on in the tutorial!
(Note: accompanying .psd is watermarked and lower resolution)

Model:
Asahi aka manwomanfilm
http://www.youtube.com/manwomanfilm

Music in preview:
Pablo Gómez – What you think

Interested in a more detailed tutorial on facial retouching? Check out my other tutorial!
Glamour Portrait Photo Retouching

Download Beauty Modelling Photo Retouching (Photo Retouching)