Getting The Ultimate Guitar Sound – Part 4 (Production)

Bobby Owsinski continues his series on getting the ultimate guitar sound. Bobby has spent a lifetime achieving just that, and the series is based on his new book, The Ultimate Guitar Tone Handbook.

Every guitar player, engineer and producer wants a great guitar sound when recording a track, but sometimes finding it isn’t all that easy. In this series, based around my new book The Ultimate Guitar Tone Handbook (written with Rich Tozzoli), I’ll outline why acoustic and electric guitars, amplifiers, speaker cabinets and effects sound the way they do, and the best way to record and mix them after you’ve gotten the sound.

Unless you’re totally an old school purist, most guitar players use a variety of foot pedals as a means of modifying the sound of the instrument. The problem is that sometimes a pedal or effect is purchased solely on reading an advert or an artist interview without knowing too much how the new pedal can help your sound. In Part 4 of this series, we’ll take a look at numerous effects that are common to a great guitar sound, as well as some of the downsides that comes with adding them to the signal chain.

It wasn’t that long ago when most engineers were pretty down on guitar players using their effects pedals, especially when it came to delays and compressors. “Let me do it in here,” became a commonly heard phrase that left guitar players shivering in terror at the prospect of losing their sound. That’s mostly changed these days as most engineers would now prefer the guitar player to get the sound at the amp and just capture that. That said, it still pays to have the tidiest signal chain possible in order to keep the noise down and the recording clean. Here’s how to do it.

Table of Contents

  • Effects Problems
  • Tone Suck
  • Noise Buildup
  • Effects Order
  • School Of Thought #1
  • School Of Thought #2
  • Proper Gain Staging

Download Getting The Ultimate Guitar Sound – Part 4 (Production)

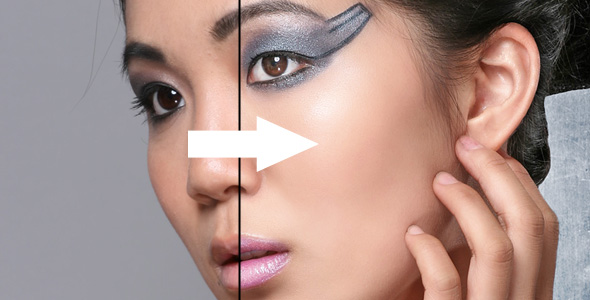
Male Model Photo Retouching Tutorial (Photo Retouching)

A 35 minute video tutorial covering all aspects of professional male model photo retouching.

I’ll be using tools such as the Liquify tool, high pass filter, a lot of layer modes, brushes and more. The video is 1200×900 resolution, so you can see everything crispy and clearly, as well as fully commentated throughout, describing all the techniques used.

Techniques covered:

You do not need to be a Photoshop Genius to follow this tutorial! All techniques are covered in sufficient depth, for those relatively new to retouching.

  • Skin cleaning.
  • Skin smoothing.
  • Keeping detail in smoothed skin.
  • Facial structure retouching.
  • Lighting retouching.
  • Hair retouching.
  • Eye retouching.
  • Colour Correction.
  • HDR Toning.
  • Swapping backgrounds.
  • Adding noise.
  • And more!

All this to achieve a professional looking glamour portrait, much like you see in cosmetic magazines, fashion magazines, and so on.
To make it all relevant, I’ll be working with a portrait taken by professional photography agency Fantasy Fotos (http://fantasyfotos.zenfolio.com/).

Along with the video, you also get a Photoshop file with all the layers shown in the video, so you can see how it works in practice!
(note files in Photoshop are lower resolution)

Model is Randy Burrell.

Music in preview courtesy of Alexander Blu (http://www.jamendo.com/en/track/946)

Related Tutorials:

Interested in a full-body retouch, with less focus on the detail, but more on the overall retouching process? Check out my other tutorial!
Beauty Modelling Photo Retouching

A tutorial focused on heavy retouching, doing virtual makeup, hair, and much more!
Geisha Makeup Photo Retouching

Interested in a more detailed tutorial on facial retouching? Check out my other tutorial!
Glamour Portrait Photo Retouching

Glamour Portrait Photo Retouching

Download Male Model Photo Retouching Tutorial (Photo Retouching)

Building a Dynamic Shadow Casting Engine in AS3 (ActionScript)

Dynamic shadows give game developers a way to recreate real life experience with lights and shadows. Every time we move, we cast shadows according to the position of the light sources around us. Dynamic shadows are no different than that. Our goal is to transfer this experience to the virtual world by creating an engine that will be able to cast these shadows.

These are common in 3D games. You have probably played a 3D game or watched a gameplay video and noticed that the shadows in most of them are dynamic. However, due to the complexity of the code, 2D games lack a good implementation of shadows, and often end up using a static alternative.

The objective of this tutorial is to implement dynamic shadows in a 2D environment.

Download Building a Dynamic Shadow Casting Engine in AS3 (ActionScript)

The Civil War Cannon: UVMapping – Part 1 (Autodesk 3Ds Max)

The ‘Civil War Cannon” is 3D Studio Max tutorial series by Cgtuts+ Co-Editor Chris Tate. This tutorial series focuses on the creation of a detailed, high resolution Civil War Cannon model using 3D Studio Max, xNormal and Photoshop. The entire pipeline is covered in detail, starting with the creation of the model and then moving onto Uvmapping and texturing.

Throughout the project, we’ll utilize a wide range of tools and techniques, including basic poly modeling and spline work, to more advanced subdivision modeling. We’ll also make use of many of 3ds Max’s modifiers and uvmapping tools.

After completing the modeling and Uvmapping, we’ll move over to xNormal to bake out an Ambient Occlusion Map and then into Photoshop to create our Diffuse, Bump and Specular maps. Lighting the scene, shader creation and completing a final render are also covered in detail.

Tutorial Series Details

  • Author: Chris Tate
  • Software: Autodesk 3Ds Max 9
  • Software: Adobe Photoshop
  • Software: xNormal (Free)
  • Difficulty: Intermediate/Advanced

Other Parts In This Series

Download The Civil War Cannon: UVMapping – Part 1 (Autodesk 3Ds Max)

Create Light Painted Typography in Photoshop (Adobe Photoshop)

If you’ve ever attempted to write words using traditional light painting photography techniques you probably know how challenging it can be to create words that are easy to read. In this tutorial, author Alex Beltechi will demonstrate how you can create a similar look without a camera and tripod.

Download Create Light Painted Typography in Photoshop (Adobe Photoshop)

The Ultimate Guide To DOF in Cinema 4D & AE (After Effects)

This week, Aetuts+ has teamed up with our sister site Cgtuts+ to bring you this amazing two part, in-depth tutorial, available exclusively to our Premium subscribers. Split across the two sites, the tutorial follows Cyril Kotecký as he walks us through the many ways we can create Depth-Of-Field using C4D and AE, covering both traditional and slightly more non-traditional methods! With the full scenes available to download, we know you’re going to love it. Click the title above to download the scene files!

Download The Ultimate Guide To DOF in Cinema 4D & AE (After Effects)

Convert Still Photo Into 3D Animated Stained Glass (After Effects)

Rob Birnholz will demonstrate a technique for converting a still image into a dynamic 3D animation. Highlights include prepping an image in Photoshop, vectorizing via Live Trace in Illustrator, using the knife tool, converting paths to layers, importing as a comp in After Effects, animating vector art in 3D using Zaxwerks Layer Tools, saving preset effects and other basic compositing tips.

Download Convert Still Photo Into 3D Animated Stained Glass (After Effects)

Compositing a CG Building Leap – Part 1 (After Effects)

In this tutorial we will be stepping through the process of compositing this CG shot over a live footage background plate. We’ll show you how to import the 3D multi-pass renders and how to correctly layer them in the comp. We’ll also go through the process of color correcting the elements to better marry them into the background plate. Then we’ll step through the process of creating a glass particle system using Particular. We will also add motion blur to various elements using the ReelSmart motion blur plug-in. Once you have completed this tutorial, you will have a much greater understanding of the types of challenges faced throughout a production compositing process, and how to tackle such challenges to get high quality output.

Download Compositing a CG Building Leap – Part 1 (After Effects)

The Smashing Book #1 (Design)

The Smashing Book #1 | Digital Edition is the digital version of the printed book about best practices in modern Web design. The Smashing Book #1 shares technical tips and best practices on coding, usability and optimization and explores how to create successful user interfaces and apply marketing principles to increase conversion rates. It also shows how to get the most out of typography, color and branding so that you end up with intuitive and effective Web designs. And lastly, you will also get a peek behind the curtains of Smashing Magazine.

PDF , epub and mobi files all included.

Download The Smashing Book #1 (Design)

Modeling The Audi R8: Part 3 (Autodesk 3Ds Max)

Follow freelance CG artist Madhan, as he walks us through the modeling workflow he uses to create stunning car models such as the Audi R8. An expert in pushing 3d Studio Max’s basic toolset to it’s limit. Madhan’s tutorial is a must-have for any artists interested in either vehicle or product design.

Tutorial Series Details

  • Author: Madhan
  • Software: Autodesk 3Ds Max
  • Difficulty: Intermediate

Other Parts In This Series

Download Modeling The Audi R8: Part 3 (Autodesk 3Ds Max)

How To Attach 2D Objects Onto Your 3D Animation (After Effects)

In this tutorial we’ll cover the how to export your 3D project from Cinema 4D in sections that will set us up well to composite 2D layers onto in After Effects. This tutorial is full of 3D to AE tips and is sure to rock your next project!

Download How To Attach 2D Objects Onto Your 3D Animation (After Effects)

Compositing Blender’s Render Passes – AE Part (After Effects)

In this tutorial I will be focusing mostly on flexibility. There are many ways to achieve better, more realistic results that this one, but the standard approach will not allow you to make many changes without going back to your 3D software and re-rendering. Proper set up of materials, render passes and compositing will allow you to quickly respond to client’s requests.

Download Compositing Blender’s Render Passes – AE Part (After Effects)

Creative Compression with Guitar and Bass (Mixing & Mastering)

Björgvin Benediktsson takes us through four detailed scenarios where compression can be used on acoustic or bass guitars. Each section has detailed screenshots and audio examples, as well as a clear explanation of the settings used.

<!-more->

Knowing how to shape your sounds with compression is one of the most fundamental aspects of being a great engineer. Compression usually tags along with EQ and they sometimes work as a team to create those great sounds you are striving for in your mixes. So in order to have you better understand the different sounds a compressor makes I’ve compiled a nice collection of audio samples using all the different settings on the compressor.

In the following tutorial we’ll be looking at various guitar and bass samples. Depending on if you are looking for subtle compression to thicken your sounds; or if you want to chain two compressors together to work in tandem on your guitar solo; or maybe you just want to know why your acoustic guitar sounds so squashed then these following tips and tricks will shine some light on the compression debacle you may have found yourself in.

Table of Contents

  • Different Acoustic Guitar Compression
  • What’s the Alternative?
  • Killing the Attack
  • Subtle Bass Compression
  • Compressed Bass Crunch
  • Conclusion

Download Creative Compression with Guitar and Bass (Mixing & Mastering)